
NOTE: As you scroll through this guide you’re going to see that I put a TON of time into this for you guys. To show your appreciation, it would really help me out if you used the sharing buttons to help spread the knowledge around! Make sure you read all the way, there’s a sweet freebie near the end!
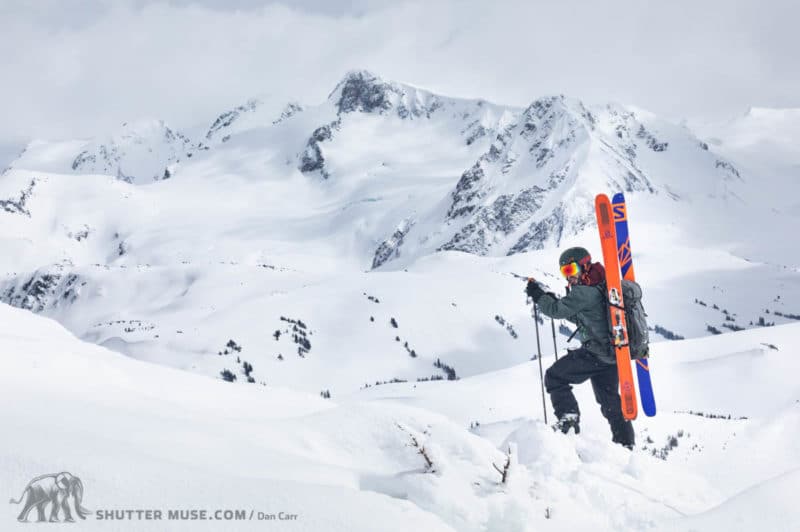
I live in the Coastal Mountains of British Columbia, and for a number of years in my photography career I worked exclusively in the ski industry. I’ve photographed on mountains in Japan, Alaska, New Zealand, all across Europe and North America. Even though my work is no longer focussed solely on winter sports, I’m not a guy that likes to be in the studio so you’ll almost certainly find me outdoors somewhere! If I had to take a guess at how many days I’ve spent outside with my camera in sub-zero temperatures, or otherwise extremely inclement weather, we’d be talking close to 1000 I think that puts me in a pretty good position to write this guide!
Protecting Yourself From The Cold
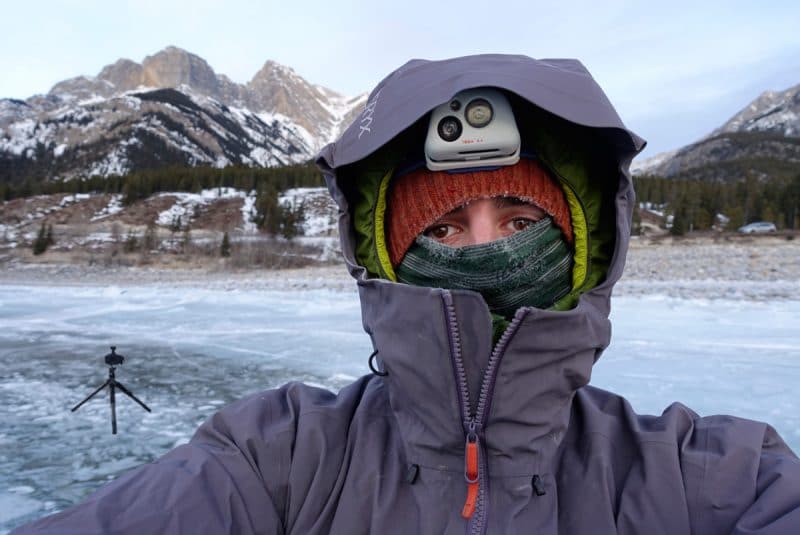
If all you can think about is how cold you are, your photos will suffer. Making sure you are equipped for your environment is an important step in bringing back the best photographs. I’m going to talk through some specific items in the following sub-sections of this first main section, but first there’s a couple of basics that should be adhered to: No cotton, and use a layering system. Cotton ceases to be an insulation layer once it gets wet, and even in cold climates you’re going to sweat and rapidly decrease the effectiveness of any cotton layers you might be wearing. Whilst you will sweat, it’s important to try and minimize this with effective layering. Wearing layers of clothing allows you to selectively remove layers to adjust to the changing environment, or the amount of physical exertion you’re having to perform. You can see in this photo above that much of my head is covered in 4 different layers. There’s an outer wind-proof and waterproof shell, a down-filled insulation layer (the green one) and then a woollen hat and woollen face mask that extends around my neck, face and back of my head. Any of these pieces can be removed quickly to adapt to the situation so that I’m warm, but not too warm.
I usually find that photography involves a lot of sitting and waiting, so for me, a super warm down jacket layer is one of my most important pieces of clothing. Down is highly compressible so down mid-layers are easy to stuff into a photo pack when you are on the move and generating more heat. When you have to stop and wait for the light, or an animal for a few hours, you’ll be glad you have it in your bag. I use the Arcteryx Thorium AR hoody and Cerium SL vest. The hoody is great in most circumstances but I can add additional core warmth with the vest on days when the temperatures are truly Antarctic! For the outer layer I have a variety of shells in differing lengths and thicknesses depending on the situation.
Protecting Your Face
In extremely cold environments, you want to minimize the amount of skin that’s open to the cold, and that means protecting your face. In my opinion, there’s nothing better than Merino wool when it comes to this particular item of clothing. Merino is extremely warm but it also has some natural odour prevention properties that make it the right choice for this job. Let’s be real here, if you put this thing over your face and breathe into it all day long in the cold then there’s going to be moisture build-up. With any other material, stuff that thing back in your pocket and forget about it for a while and you’re unlikely to want to put it back on your face next time you head out. That’s not the case with Merino wool, though. I don’t know the science behind it, but it just doesn’t smell! My personal favourite is the Icebreaker Flexi Chute.
TIP! Camouflage neck gaiters like these ones from Buff, can provide facial protection for some cold climates, but also double as lightweight and extremely packable camouflage lens covers for super telephoto lenses instead of using the usual ones from Lens Coat.
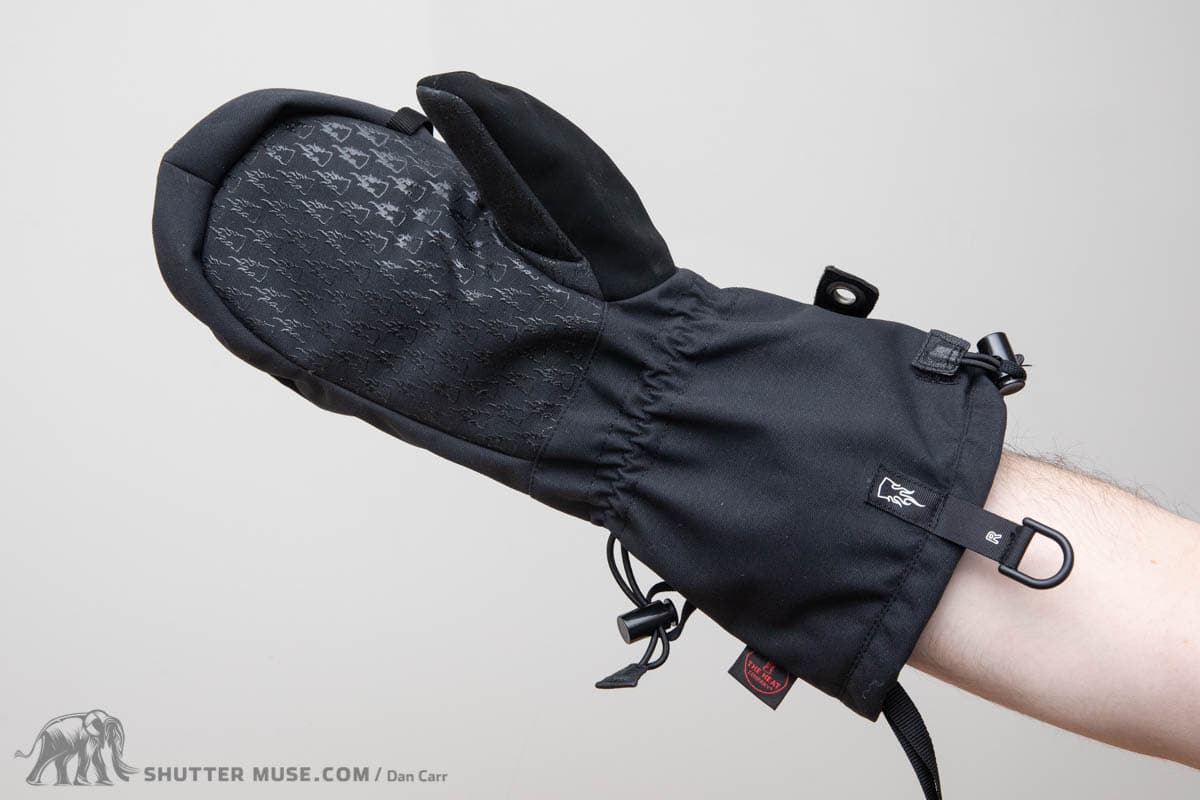
Best Photography Gloves for the Job
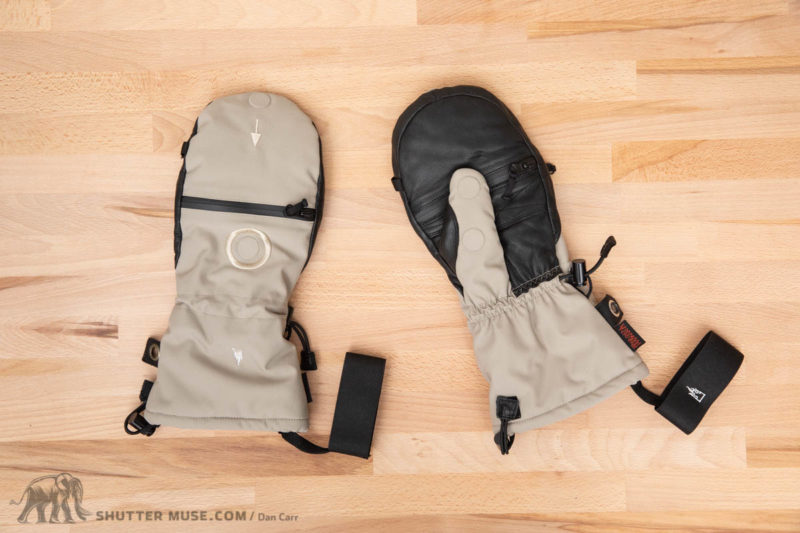
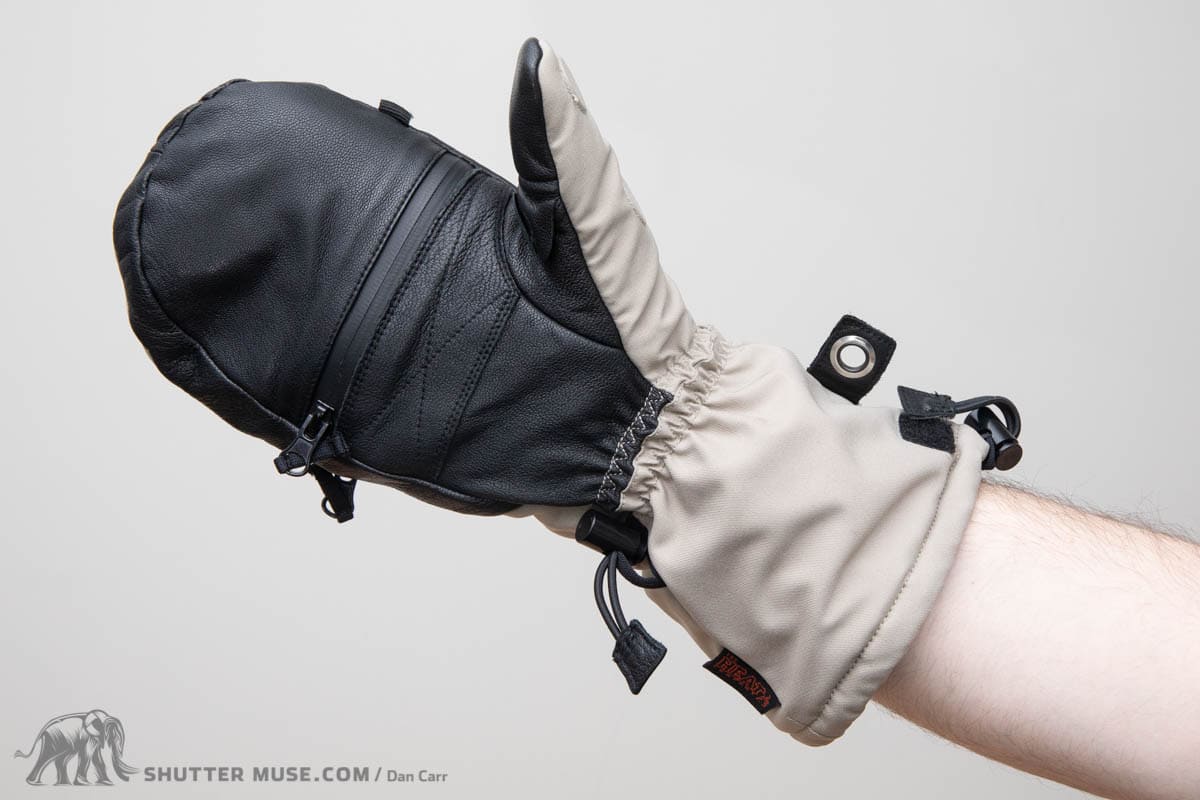
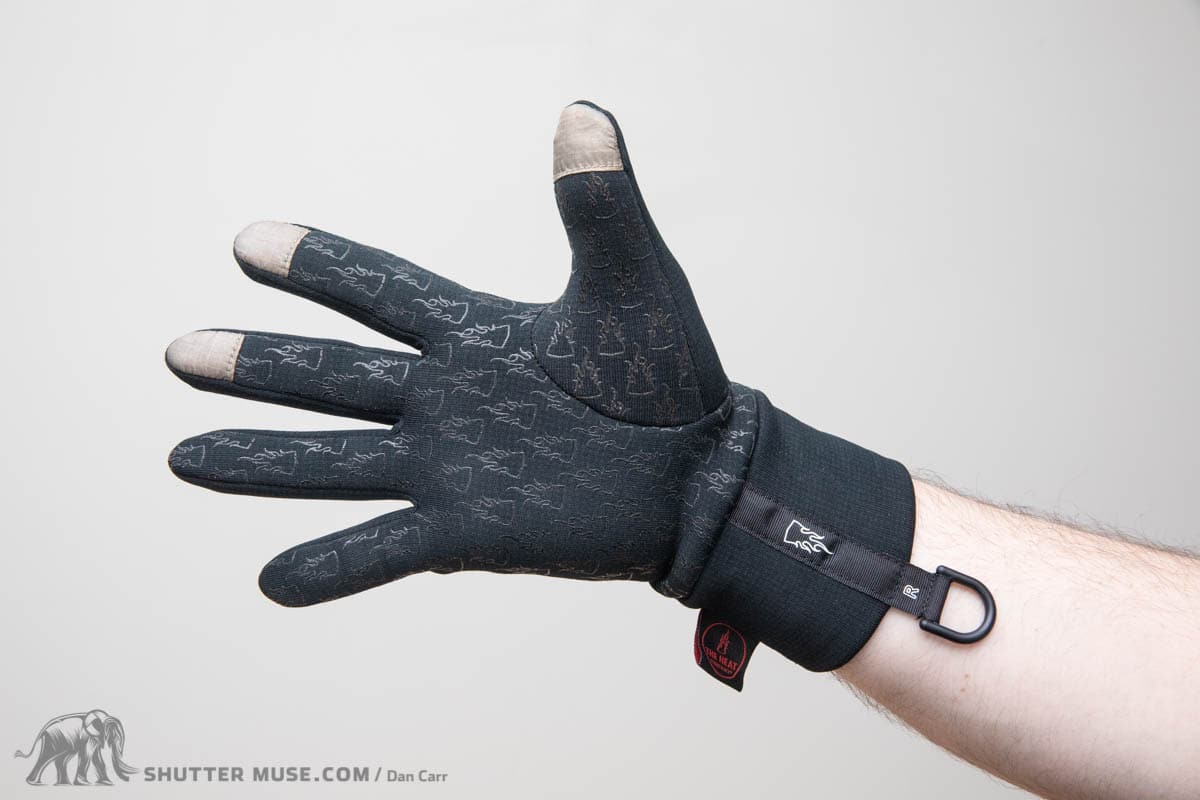
With so much of my time spent in cold climates over my career, I have tested my fair share of glove options. I use to use regular winter gloves with some basic liners, but in recent years there has been an explosion of photography specific gloves on the market. For a huge photography glove buyers guide on this site I tested all of the best options on the market right now and the Shell Mitt from The Heat Company came out on top.
>> Read the Ultimate Photography Glove Gear Guide
In fact, The Heat Company has what they call their 3-layer system which includes a variety of optional glove liners to suit various temperatures, and then the optional Polar Hood waterproof shell to seal out moisture and seal heat in when used in polar climates. During my own testing I used the glove with the liner down to -40 Fahrenheit (-40 Celsius) with no trouble at all. I’m sure you could take it even further with the Polar Hood! What’s also important is that the mitt on its own is comfortably useable from about 20 Fahrenheit (-5 Celsius), so that gives you an incredible range of temperatures with one customizable setup. A truly brilliant product!

Pay Close Attention to Your Feet
Your body’s extremities are going to be the most susceptible to extreme cold. We’ve already discussed heads and hands, so it would be remiss not to mention your feet. Regular summer hiking boots are unlikely to work well enough in the kinds of cold temperatures that I would deem as extreme, so it’s going to be important to invest in some good winter boots if you plan on spending prolonged periods in the cold. My personal favourites at the moment are the Arcteryx Bora2 Mid GTX boot with the optional insulated liner. These boots are great becuase the liners are removable, and that means you can adapt them to the conditions you find yourself in, without actually needing to carry a large array of footwear on a trip. With the standard liner they can be worn in the summer, and the insulated liner takes their comfort level to somewhere in the -10 to -20 celsius range in the winter, depending on what socks are being work with them. These are definitely high-end boots, but they can actually save you money when you consider that you don’t need to buy both winter AND summer hiking boots.
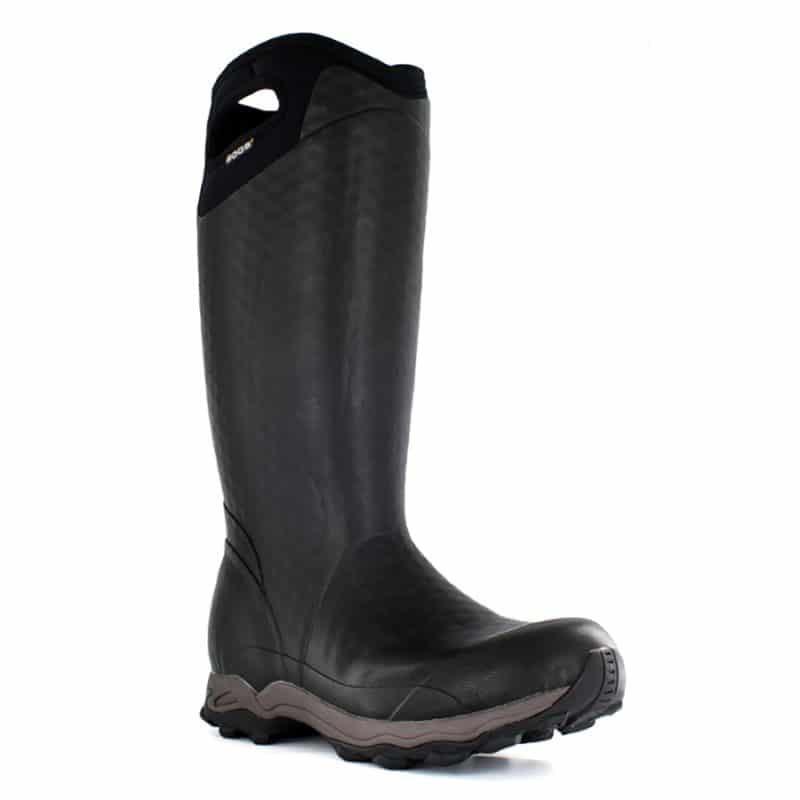
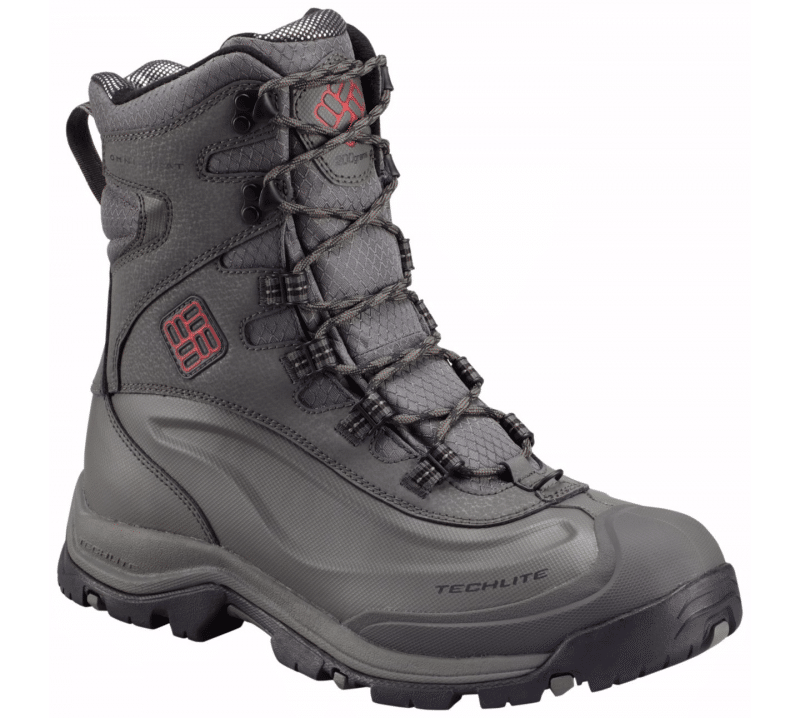
For colder temperatures and very deep snow you’ll want to look at a taller boot like the Bogs Buckman (rated to -40°F / -40°C) which works very well in cold/wet conditions around rivers, lakes and waterfalls, or the Columbia Bugaboot (rated to -25F/-32C) which is a more traditional style book but with a higher top. If you’re headed to the Arctic, Baffin’s range of expeditions boots will see you good right down to -148°F / -100°C!
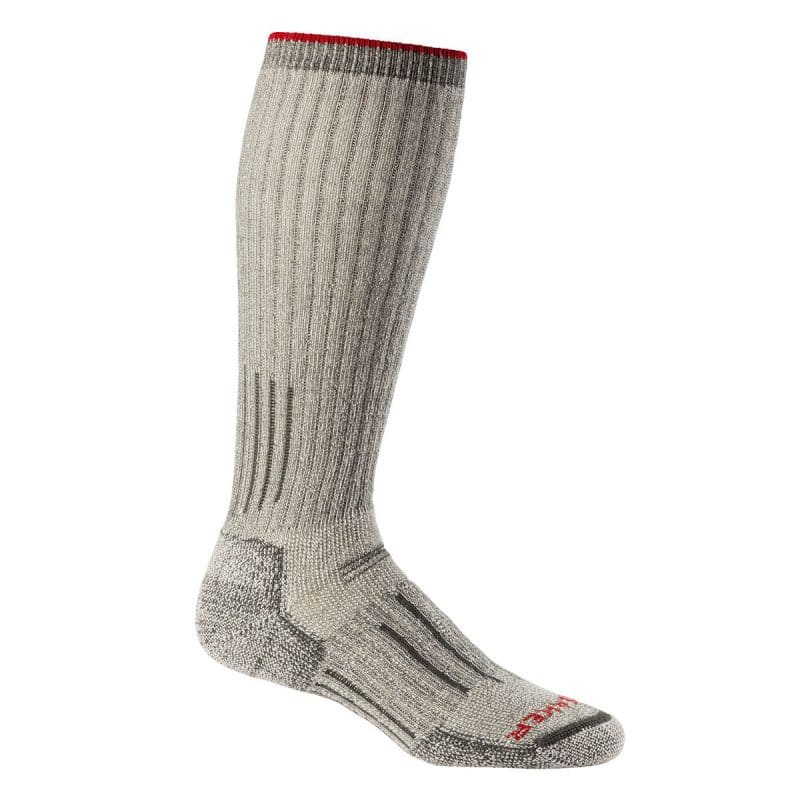
Once you have your boots sorted out, you’ll want to pair them with equally good socks or it’ll just be money down the drain. No cotton socks! For specific winter usage, it’s often best to buy your boot in a size larger than normal, and then wear extra thick socks. Much like face protection, I really don’t think you can beat Merino wool when it comes to winter expedition socks and I use the Icebreaker Hike+ and Icebreaker Hunt+Fish Expedition depending on the height of boot I’m wearing.
Get a Grip
When working in cold environments, you want to make sure you have a solid grip on ice or hard-packed snow so that you don’t come crashing to the ground with thousands of dollars of camera gear. My personal choice is usually the YakTrax XTR Extreme which is like a set of miniature crampons that fit over your boots. The spikes are quite vicious, so they come in a little protective bag to keep the rest of your bag’s contents safe. I find these are great in a lot of situations, but the one area where you might also consider something less extreme is when photographing on frozen lakes. The YakTrax Extremes really mess up the surface of the ice so it’s poor practice to use these in the company of other photographers as you might ruin their intended shot. At famous frozen lakes this can be a real problem because the damage can last a long time if the weather stays constant. Please consider your fellow photographers and either remove larger spikes like these ones, or use one of their less spiky variants in those situations. One thing that I have found with these products is that it pays to be able to try them on with your specific footwear, or at least buy them from am online place with a good return policy. Sizing is tricky to estimate with large winter boots and the set that I have works well with some of my boots, and not so well with others.
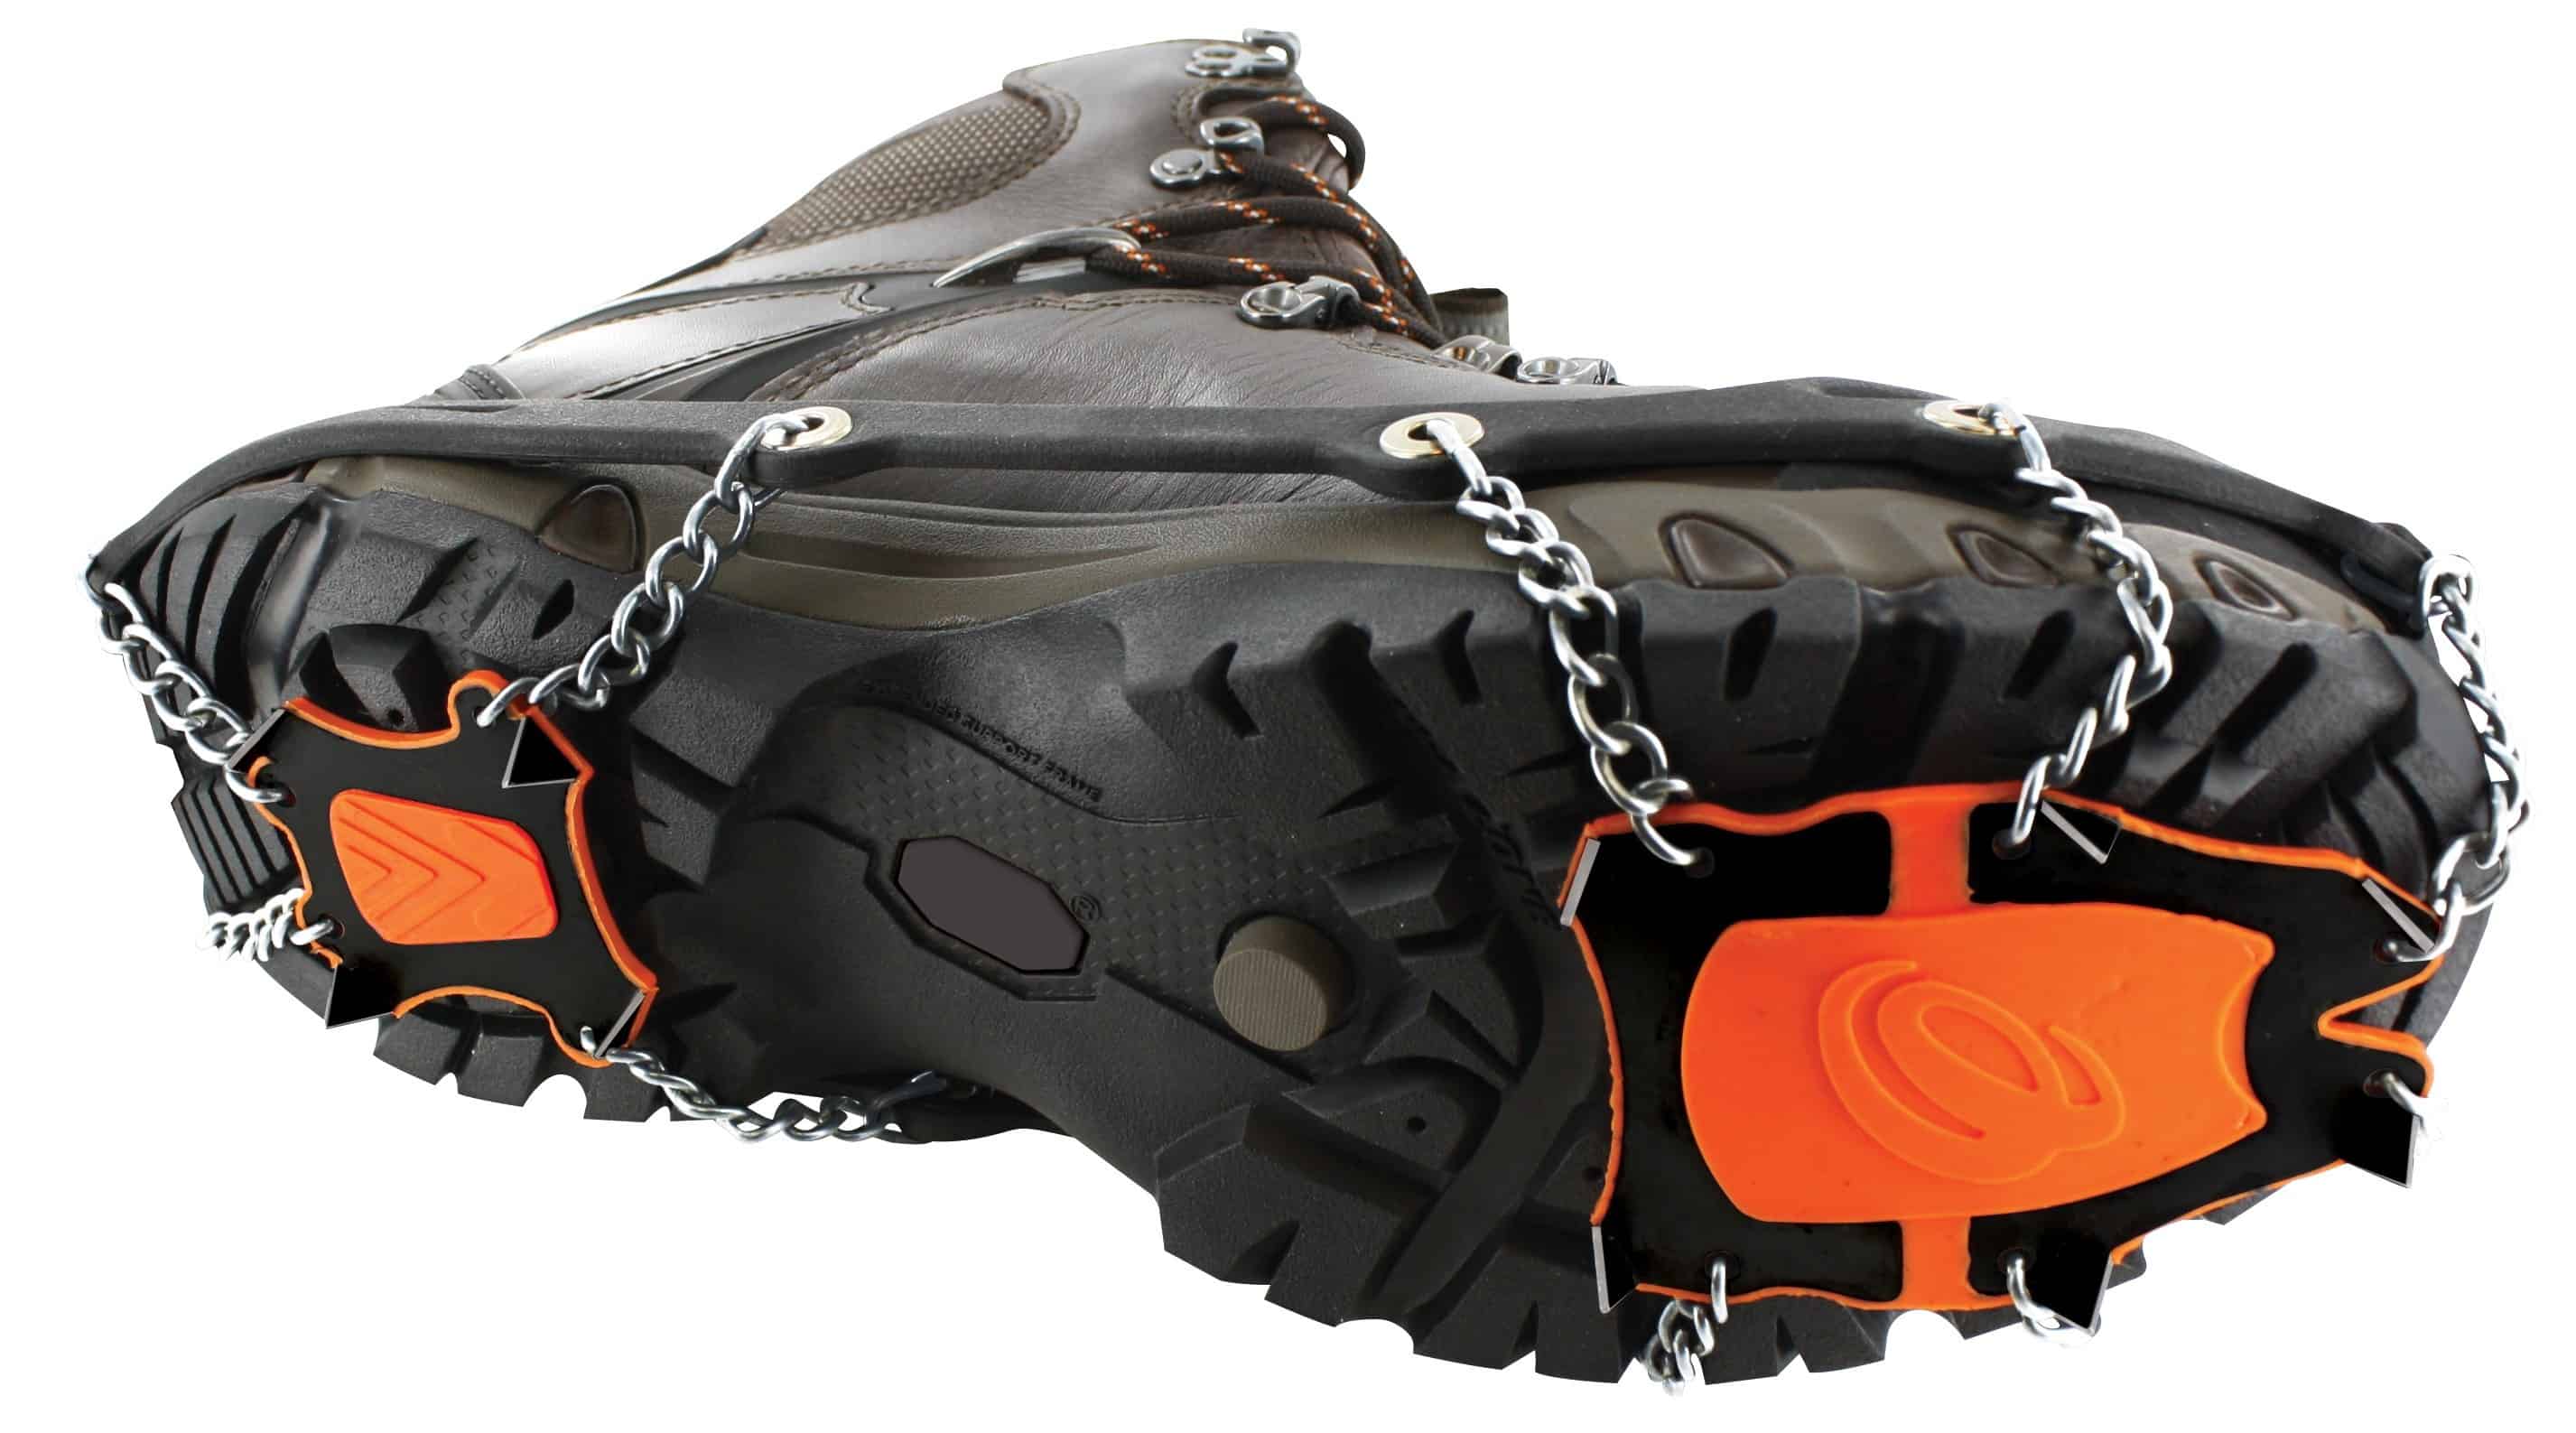
I’d also like to mention that in some circumstances, mountain-based events like the FIS Ski World Cup actually require photographers to wear proper full-sized crampons when they are walking alongside the course. I’d guess that most people reading this article will be thinking more about landscape and wildlife photography, but since I also have experience shooting these World Cup downhill skiing events, I thought I should share that interesting aside! I certainly wish someone had told me prior to arriving at my first event…
Protecting Your Camera
Condensation Prevention
When you move your camera gear quickly from a cold environment to a warm one, condensation is going to build up all over the camera and lens element. The first line of defence against this is not to warm your camera up unnecessarily in the first place, or at least do it gently. For example, if you’re driving around in your car shooting winter landscapes, put your camera bag back in the trunk when you move to the next location, and not alongside you on the passenger seat where it will be much warmer. The quick temperature change is what causes condensation, but in the trunk it will be much more gradual without your car’s heater pointing at it.
If you do have to move your gear through a temperature range very quickly, the oldest trick in the book is to use ziplock bags. Place your camera gear into a ziplock bag and make sure you seal it before coming into the warmth. When you do come inside, the condensation will form on the outside of the bag and not the camera. A great use of this technique is if you are shooting at a ski resort and want to pop inside to grab come food or a drink. Usually the resorts keep these mountain lodges at a stifling temperature, and they are also extremely humid from all the snow-sodden sweating people in there. Without your ziplock bag, your cameras will be covered in condensation after just a minute.
LCD Protection
In extreme temperatures the first sign that your camera is struggling will be from sluggish LCD screen performance. The refresh rate will drop, and in some circumstances I’ve also seen black marks appearing on the screen. I’ve never suffered any permanent damage, but if I do notice any kind of negative LCD effects like that then it’s either time to warm the camera up a bit, or stop using the LCD screen altogether. your first instinct might be to put your camera inside your jacket, but your sweat means that is a moist environment and it’s likely to cause instant condensation build up. A better option is to put the camera in your bag, but slowly warm it up using disposable hand warmers. We’ll talk more about these in the next section in relation to batteries as well, but I’ve only had to use them a couple of times in my career on cameras.
Protecting Your Ass (and Knees)!

Low angles often work well for landscape photography and wildlife photography so I often find myself kneeling down or sitting down. In normal conditions that’s not such a big deal, but when temperatures dip well below freezing it can make things tricky. Try kneeling down on a frozen lake for a few minutes and you’ll soon be numb and wet.
The best solution for this is a little thing called the Z-Seat from Thermarest. You don’t have to blow it up, so it’s not going to hold you up when the light is changing fast, and it weighs next to nothing. Toss this down next to your tripod in the snow or on the ice, and your shooting experience will be greatly improved, allowing you to use your full mental capacity for evaluating the scene and not feeling the bitter cold. It’s also just a great little thing to sit on in general, so I’ll often take it with me when I’m hiking.
Extending the Battery Life of Your Camera and Other Devices
All electronic devices will suffer from decreased battery life when they are exposed to colder temperatures. The first line of defence for smaller electronic devices is to carry a small additional battery pack with you that can be used to top up other devices that are running low, in particular, cell phones.
My absolute #1 recommendation for this is the excellent Goal Zero Venture 30 battery pack. I’ve reviewed it in the past, and it’s been a staple feature of my kit for a while now. The ruggedized, water resistant design makes it perfect for adventurous photographers, and I usually use it to keep my cell phone and GoPro topped up. Of course it is itself a battery, so it too will experience a loss of life in very cold temperatures, but it still has plenty of juice for a few phone charges. From a safety standpoint, it’s also a great accessory to have with you to give a little emergency power to GPS mapping devices, or safety beacons the previously reviewed InReach Mini.


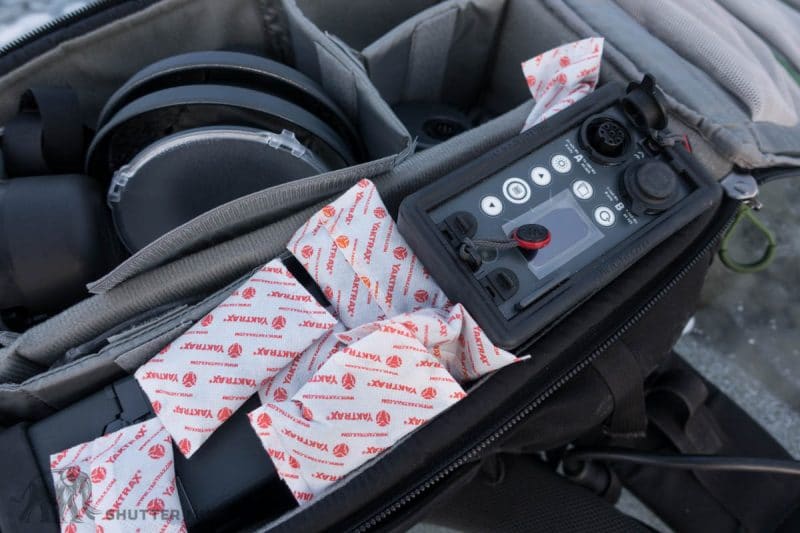
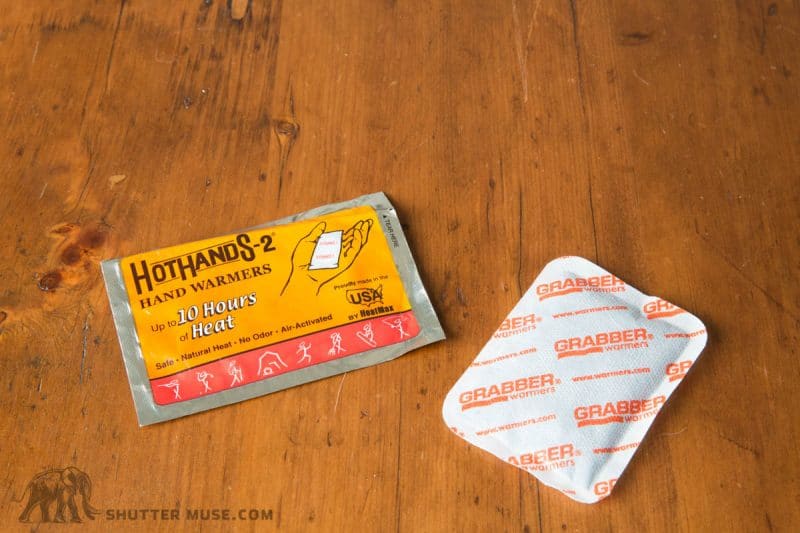
Warming Batteries with Hand Warmers
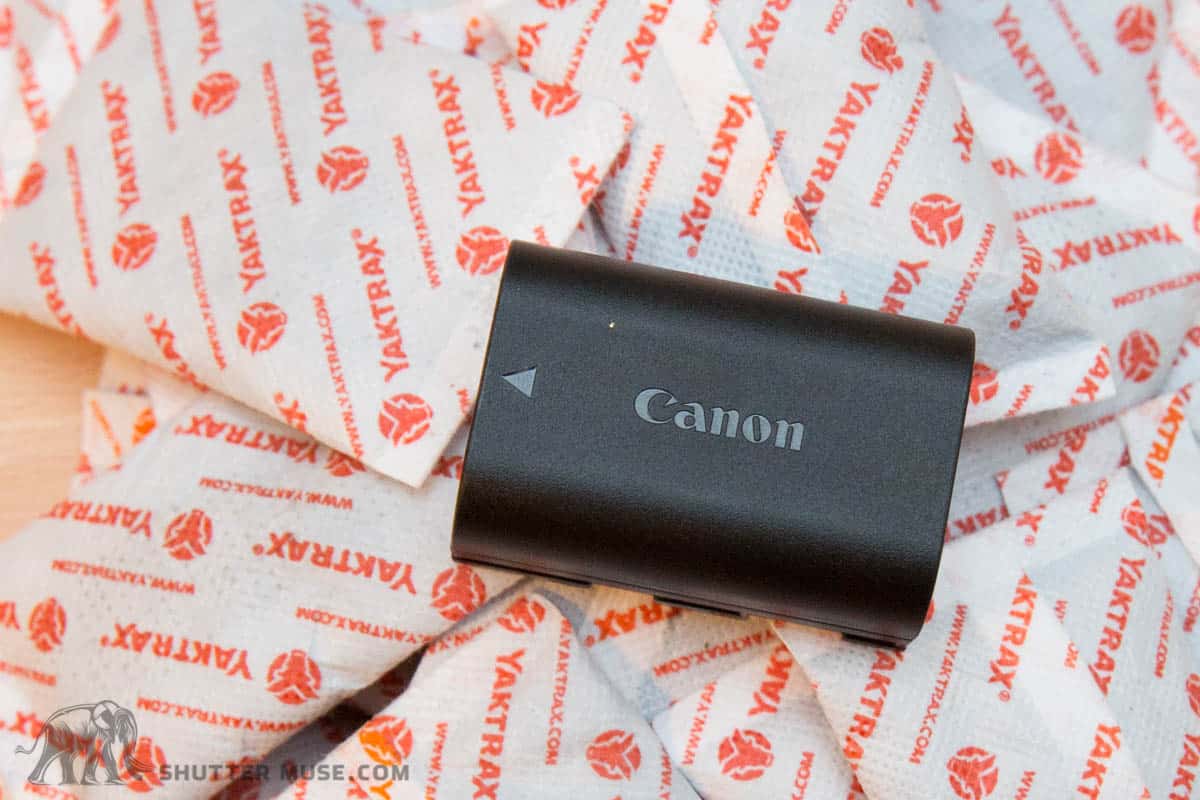
Disposable hand warmers are a great way to keep your camera batteries at their prime when temperatures plummet. I live in the mountains, so I usually have a ton of these things lying around, and they’re great for putting in a smaller camera bag compartments to create a warm zone for battery storage. They get warm, but I would not describe them as getting hot, so I have no safety concerns with this method. They’re surprisingly cheap, with a mere $40 getting you up to 80 of them on Amazon!
Pro Tip: Carry an elastic band with you so that you can attach them easily to a battery to maximise surface area contact.
Camera Battery Life Extension
In these extremely cold environments, here are some ways to prolong the life of your camera:
- Reduce the camera’s picture review time to the absolute minimum amount – usually 2 seconds.
- Dim the brightness of the LCD screen and simply shade the screen with your hand when using in direct sunlight.
- If you are using a camera with a built in electronic zoom, keep your zooming to a minimum as the motors draw a considerable amount of power.
- Set the camera’s auto off setting to the minimum – usually about 1 minute. Whilst you should ideally turn your camera off manually, most people aren’t accustomed to that.
- Use back-button auto focus if your camera allows it so that in continuous focus mode, the camera isn’t refocussing all the time while you are composing your image. Instead, it will only turn on the focus mechanism when you press the focus button on the back of the camera. This feature is available in most DSLRs and many mirrorless cameras, but typically not in point and shoot style cameras.
- Don’t delete photos on the camera, save the “chimping” for when you get home and do your file culling on the computer.
- Use the viewfinder, not liveview! Using the LCD screen and liveview probably draws more power than all of these other things. If it’s cold, and you’ve got a viewfinder, use it if power saving is a priority. It’ll make a huge difference.
- Maintain a healthy set of batteries. Some manufacturers will display “battery health” in the menus for you. Very old batteries don’t last as long in the cold. Li-Ion batteries like to be charger regularly to maintain their health.
Rain, Sand and Dust Covers
Weather sealing on camera bodies gets better yearly, but unless you buy a dedicated underwater camera, you should still use some camera cover in certain situations. Torrential rain is the obvious example, but sand and dust in your lens’ focus barrel or zoom gearing can easily cause a trip to the service center. There’s nothing worse than hearing sand grinding away at the inside of your precious lens every time you rotate the zoom ring; it’s like fingernails on a chalkboard for me!
Over the years, I’ve tried a lot of different camera covers. The three that I most often recommend to people are the Think Tank Photo Hydrophobia, Think Tank Emergency Rain Cover, and the Peak Design Camera Cover. One isn’t better than the other, it depends on the situation you’re likely to find yourself in.
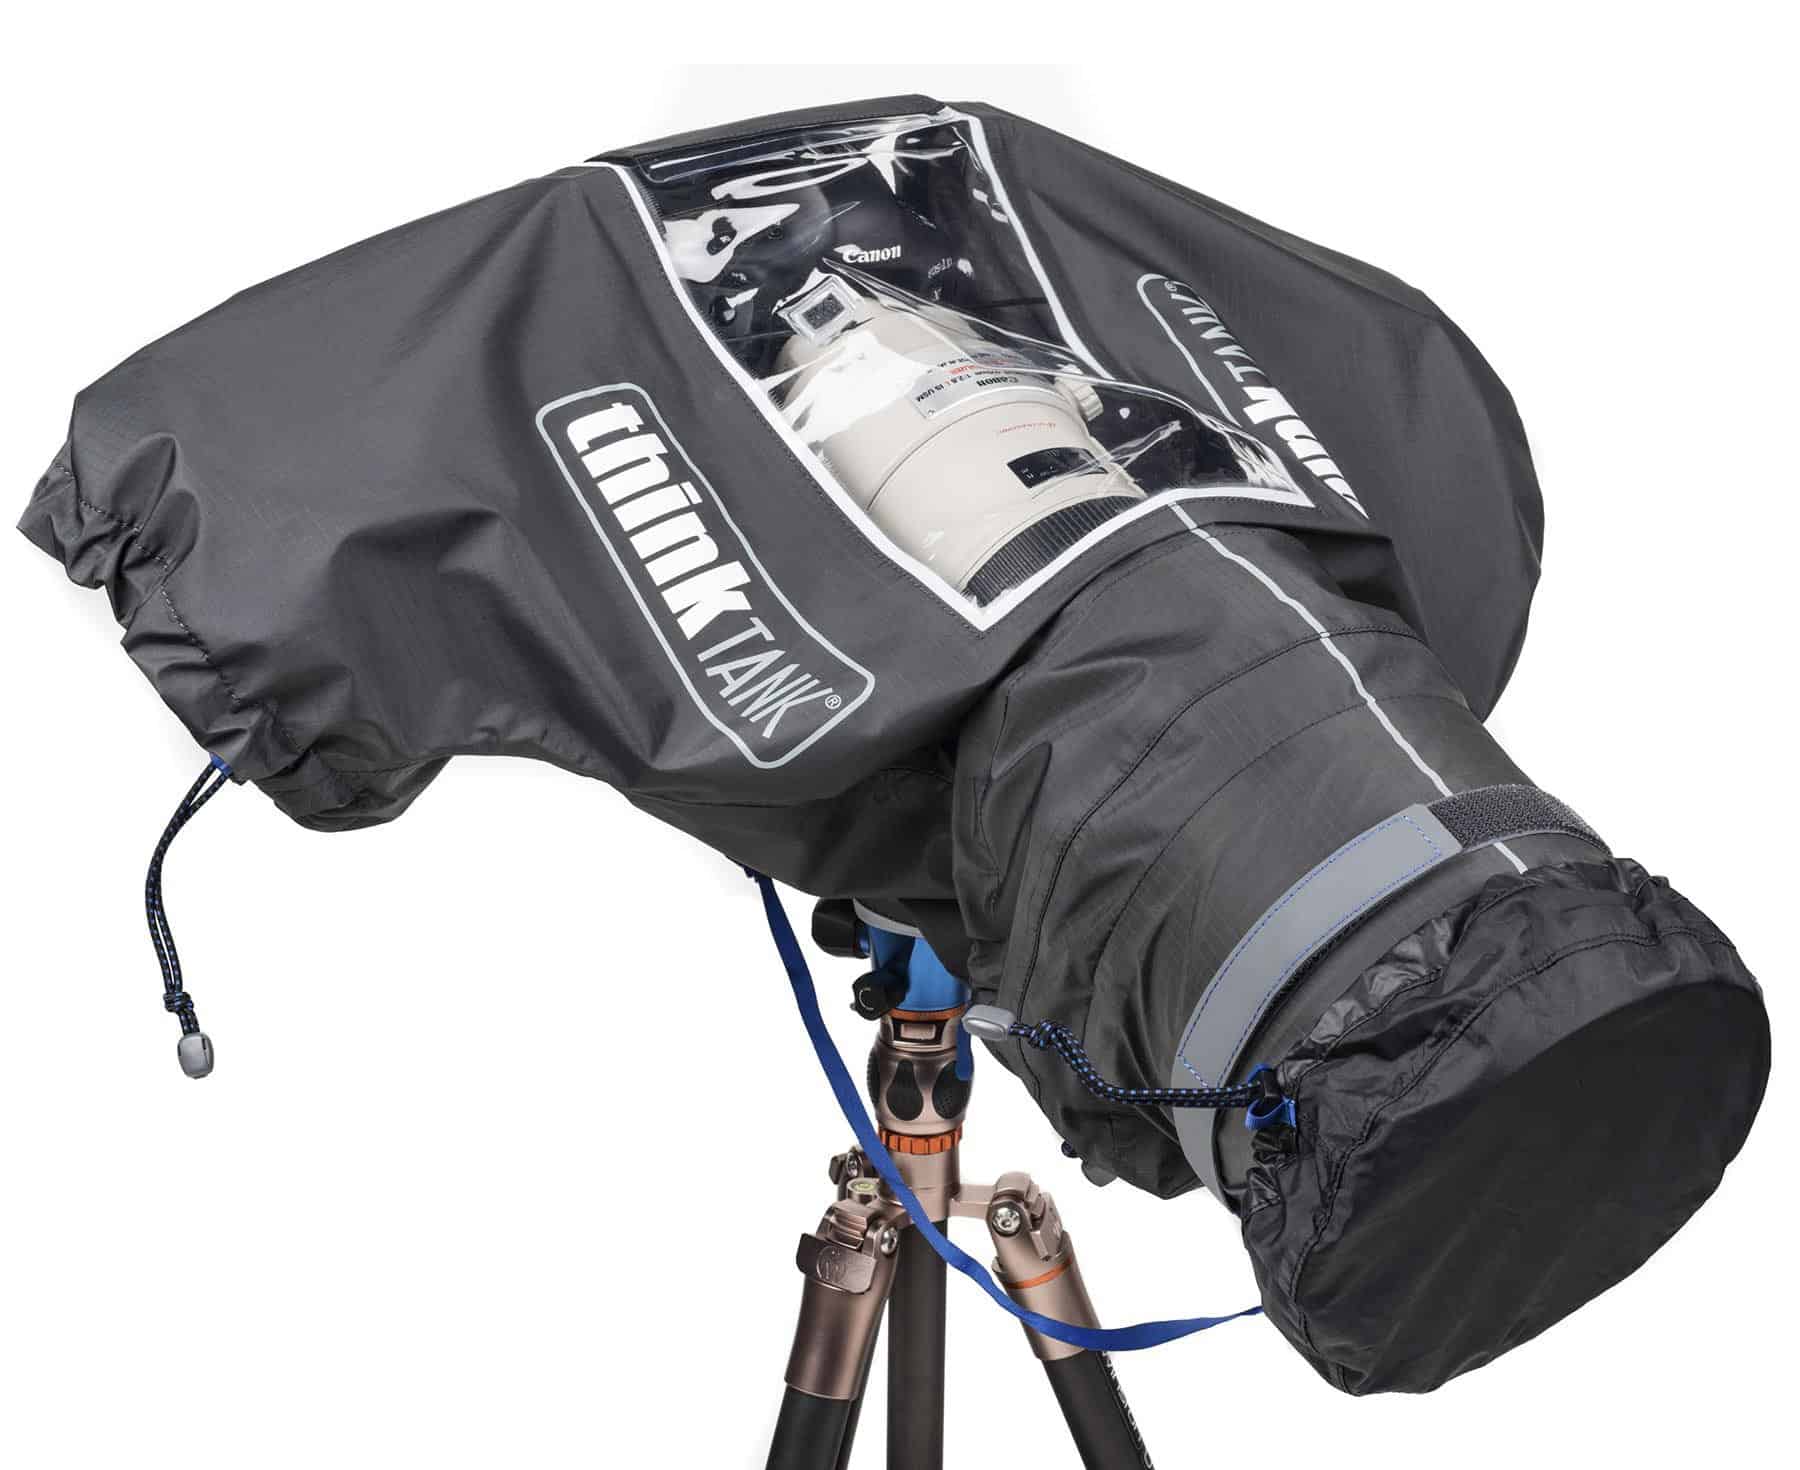

1. Think Tank Hydrophobia V3
This is a fully waterproof rip-stop nylon cover with taped and seamed seals, integrated shoulder strap and a front element cover that’s tethered to the main cover. It comes in three variations:
- Hydrophobia 300-600 V3 – For cameras with a lens size between 300mm and 800mm
- Hydrophobia 70-200 V3 – For cameras with medium-telephoto zoom lenses such as 70-200mm, 100-400mm, 100-500mm
- Hydrophobia 24-70 V3 – For cameras with short primes, wide-angle, and standard zooms such as 24-70mm, 24-105mm, 16-35mm, or 14-24mm
If you must continue shooting in extreme weather, there isn’t a better camera cover for protecting your gear. The downside to the Hydrophobia is that they are quite large and bulky to pack. This is a cover I grab from my gear closet when I know I’m guaranteed to be shooting in the rain/snow/mud/sand/dust.
2. Think Tank Emergency Rain Cover
The simpler sibling to the Hydrophobia, the Emergency Rain Covers from Think Tank are lighter, cheaper, and less bulky but don’t offer hand holes, an eyepiece, or a front element cover. I always keep one of these in my camera bag, just in case, and they’re available in three sizes as follows:
- Emergency Rain Cover Small – For cameras with short primes, wide-angle, and standard zooms such as 24-70mm, 24-105mm, 16-35mm, or 14-24mm
- Emergency Rain Cover Medium – For cameras with medium-telephoto zoom lenses such as 70-200mm, 100-400mm, 100-500mm
- Emergency Rain Cover Large – For cameras with a lens size between 300mm and 800mm
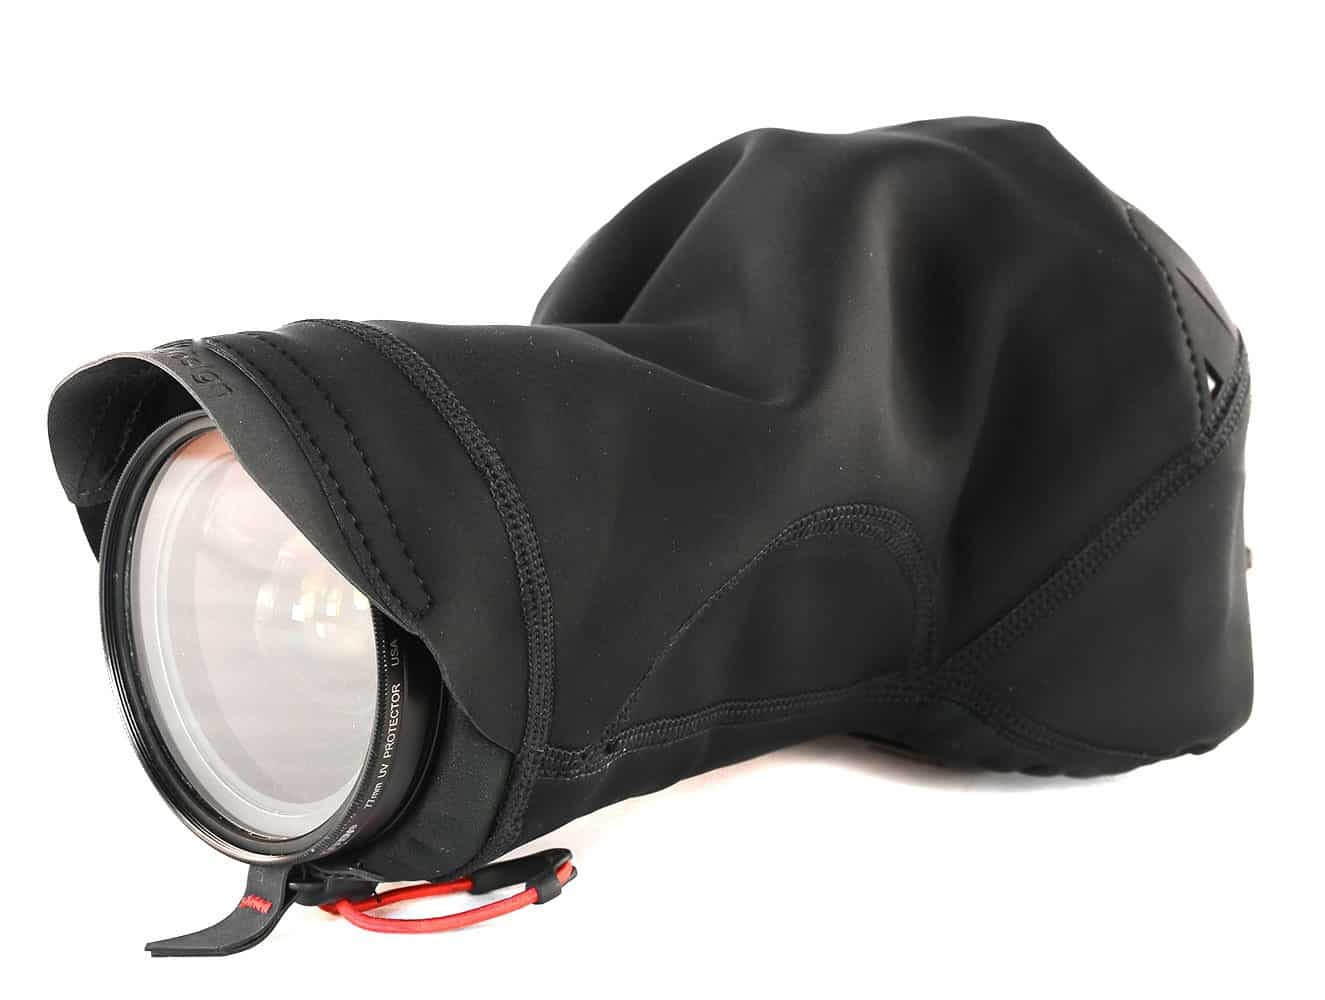
3. Peak Design Shell Camera Cover
While the Think Tank rain covers are designed to shoot with your gear in bad weather, the Peak Design Shell is all about protecting your camera when you carry it outside of your camera bag. The shell has a closed back, so the camera is well protected even when carrying it on a sling, clipped to your belt, or attached to your bag’s shoulder strap with a Peak Design Capture Clip. The biggest drawback is that you can’t shoot with the cover on the camera because there’s no access to the viewfinder or LCD.
Do You Know Where Your Towel Is?
Can you tell I’m a Douglas Adams fan? Anyway… I like to keep a small super absorbable towel in the pocket of my camera bag for drying my gear before it goes back into my bag. If you shoot in the rain or the snow, then either your camera, or the camera cover is going to be wet when it needs to be put away. If you introduce this moisture to the interior of your bag then you’re going to find condensation forming all over your gear, and particularly on your lens elements. You’ll also have to dry your camera bag out at the end of the day which can be a pain in the ass in itself. I’ve found the solution to this is these tiny towels from a company called PackTowl. They are designed for backpackers, so they’re super lightweight, and incredibly absorbent. Just give your gear a wipe before putting it into the bag, and make sure you place the towel in an exterior pocket. If you put it inside the main compartment with your gear then it kind of defeats the whole purpose!
Be Careful With Your Aluminum Tripod in the Cold!
Metal gets brittle at very cold temperatures and this can cause problems for aluminum tripods. I’ve done it myself, and I’ve seen others do it many times… it’s all too easy to snap the leg of an aluminum tripod that’s been out in sub-zero temperatures for a long time. Carbon fibre doesn’t get brittle like metal, so that’s one of the reasons I switched to using carbon tripods many years ago. I snapped a leg clean off an old aluminum tripod while I was in Japan and many hours drive from the nearest camera store. Never again! Of course, even carbon tripods have metal parts to them, so it’s a good idea to make sure the metal parts are thick and chunkily engineered, and that any plastic parts are kept to a minimum and only used in non-critical areas. Plastic flip-lock levers for leg extensions are an easy point of failure in the cold, the rubber twist-grip style leg locks are much more favourable! I use a Really Right Stuff TVC-24L and a TQC-14, both of which have never let me down.
Save Your Silica Packs

You know those tiny little white sachets that fall out of shipping boxes all the time? They are full of dry silica gel which is highly absorbent and designed to prevent mould and moisture damage to goods during long shipments. In wet and snowy environments, it’s a good idea to have a couple of these in your camera bag to help keep the moisture levels down. Just opening your bag to extract a camera in the wet will allow a few snow flakes, or a few drops of rain into your bag and this can eventually allow condensation to build up on your gear. It’s unlikely to build up in any amount that would cripple your gear, but that’s not all we’re worried about. Sometimes it’s just about being able to grab your camera and get a shot very quickly. If your lens is covered in condensation when you pull it out, it might cause you to miss a fleeting moment while you’re cleaning and drying it.
If you don’t have any silica packs lying around from your last Amazon order, you can also pick them up from most good camera stores where they sell re-useable tins of silica. After heavy use, you simply stick them in the oven for a short time to dry them out again! When I picked up a Phantom drone recently it came in a hard case that actually had laser cut slots for these reusable silica packs. A very cool idea!
Are Your Lenses Really Resistant To Water?
Perhaps you have gone to the expense of buying the very best lenses for your camera system because they are labelled as resistant to dust and moisture, but are you sure about the level of protection that’s offered? The problem is that there is no standardization in this area at all, so whilst one lens might stand up to prolonged periods in a deluge of rain, another might only be good for a quick sprinkling, yet both might be labelled as moisture resistant. Further confusion is introduced when you read the fine print in the specifications of some pro lenses that states moisture resistance is only complete when a front filter is used on the lens. Not many people know this, but it’s certainly the case with a number of Canon’s L-Series lenses.
From Canon on the venerable 17-40 f/4 L
“since the front element of this lens moves when zooming, you need to attach a Canon PROTECT filter sold separately for adequate dust-and water-resistant performance. Without a filter, the lens is not dust or water resistant”.
Frustratingly, this is a hard topic to get information about from manufacturers because none of them want to open themselves up to trouble by guaranteeing their lenses to be resistant to a specific amount of moisture. Make no mistake though, your lenses are not waterproof, so don’t drop them in standing water.
If you know that you are going to be spending time in a location that’s likely to leave you out in the rain, it’s prudent to pack some sort of protective filter for the front of your lens, even if it is weather resistant. Under normal circumstances I don’t recommend using things like UV filters for everyday protection, but when the weather is guaranteed to be bad, the added protection outweighs the potential negative image quality effects.
When it comes to selecting a filter to use for extreme weather protection, there’s two options that I can highly recommend: The first is the Formatt Hitech Firecrest Ultraslim UV Filter which is what I tend to carry around with me for weather emergencies. The Ultraslim Firecrest UV filters are the thinnest filters I’ve ever seen, and what’s great about that is it makes them extremely lightweight. If I’m going to carry around a filter in my bag for emergencies, I don’t want it getting in the way. In fact, I want to forget it’s there at all until I need it. These Ultraslim filters are just 13g or 0.03 lb! If I absolutely have to be out shooting in the driving rain or a blizzard, then this filter just puts my mind at ease a little bit more.
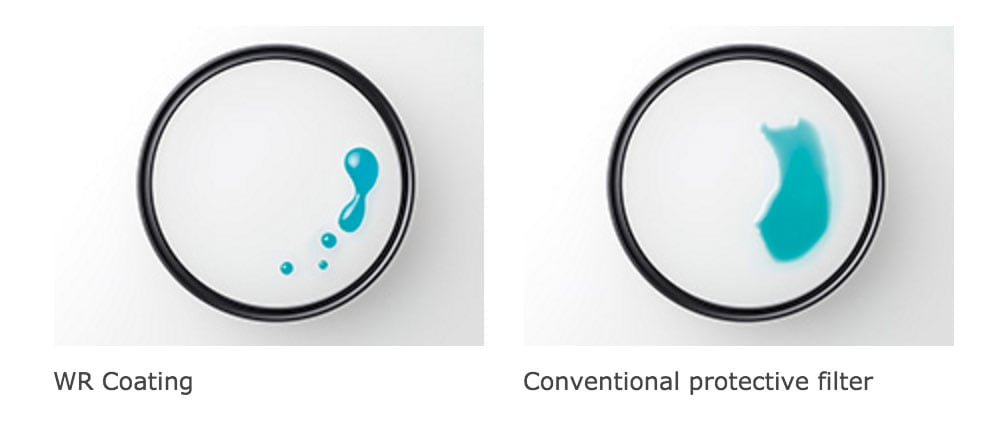
The second option for weather protective filters are the Sigma WR Ceramic Protector filters. These are quite a bit more bulky than the diminutive Firecrest Ultraslims, but they actually have a water resistant coating applied to the glass that helps them shed water droplets.
What to Do If Weather Breaks Your Camera
Hopefully this will never happen if you follow the precautions that I’ve laid out in this section, but if you do find that your camera is malfunctioning then there’s a couple of things you should:
- Immediately turn the camera off and remove the battery
- Find a sealable container and fill it with rice or cat litter, place your gear into the container and seal it up for 24 hours. Most weather-induced malfunctions will be due to moisture, and some camera gear has protective circuitry that disables it when moisture is detected. Hopefully that’s all that happened, and some time in the container will do the trick. Cat litter and dried rice are both extremely absorbent and they’ll such moisture out of most things even when they aren’t in direct contact. They work much like the silica packs that were mentioned before, but rice and cat litter are much easier to come by in bulk, not to mention much cheaper.
This technique absolutely works. Check out this additional report from a friend of mine who saved his camera when it got wet!
The one caveat to this emergency workflow is when you are sure that there isn’t excess moisture in your gear, and the weather is extremely cold. In these circumstance, you can first try to simply warm up your gear slowly to see if that brings it back to life. I know that I’ve had to do this on several occasions with larger Li-Ion flash batter packs like the Elinchrom Quadra. Make sure you bring things back to temperature in a safe manner using the previously discussed techniques, though. You don’t want to go from simply having a cold batter pack, to having a moisture problem from condensation! If warming it up doesn’t fix things, then it’s time to bust out the kitty litter!
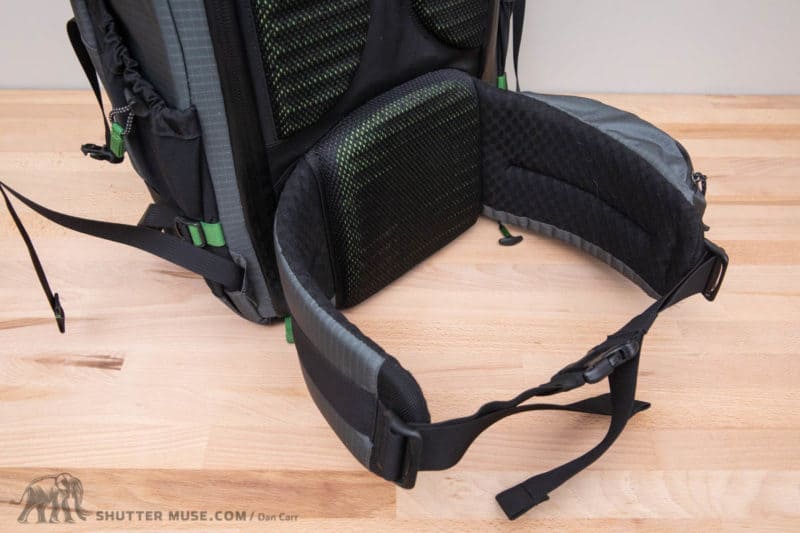
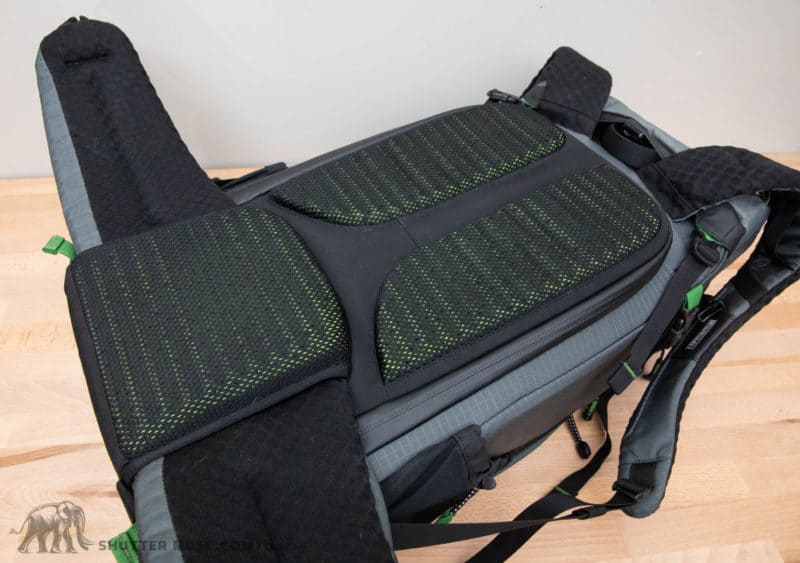
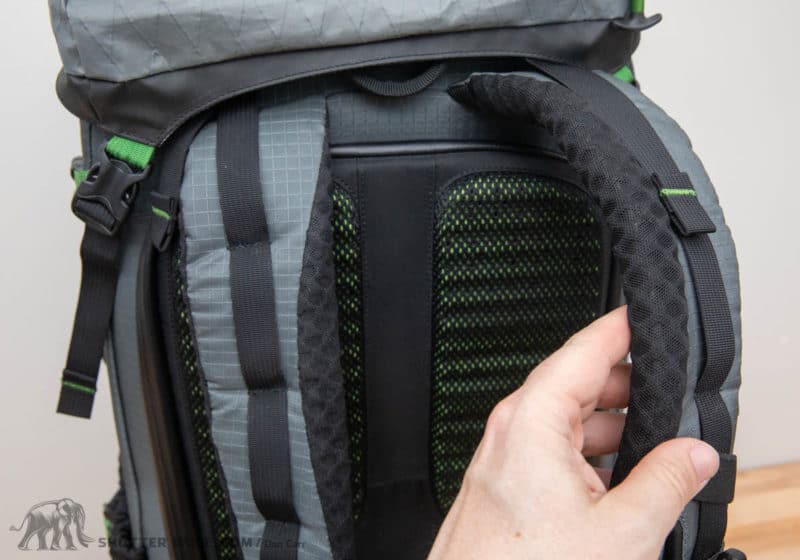
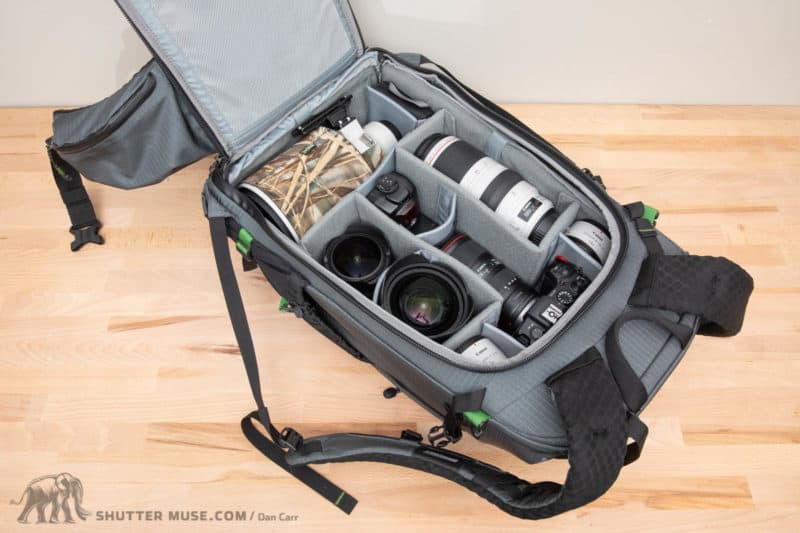
Best Camera Bag For Extreme Weather
If you know you’re going to find yourself in tough weather conditions then the main concern for camera bag choice should be the bag’s ability to stand up to the elements in its “naked”, native form. What I mean by this is that any camera bag can be made to be relatively weather resistant with the application of some sort of waterproof nylon cover. Many manufacturers even include them with their bags, but all of them compromise access to the bag in some way when the cover is attached, and there’s nothing more annoying than wrestling with a giant nylon cover that has suddenly turned itself into a sail fit for an Americas Cup yacht during a period of gail force wind.
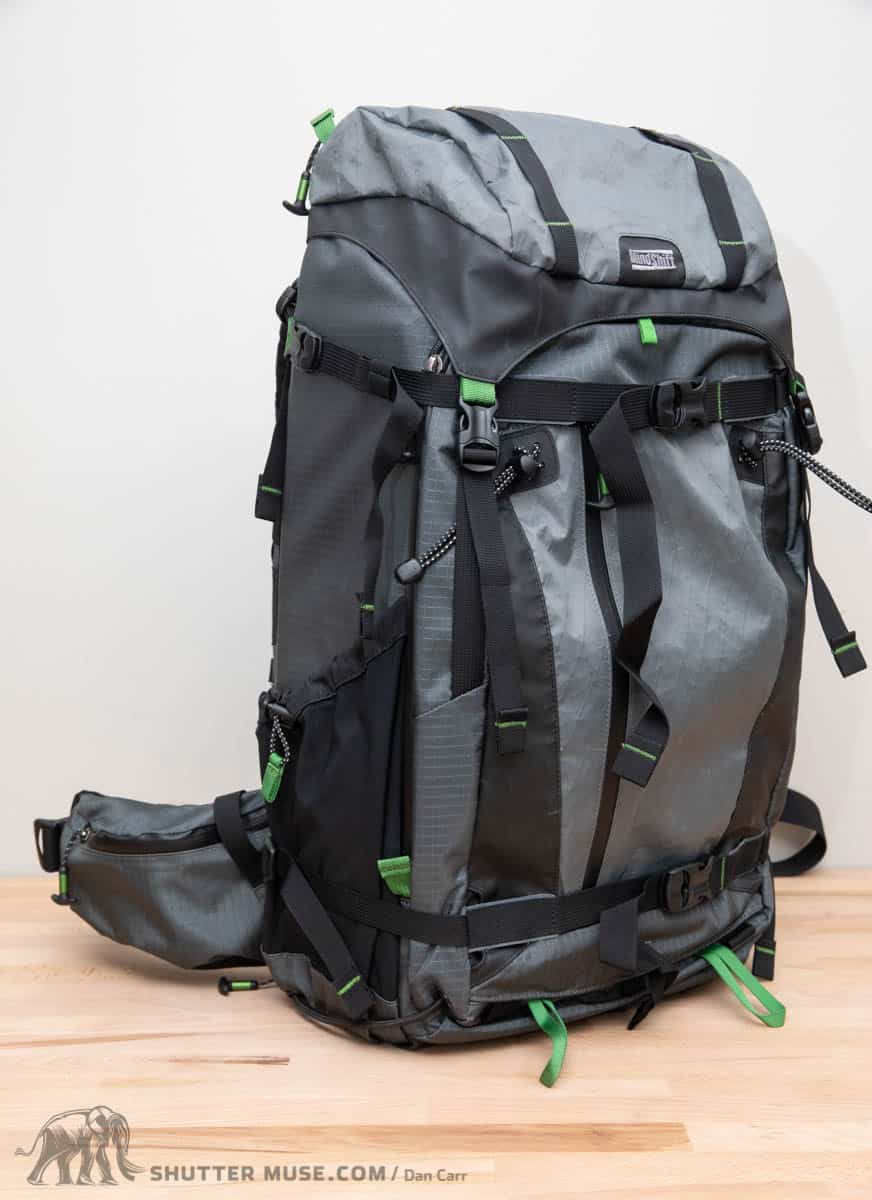

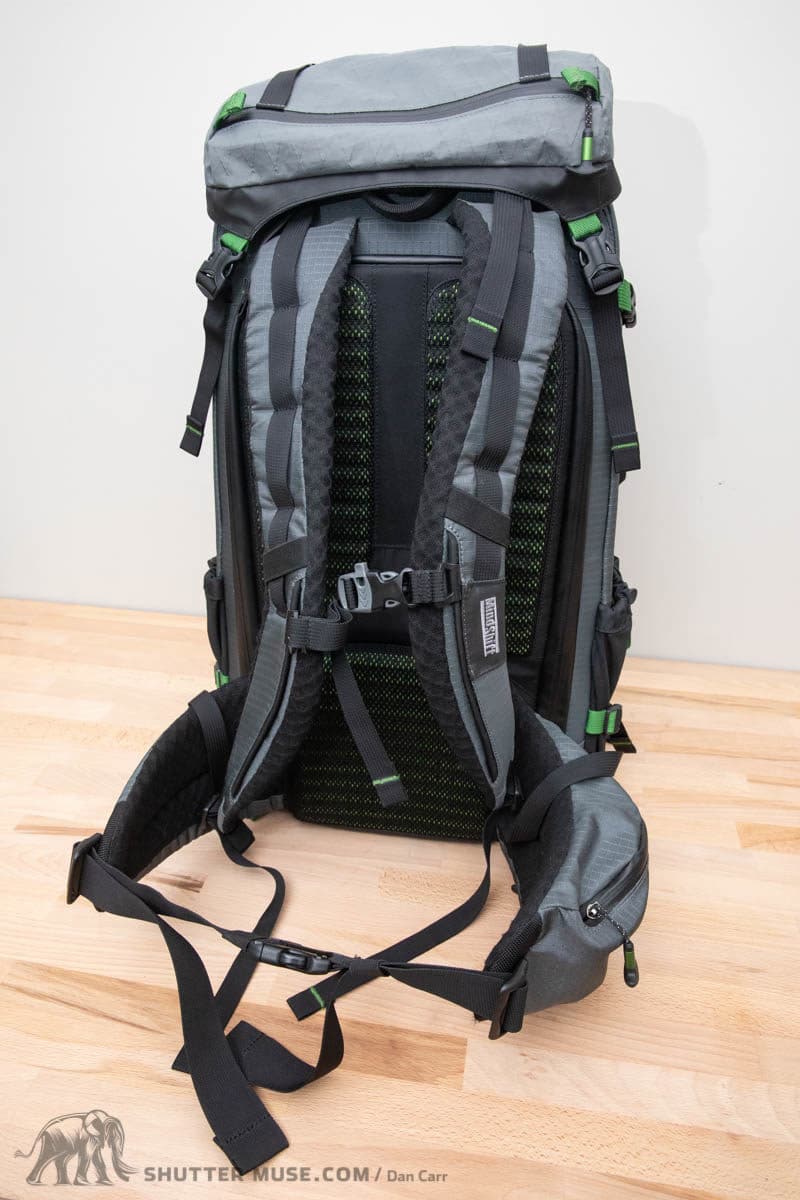
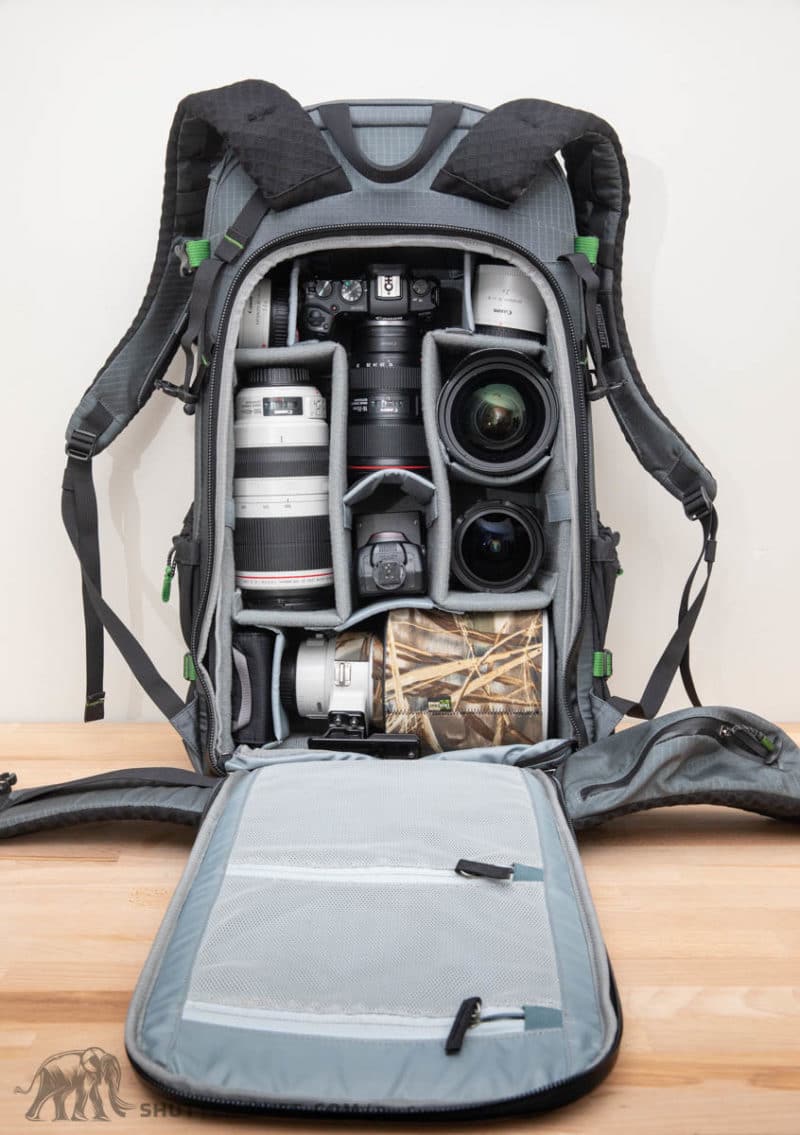
What you need is a bag that can stand up to most things without necessitating the use of a cover, and the BackLight Elite 45L from MindShift Gear is the best one I’ve ever tested. Here is the link to my extensive BackLight Elite review.
Full disclosure, I did help MindShift develop this pack over a two year period, but I know how tirelessly the design team tweaked this design to perfection over those years when I was in the field testing the prototypes for them.
The BackLight Elite has water resistant zippers all round, a waterproof TPU base to stand in the snow and waterproof, tearproof, ultralight sailcloth material on the top and front of the bag. This thing is rugged to the extreme, as well as being the most comfortable pack I’ve ever used. Just look at the photos of the harness and padding! Finally a camera pack that has been built just like a high-end hiking pack.
Beware of Relying On Mobile Apps
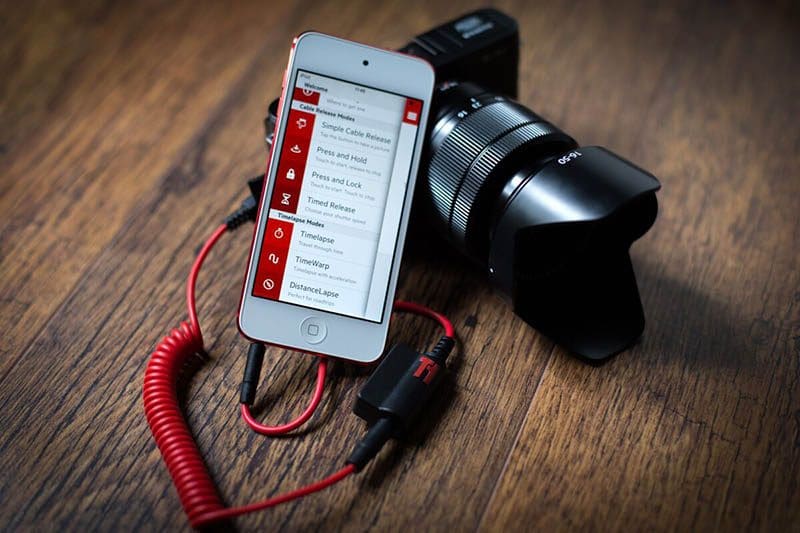
I carry some form of camera trigger with me wherever I go because I never know when I’m going to want to take a long exposure image. A trigger allows me to put my DSLR into Bulb mode for exposures over 30 seconds, but it’s also part of my best-practice routine when I’m using a tripod for landscape work and looking for ultimate sharpness. Using the shutter trigger instead of pressing the shutter button on the camera means that I don’t introduce any vibrations into my tripod setup at the moment when I take the shot.
Until a few years ago, the choice of triggers were limited to simple push-button ones that offered little in the way of additional functionality. In recent years though, there have been several products that take advantage of the powerful mobile devices that we all carry in our pockets. The most popular one, and the one that I own, is called the Trigger Trap. This devices connects my iPhone to my camera, and the accompanying app allows for a bewildering array of long exposure and timelapse functionality. It’s awesome, and I love it, but there’s a problem…
Mobile devices don’t do well in the cold at all. In general, their batteries seem to feel the effects of the cold much quicker than a typical camera battery, likely because of their much larger surface area and wafer thin casing. If you plan on spending a long time outside in reasonably cold temperatures then you could very well find yourself running out of battery power on your mobile device, and then your trigger is gone!
Actually the problem can be much worse than this because most mobile devices have a safety mechanism that will shut them down in extremely low temperatures, even if their is plenty of battery power remaining. On a recent trip to the Rocky Mountains of Alberta, I caught a high pressure weather system that left me with cloudless sky for nearly two weeks, and resulting temperatures that didn’t rise about -15 Celsius (5°F). Many days were much colder than this. What I found was that even with a fully charged battery, my phone would switch off after about three minutes of exposure to those low temperatures. I tried keeping it close to my body, to make it as warm as possible, but it made no difference at all. These devices have gotten so big, yet so thin these days, that they just shed heat almost instantly when exposed to those kinds of low temperatures. Mine wasn’t the only phone to experience this annoyance on the trip, so I know it’s not limited to just my phone or even my phone model.
Obviously in this kind of situation, a triggering solution like the Trigger Trap is of no use at all! You need to be carrying a much simpler cable release, and preferably one that doesn’t use any kind of battery. For Canon users the most common one is the RS80-N3, for Nikon it is the MC-30A and for Sony it is the RM-VPR1. Note that there are other options as well, so check the details first to make sure it will work with your camera. Sometimes I carry the battery powered TC-80N3 for my Canon gear, but this is powered by a CR2032 battery so again, in extreme cold it isn’t the best option and you should have one that doesn’t require any power.
Access To Your Maps and Notes
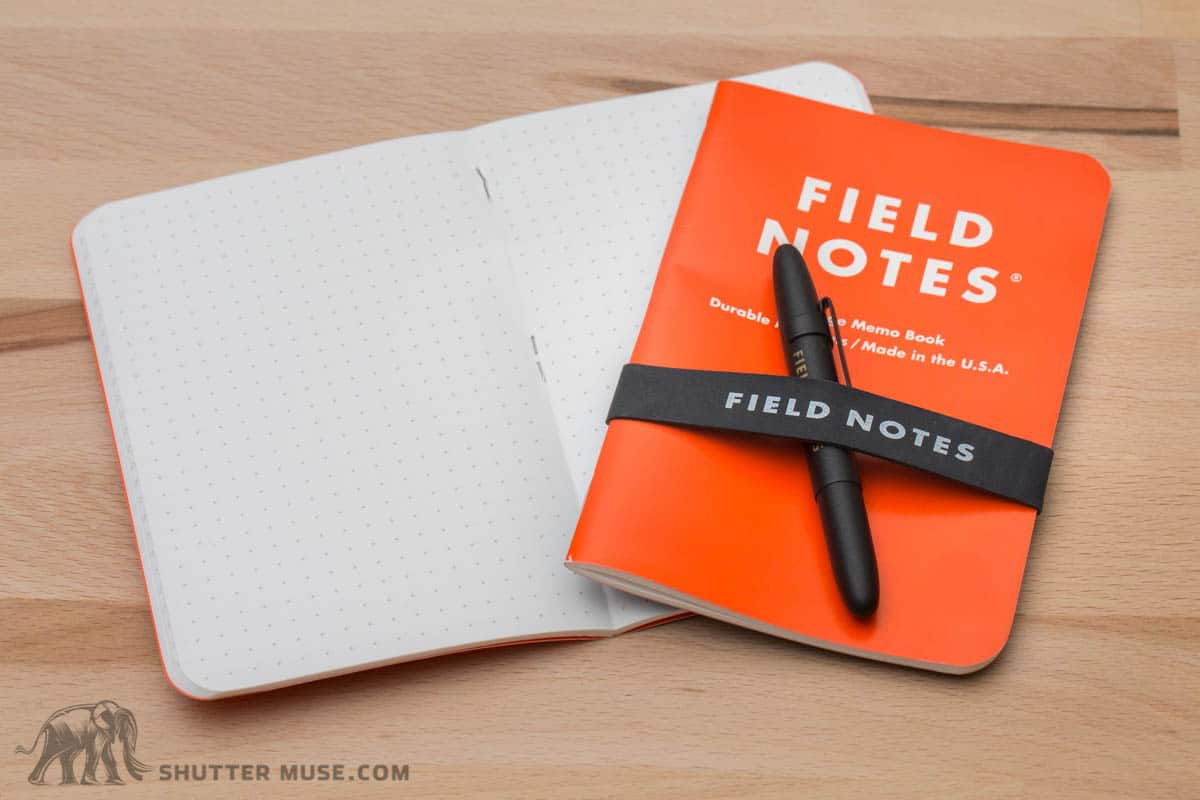
If my mobile device runs out of power, or simply shuts down due to some self-preservation mode, it’s not just triggering ability I might lose. I store a ton of location information, maps and photography related notes on my device as well. Make sure you plan ahead and think about this! One such example is that I use the Evernote app to store notes about all the nodal point measurements for all my lenses when I’m using my pano head for panoramic images. With nodal points measured down to the millimetre for 8-10 different lenses, there’s just no way I can remember them all! 95% of the time this won’t be a problem and I can simply consult my app, but what if the perfect panorama opportunity arises and my phone has shut itself down!
For this reason, I really recommend keeping an emergency set of nodal points on good old-fashioned paper in your camera bag or memory card wallet. The Think Tank card wallets have a business card slot in them that’s perfect for storing a small piece of card with some notes on. This is how I used to do it, but I’ve also recently discovered the fantastic Expedition memo books from Field Notes. These little note books are made from waterproof and tear-proof synthetic paper and they are only 48 pages so it makes them thin and light enough to slip just about anywhere inside your camera bag. I pair mine with the tiny Fisher Space Pen which can write in any kind of weather, or even underwater. This means that no matter what the weather is doing, I have a place to refer to old notes and write new ones. If you are a note taker, the Expedition books are the way to go, but if you just want an emergency place to store a few key settings like nodal points, the former option of the Think Tank card wallets works great.
Long Exposure Calculations
The same thing goes for long exposure calculations as well. Most of the time I’ve come to rely on apps like Photopills to help me calculate very long exposure times with my Breakthrough Photography 10-stop and 15-stop neutral density filters. In very cold climates, that reliance could lead to the same problems that I’ve already underlined in this section. The best option is to carry around a printed table of long exposure times, either tucked away in the aforementioned Think Tank Card wallet, or transcribed into something rugged like the Field Notes Expedition book. If you happen to have a lamination machine at your disposal, that can also be a useful modification.
FREE Download – Long Exposure Charts for Printing!

Yes that’s right, I really am that awesome 😀 If you were reading this section and wondering where you can find a nice reference table of long exposure times to print and keep in your bag, I’ve got you covered. Hit the big button below and I’ll e-mail you some beautifully formatted charts in PDF format!
If you don’t want to download these as a PDF, I’ve also added the neutral density long exposure charts to the site. If you’re feeling particularly technically minded then you might also want to check out my other post: How To Calculate Long Exposure Times, for all the gory mathematical details of where these numbers actually come from.
Keeping Your Phone Dry in the Rain or Extreme Humidity
If the weather isn’t too cold to use a mobile device for some of the tasks mentioned above, you might also run into trouble with heavy rain or extreme humidity. Whilst it’s obvious that a waterproof cover for your phone is a good idea in rain and snow, it might be less obvious, but still highly recommended, in extremely humid climates. I’m not talking about Miami on a hot day here, I’m thinking more like monsoon season in the jungles of Cambodia, or the Amazon rainforest. Moisture can easily find its way into your device if you have it in a pocket while you are perspiring in high humidity for long periods. If you don’t use a case in extreme humidity, at very least, best practice is to put your device inside your camera bag and not in a pocket.
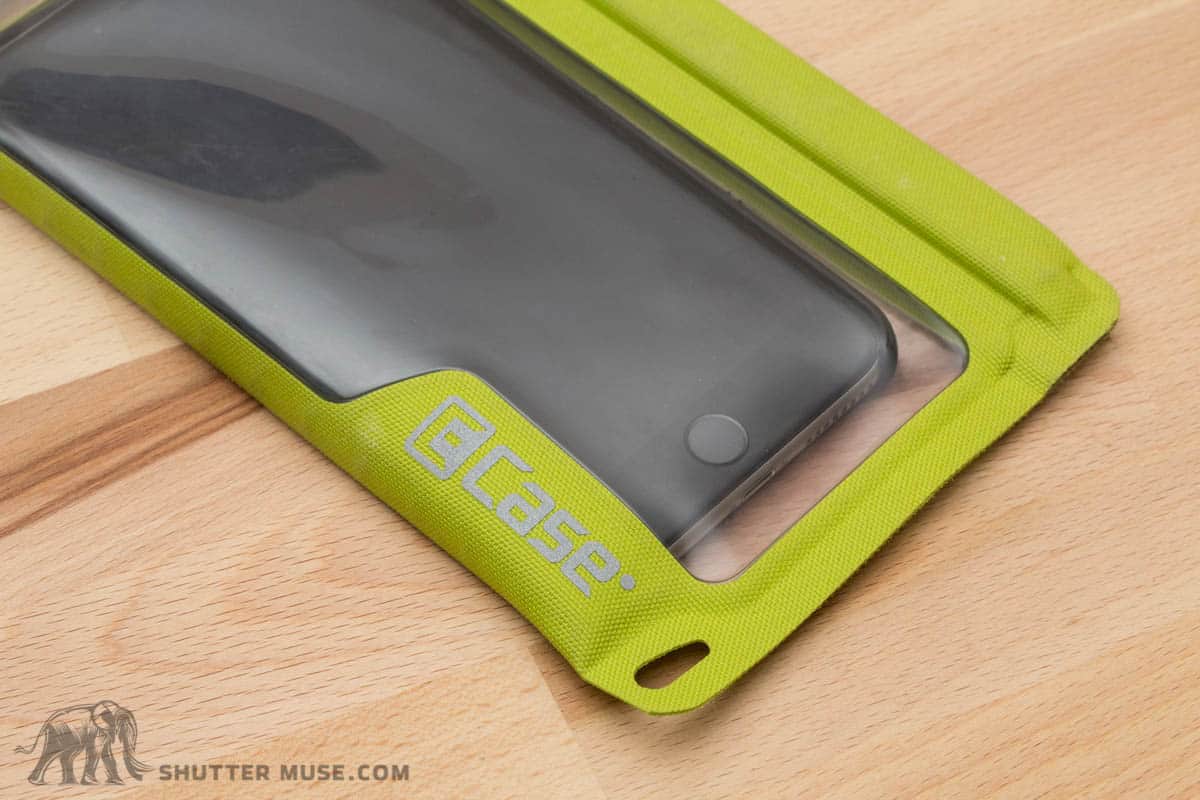
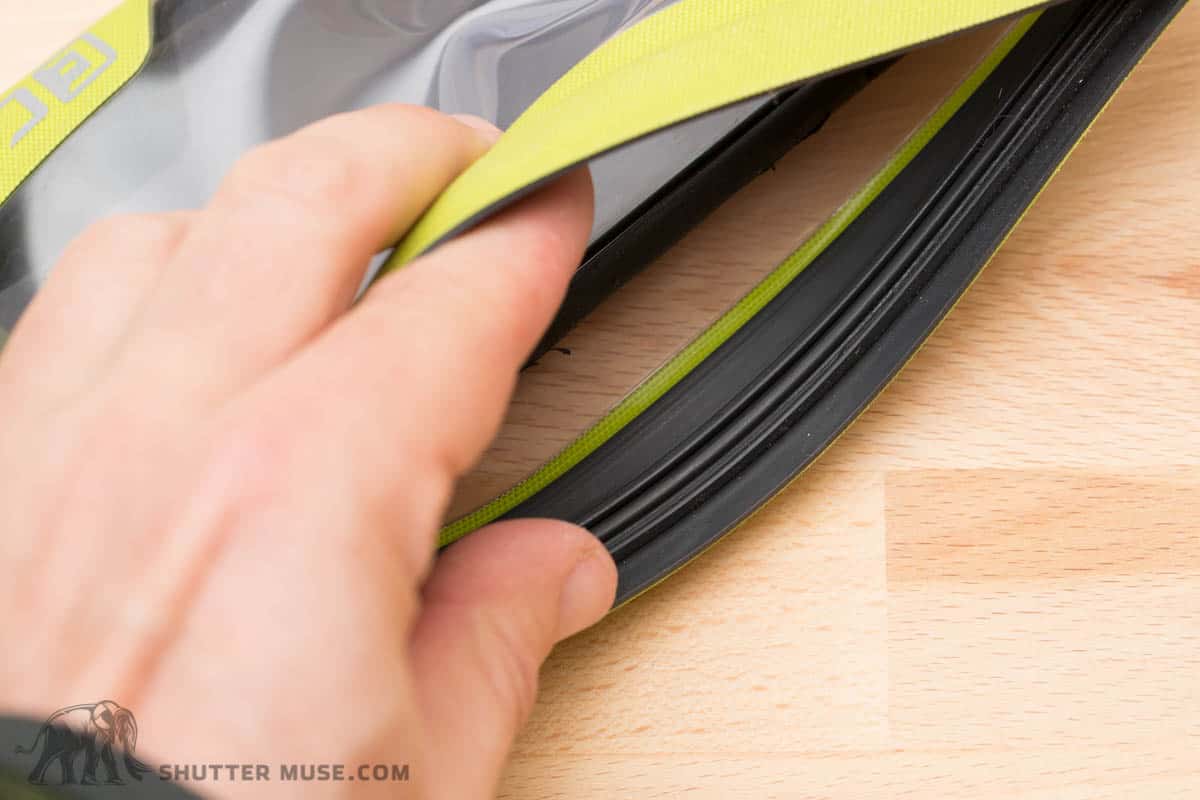
I’ve had bad experiences with OtterBox phone cases so I can’t recommend them, but cases from LifeProof are a popular option. Personally, I don’t like to have my phone in a big chunky case all the time so I put it into an E-Case from Cascade Designs. With these cases I can quickly remove the phone when waterproofing isn’t needed, and it also gives me a dry place to store a few other items like identification or some money. You can still maintain touch control of your device, and some of them feature a headphone pass-through port which makes it possible to continue using shutter release apps like the Trigger Trap. They pack flat, so I just keep one in my travel bag at all times.
Final Word
A large portion of the globe sits in temperatures that fall below freezing, or areas where weather can be unpredictable, extreme and even violent. To ignore these areas would be a great waste of photographic opportunity, and blue skies are boring anyway, right? The key to success in these regions is to be thoroughly prepared before you find yourself in that situation. If you’re spending all your time troubleshooting problems with your gear, or even with yourself, then you’ll be letting photographic opportunities pass you by. If you’ve expended a lot of time, energy and quite possibly money to get to wherever you are, that’s a real waste. Take the time to prep your gear and make sure you’ve got any extra accessories that might help you. If you find that you rely heavily on the use of a mobile device for its apps and maps, make sure you have a solid plan-B in place for the times when it’s either too wet or too cold to use it.
Extreme Weather Shopping List
Here’s a list of all of the useful items that have been mentioned in this article.
- Goal Zero Venture 30 battery pack – Amazon | B&H
- Handwarmers – Amazon | B&H
- Camouflage Buff – Amazon | B&H
- Icebreaker Flexi Chute neck warmer – Amazon
- PackTowl – Amazon
- Peak Design Shell camera covers – Peak Design
- Batteryless shutter cable – Canon -> Amazon | B&H – Nikon -> Amazon | B&H – Sony -> Amazon | B&H – Fuji -> Amazon | B&H
- Think Tank Card wallet – Think Tank Photo (free gift if you spend more than $50)
- Long exposure charts for printing when you can’t use a mobile device – FREE – Click here
- Think Tank Hydrophobia – Think Tank Photo (free gift if you spend more than $50)
- Aquatech Sports Shield – Amazon | B&H
- Storm Jacket rain cover – Amazon | B&H
- E-Cases waterproof phone cases – Amazon
- LifeProof waterproof phone cases – Amazon
- Bogs Buckman insultaed high boot – Amazon
- Columbia Bugaboot – Amazon
- Arcteryx Bora2 Mid GTX Boot – Amazon
- Icebreaker Hunt+Fish Expedition sock – Amazon
- Yaktrax XTR Extreme – Amazon
- SIGMA WR Filters – Amazon | B&H
- Thermarest Z-Seat – Amazon
Pin the Post
I’ve put an incredible amount of time into creating this post, if you use Pinterest, it would be a great help to me if you shared it using the graphic below.


Thanks for a great guide on cold weather photography. As a Swede/hunter/slalom dad/photographer I recognize a few tips, but would like to highlight the virtue of standing on something else than snow, ice or cold ground. By standing on a foam sitting pad you will not get instant gratification, but after let’s say 15 minutes you can enjoy the dancing of your fellow ski parents around you. Costs nothing, weights nothing and you could also use it for your butt or equipment, though not at the same time.
That’s a great tip as well, Anders! Might have to add that to the list!
Great article! Thank you for sharing your knowledge. I spent long hours photographing aurora borealis in northern Canada. Staying warm is essential -feet, hands, head and face must be protected. Do not ever touch frozen metal parts (tripod head…) with bare fingers! I use thin thermolite gloves from Dakota (cheap at your local hardware store) when changing settings, with mittens to keep my hands warm.
I also protect my DSLR with a camera parka from AT Frosted Lens. No more frost on my camera and the battery last longer! Sometimes I use chemical heat warmers inside for time-lapses. And we I go back inside, I keep my DSLR in its camera parka in the camera bag until the next day to avoid condensation (and yes, remove your memory cards first!!!).
Winter is a wonderful season for photographers! Have fun!
Thanks for sharing!