Today I’m bringing you an Adobe Lightroom tutorial in two different ways.
Lightroom presets are a key component in speeding up the photo editing workflow. You can make them yourself (time consuming) or you can buy them for next to nothing from a number of different online stores. Once you’ve purchased them, you’ll need to install them, and that’s what I’m going to show you how to today – in less than 30 seconds!
Actually I’m going to give you two videos.
The first video shows you the best way to install Lightroom presets with the sub 30 second method, and if you’re a reasonably confident computer user with some very basic Lightroom knowledge this will be all you need. The second video takes things a little slower, and discusses some of the potential pitfalls if you are having some troubles. I was compelled to create this first video because I found a ton of tutorials online for this process and the videos ranged in length from 8 minutes all the way up to 19 minutes. Whilst I do see the benefit of such great detail for some users, I also thought that they were all unnecessarily long and drawn out for those users that are already fairly confident with their computer and the Lightroom environment.
Video #1 – The Fastest Way to Install Lightroom Presets
Hit the ground running. No fluff. This video will only walk you through the best (and fastest) way to install Lightroom presets.
To compliment the simplicity of this first video, I’ll keep the written version of these instructions equally brief. For some folks, this will be enough of a memory jog for how to do this. For anyone looking for more detail, please view the second video and elongated instructions further down the page (which also shows a second method for installing the presets). If you have additional questions, there’s an FAQ at the bottom of the page as well!
Step-by-step
- Step 1 – If you have purchased some Lightroom presets, ensure that you have unzipped the file to reveal the folder containing the presets.
- Step 2 – In Lightroom, click the Preferences option in the main menu, located under the Lightroom tab.
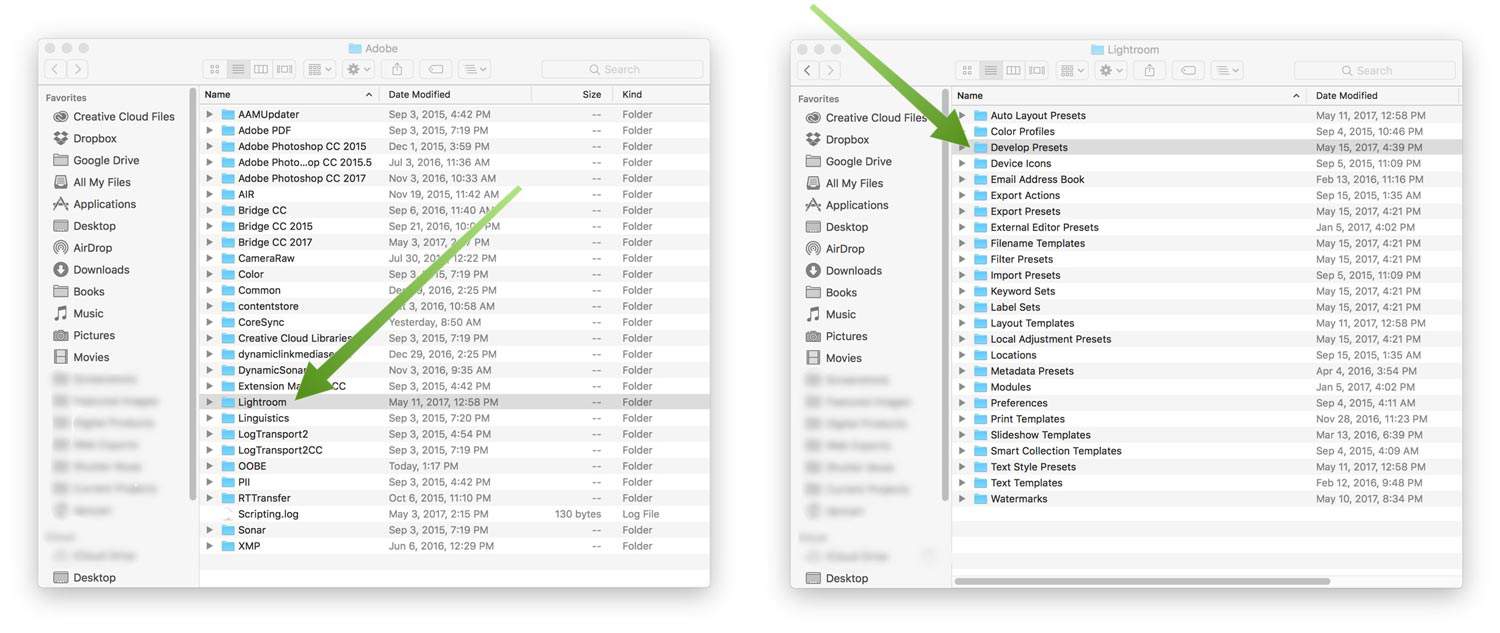
- Step 3 – Under the Presets tab in the preferences menu, click the button that says Show Lightroom Presets. This will open your file browser and show the parent folder called Lightroom location for storing presets.
- Step 4 – Double click on the folder labelled Develop Presets.
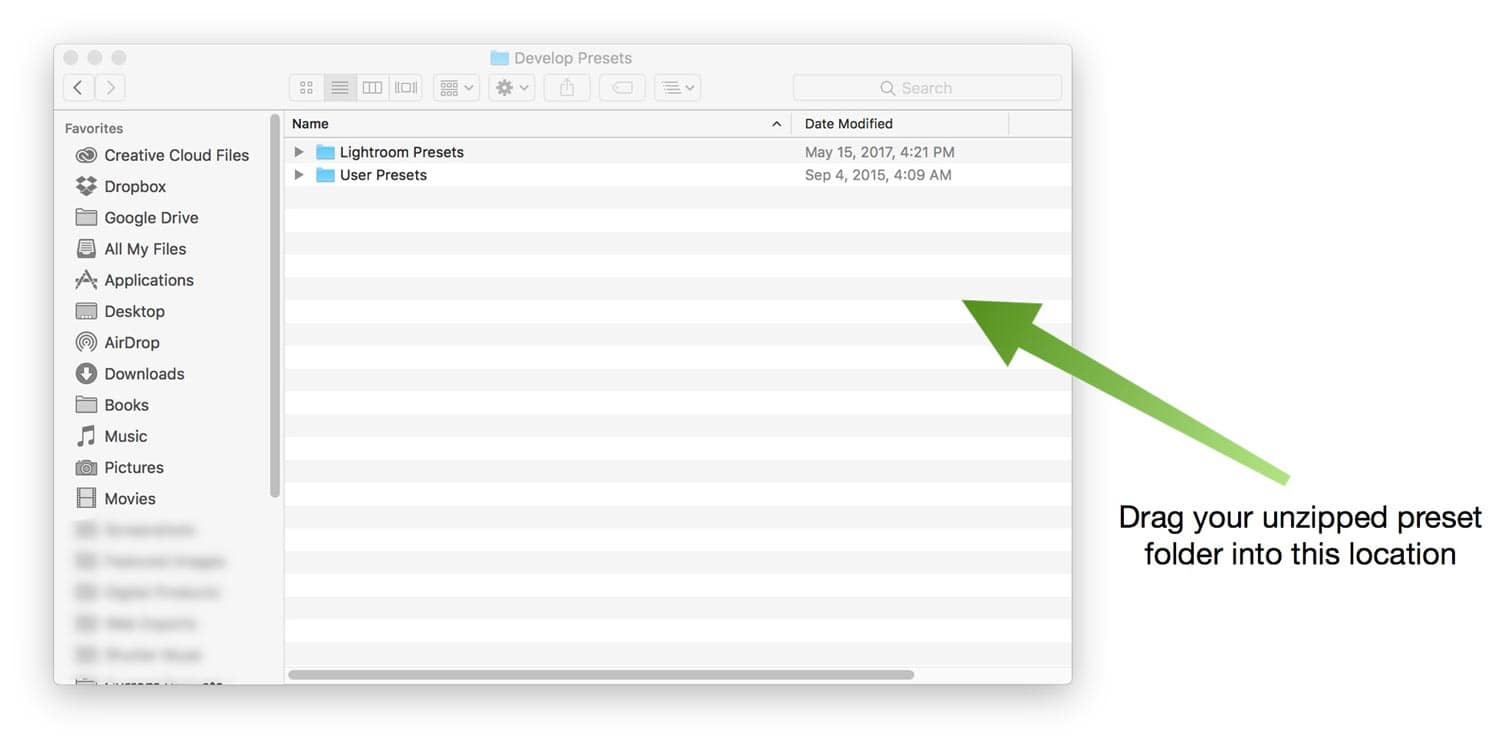
- Step 5 – Open a second separate window in your file browser and navigate to the folder which contains the Lightroom presets you want to install. Drag the folder of new presets from this second window, into the Develop Presets folder in the first window.
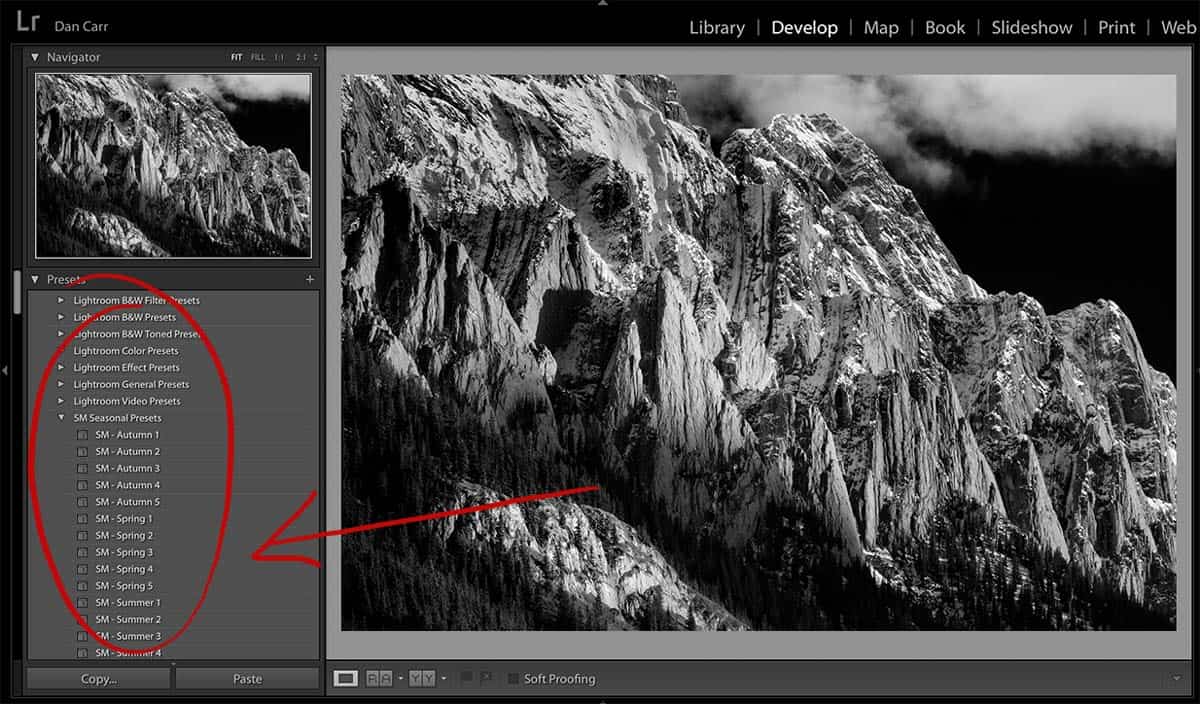
- Step 6 – Shut down Lightroom and the re-open it. Your presets will now be visible in their folder in the Presets section of the Develop tab.
Video #2 – The Detailed Lightroom Preset Installation Tutorial
If you’re a real Lightroom beginner, or just using presets for the first time, that first video probably wasn’t for you. This second video walks through the process in much more detail and also explains some of the common issues that people have when installing Lightroom presets for the first time.
Step-by-step
This second video actually explains two methods for installing Lightroom develop presets. The first method in the video is the same as the method described in the first video on this page, although I run through things a little slower this time. In the step-by-step guide below, I’ll repeat the process described further up the page in the first section, but similar to the more in-depth style of the second video, I’ll explain the process in a bit more detail.
Method #1 for Installing Lightroom Presets
Step 1 – In most circumstances you’ve probably downloaded multiple Lightroom presets simultaneously as a zip file. The first thing you need to do is open up your file browser and locate the zip file on your hard drive. Once this is located, you’ll need to unzip the folder so that we can access the develop resets that are inside it. On a Mac, this is as simple as double clicking the zip file. As soon as you do this, a folder with the same name as the zip file will appear within the folder that contains the zip. On a PC, do not double click the zip file! Instead you need to right-click on the zip file and select the option that says “Extract All“.
Step 2 – Open Lightroom and select the Preferences menu from under the Lightroom option in the main menu. On a mac you can use the shortcut Command+’ to open the preference menu, on a PC the shortcut is Ctrl+’

Step 3 – Navigate to the Presets tab within the Preferences menu and then click the button that says Show Lightroom Presets Folder. This will open up your computers default file browser again, and the Lightroom folder will be highlighted and selected. Double click the Lightroom folder to open it, and within that folder, once it has opened, double click the folder called Develop Presets. Inside this folder you will find two pre-existing folders. One is called Lightroom Presets, and the other is called User Presets. That first folder is where the default presets are stored, these are the small number o basic presets that come with Lightroom when you install it. The second folder, User Presets, can basically be ignored. If you haven’t yet created your own presets in Lightroom, this second folder will be empty. Either way, for our purposes right now you can just ignore it. All you need to know is that we are going to leave both those folder as-is. We will not be putting any files or folder into them, so just ignore them!
Step 4 – We now need to gather both of the file browser windows we have discussed, together on the same screen. In one panel I want you to keep the Develop Presets folder open, and in the other panel, I want you to have the the download folder that contained your downloaded zip file, and now also contains the expanded folder of presets. Now, we simply drag the preset folder into the Develop Presets folder so that it’s alongside the User Presets folder and the Lightroom Presets folder.
Step 5 – At this point, it’s very important that you close down Lightroom and re-open it again. Unless you do this, the imported presets will not appear. Once you’ve done this, you’ll find the presets panel underneath the navigation panel, once you have selected the Develop module. People often get tripped up at this point because they are still in the Library module! You must make sure you are in the Develop module, where you will now see your new folder of freshly installed Lightroom CC presets.
Method #2 for Installing Lightroom Presets
Step 1 – Locate your downloaded Lightroom Presets and unzip them if they have been compressed. On a Mac, simply double click the zip file to do this, on a PC, right-click and then use the option to “Expand All”. Once this is done, you can close this file browser window, we won’t be needing it anymore for this particular installation method. All we needed to do there was make sure the presets aren’t zipped up.
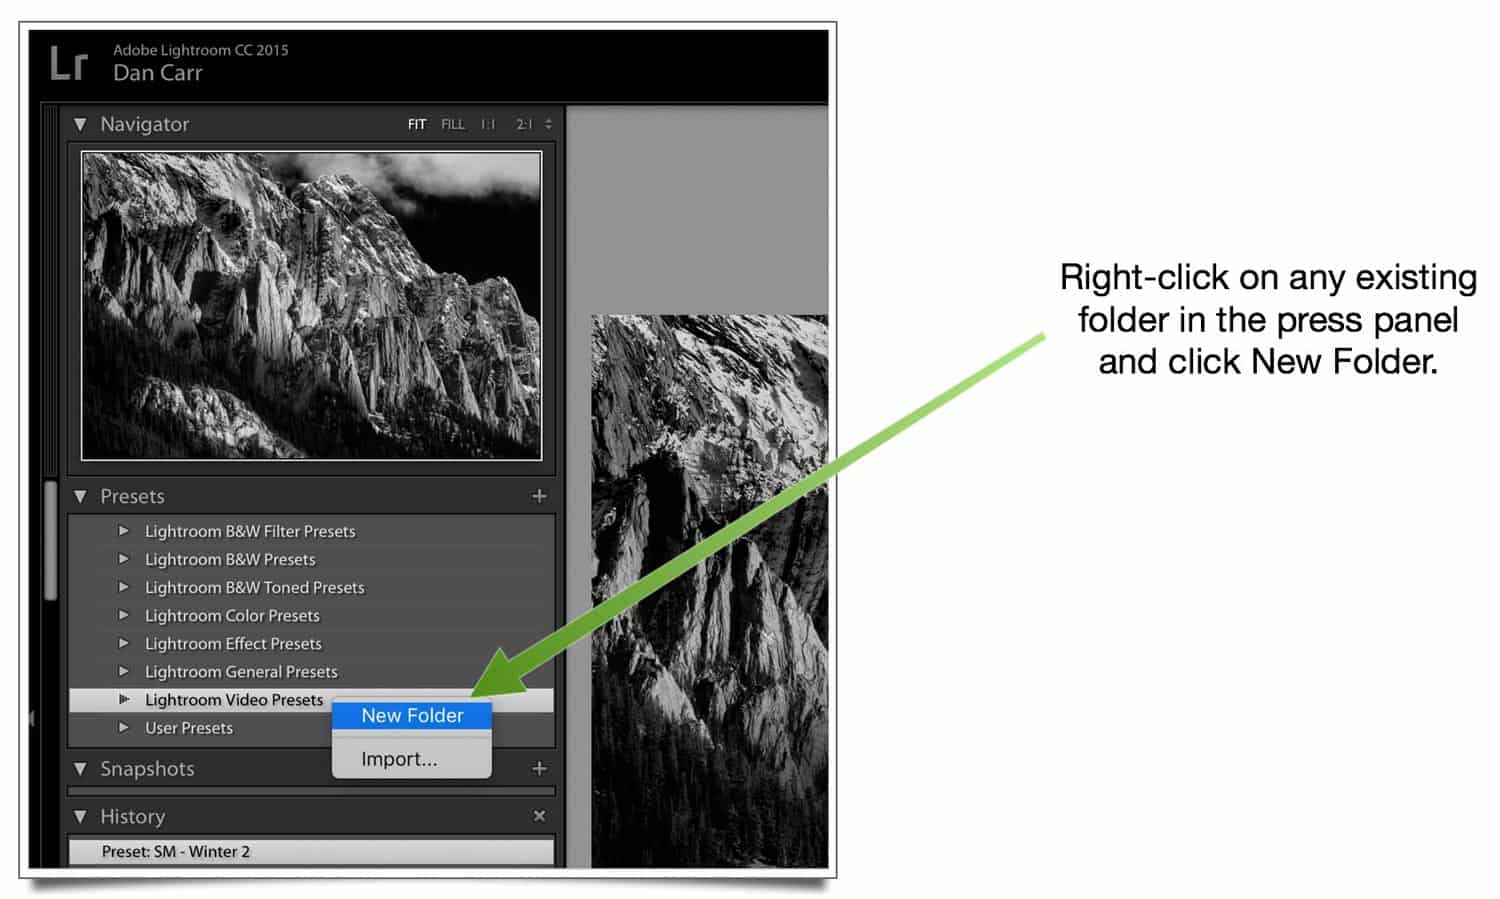
Step 2 – Open Lightroom, choose the Develop module and find your way to the Presets panel on the left side of the screen. If this is your first time importing Lightroom Presets then you’ll see a preset folder called User Presets, and then several other that all start with the word “Lightroom” – such as Lightroom B&W Presets, or Lightroom Effects Presets. We need to right click on any of those existing preset folder and then choose the option to create a “New Folder”. Give the folder a name that helps you to identify the new presets we are trying to install.
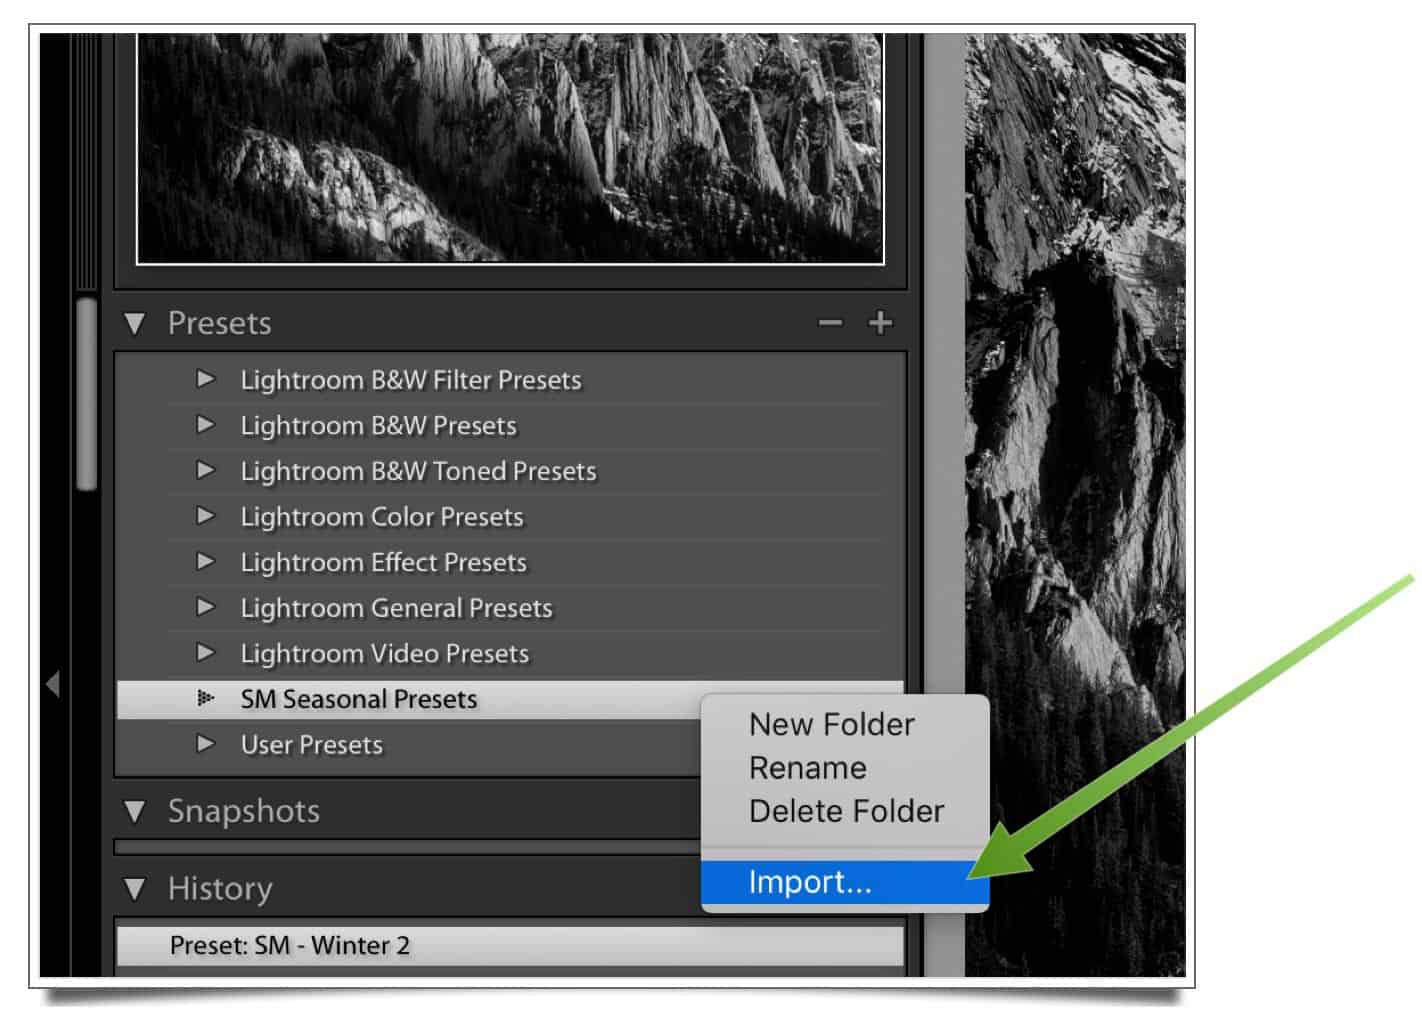
Step 3 – Right click on this newly created folder and choose the option to “Import…”. This will open a dialogue box that allows you to specify which presets you install into this folder. Navigate to your unzipped preset files, select all of them and then press the Import button.
This second method has some advantages and disadvantages. It forces you to name the new Lightroom preset folder, whereas the first method simply names the folder based on the name of the zip folder that you downloaded. On the plus side though, this second method allows you to be much more selective about which presets are installed, since you are having to manually select them, rather than blindly importing everything as in the first method. This could be very useful if you have purchased a bundle that contains many hundreds of presets, and perhaps you’re only interested in a small number of them, for example, all of the ones that are applicable to landscape photography.
Hopefully this clears everything up! Two different methods for installing Lightoom CC develop presets.