
Instagram is probably the most rapidly expanding social network on the planet at the moment and it’s now surpassed Twitter in terms of active user numbers with a staggering 300+ million accounts. I wrote quite recently about why I like Instagram, and since that post it has only gone up in my estimations.
Recently I was looking at ways to display some panoramic images on Instagram. The square format makes this quite a challenge if you still want people to be able to see what’s going on in the photo. I decided to experiment with displaying some panos as videos instead, where the video effectively pans across the panoramic image revealing the whole thing, but making use of the full height of the 1:1 square.
It’s actually VERY easy to create this video in Photoshop! Many people don’t even realize that you can create and edit videos in Photoshop, but it’s actually quite a powerful tool. To create something as simple as this panning pano video, we’ll barely even touch on the video powers of the program, but its a really good introduction to some of the important functions. I hope it inspires some new and interesting uses of the program from you! If you use this tutorial to create a pano video for Instagram, use the hashtag #ShutterMusePano so we can all check them out!
For the tutorial I am using Photoshop CC and you should also be able to perform the same process in CS6 and possibly earlier versions as well. If you don’t have a compatible version, the photographer’s Creative Cloud bundle is only $10 month and includes Lightroom and Lightroom Mobile as well. I think it’s well worth the money. I should note that it’s perfectly possible to do this kind of thing in a proper video editing tool like Final Cut Pro X or Premiere as well, in fact it might even be faster to do it that way, but this tutorial is for photographers who might not have access to that kind of software.
Video Tutorial
Step-By-Step
Step 1 – Create a new file

Current Instagram photos are 640px x 640px. Command+N to create a new file with those dimensions.
Step 2 – Place your panorama

With our square canvas in place, now we need to get our panoramic image into the file. The important step here is that we need to use the “Place Embedded” command and NOT just copy and paste your image. By placing our file, it becomes a smart object and not a normal layer and this will allow us a few extra options when it comes to editing out video. The “Place Embedded..” command is in the “File” menu at the top.
Once you have the images placed on your canvas, drag the corners out while holding the Shift key, until you fill the height of the canvas and you can’t see any of the background colour. Then drag the photo all the way to one side. This will be the start point of your video so at this point you need to make the decision whether your video is going to pan to the left, or pan to the right.
Step 3 – Turn on Timeline
Under the “Windows” menu at the top of your screen, select the option labelled “Timeline”. Your screen will split and a drop-down box will appear in the middle of the lower half which allows you to choose from Frame Animation, or Video Timeline. Click “Create Video Timeline”. Anyone that has used an NLE like Final Cut or Adobe Premiere will be somewhat familiar with the kind of view that appears next on our screens.
Step 4 – Extend the Timeline
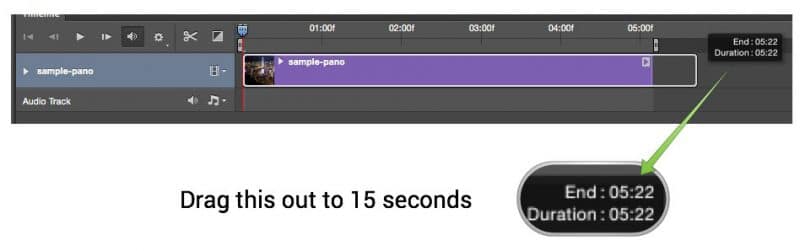
Instagram allows you to upload a video up to 15 seconds in length. You’ll find that having created your timeline, the video length is currently set to 5 seconds. To extend this, place the cursor on the right hand side of the timeline and drag it to the right. You’ll see a window appear that tells you the time and I would recommend dragging it all the way to 15 seconds. Once you have done this, use the zoom control at the bottom of the screen to zoom out so you can see the full timeline in our window to keep things simple.
Step 5 – Set transformation mode

On the right-hand side of your clip, you’ll see a small grey arrow. When you click this you’ll get some transformation options. Note that this is where the importance of “Place Embedded…” comes into play. Our image is a smart object and because of that, we have additional options in this little menu. Click the arrow and then select “Pan” from the menu. Un-check the resize option and if you want your pan to start at the left and move to the right (as in my example below), type 180 into the direction box.
At this point you will see that the image starts to pan if you drag the playhead in your timeline. What we need to do now, is define where it will finish the pan.
Step 6 – Add keyframes

Keyframes are indicators in a timeline that define the start and finish points for a transformation or movement. Since this is such a simple transformation, you don’t really need to know all the ins and outs of keyframes though. As long as you are following this guide exactly as I’m writing it, you’ll be fine.
So at this point we have our image at the starting point in the square. Now drag the playhead all the way to the right-hand side. The image will pan, but it won’t get all the way across. With the play head on the end of the timeline, hit the v key to select the arrow selection tool and now drag the image, within the square canvas, all the way to the other side to the position you want to end in.
Next we add keyframes! All you have to do is click the little down arrow on the left of the filename in the video timeline. This will automatically place a keyframe at the beginning of the video and one at the end! For a simple A to B pan, that’s all we need! Now you’ll see that when you drag the playhead, this time it pans right across the whole image. Drag the head to the beginning and hit the play button to see your video!
Optional bonus step: If you would like your video to pause for a second at the end of the pan, we need to drag the ending keyframe to the left a little on the timeline. This keyframe defines the end of our pan, so wherever you place it will effect both the speed of the pan and the amount of time the image pauses at the end of the video.
Step 7 – Export video file

In the bottom left of the Timeline window is a small arrow which you can click to export your video file. The actual file you are working on should be saved as a Photoshop PSD file just as you normally would, but we need to export the video to a video file format. When you click the arrow, the export dialog will appear and you have have control over the size, frame-rate, video type, code and quality. I’d recommend using H.264 and 30 frames per second. In terms of quality, I think low works just fine for our purposes, but you might want to run all three and look at them side-by-side to see how you feel about it.
Step 8 – Transfer to phone
Ok this last step I can really leave up to you guys since there is a million ways to do it. I’m an Apple guy myself so I use AirDrop to send the file to my phone. Simply right click on the file in the Finder window and select Share->AirDrop. Click on my name and the file gets pushed straight to my iPhone. After that, share it on Instagram and use the hashtag #ShutterMusePano !

Example
This is the first pano that I tried with this technique, a shot of Hong Kong at night, from Victoria Peak. A few people have commented that it moves too fast, though the problem is the 15 second time limit on Instagram photos. This was a particularly wide pano, about 4:1 I think. If you used a 3:1 panorama then I think the speed would be a bit more suitable.


I have tried a similar thing (using Adobe Premiere or more simply the animate feature in PowerPoint and export to video) on my IG acct, I call it #panoslide.
Nice Jonathan! Thanks for sharing.
I love it, written instructions are straightforward, direct and accurate. well done and just what I wanted.
Thanks! Glad you found it useful.
Hi Dan Carr, thanks for sharing. do you know how to turn the photo taken by Ricoh Theta into instagram video? like this one which it shows 360 photo in video. https://scontent-kul1-1.cdninstagram.com/t50.2886-16/13347437_1730359753877743_501526561_n.mp4
There’s no reason why you can’t just open the 360 photo from the Theta in Photoshop and just follow the guidelines in this tutorial.
I tried. it turn out just like Panorama video instead. unlike the one i posted URL 360 video. Didnt understand which step i shd edit from Panorama to 360 view? Thanks for your reply. Appreciated your help.
The more I think about it, the more I think maybe it’s not possible as Photoshop can’t do a spherical projection. The way I would do it is to play the Theta 360 video spinning thing in the app and record the screen using other software. I don’t know if there is a Theta desktop app, but if there isn’t you can plug your phone into your computer to mirror the screen on your computer and then use a simple screen recording app to record the video. Then send that video back to your phone and upload to Instagram.
Yeah ive been trying. hopefully i can figure it out. thanks for ya replied. 🙂
No problem. Let us know if you figure it out!
HI Dan,
I was wondering if you have a simple solution for adding a 1-2 second still frame of the complete pano in it’s smaller humble glory, surrounding by white in a square, both at the beginning and the end of the video panning sequence. I understand that the pan length would need to be reduced to say 10 or 11 seconds. Do you know if this is possible, to essentially bookend the video pan with the full image itself?
Than
Figured it out.
THanks anyway
Glad you got it sorted!
This is a great post. Do you have any tips on how to do that same thing using Photoshop CS4 Extended?
Sorry, it has been years since I used such an old version. No way to figure that out I’m afraid.
I can’t seem to figure out the time… The numbers standing in the timeline are clearly not seconds, but what are they? And how can I set the right amount of seconds?
Okay, I can see now that in you example there are actually standing seconds. My timeline starts with 00, 15f, 1:00f, 15f, 2:00f, but those are not seconds. Any idea how I can change that?
00 is zero seconds. 15f is 15 frames so if you timeline is set to 30fps then 15f is half a second. Then next you get 1:00f which stands for 1 second. Then the next thing again is 15f which is just showing you 15f past the 1 second mark. 2:00f is 2 seconds.
Hey Dan, I tried this but Photoshop (CC) freezes as soon as I click the export button. According to one thread I found, Photoshop will always do this if you try to export animated frames with no actual video content. How does it work for you?
It should be noted that I added .WAV audio files to my timeline.
I’m afraid I have no idea, but it works fine for me. if you have a legitimate copy of Photoshop then you are entitled to their support services so I would start a ticket with them. Sorry I can’t be more help!
Great tutorial. Was looking all over on how to do this and couldn’t find anything. But finding those little icons and knowing to use a smart object is just not intuitive at all. Thanks a bunch.
Great tutorial, thanks. I works just fine and dandy, hit play button at the end, and all looks fine. Unable to export, though, have tried waiting for up to 30 min, Photoshop still active, but no export. Any idea?
No idea I’m afraid 🙁
Hello Dan, a really useful insertional about making Panos into videos. Can you direct me to some more instructional videos about using still images and Photoshop’s timeline? I’m interested to know the principles used so I can learn a bit more.
Thank you
Hugh
I’m sorry, I don’t currently have any more videos on this topic myself. Your best bet is just to search on YouTube.