When thinking about the camera settings that affect the look of an image, most people naturally think of aperture, shutter speed and ISO. These three things affect the exposure of our image, but there is one more setting that’s often overlooked; white balance.
What Is White Balance?
White balance often flies under the radar because it doesn’t affect the exposure of the photo, but it does affect the colour accuracy and can make a dramatic difference to your final photo. If you’ve ever taken a photo of someone indoors and thought that their skin looks a bit orange, then you’ve come across the effects of an incorrect white balance.
Our job as photographers is to recreate a scene as accurately as possible using both light and colour. The three pillars of the exposure triangle take care of the light, and white balance takes care of the colour. Of course both light and colour can be edited with software to some extent, but we should always strive to capture it accurately in the first place.
All light sources have a slightly different colour temperature, either warm or cool, and this colour causes a cast on our images. White balance neutralizes this colour cast by effectively telling the camera which objects in an image should have a neutral grey/white colour and from this, a shift can be applied that will correct all the other colours in an image relatively, so that the colour of the light doesn’t effect the look of the photo. The human brain, complex as it is, corrects for colour casts on the fly so it’s not something we’re used to seeing in real life.
White balance is measured in Kelvin (K) and all digital cameras are capable of setting the white balance automatically by analyzing the image and estimating which object in it should be white. The tricky thing is that as soon as light is bounced off an object, it picks up a slightly different cast dependant on the colour of that object. Fire a flash against a green wall for example, and the reflected light off the wall will bounce back with a slightly green tint. The result is that any one scene in front of your camera is unlikely to contain light of only a single colour temperature because light will reflect, to some extent, off anything apart from pure black. Cameras do a pretty good job these days of guessing a good average, but occasionally they can get tripped up in complex situations and this is where you might see someone with overly orange skin as we mentioned earlier.
Do You Know What Your White Balance Is?

White balance is an important piece of the image capture puzzle so settings are prominently displayed on all cameras. Refer to your camera’s manual for the exact position, but the example above shows Canon’s typical placement on their DSLRs. If you are using a point-and-shoot camera, pressing the Info or Display button several times will cycle through the available on screen controls around the image on the LCD screen and white balance will be shown there. All cameras have automatic white balance modes which many people find are sufficiently accurate for their needs. If you want to take more control over the image though, there will be a selection of presets available that are defined by industry standard icons (shown below).
Your Camera’s White Balance Presets
Generally speaking, these are the white balance presets that will be available in your camera. A ‘Custom White Balance’ is when you take a photo of a neutral grey/white surface with your camera and then use that image as the basis for defining the while balance of your scene. It can be very handy in difficult lighting situations with strongly mixed colour temperatures, or when critical colour matching is required for fashion and product photography.

- AWB – Automatic white balance mode will deliver the camera’s best guess at the average while balance of the scene. In outdoor situations, cameras these days do a very good job at this and the vast majority of people will never take their camera out of auto mode. (Not you though right? You seem like the adventurous type!)
- Daylight – On a sunny day outside, 5600K is what daylight is said to correspond to. You might sometimes see lightbulbs that say they are 5600k and this means they are balanced to look like daylight.
- Shadow – Light cools down a lot in the shadows so a very warm 7000-7500k is needed to counteract this.
- Cloudy – A little warmer than daylight, it’s not quite a shadow as a lot of diffused daylight will still pierce the clouds.
- Tungsten – This is the most common setting for shooting indoors with regular bulb lighting (tungsten lights).
- Fluorescent – These kind of bulbs are often found in sports stadiums and they are a cooler temperature than tungsten lights.
- Flash – Flash temperatures are quite similar to daylight.
- Custom – Shoot a test shot and force your camera to meter its WB setting from the test shot. See your camera’s manual.
- User – This allows the selection of any Kelvin temperature of light. Handy for extremely tough lighting with multiple sources, or for special effects. Not all cameras have this option.

The RAW Advantage
The way in which you deal with white balance should differer depending on whether you are shooting in RAW or JPEG. RAW shooting delivers a massive advantage over JPEG when it comes to white balance settings because it allows you to choose a white balance after you have taken the photo, and with no loss of image quality whatsoever!
Why is this? You might ask.
A RAW files contains all of the colour data from the camera’s sensor at the time of image capture. We have not yet baked our colour conversion into the file, that’s what we do with RAW converters like Adobe Lightroom. Choosing a white balance is similar to applying a filter preset in your RAW converter, we still have all of the original data that we can revert back to. With a JPEG though, the conversion is done in the camera and then the un-used colour data is discarded when the compressed file is saved. Software can approximate colour temperature changes to JPEGs, but if colour data has been discarded, it can never be accurately regenerated so large white balance changes to JPEGs do not produce good results. With RAW files though, there is absolutely no negative effect of changing the temperature after you have shot the image. In fact for this reason, I know a lot of photographers who deliberately leave the white balancing process until after the shoot so that they have one less thing to manage in the field. Whether this is a technique that works for you will depend on your subject but I often leave my camera in auto white balance mode and adjust in Lightroom when necessary. Shots can be easily adjusted in bulk so all images from a particular shoot can be adjusted in a few seconds.
When shooting RAW, you’ll see white balance sliders in your RAW converter that allow you to select the colour temperature, or one of the presets that we saw earlier in the article. If you try to adjust the white balance of a JPEG image though, you’ll find a simpler interface that allows you to warm up or cool down the image using relative values. Definitive kelvin temperatures are not possible one the conversion to JPEG has taken place since your RAW converter has no way to back-track to the original data without knowing exactly how the RAW to JPEG conversion was done in-camera.
You might be thinking that this is a big advantage for shooting RAW images and you’d be right! Many people would count this as one of the main reasons for shooting RAW over JPEG, myself included. In those critical times when shooting JPEG makes more sense, usually from a workflow perspective like at a sporting event, careful manual selection of the white balance is necessary. Sporting events in stadiums and sports halls can have a particularly tricky mix of lighting temperatures and it’s important to make sure that all your photos from one event have the same look to them.
Video Shooting
If you are shooting video with your DSLR then it is absolutely critical to capture accurate colour temperature because (at least at the time of writing this) there are no DSLRs that capture RAW video. In fact the video data captured by DSLRs is even much less than a JPEG and this means there is next to no latitude in the correction that can be made to colour temperatures of DSLR video in post production. Get it right in camera with a custom white balance, or careful selection of one of the presets, or you could be in for a nasty shock.

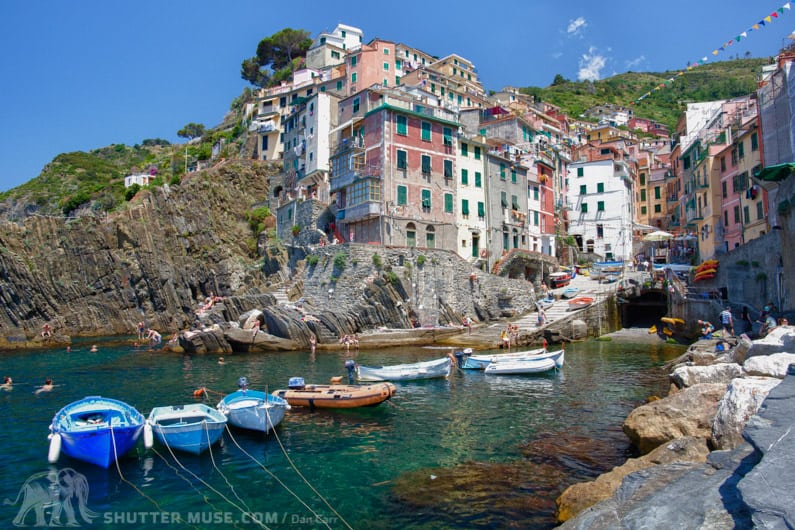
WB:6000K in Revelstoke, BC, Canada
Mixed Lighting
As I mentioned in the very first section of this article, it’s rare, if not impossible, to have a single colour temperature in an image because the moment your light source bounces off something, its colour is changed. Sometimes things get even more extreme though when you have several very distinct original light sources. Since we can only set white balance to one setting, we have to choose the one that best approximates what we saw with our own eyes. Take the photos below as an example. This was taken at the famous Fairmont Banff Springs hotel in Banff, Canada. This beautiful Christmas dining hall is a single exposure that was taken in the late afternoon. The windows to the left of the scene are streaming in diffused daylight, the chandeliers above the tables in the centre of the hall have tungsten bulbs in them and the lights in the hallway at the back of the scene have another tungsten bulb type that’s throwing out an even warmer colour temperature.
Lesson #1 here is that not all bulbs are built the same. You can clearly see a huge disparity between the two types of tungsten lighting so this doesn’t always mean the tungsten preset in your camera will be right.
The camera actually did a pretty good job here by selecting 3300K. I think you’ll agree that it’s a good average of the scene, though the lights in the background are still pretty warm. The 2000K setting does neutralize the tungsten lights but the cool daylight from the windows gets cooled down even further and turns the floor a terrible shade of blue. Heightened blues like this look very unnatural and should be avoided at all costs. If you have an extremely mixed situation, it’s generally better to go a bit warmer on the colour because up to a certain point, this can just add to the warm mood of the image and make it feel cozy. I would maybe warm this image up a touch to 3500k because I do think it suits a cozy Christmas feel.
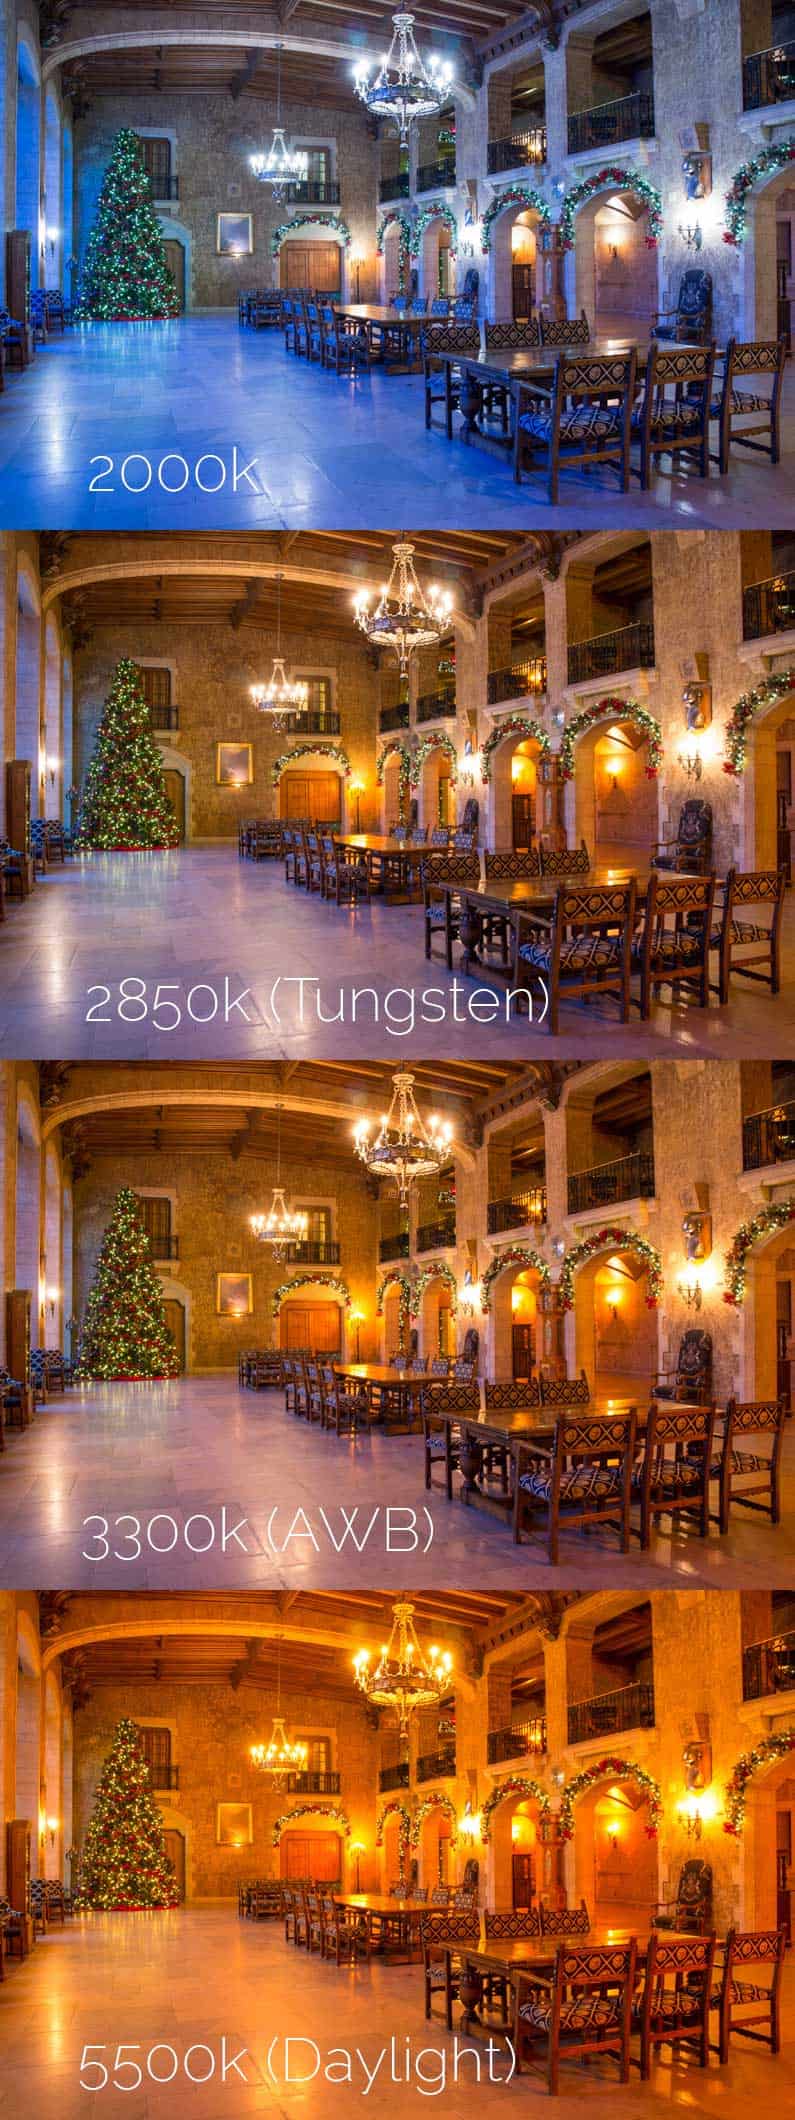
Fairmont Banff Spring Hotel, Banff, Canada
Useful Tools
If you are set on capturing the most accurate white balance at the time of shooting then there’s a few simple tools out there that can help you. My favourite one is the ExpoDisc 2.0. It looks like a fancy lens cap with a bunch of tiny prisms on it. Before your shoot you simply place it over the lens and take a shot. Then use that shot to set your custom white balance. Of course you could also use a simple grey card, but the prisms on the ExpoDisc bring in light from many different directions and this helps to give a more accurate average from a scene with a lot of mixed lighting sources and reflections.
The second tool that I recommend taking a look at is the Datacolor Spyder Cube. This little plastic cube is used to create a reference shot for processing your images later in a RAW converter. Simply take a shot of the Spyder Cube in your location and then you have black, white and grey references to use with the tools in your RAW converter.
The main difference between the two tools is that the ExpoDisc works much better if you are shooting JPEG because it ensures that you capture accurate colours in-camera. The Spyder Cube would be pretty pointless if you are shooting JPEG, but it can speed up your post-production workflow if you are someone that prefers to set white balance in a RAW converter after the shoot.
You May Also Like
- Understanding Aperture
- Understanding Shutter Speed
- Understanding ISO
- Understanding The Exposure Triangle
Pin This Post!