Sony Alpha mirrorless cameras are among the most complex and customizable on the market. When you first unbox that new camera and dive into the menu system, it can seem like a daunting task. Pages and pages of sub-menus await you, and sadly the built-in help function is almost useless. The result is that many people don’t extract the most out of their Sony cameras. Critical options to help you create better, sharper images often go completely unused.
Well, buckle up! That is about to change. The purpose of this guide to help you unlock the hidden potential in your camera. I’m going to walk through all of the ways that you can customize the function of your Sony Alpha mirrorless camera, and in the end, you will have a better, more responsive tool in your hands.
Author’s Note
Due to the complexities of Sony’s cameras, this is an unusually long tutorial. If you’re just sitting down with your morning coffee, looking for a quick article, this isn’t the one for you today. Even if you do have plenty of time to spare, I recommend that you bookmark this page, or save it to your Read Later service for future reference.
Table of Contents
Versions of Sony Camera Menus
Sony’s camera menus have changed dramatically over the years. In this guide, I will attempt to keep things relevant to all of Sony’s Alpha mirrorless cameras by including screenshots and information about both current and old versions of the menu systems. To do this efficiently, I need to give names to the different menu systems so that you know which ones I’m talking about.
Old Menu System
If your Sony camera menus look like this, I will be referring to it as the Old Menu System. Cameras that use this menu system include:
- Full Frame
- a7, a7 II, a7 III
- a7R II, a7R III, a7R IV
- a7S, a7S II
- a7C
- a9, a9 II
- APS-C
- a5000, a5100
- a6000, a6100, a6300, a6400, a6500, a6600
New Menu System

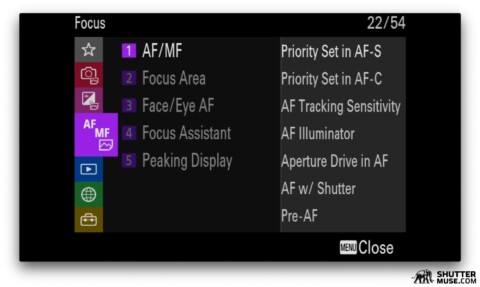
If your Sony camera menus look like this, with the tabs on the left, I will be referring to it as the New Menu System. This new menu was first introduced with the a7S III in late 2020 and subsequently used on all Alpha cameras after that point, apart from the a7C. It is a huge improvement over the Old Menu System, with menu item location being far more logical. Cameras that use this menu system include:
- Full Frame
- Sony a7S III
- Sony a1
- Sony FX3
- Any other Alpha camera launched in or after 2021
A Note About Sony NEX Menus and the a3000
This guide is designed to show you how to customize Sony Alpha Mirrorless cameras. The extremely old menu system of the Sony NEX system is not included. Technically the Sony a3000 (launched in 2013) was the first Sony mirrorless camera to have its model name prepended by the “a” for Alpha. This camera was something of an outlier, though. It was the only “aCamera” to use the old NEX menu system, and as such, will not be covered in the guide. I’m sure you don’t care… nobody used that camera anyway!
Sony Menu Settings Vs. Sony Camera Customization
When you get a new camera and switch it on for the first time, the way I see it, there are two distinct tasks ahead of you. At first, this might not be obvious, but let me explain the differences and then I am sure you will agree.
Changing the Menu Settings
The first task is to run through the pages in the menu system and change the Menu Settings to your liking. For clarity in this guide, I think of menu settings as changing something that adjusts the internal function of the camera. For example, setting the camera to shoot either RAW or JPEG. Or perhaps choosing the ISO range for the Auto ISO function.
Usually, these sorts of settings are characterized by a limited set of options that are clearly displayed on the screen once the setting is selected in the menu. To stick with the example of Image Quality Settings, when you open this in the menu, you are presented with a clear choice between JPEG, RAW and JPEG+RAW.
These are what I define as Menu Settings, and through my workshop teachings, I have seen that most new camera owners will at least take a stab at understanding some of the menu settings. Perhaps 25% of people will even take to Google to try and understand some of the less common, usually brand-specific menu settings such as Sony’s Dynamic Range Optimizer function. A diminishingly smaller number of people will even look in the manual!
Customized Camera Controls
After running through your Menu Settings, the next task should always be to customize the camera controls. Again, for clarity in this guide, I define this as adjusting the function of physical camera controls. While this customization is usually set up initially within the camera menu, using specific Menu Settings, the feature must be predominantly activated by the photographer using a physical control.
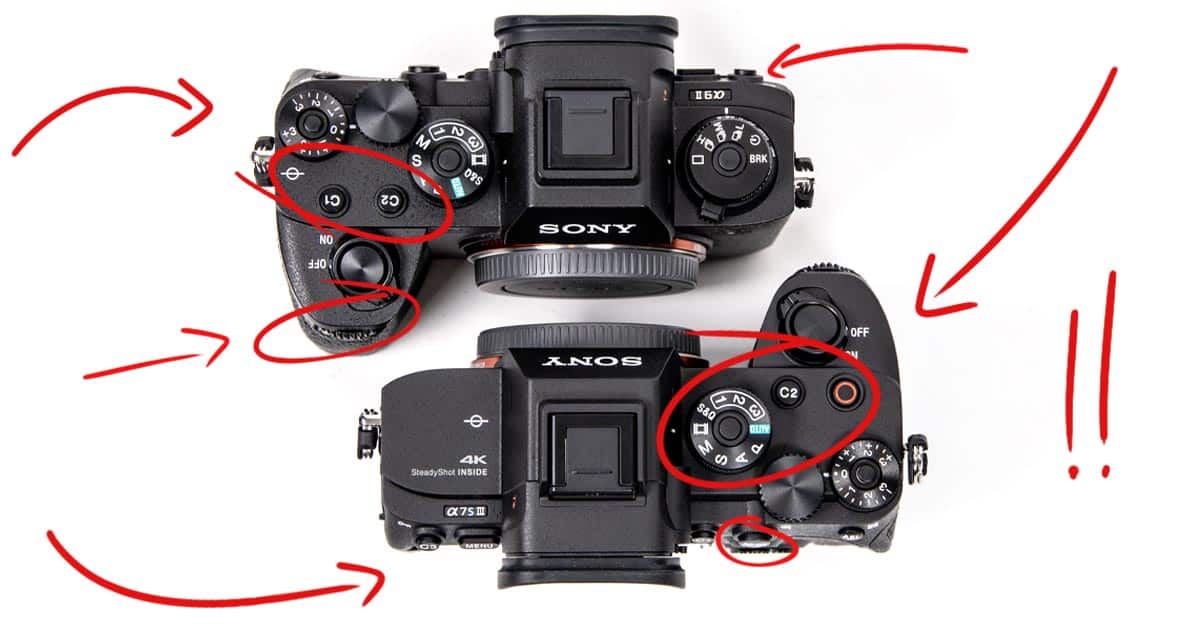
In its simplest form, a good example of a Customized Camera Control would be setting up a few custom buttons. Maybe you set the C1 custom button so that it cycles sequentially through your available autofocus modes. Or perhaps you set the C2 button so that it turns the exposure zebra function on and off. These Custom Key Settings, as Sony calls them, are an example of a Customized Camera Control.
Many people do indeed attempt to set up a few Custom Key Settings, but usually, it is limited to cycling through a function’s options or turning one on and off. Did you know that you can actually assign an entire shooting setup to the momentary push of a button? Using it to instantly switch exposure modes, autofocus settings, aperture and shutter speed? We will, of course, be covering such things later on in this guide.
How to Customize All Sony Mirrorless Cameras
In the previous section, I defined the difference between the two distinct stages of setting up a new camera. We have Menu Settings, which define the specific internal functions of a camera while you are using it. And we have Customizable Camera Controls, where a specific function or group of functions is assigned to a physical control that must first be activated by the photographer.
In this guide, we are going to be concentrating on Customizable Camera Controls. Of course, there are merits to better understanding the entirety of your camera’s Menu Settings, too. For this guide, though, I’m focussing on the control customization of your Sony camera because I feel it is the more overlooked and least understood topic.
Customization Hierarchy
In this guide we are going to explore 8 different camera customization options. These include various custom button setups, custom menus and complete camera setups that can be recalled whenever you need them. With so many options, though, how do you know which one to use for which function? That’s where my personal Sony camera customization hierarchy comes in. So let’s first take a look at the custom functions, and how they should be used.
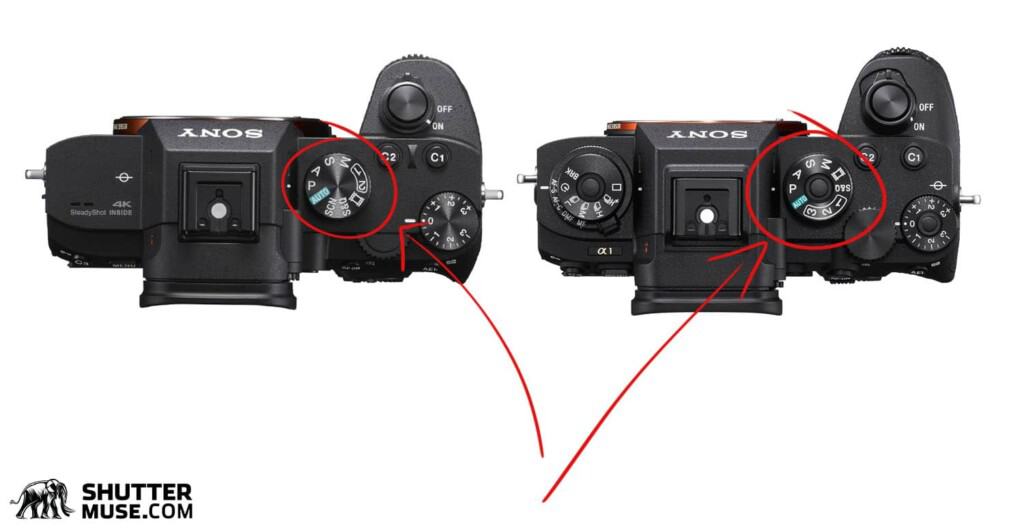
My Menu
The custom My Menu should generally be used for access to functions you need at the beginning of every shoot. These are functions that get you prepared for the type of photography you are about to do.
Example: Format memory cards or Interval Shoot Function if you are about to create a time lapse.
Function Menu
The Function Menu should provide access to camera settings that often need to be changed during a shoot, but not while actively shooting.
Example: Grid Lines on/off, Pixel Shift Multi Shoot, Eye AF on/off.
Custom Keys
Your Custom Keys should be used for functions that you need to control while looking through the viewfinder. These are usually split-second decisions that have to be rapidly adjusted. But they can also be used for enabling or disabling tools that help you accurately make those split-second decisions without having to take your eye off the viewfinder.
Example: ISO control, Focus Area Select, Zebra Display on/off, Exposure Compensation.
AF Area Registration
The AF Area Registration function, with a corresponding Custom Key to recall it, should be used when you want to quickly and temporarily switch to a pre-programmed autofocus area. It should usually be used as a backup to switch from a more precise AF Area to a wider AF Area when your subject suddenly gets much closer or more erratic.
Example: You are photographing an approaching lion from a safari vehicle with a super-telephoto lens. At a distance, a medium Spot AF frame is perfect, and you can accurately place it on the lion’s head and keep the framing perfect. At a point, as the lion gets closer, it fills more of the frame and now its eyes are falling outside of your medium Spot AF frame. The lion’s increase in relative size within the frame speeds up as it gets closer, and you realize that now the best thing would be to quickly switch to a Wide AF frame and let the camera’s Animal Eye AF do the work.
My Dial
Be careful with this one. If over-used, it can produce confusion during fast-paced shooting. I recommend that it is only used when you need to change the function of the camera dials for a long period within a shooting day or to change the dial function between video and stills shooting mode.
Most photographers develop muscle memory for the use of the front and rear camera dials, instinctively knowing that one will change aperture and one will change the shutter speed. If the My Dial function is used to constantly switch the function of the camera dials over and over throughout the day, you will lose that memory, and it could cause a mistake at a critical moment.
Example: As a sports photographer you have installed a remote controlled camera in a position that makes it hard to access the front of your camera with your hand. A custom My Dial setup can be used to switch your usual front dial function to the control wheel on the back of the camera for the day.
Memory Recall/Mode Dial
Memory Recall slots should be used when you photograph several distinctly different types of photos during a single shoot on a single day. The ones you use most often should be assigned to available slots on the camera’s Mode Dial as these are much faster to implement than ones stored on the memory card and accessed through the menu.
Example 1: As a wedding photographer you might have a dedicated “Church” low-light setup that uses different noise reduction settings, different autofocus priorities and different drive mode settings to ensure completely silent shooting during a ceremony in a church.
Example 2: A sporting event photographer is going to spend much of the day switching back and forth between fast action and athlete portraiture. Dedicated slots in the memory, assigned to two modes on the mode dial could be used to instantly switch the camera back and forth between perfect setups for these types of images.
Registered Shoot Set
A Registered Shoot Set and a Custom Key to recall it, should be used when you have a set of exposure and autofocus settings that need to be recalled temporarily during a shoot while your eye is up to the viewfinder.
I have underlined the point about temporary use while your eye is up to the viewfinder because this is what distinguishes this from using the Memory Recall function. Registered Shoot Set is instant and temporary. Memory Recall does a similar thing, but is used when you know that you are about to need it, and potentially need it for a prolonged period.
Example: You are photographing a static bird on a perch using a slower shutter speed and a low ISO. You know that at some point, the bird will “blast off” and suddenly fly fast and erratically away from its perch. This almost-instant moment requires a completely different shutter speed, and thus a different ISO, as well as a different, broader autofocus area. Recalling a Registered Shoot Set with a Custom Key hold can achieve this.
Save/Load
The Save/Load function should be used when you get another camera that is the same model as your existing camera, and you want to set it up identically.
Example: Renting a second camera, buying a second camera or borrowing a camera from an agency gear pool.
Setting Up the 8 Sony Camera Customizations
In this section I will explain all of the available customization options, how to enable them and what settings you should use to get started.
Camera customization for your Sony mirrorless camera can be split into 8 different categories. This is the same for all Sony mirrorless cameras, although the depth of customization that is available within each category varies slightly by model.
In general, the base a7 models and the APS-C models share the same level of customization, with the higher-end a7S, a7R, a9 and a1 models all sharing a slightly deeper level of customization in each category. For example, the Sony a6600 and the a7 III have two custom mode dial options [1, 2], where the a7R IV, a9 II and a1 cameras have 3, [1, 2, 3].
While these small differences do exist, I find that even the low-end Sony cameras offer more customization than the pro-grade Canon DSLRs I used for over a decade before I switched to Sony. All Alpha cameras have a remarkable level of customization, which is both why this guide is necessary, and also why it is rather long!
1 – Custom My Menu
The custom My Menu function allows you to group your most-used features into a series of custom menu tabs. The order of items in these tabs can be re-arranged, and multiple tabs can be created. This allows you to create tabs that contain specific functions for different tasks or types of shooting. For example, you might create a tab that has everything you need for shooting time-lapses, and another tab that had everything you need for shooting movies. Once correctly configured, as we will do later on in this guide, your Custom Menu can be called up at the press of a button.
How to Enable My Menus
Old Menus
Create My Menu
- MENU → (My Menu) → [Add Item].
- Select an item that you want to add to (My Menu) using the control wheel.
- Select item location within (My Menu) using the control wheel.
- Later, you can sort the order of (My Menu) items using MENU → (My Menu) → [My Menu Setting] → [Sort Item].
Set My Menu as Default (Recommended)
Turning this on will display your My Menu when you press the MENU button, instead of showing the Camera Settings page.
- MENU → (My Menu) → [Display From My Menu] → [ON].
NOTE: It appears as though this option was first added to the a7R IV. This means that the only Sony cameras with the Old Menu system that have this “Display From My Menu” option are the a7R IV, the a7C and the a9 II.
New Menus
Create My Menu
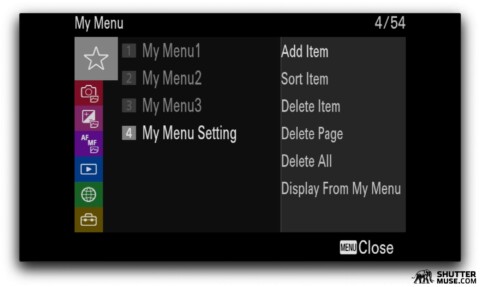
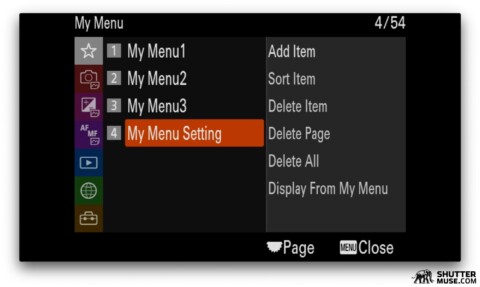
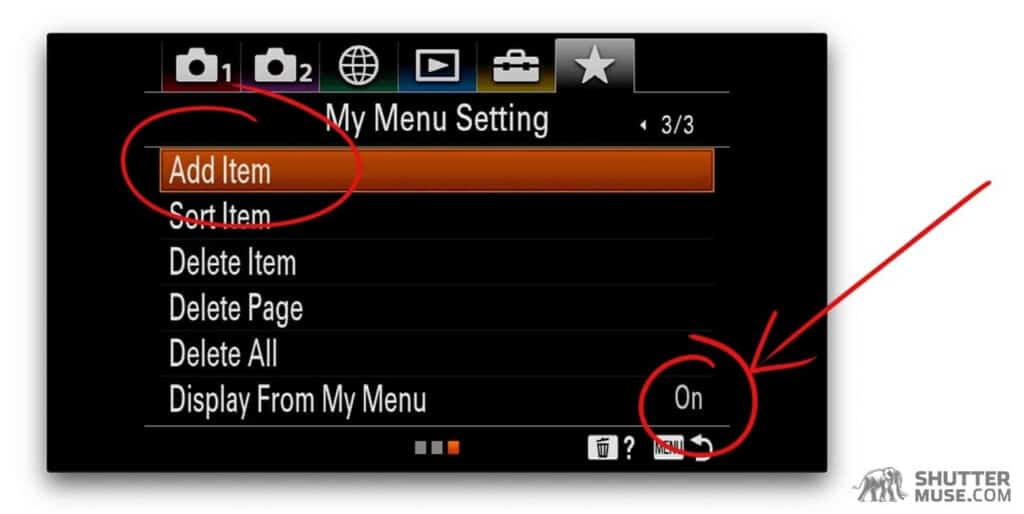
- MENU → (My Menu) → [My Menu Setting] → [Add Item].
- Select an item that you want to add to (My Menu) using the control wheel.
- Select item location within (My Menu) using the control wheel.
- Later, you can sort the order of (My Menu) items using MENU → (My Menu) → [My Menu Setting] → [Sort Item].
Set My Menu as Default (Recommended)

Turning this on will display your My Menu when you press the MENU button, instead of showing the Camera Settings page.
- MENU → (My Menu) → [My Menu Setting] → [Display From My Menu] → [ON]
Recommended My Menu Setup
After much trial and error, I have arrived at a set of custom My Menu setups that I think will be almost universally useful. Even if your photographic needs are not identical to mine, these setups will act as an excellent starting point that you can build from, add to or shuffle around.
Remember, the custom My Menus should be used to access menu items that are only needed at the beginning of your day or the beginning of your shoot. They are only the first part of the Sony camera customization hierarchy. If you look at the menus below and think “I would have included such and such a function in my My Menu”, there’s a very good chance that I have simply included it in the customized Function (Fn) menu, or as a function assigned to a custom button instead. Before you pass judgement on my menu recommendations, make sure you read through the rest of the recommendations. They are all intended to work together.
I wish that Sony offered the ability to name the menu tabs, but they don’t, so we are stuck with numerical designations. The first two menus should be added to everyone’s cameras. The additional menus are specific to different types of photography, and should only be added if you think you will be doing a significant amount of that type of photography.
Note: Sony allows you to add the same menu item to multiple menu tabs. If your My Menus are just a scattering of unorganized functions spread across multiple tabs, there would be no point to this. If you have created tabs that service specific types of photography, acting almost like a pre-flight checklist, you might find it useful to occasionally re-use the same function.
My Menu 1 – Everyone

This My Menu setup is my default starting point for all cameras. Creating your My Menu should not be about trying to jam as many functions as possible into each page. Keep it simple, and split things up into logical chunks.
Of course, at the top is the card format option which I run before each new shoot. This is followed by Image Quality where I choose RAW or RAW+JPEG and RAW compression settings. Then we have Rec. Media Settings where I choose which files are recorded to which memory cards. Usually, I make a copy of all files to both cards, but sometimes I will shoot photos to one card and videos to the other. This option will not be relevant for those using a camera that only has a single card slot.
In the middle, I have the Bluetooth Remote Control option. The Sony RMTP1BT remote control is excellent. I find myself using it all the time. But the downside is that you have to enable the Bluetooth function every time you want to use it. If you leave Bluetooth on continuously, it drains the camera battery faster. Having this option in the My Menu is the best way to handle this annoyance as I can simply choose whether to enable it at the beginning of each shoot and usually its presence reminds me to turn it off at the end, too.
Then we have the AF w/Shutter option which basically disables back button focus by allowing the shutter button to activate focus. While I use back button focus 90% of the time, there are some moments when it is easier to turn it off, for example when shooting at an awkward angle where you don’t have a perfect view of the LCD screen or viewfinder.
My Menu 2 – Everyone

This My Menu setup gives you the basics you need to start a video shoot with your camera.
My Menu 3 – Landscape Photographers

For landscape photographers, this My Menu gives you quick access to exposure bracket settings, interval shooting for time-lapse work and high-resolution Pixel Shift mode for those cameras that have it. I also include the White Balance option in there. Although I shoot RAW, which allows me to adjust the white balance in post, sometimes it’s good to experiment with warmer and cooler tones in-camera as it can put me in a different frame of mind and alter my composition of a scene.
My Menu 4 – Wildlife Photographers
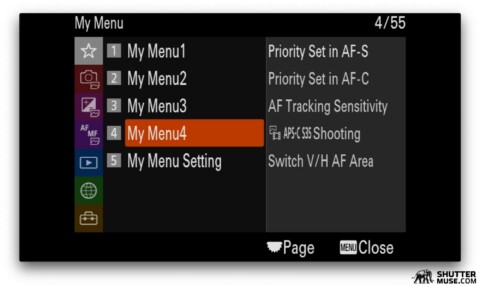
Wildlife photographers will find these autofocus settings useful to have to hand in a custom My Menu. I also include APS-C crop mode in this menu, which can be useful when simulating a longer reach with a telephoto lens when working with higher resolution Alpha cameras.
My Menu 5 – Sports Photographers
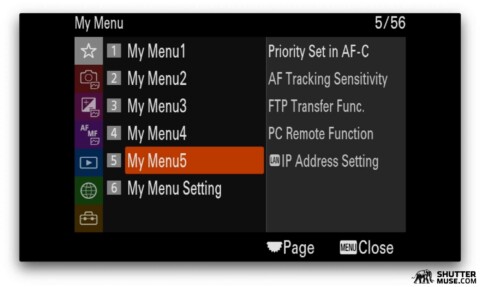
Autofocus set and networking options are the main things to set up for wire agency sports photographers. Unfortunately, while the top-end cameras such as the a9 series and a1 series do feature in-depth IPTC metadata functions, you cannot add these to the My Menu. I have no idea why.
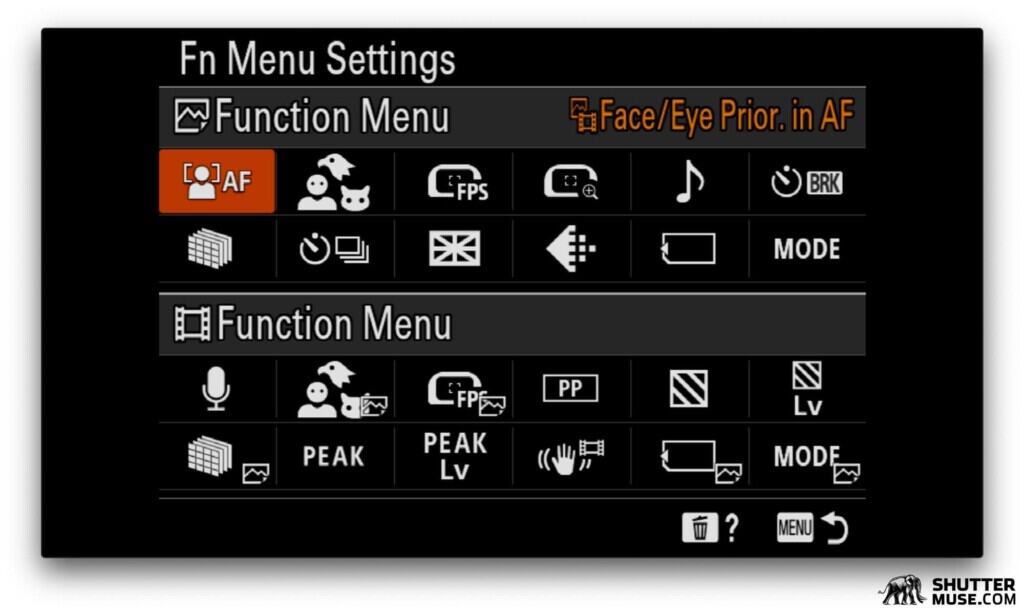
2 – Function Menu (Fn)
Pressing the (Fn) button on the back of the camera pulls up a quick-access menu containing 12 customizable functions. An additional setting allows you to create two separately customized Function Menus. One that is displayed during stills shooting, and another that is displayed in movie mode.
How to Enable Custom Function Menus
Old Menus
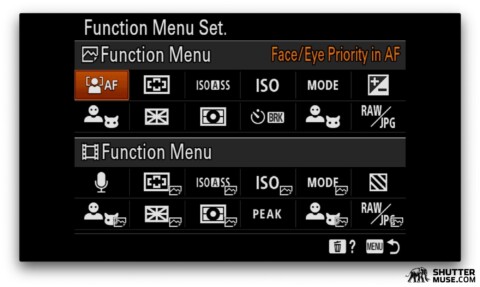

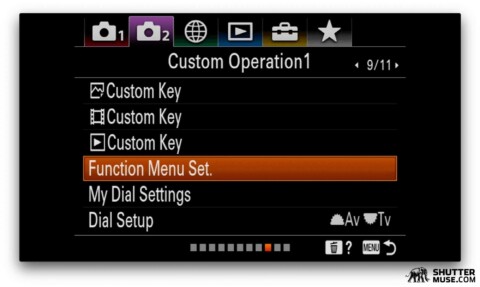
- MENU → (Camera Settings2) → [Function Menu Set.].
- Choose to edit either [Video] or [Photo] Function Menu.
- Use the Control Wheel to select the function you wish to change. Press the centre button to confirm.
- Use left/right to choose the function group page, then up/down to select the desired replacement function. Press the centre button to confirm.
New Menus
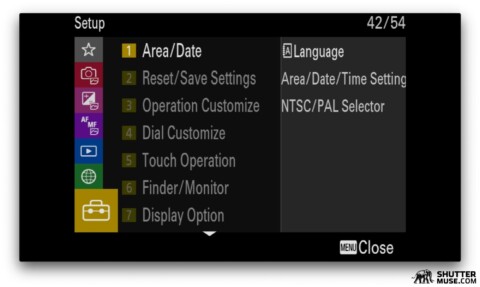
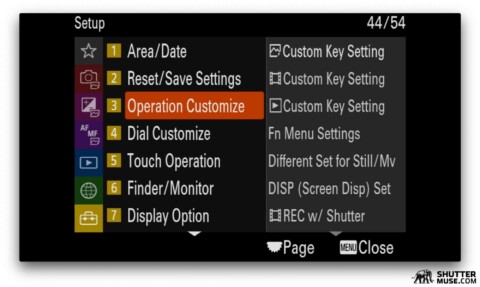
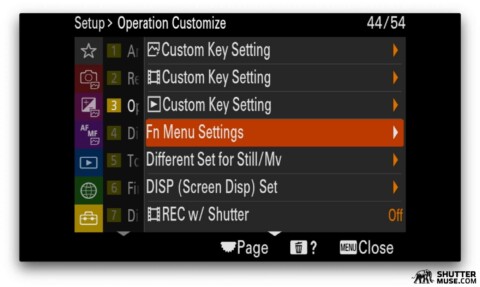
- MENU → (Setup) → [Operation Customize] →[Fn Menu Settings]
- Choose to edit either [Video] or [Photo] Function Menu.
- Use the Control Wheel to select the function you wish to change. Press the centre button to confirm.
- Use left/right to choose the function group page, then up/down to select the desired replacement function. Press the centre button to confirm.
Recommended Function Menu Setup
As we saw earlier when I explained how to customize the Function Menu, this (Fn) button on the back of the camera gives you quick access to 12 different items from the camera menu. Sony allows you to create two Function Menus. One will be active when the cameras in Movie Mode and S&Q Mode, the other will be active in all of the still photo modes.
Unlike the My Menu setup that allows you to keep creating additional tabs for different types of photography, the Function Menu is limited to the photo and video Function Menus. For this reason, most people’s best solution is to apply a universally useful set of options to this menu. The exception to this rule would be if you are a highly specialized photographer that only shoots something like sports photography, and nothing else – ever. But this isn’t most people.
Function Menu (Still Photos)
- Slot 1 – Face/Eye Detect
- Slot 2 – AF Tracking Sensitivity
- Slot 3 – Face Priority in Multi Metering
- Slot 4 – Touch Operation
- Slot 5 – Drive Mode*
- Slot 6 – Interval Shooting
- Slot 7 – Metering Mode
- Slot 8 – Silent Mode
- Slot 9 – Grid Lines
- Slot 10 – Image Quality
- Slot 11 – Self Timer During Bracket
- Slot 12 – Pixel Shift Multi Shoot
*Drive Mode might seem like a redundant feature to put in this menu if you have a Sony a1 or a9 series that has a physical drive mode dial. However, this function is still useful because when selected via the Function Menu, and set to Bracket shooting mode, you can use the camera dial to scroll left and right through the various +- ev bracketing options. Something which you cannot do when simply selecting Bracket (BRK) mode from the physical mode dial. This will be particularly useful for landscape photographers who want to bracket exposures for high dynamic range images.
When this specific Function Menu setup is used in combination with my recommended My Menu setup and Custom Keys, you are well on your way to the perfect Sony mirrorless camera setup!
Function Menu (Video)
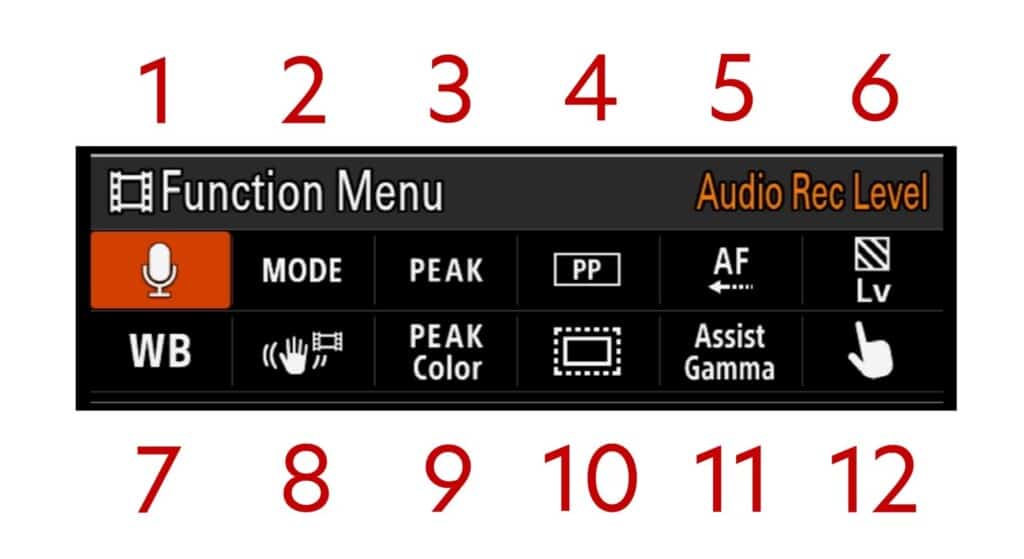
- Slot 1 – Audio Rec Level
- Slot 2 – Shooting Mode
- Slot 3 – Peaking Display
- Slot 4 – Picture Profile
- Slot 5 – AF Transition Speed
- Slot 6 – Zebra Level
- Slot 7 – White Balance
- Slot 8 – Steadyshot Mode
- Slot 9 – Peaking Colour
- Slot 10 – APS-C/S35 Mode
- Slot 11 – Gamma Display Assist
- Slot 12 – Touch Operation
A few functions on here are particularly noteworthy. Shooting Mode in slot 2 is necessary because otherwise you have to delve into the main menu to choose between manual, aperture priority or shutter priority once in video mode. Gamma Display Assist is useful for giving a normal looking picture while you are shooting in S-Log mode. Touch Operation is useful as it allows you to tap the screen to pull focus between different objects in the frame, and AF Transition Speed controls how fast that focus pull will be.
Sony didn’t get everything right with their camera setup options, but one thing they did perfectly is to allow you this dedicated Function Menu for the video modes. As you can see, the best video settings for Sony cameras are quite a lot different to the still photo Function Menu settings. It’s great that we can separate the two!
3 – Custom Key Settings
Sony refers to these as keys, but I will almost always refer to them as buttons, as I’m sure many of you do. The function of nearly every button on a Sony mirrorless camera can be customized to suit your needs. The only buttons that cannot be customized are the Trash Can/Delete button and the Menu button.
While it is obvious that buttons such as (C1) and (C1) can be customized – the C does stand for “Custom” – it is less obvious that the function of most other buttons can also be customized. For example, if you do not wish to use the right-hand button on the control wheel for ISO control, you can assign a different function to this button, and re-locate ISO control to another location.

How to Enable Custom Keys
Custom Keys can be defined differently for Photo and Video modes.
Old Menus


- MENU → (Camera Settings2) → [Photo Custom Key] OR [Video Custom Key].
- Choose button location (Rear1, Rear2, Top, Lens)
- Use up/down to select the desired button for customization. Click the centre of the Control Wheel to confirm.
- Use left/right to choose the function group page, then up/down to select the desired function. Press the centre button to confirm.
New Menus


- MENU → (Setup) → [Operation Customize] → [Photo Custom Key Setting] OR [Video Custom Key Setting].
- Choose button location (Rear1, Rear2, Top, Lens)
- Use up/down to select the desired button for customization. Click the centre of the Control Wheel to confirm.
- Use left/right to choose the function group page, then up/down to select the desired function. Press the centre button to confirm.
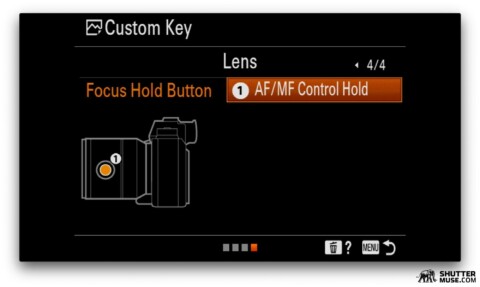
Note: If your lens has a Focus Hold button on it, you can also use the Custom Key Setting menu to assign it a new function. My recommended setting for this is discussed later in this guide.

Custom Key(Button) Setup Recommendations
As with the Function Menu, we can create two sets of Custom Keys. One for stills and one for video. For those paying attention earlier on, some of these Custom Keys can be used to activate other Camera Customizations, such as Registered Shoot Sets and Registered AF Areas.
Custom Menus should be used to set up a camera before a shoot. The Function Menu should be used for changing settings mid-shoot, but during a pause. Custom Keys should be used for settings that sometimes need to be changed on the fly while your eye is up to the viewfinder.
While most of Sony’s customization options are available to everyone, there are some differences in the number of buttons on some cameras. If you find that you do not have one of the buttons listed below, you will have to make a judgement call and sacrifice a setting or two. For reference, the menu that is shown for illustrative purposes is from a Sony a1.
Custom Keys (Still Photos)
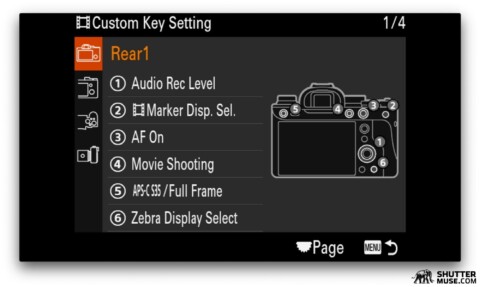
Rear 1

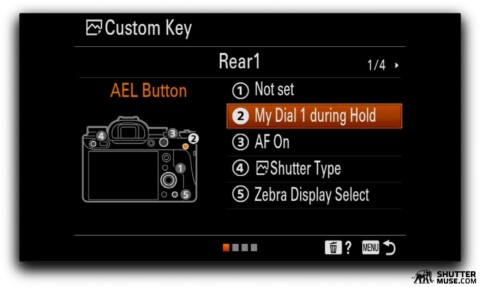
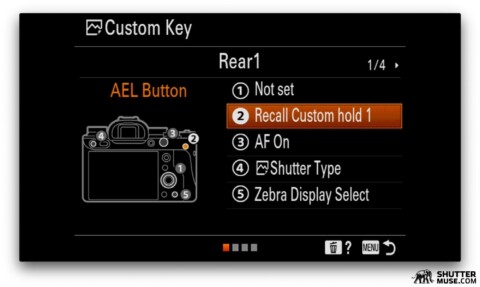
I don’t set anything to the rear control wheel (1) for general shooting because it is too easy to knock it. You can set another button as a lock button, but that always seemed like a waste of a button to me. (2) is set to Recall Custom Hold 1, which will be covered in more detail in the Recall Custom Hold recommended settings below. (3) is always left as the default AF-On for BBF. (4) is left as Movie Shooting for rolling a quick video clip without the need for switching the PASM mode dial. (5) is set to switch between electronic and manual shutter. (6) is set to enable/disable the amazingly useful exposure zebras, which practically guarantee a perfect exposure.
Rear 2

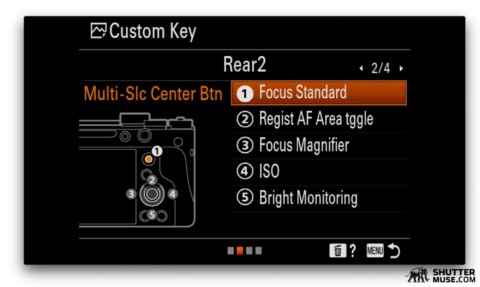
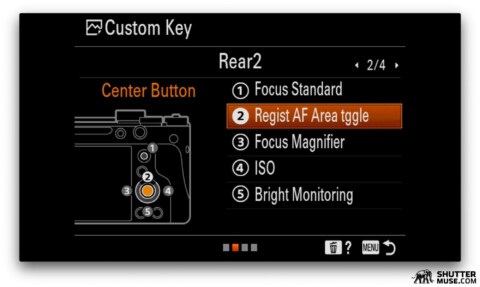
(1) is set to Focus Standard which resets the focus point to the centre position, and it’s important to know that the (1) button is a press of the multi-directional dial. (2) toggles the Registered Focus Area on and off. This is discussed in more detail in the next section. (3) switches between left and right eye when the focus system is using Eye Detect AF. This needs to be on a button so that you can do it on the fly while looking through the viewfinder. (4) left as the default ISO function. (5) is set to Bright Monitoring. This is a very useful function that boosts shadows on the LCD screen when shooting the northern lights, the milky way or other astrophotography subjects. Doing so enables you to compose an otherwise very dark scene, but it’s useful to have it on a button so you can switch it on and off to check your real exposure after composing.
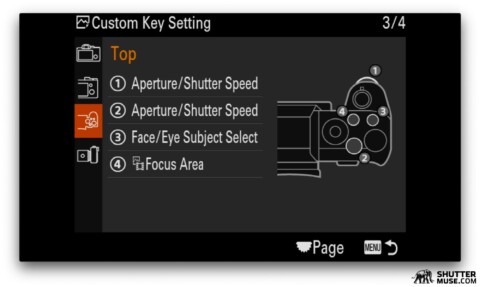
Top

(1) and (2) are default settings. Aperture on the front dial and shutter speed on the rear. (3) cycles between Human, Animal and Bird Eye Detect AF modes. (4) cycles between Focus Area options.
Custom Keys (Video)
Rear 1
Unlike stills shooting, for video shooting, I do assign a function to the rear (1) dial. I never shoot video with the camera pressed to my face, so there is no chance of accidentally knocking the wheel. Audio Record Level works great in this spot. (2) turns Markers on and off for shooting aspects other than 16:9. (3) stays as the default AF-On. (4) stays as the default record button. (5) switches on Super 35 mode. (6) is used for enabling and disabling zebras to get perfect exposure.
Rear 2

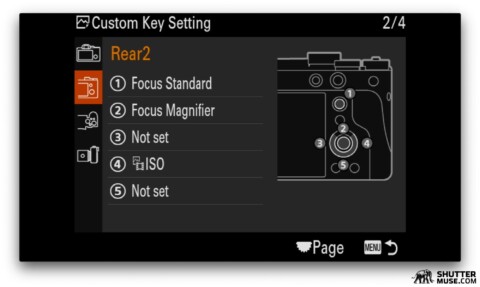
(1) is used for Focus Standard, to centre the focus point. (2) is used to activate Focus Magnifier for precise manual focusing. (3) toggles the Audio Level Display. (4) stays as the default ISO control. (5) toggles Focus Peaking on and off.
Top

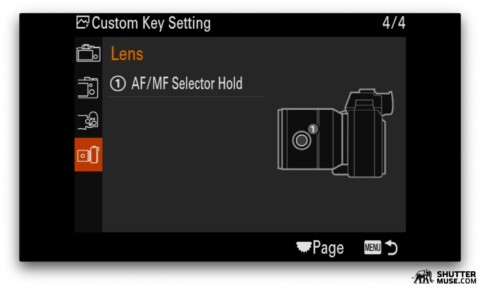
My top key settings are the same for video shooting as they are for stills shooting.
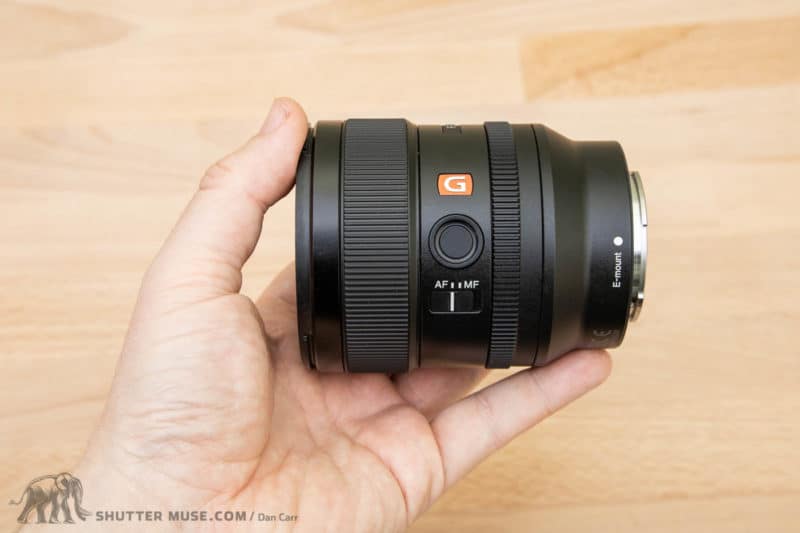
Sony Lens Focus Hold Button Setup
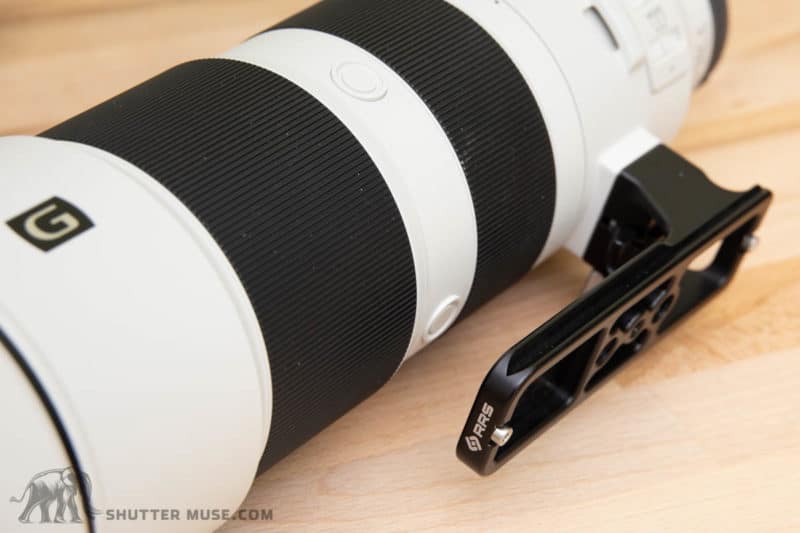
Some Sony G lenses and most Sony G Master lenses have one or more customizable buttons on the side of them. This button is called the Focus Hold button, named after the default setting for the button. With the default setting, the camera’s focus is locked while the button is held, regardless of whether you are activating autofocus with another button. No matter how many Focus Hold buttons are on a lens, they all perform the same function and are only duplicated to allow easy access to them when the camera is in both horizontal and vertical orientation.
If your camera is set up to activate autofocus while you press the shutter button, having a button on the lens set to Focus Hold is very useful. It allows you to focus on your subject with a half-press of the shutter, then press the Focus Hold button to lock focus to that point. Finally, you can reframe your subject in the viewfinder and get the shot without the camera trying to focus again.
If your camera is set up to use back button focus, however, the Focus Hold function is 100% pointless. With back-button focus – where the autofocus is only activated when you press the AF-On button – you are essentially performing a focus hold every time you take your finger off that button. If you use back-button focus, you should re-assign the lens’ Focus Hold button to something that is actually useful.
Which Function Should You Choose?
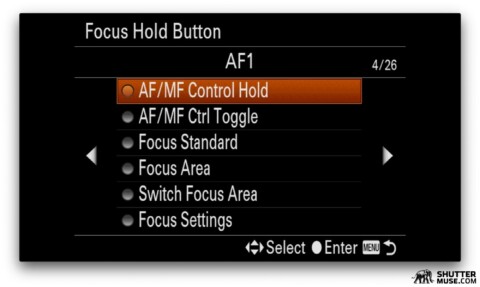
I set all of my cameras up with AF/MF Control Hold on the Focus Hold button. With this function, when the focus hold button is pressed and held, the camera switches to manual focus mode. If you release the Focus Hold button, the lens goes back to autofocus mode.

This is very useful when you are trying to focus on a very complex scenario that the camera’s autofocus configuration just isn’t figuring out. For example, a scene where your subject is partially hidden by several foreground elements. By pressing the re-assigned Focus Hold button to activate AF/MF Control Hold, you can take quick manual control of the focus and select the right subject.
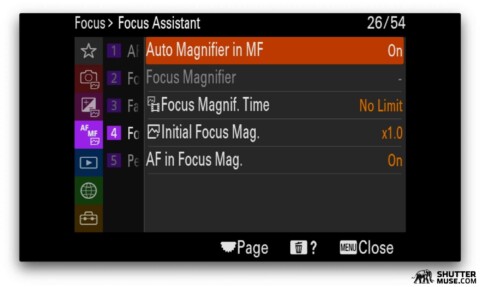
Holding the button while simultaneously rotating the focus ring with the fingers of the same hand is easy, and if you set Auto Magnifier in MF to ON (MF Assist in the old menus), the view on LCD or in the viewfinder will magnify as soon as you start rotating the focus ring. With a 4x or 10x zoom on the screen, precise focus is easy.
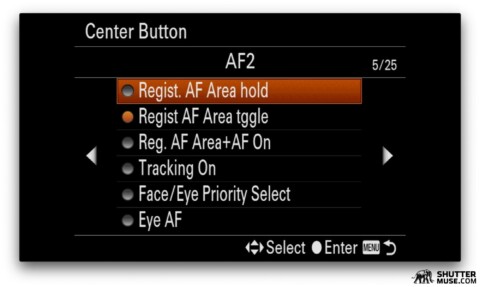
4 – AF Area Registration
When combined with a Custom Key, the AF Area Registration Function can be used to quickly switch to a pre-programmed AF Area [Wide, Zone, Centre, Flexible Spot (S, M, L), Expand Flexible Spot, Tracking]. The Custom Key can either be assigned to toggle the registered AF Area on and off, or it can be set as a hold key, leaving the registered AF Area active only while the button is depressed.
A further option, [Regist.AF Area+ AF On], will activate the autofocus at the same time as turning the registered AF Area on. This is useful for people that have their camera set up to use back button focus. Instead of needing to hold two buttons, you can just hold one.
Another particularly useful feature of the AF Area Registration function is the ability to quickly change which AF Area is registered. Instead of needing to delve into the camera’s menu system, a different AF Area can be registered at any time simply by selecting the AF Area and then holding down the (Fn) button for two seconds. This makes it one of the few Camera Customizations that can be quickly re-configured mid-shoot without needing a deep dive into the menu.
How to Enable AF Area Registration
Old Menus
Enable Function


- MENU → (Camera Settings1) → [AF Area Registration] → [On].
- Choose Focus Area and set desired focus area position. Hold the (Fn) button for 2 seconds to register.
Set Custom Key to Recall Function

- MENU → (Camera Settings2) → [Custom Key] → choose desired key, then select [Regist. AF Area hold], [Regist. AF Area tggle (toggle)] or [Reg. AF Area+AF On].
- During shooting, hold down the key to enable function.
New Menus
Enable Function
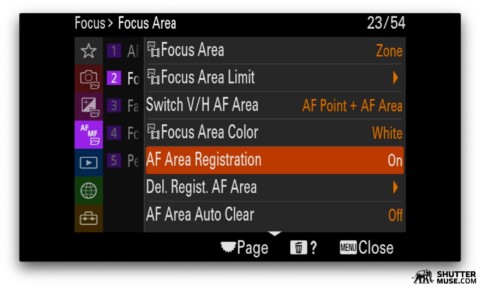
- MENU → AF/MF (Focus) → [Focus Area] → [AF Area Registration] → [On].
- Choose Focus Area and set desired focus area position. Hold the (Fn) button for 2 seconds to register.
Set Custom Key to Recall Function
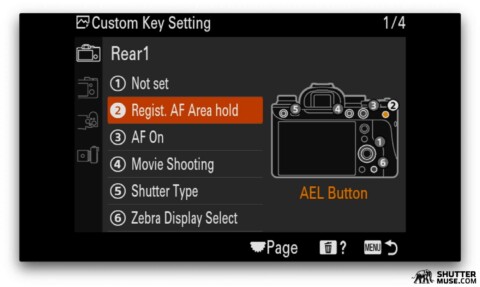
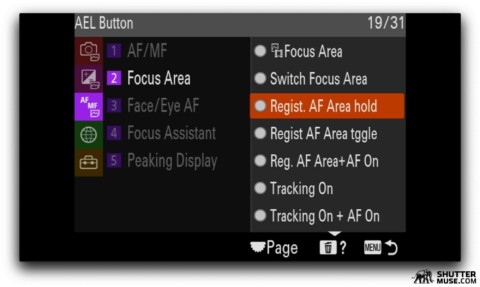
- MENU → (Setup) → [Operation Customize] → [Custom Key Setting] → choose desired key, then select [Regist. AF Area hold], [Regist. AF Area tggle (toggle)] or [Reg. AF Area+AF On].
- During shooting, hold down the key to enable function.
AF Area Registration Limitations
- You cannot assign Registered AF Area recall [Hold] to the Left, Right or Down button
- When the Mode Dial is set to Auto, Movie or S&Q, you cannot recall a registered AF area
- When AF Area Registration is set to [ON] the Lock Operation Parts setting is locked to [OFF]
- A focus area cannot be registered in the following situations:
- While [Touch Focus] is being performed
- While using the digital zoom function
- While [Touch Tracking] is being performed
- While focusing
- While performing focus lock
AF Area Registration Recommendations
When AF Area Registration is turned on, a new AF area can be registered by holding the (Fn) button for two seconds. The initial set-up was detailed earlier. The beauty of the AF Area Registration function is that you can so quickly change which AF Area is being recalled by the custom key.

For this reason, I’m not going to bother recommending a specific focus area to register because it would be completely at odds with the point of the feature. You need to learn to register a useful AF area for whatever you are going to be shooting that day. What I am going to do, though, is firstly recommend that you do turn AF Area Registration on, then use the Custom Key settings to assign Registered AF Aerea Toggle to the centre button of the rear dial.
5 – My Dial Settings
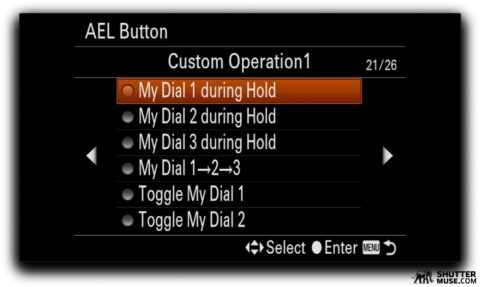
The function of the front dial, rear dial and control wheel can all be customized. You can also register up to three combinations of dial settings that are stored as My Dial [1, 2 and 3]. These My Dial settings can then be recalled with a push of a button by assigning them to a button using the Custom Key Settings. When making that custom key assignment you will have three options for ways to enable the My Dial settings:
- My Dial during Hold: The My Dial [1, 2 or 3] will only be active while holding the button.
- My Dial 1→2→3: Each press of the button will cycle to the next My Dial setting.
- Toggle My Dial: The registered My Dial [1, 2 or 3] will toggle on/off at the press of the button.
The default is for aperture and shutter speed to be assigned to your front and rear dials. My Dial settings are useful for things like video shooting when it might be more preferable to assign something like White Balance to one of the dials as video shooting is often done with a locked shutter speed.
I’m sure there are many ways that this feature could be useful. Just off the top of my head, another use case could be a camera that is mounted up high in a remote setup. In this case, it is hard to reach the front dial. You could use a custom My Dial setting to assign aperture and shutter speed to the rear dial and control wheel so that they are both accessible from the back of the camera.
How to Enable Custom My Dials
Old Menus
Enable Function


- MENU →(Camera Settings2) → [My Dial Settings].
- Select a dial or wheel for (My Dial 1, 2 or 3), and press the centre of the control wheel to confirm.
- Choose the desired function to assign, and then press the centre of the control wheel to confirm.
- Select [OK] to confirm and save settings.
Set Custom Key to Recall Function

- MENU →(Camera Settings2) → [Custom Key] → Select the button that you want to use to recall “My Dial.”
- Choose to either recall a specific My Dial (1, 2 or 3) with a hold or toggle or choose to cycle through them all in order.
New Menus
Enable Function
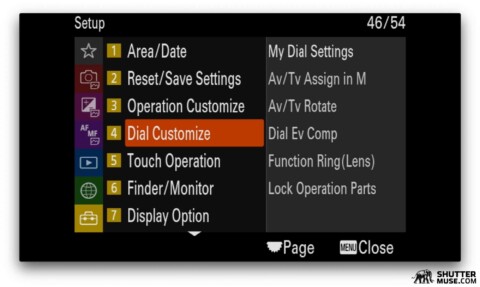

- MENU → (Setup) → [Dial Customize] → [My Dial Settings].
- Select a dial or wheel for (My Dial 1, 2 or 3), and press the centre of the control wheel to confirm.
- Choose the desired function to assign, and then press the centre of the control wheel to confirm.
- Select [OK] to confirm and save settings.
Set Custom Key to Recall Function


- MENU → (Setup) → [Operation Customize] → [Custom Key Setting] → Select the button that you want to use to recall “My Dial.”
- Choose to either recall a specific My Dial (1, 2 or 3) with a hold or toggle or choose to cycle through them all in order.
Note: When using a Custom Key to recall a My Dial setting, the new function of the dials is briefly displayed on the screen as a reminder. Nice.
My Dial Recommendations

As I mentioned during the instruction on how to set up the My Dials, this can be complicated. Continuously altering the default function of the camera dials gets confusing, and it can ruin your muscle memory and cause a major screw-up at just the wrong moment. Unless you have a very specific and very occasional reason to do this, I recommend staying away from this one.
With only very specialized reasons to use this feature, I’m going to refrain from giving any recommended settings for now. If you know how you would use this, and want to offer up suggestions for using it and not ruining your regular dial muscle memory, sound off in the comment section! I’m all ears.
6 – Memory Recall & Custom Mode Dial

Shooting mode (M, AV, TV, P), camera settings and shutter speed and/or aperture can all be saved to one of three internal slots [1, 2, 3] and four additional slots on your memory card [M1, M2, M3, M4]. This is useful for creating quick presets for specific scenarios requiring a known shooting mode, autofocus setting and aperture/shutter speed.
To recall these settings you can use the Custom Mode Dial to access the first of the numerical Memory Recall slots. On some cameras, this is [1 and 2]. On other cameras, it is [1, 2 and 3]. The lowest end APS-C cameras do not have any Memory Recall slots on the actual PASM dial.
Regardless of whether there are zero, two or three of the numerical slots on the Custom Mode Dial, all current Alpha cameras still have three slots available. Any that cannot be accessed using the Custom Mode Dial must be accessed through the menu system instead. Memory Recall slots [M1-M4], stored on the memory card, are always accessed through the menu system.
Be warned. In my experience, saving settings to the [M1-M4] slots on your memory card is asking for trouble. You will almost certainly forget they are there, and accidentally delete them when you format your card at the start of a shoot. If you do have an edge-case scenario that requires more than the use of the three internal [1-3] memory slots, make sure you have backups of your [M1-M4] setups stored safely on a computer, or on a dedicated card that has write-protection switched on.
How to Enable Memory Recall
Old Menus

- Set the camera to the settings that you want to register.
- If you plan to store the setup on your memory card and not the camera, first choose which card, using MENU → (Camera Settings1) → [MR Select Media].
- Then register the settings at MENU → (Camera Settings1) → [MR 1/2 Memory]
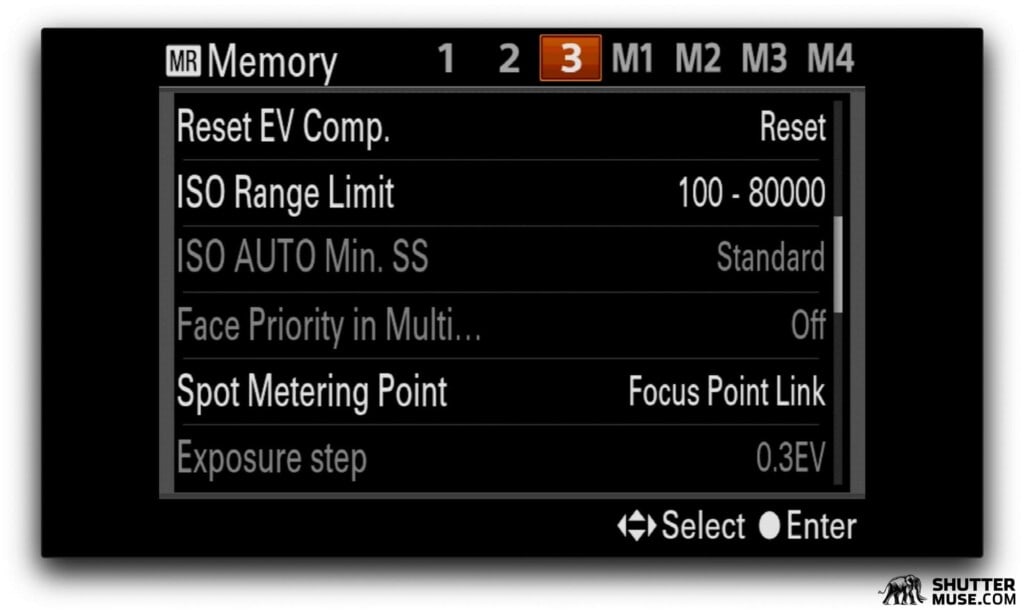
- On the top row, use Control Wheel to select the Memory Slot from [1-3](stored in camera) or [M1-M4](stored on a memory card).
- You can scroll down the page to view the list of settings that are currently registered to each memory recall slot.
- If your camera has a Mode Dial with Memory Recall slots [1, 2] or [1, 2, 3], you can use this to recall your saved setup.
- If your camera does not have recall slots on the Mode Dial, or only has two slots but you want to recall the third saved setup, or you want to recall [M1, 2, 3, or 4] you can go to MENU → (Camera Settings1) → [MR 1/2 Recall], but only when the Mode Dial is set to either [1,2, or 3], or MR on some cameras. Otherwise, you will be met with the warning that “This function is currently disabled”. Yes, this is stupid. I know.
New Menus


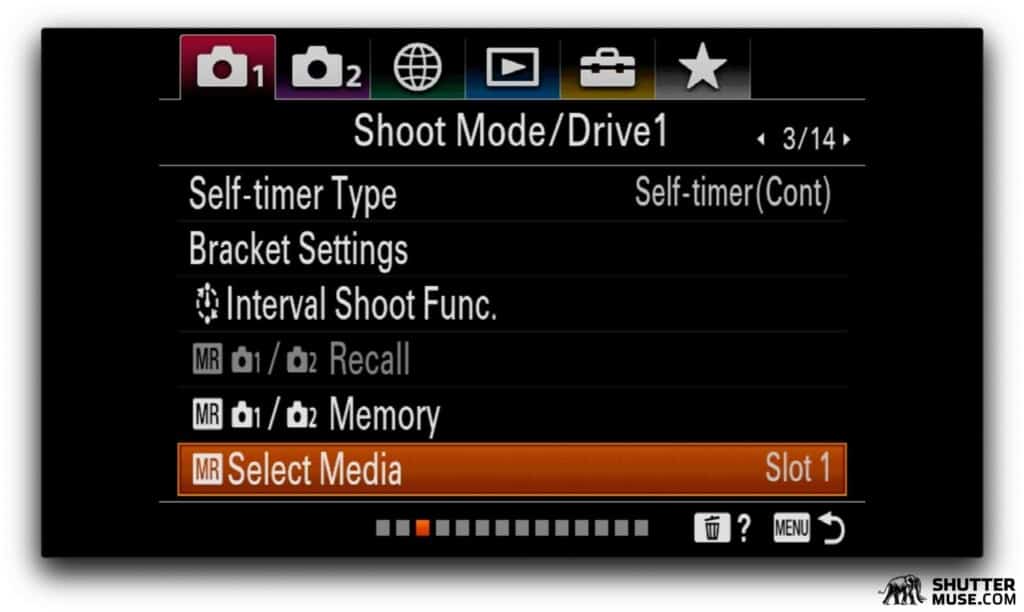
- Set the camera to the settings that you want to register.
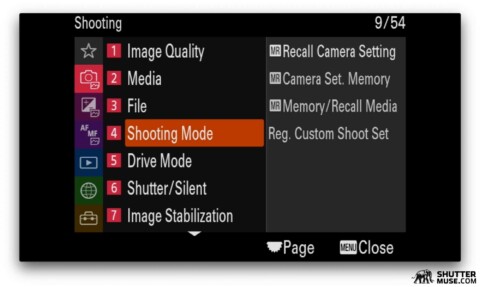
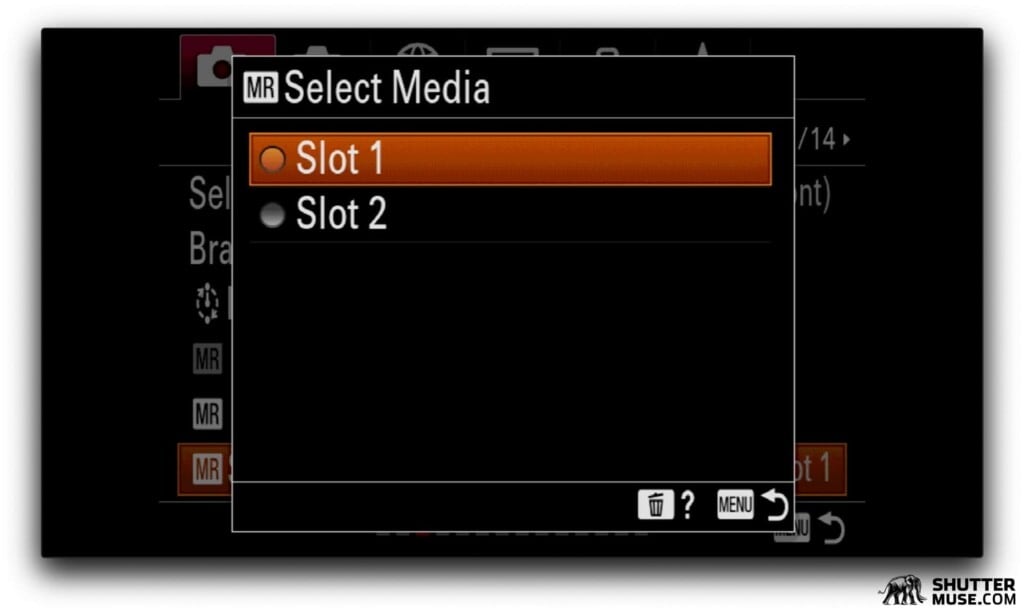
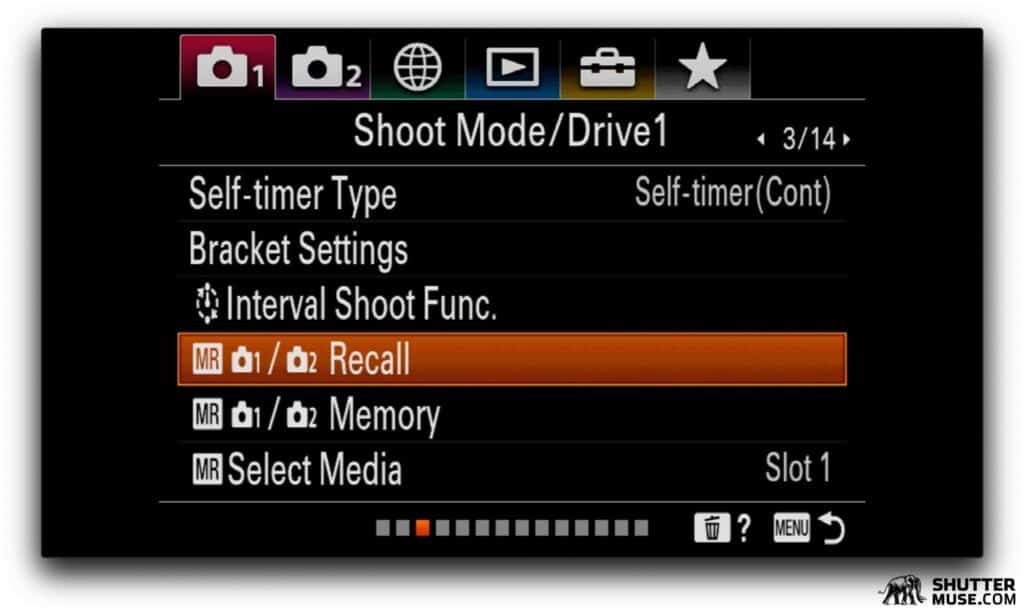
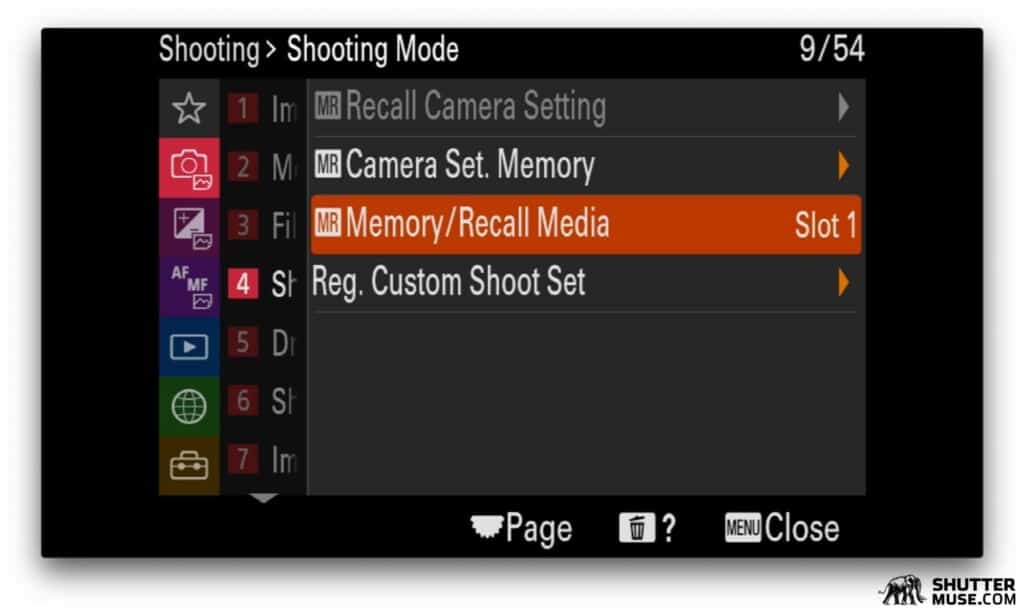
- If you plan to store the setup on your memory card and not the camera, first choose which card, using MENU → (Shooting) → [Shooting Mode] → [Memory/Recall Media].
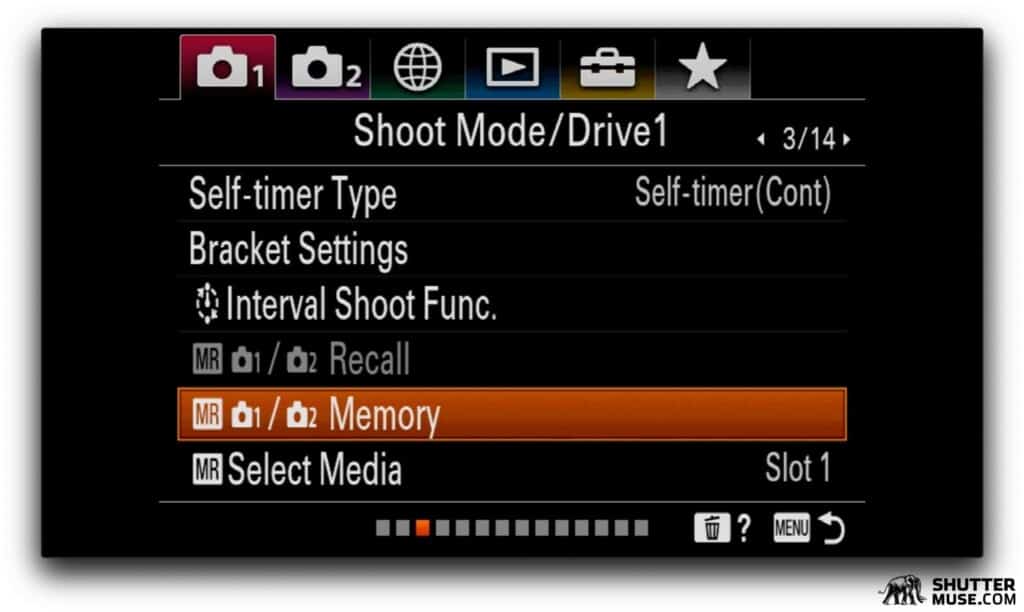
- Then register the settings at MENU → (Shooting) → [Shooting Mode] → [Camera Set. Memory]
- On the top row, use Control Wheel to select the Memory Slot from [1-3](stored in camera) or [M1-M4](stored on a memory card).
- You can scroll down the page to view the list of settings that are currently registered to each memory recall slot.
- If your camera has a Mode Dial with Memory Recall slots [1, 2] or [1, 2, 3], you can use this to recall your saved setup.
- If your camera does not have recall slots on the Mode Dial, or only has two slots but you want to recall the third saved setup, or you want to recall [M1, 2, 3, or 4] you can go to MENU → (Shooting) → [Shooting Mode] → [Recall Camera Setting], but only when the Mode Dial is set to either [1,2, or 3], or MR on some cameras. Otherwise, you will be met with the warning that “This function is currently disabled”. Yes, this is stupid. I know.
Note: When you turn the Mode Dial to select a Memory Recall, you can also use the left/right on the Control Wheel to select either [M1, 2, 3 or 4]. At this time, the camera settings that have just been applied by the memory recall are also displayed on the screen.
Memory Recall & Mode Dial Recommendations
While I can make some universally useful recommendations for things like the custom My Menus, Function Menu and Custom Keys, the Memory Recall function is a difficult one. This feature has the power to change most of the camera settings at the push of a button or the turn of a dial.
It’s not practical to get too specific about this as the settings that can be included in the Memory Recall can include several that are simply personal preferences, and many that will be highly specific to your own photography. What I will do is give some pointers, and explain how I use Mode Dial slots #1 and #2 (I don’t use #3). Hopefully this will give you some inspiration and get you going in the right direction. Leave a comment and let people know how you use your custom settings!
My Mode Dial # 1 Setting

When shooting landscapes or working with people, there is usually enough time to fine-tune my camera to the correct settings before a shoot. Animals are a completely different matter. My first Memory Recall slot has all the settings I need for a great wildlife photography starting point. If I get stumble upon some interesting wildlife on my way from completely different kind of shoot, I can spin the dial to #1 and get right down to business with my preferred autofocus settings, tracking AF mode and exposure settings.
My Mode Dial #2 Setting

The second Memory Recall slot in my cameras is reserved for underwater photography. I use very specific autofocus settings and exposure settings for this type of work. I also have some limitations to the control of my camera when its in the underwater housing. All of these things combine to create a very different collection of settings that don’t really match any of the other work I do. This is another perfect scenario for the Memory Recall function. All of these settings can be saved and recalled once or twice a month when I need them, saving me valuable setup time at the beginning of each shoot.
7 – Registered Custom Shoot Set
This poorly titled function – actually labelled Reg. Custom Shoot Set in the menu system – is used to recall a camera setup only while holding a specific button on the camera. It’s best to think of this as a temporary version of the Memory Recall feature, with the settings only active while holding down the assigned button.
To use this customization, you will need to first register your Custom Shoot Set, and then use the Custom Key Setting to assign it to a specific button press. Up to three Custom Shoot Sets can be created. This means that you could, in theory, assign all three to custom buttons on the camera and create a camera chameleon that can be quickly adapted while pressing those buttons.
Functions That Can Be Registered:
- Shooting Mode
- Aperture
- Shutter Speed
- Drive Mode
- Exposure Compensation
- ISO
- Metering Mode
- Docus Mode
- Focus Area
- AF Tracking Sensitivity
- AF ON
How to Enable Registered Custom Shoot Set
Old Menus


Create and Register Custom Shoot Set
- Set up your camera with the settings you would like to register.
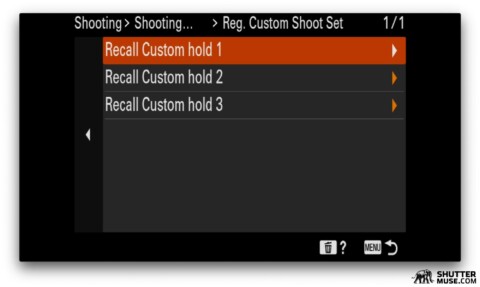
- MENU → (Camera Settings1) → [Reg. Custom Shoot Set].
- Select a registration number from [Recall Custom hold 1, 2 or 3].
- Use Control Wheel direction buttons to choose which settings you would like to include in the set.
- Choose [Import Current Setting] and press the Control Wheel centre button to confirm.
- Choose [Register] and press the Control Wheel centre button to confirm.

Register Custom Key to Activate Custom Shoot Set
- MENU → (Camera Settings2) → [Photo Custom Key Setting].
- Select the desired key and then select one of the registration numbers from [Recall Custom hold 1, 2 or 3].
- During shooting, press and hold the registered button to activate Custom Shoot Set.
New Menus
Create and Register Custom Shoot Set

- Set up your camera with the settings you would like to register.
- MENU → (Shooting) → [Shooting Mode] → [Reg. Custom Shoot Set] → Select a registration number from [Recall Custom hold 1, 2 or 3].
- Select a registration number from [Recall Custom hold 1, 2 or 3].
- Use Control Wheel direction buttons to choose which settings you would like to include in the set.
- Choose [Import Current Setting] and press the Control Wheel centre button to confirm.
- Choose [Register] and press the Control Wheel centre button to confirm.
Register Custom Key to Activate Custom Shoot Set

- MENU → (Setup) → [Operation Customize] → [Photo Custom Key Setting].
- Select the desired key and then select one of the registration numbers from [Recall Custom hold 1, 2 or 3].
- During shooting, press and hold the registered button to activate Custom Shoot Set.
Important: [Recall Custom hold 1, 2 and 3] are only available while shooting in P/A/S/M modes.

Suggested Registered Shoot Set Setup with Custom Key
Registered Shoot Set is a powerful customization option that I find myself using all the time. To recap, this function allows you to recall a set of exposure and autofocus settings while holding a specific custom button. The best way to use this is to set up what I call Dual Back Button Focus or DBBF.
Most people are at least somewhat familiar with why you should use back button focus (BBF). When using regular BBF, your currently selected autofocus mode is activated by pressing the AF-On button on the back of the camera. Autofocus is not initialized when you press the shutter button.
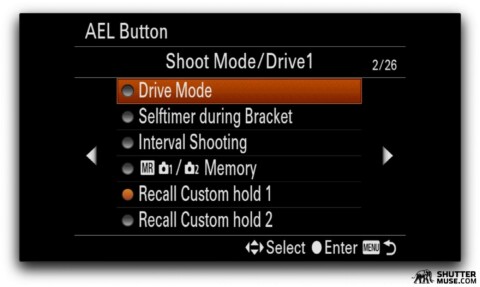
DBBF takes this one step further and assigns a second focus mode to another button on the back of the camera. In the case of Sony mirrorless cameras, we use the not-often-used AEL button which is located to the right of the AF-On button. First, you create a Registered Shoot Set, and then you use the Custom Key function to recall that shoot set when the AEL button is pressed.
Oh Sh*t Button
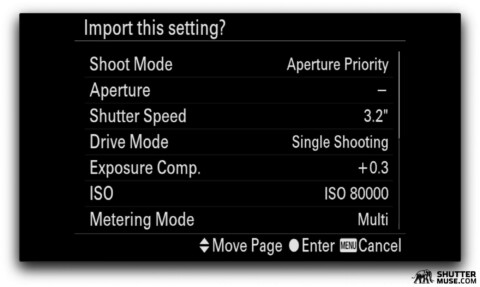
The best setup for DBBF is to create what I like to call an “Oh sh*t” button. Once set, pressing the AEL button immediately activates the Wide AF Area selection and puts the camera into shutter speed priority with a 1/2000 of a second shutter speed, continuous shooting (hi) with continuous AF and Auto ISO. The fast shutter speed, Wide AF Area and continuous modes are perfect for capturing an erratic subject that has caught you by surprise.
Example: Let’s say you are out taking some landscape photos by a lake. You’re all set up for beautiful vistas, with a low ISO, single-shot AF and aperture priority set to f/10. All of a sudden, a bald eagle appears! It’s flying right towards you and it dives into the lake to snatch a fish just 20ft in front of you.
What do you do? Watch helplessly in the knowledge that your camera is not set up for capturing that moment? No! You smash your thumb right onto your “Oh Sh*t” button and start firing away to capture your first National Geographic cover shot. Well, ok, maybe that is a slight exaggeration. But only the part about the cover shot. I have actually used this technique to capture a bald eagle photo among many other things.
A custom button like this is universally useful. There will be times when you appreciate the quick access to a fast shutter speed when something you are shooting suddenly starts to move. And there will also be times when you are thankful for the Wide AF Area. For example, when you are taking photos of your kids at a distance, using a smaller AF area, but all of a sudden they run right up to you and suddenly find yourself with the wrong AF area. Just hit that “Oh Sh*t” button to save the day!
Setting Up Oh Sh*t Mode
Custom Shoot Set Settings
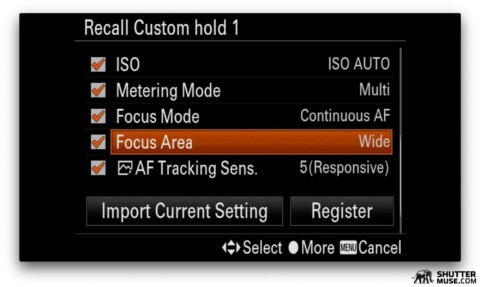


Following the earlier instruction for Custom Shoot Setup, create a Custom Shoot Set with the following settings:
- Shoot Mode: Enabled – Shutter Priority
- Aperture: Disabled
- Shutter Speed: Enabled – 1/2000
- Drive Mode: Enabled – Continuous Shooting Hi
- Exposure Comp.: Disabled
- ISO: Enabled – Auto
- Metering Mode: Enabled – Multi
- Focus Mode: Enabled – Continuous AF
- Focus Area: Enabled – Wide
- AF Tracking Sens.: Enabled – 5(responsive)
- AF On: Enabled – On
Now Register the Custom Key

Using the previous instructions for setting Custom Keys, set the AEL button to Recall Custom Hold 1.
Additional Custom Shoot Sets?
Sony let you store three complete Custom Shoot Sets, and in theory you could assign them all to different buttons on the camera. In practice, I have never found a use for all of them, and there aren’t really enough buttons on the camera to go dedicating three of them to this purpose. I’d say for 99% of people, a single Shoot Set, set up just as I have described here, will be perfect.
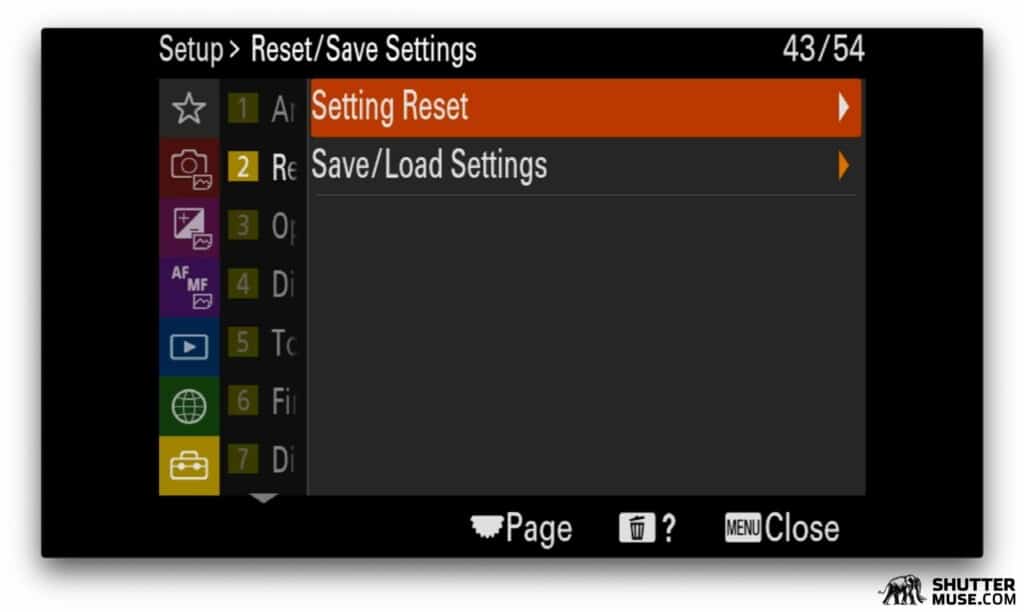
8 – Save/Load Settings (Complete Camera Profiles)
The final often-overlooked Camera Customization is like the nuclear bomb in your customization arsenal. Once you have fine-tuned your Menu Settings and all of the Camera Customizations listed above, you can save the entire camera setup to an SD card using the Save/Load Settings option. This creates a setup file that can then be loaded onto another camera of the same model, immediately creating a clone of the original.
How to Use Save/Load
Old Menus

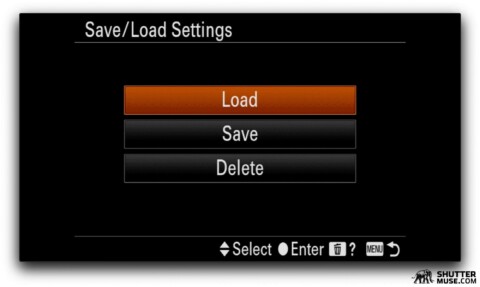
- MENU → (Setup) → [Save/Load Settings]
- Choose Save, Load or Delete.
New Menus

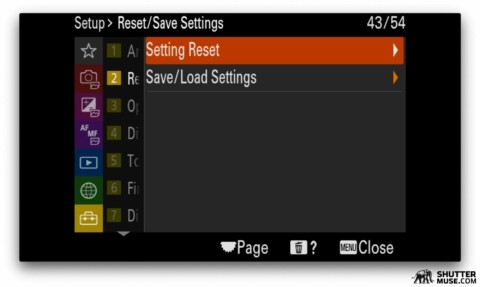
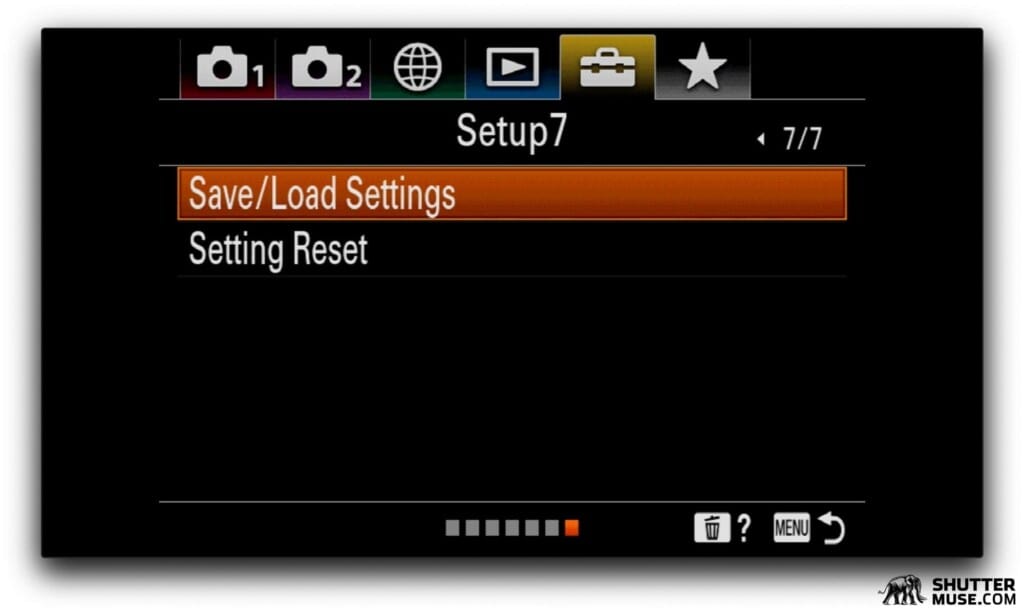
- MENU → (Setup) → [Reset/Save Settings] → [Save/Load Settings]
- Choose Save, Load or Delete.
Important: Only Slot 1 is used for saving or loading data. If you only have a single card, and it is in Slot 2, you cannot perform the Save/Load function.
This is useful for businesses and agencies who use a pool of cameras that rotate between different photographers. Once a photographer has got the camera set up to their liking, they can save the settings to an SD card and use that to quickly recall them when they next use the same model.
This is also a useful feature for people who rent cameras for specific jobs. Once you have that rental camera set up perfectly, you can save the settings to an SD card and use them in the future if you ever rent the same camera model again. Essentially, this takes all of the things we are talking about in this article and encapsulates them into a single file on an SD card.
Prior to Camera Firmware Updates
A very kind reader reminded me in. the comments that there is another important time to use this particular option. You should always use the Save Setting function before you do a firmware update. When you do a firmware update on a Sony camera, it completely resets the camera back to its factory specifications. If you use the Save Settings function, you can the Load Settings after your firmware update. Very useful. (Thanks for the reminder, Wilbur!)
If you make use of this function, I would recommend keeping a dedicated SD card in your bag to save and load the settings. If you keep the settings files on the card you actually plan to use for image storage, theres is a more than good chance you will, at some point, forget about them and then press the card format button. I also recommend keeping a copy on your computer.
Settings That Cannot Be Saved
For reasons that are not at all clear to me, some camera settings will not be saved when using the Save/Load Settings function:
- IPTC Information
- Copyright Info
- External Flash Set.
- White Balance: Custom 1/Custom 2/Custom 3
- Face Memory
- All Network & FTP Settings
- Area/Date/Time Setting
Some of these make sense. I can see Face Memory being omitted for privacy reasons. But others such as IPTC and Copyright Info would be useful inclusions for some people in the target audience of this function.
Save/Load Settings Function Compared to Memory Recall Function
The Save/Load Settings function is NOT the same as the Memory Recall function that allows you to save up to 4 Shoot Sets to slots [M1, M2, M3 and M4] on a memory card. These functions are often confused because they both save things to a memory card. I will summarize their differences here:
- Save/Load Settings function – A backup of (almost) everything that can be set up using the menu system of your camera. This includes custom key settings, custom menus, autofocus preferences, custom function menus and custom shoot sets stored in memory recall slots [1,2,3]. It does not affect the current shooting mode [M, AV, TV, P] or currently selected shutter speed and/or aperture.
- Memory Recall function – The seven available Memory Recall slots (1-3 in camera, M1-M4 on memory card) are used to store a shooting mode [M, AV, TV, P], aperture and/or shutter speed, as well as settings in the Camera Settings tab such as autofocus mode.
In other words, the Memory Recall function is used to create multiple Shoot Sets that can be temporarily applied to the camera to suit different scenarios throughout your shooting day. For example, switching quickly between landscape photography and wildlife photography. The Save/Load Settings function is designed to be applied just once at the beginning of the day when you need to quickly set up a brand new camera from scratch.
Save/Load Settings Protocol
The Save/Load function is more of a single-step process than a complex Camera Customization that has a variety of options. As such, there are no specific recommendations to report. However, I will reiterate a point that I made earlier in this guide about the storage of memorized settings on your camera’s memory card. Many photographer’s pre-shoot rituals include the formatting of the memory card in the camera. If you have saved your camera settings file to that card, you will almost certainly nuke it at some point during card formatting.
The best solution is to have a dedicated card for storing camera settings files. The files themselves are tiny, and I would bet you have an old, low-capacity SD card lying around somewhere, right? Even something as tiny as a 2GB card will do, and if you don’t have one, you can pick something like that up for under $10 from Amazon.
Final Wrap-Up (& Request for Help)
If you have made it this far, congratulations. You are well on your way to harnessing the hidden power of Sony cameras that most people never unlock. This is one of the longest and most in-depth camera tutorials that I have ever written. As far as I can see, it is unparalleled on the web in its detailing of Sony mirrorless camera customizations.
I wrote this guide because when I switched to Sony mirrorless cameras it took me many hours of research and experimentation to customize my camera to what I thought was perfection. But then, a few weeks later I would discover another hidden feature that totally changed the way I viewed my current setup and forced me to reconsider many of the things in my hierarchy of custom settings. This happened again and again and wasted a lot of my time. Now you won’t have to go through that!
Although the length of this guide might make the Sony camera customization process appear long and complex, it should actually be relatively straightforward if you follow it step-by-step and simply use my recommendations. The good news is that you only have to do this once when you first get your camera, and with this guide, you should have it set up to perfection in about thirty minutes.
My recommended settings are for a great setup that will suit a wide variety of shooting situations. With this guide, my hope is also that the detailed explanations of the custom functions alongside the recommendations, will also empower some of you to use my recommendations as a starting point, and then confidently tweak them to suit your own shooting style and photo subjects.
If you found this guide useful, it would be a huge help if you acknowledge that by sharing it with your photo friends and social media followers. The more traction I get with these huge guides, the more time I can dedicate to creating them in the future. And please, do use the comments section below to share your own custom camera tweaks that have really helped you!

Excellent article!
One thing: on my A7III firmware 4.00, the “MENU → (My Menu) → [Display From My Menu] → [ON].” is not present. Am I missing something or maybe the OLD Menu system is not standard across cameras?
Hi Dave. Thanks for bringing this up. It seems that the feature isn’t available on the a7III. I just had a dig through the manual. I find that very strange because it is available on the a7C which is just an a7III in a different body. Sadly this seems like something that, at this point, they probably won’t add if they haven’t done it already.
You might be able to find a workaround, though. On some of the Sony models when configuring custom keys, you can set a custom key to display the My Menu. I wonder if that option is available on the a7III? Although it does then use up a button, because you can’t reassign the actual Menu button.
I’m going to add a note to the tutorial about this.
Wow thank you so much Dan! This is exactly what I have been looking for since a switched to a Sony a7iii from my old Canon 7D 2 weeks ago. I knew it would take some time getting used to the new menus and had heard they weren’t particularly well explained by Sony, but was sure I would be able to find plenty of help online…
I looked everywhere (your site included) but found very little useful advice, so thanks very much, your time and effort is much appreciated!
Simon
Love to hear this! Thanks, Simon.
Something to possibly add to your section,
8 – Save/Load Settings (Complete Camera Profiles)
A ‘necessary’ reason to SAVE your comprehensive camera settings is that, apparently, when one does a software update (there have been two for the Alpha 1 as I write this) it wipes all the carefully adjusted custom settings one has labored over. That is, the update re-sets the camera to its original shipped state, including, of course, the new functions. Sony says the reason is because a software update creates, essentially, a ‘new’ camera. Weird: when I update my Leica and Fuji bodies they simply incorporate the new functions into the Menu without wiping all my customized settings. I actually cannot verify this wiping of the settings as I have resisted doing the software updates until I have a chance to SAVE my settings – which I have finally done today as there was a new A1 software update a day or two ago.
EXCELLENT suggestion, Wilbur! And timely, too. I was just about to perform the a1 update myself. Thanks for reminding me of this quirk. I will add this to the article.
Since you wrote this excellent guide, have any settings you mentioned that cannot be saved with the Load/ Save option, now be saved?
I have many setups for FTP stored that will be very tedious to have to apply again, it’s ridiculous that this type of option cannot be saved for professional sports shooters who use FTP regularly.
Michael
20 Sept 2021
As far as I know, nothing has changed. It is not all that long since I wrote the guide and unfortunately, camera companies move at a glacial speed.
I’ve only given a cursory read so far so perhaps I will find my answer on a closer reading and probably some experimentation.
It seems to me that the custom configurations that are stored on an existing SD card cannot easily be saved to another SD card. Is there some way to retain the custom configurations in preparation for restoring these custom configurations after re-formatting a card?
I have looked all over on my A6500 and I could not find a Save/Load option anywhere. The closest thing to that was the “Setting Reset” option in Setup7. Clicking on that my options consist of “Camera Settings Reset” and “initialize”. Neither of these options provide a way to save anything and the only load operation available seems to be to load all of the factory settings.
PG SLOT, slots on the web PG-SLOT.GAME No. 1, the easiest way to play PGSLOT slots, PG games break often, promotions, free credits, PG SLOT GAME, free bonuses every day. available 24 hours
Dan, thank you so much for your time and effort in preparing this guide and for sharing it for others to use! I have found it most useful and recommend it to new Sony users.
Thank you, Grant! You’re very welcome. Thanks for sharing, too.
This is first rate information. Thanks for posting it.
Ern
Hello Dan
First, thanks for this remarkably thorough piece of work. Well done!
As it happens, I have come upon it while part-way through writing something very similar, initially for my own reference but possibly for publication in due course. Like you, I have used the concept of a hierarchy.
Reading your version has been thought-provoking and useful. I have to say, though, that I find your use of the hierarchy a bit strange – I am surprised by your very emphatic directions about the kind of settings it’s appropriate to use in each of the customised systems.
Prime example: “My Menu should generally be used for access to functions you need at the beginning of every shoot,” you say? Why? If it is set up right, My Menu is just as easily accessed as the Fn button menu, and gives access to a max of 42 functions. I have adopted it as my main system for accessing settings not dealt with by dials and custom keys.
Anyway, thanks again and KUTGW.
cheers
Thanks Chris. RE: My Menu – I don’t find creating a vast My Menu with that many items helpful. If I have to wade through my My Menu to get to where I need to be, I might as well wade through the main menu. Each to their own, though. I just prefer to keep it simple. There are a handful of functions I use all the time and they cover 95% of my menu usage. Even then, I’ll often go days of shooting without touching anything other than the format cars option in the My Menu. If Sony would let me assign card formatting to a 5-second hold on a button combination, as my Nikon cameras do, I would do that in a heartbeat and then I’d almost never access the menus at all!
hello Dan,
thanks for your tutorial.
One little error: “The only buttons that cannot be customized are the Trash Can/Delete button and the Menu button.” is wrong.
“Trash” may be reassigned -it is free in shooting modes, only in Play mode it’s primary function works-, “Play” and “Fn” can’t be customized.
I reassign the Trash button at one of my first actions at every body, so i stumble upon the sentence above.
A7R5 (and further?) do not allow customizing Play mode (did anybody ever use this? 😉 ), A7gen3 up to A1 has this option and then you may even alter the function of Fn. There are more model specific variants, out of scope of your tutorial.
cheers, thomas
Hi, can someone create an export of all the settings made in this post for an A7 iv?
Thanks
Hi, can someone create an export of all the settings made in this post for an A7 iv?
Thanks
아름다운스웨디시업소