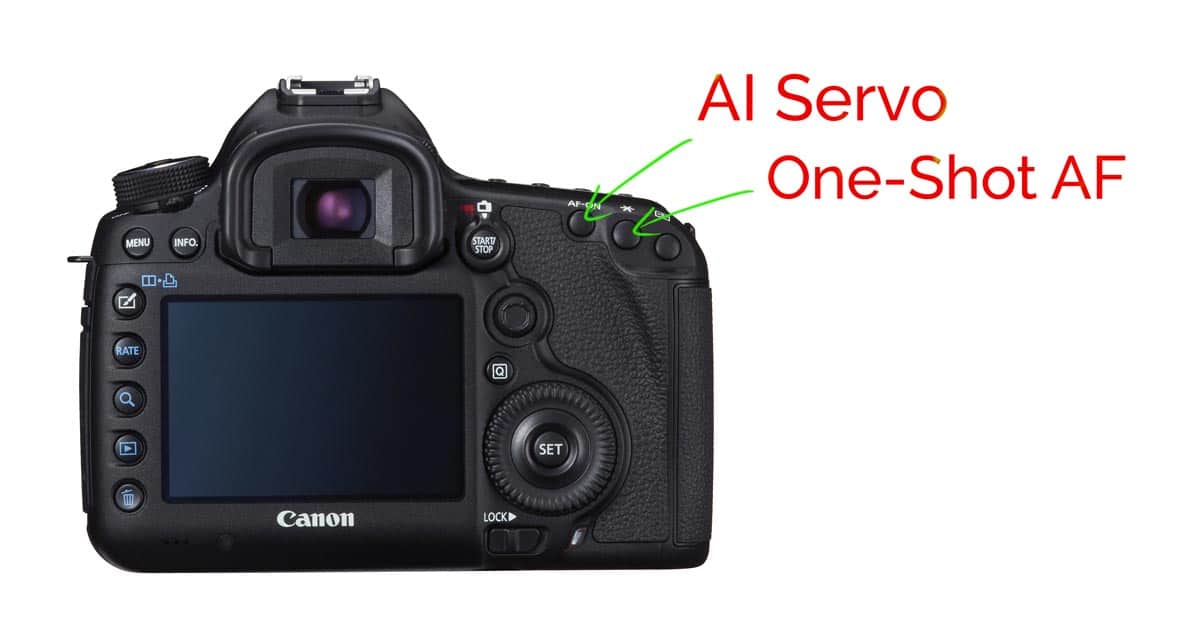
I’m primarily a Canon shooter myself and I recently wrote a tutorial about how to set up a Canon camera for back button focus with two different buttons, where each button initiates a different focus mode. It’s a technique that’s not that well known, but I absolutely love using it. I wasn’t sure if Nikon cameras has similar functionality but I borrowed one from my friends at B&H Photo to take a look, and sure enough, you can also set up some Nikon cameras in much the same way.
Firstly, if you’re not familiar with the general benefits of back button focus then I would urge you to read my popular article: The Ultimate Guide to Back Button Focus. This details many reasons why professional and advanced amateurs gravitate to using this focus method. That same post also has details on how to set up standard single back button focus on Nikon cameras, so it’s a good place to start if this concept is new to you. If you’re comfortable with using back button focus though, it might be time to add even more functionality, and that’s what I’m going to talk about in this post.
What Exactly Are We Setting Up Here?
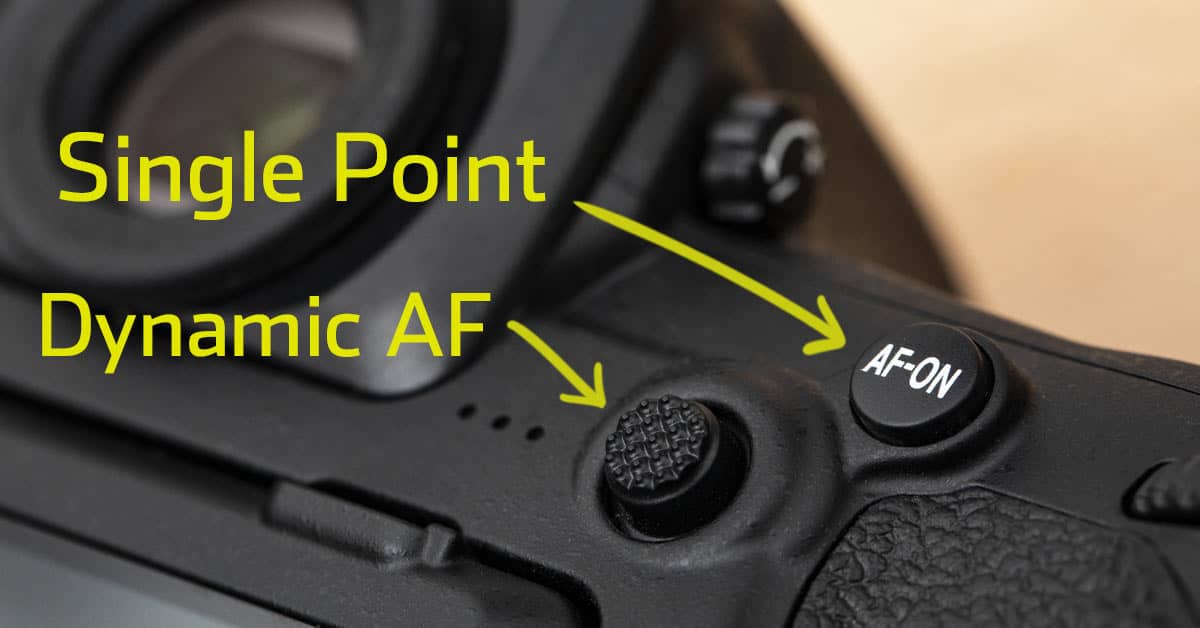
With regular back button focus the AF-On button activates the currently selected autofocus mode with the currently selected set of AF points. In this tutorial I will show you how to use two different buttons to activate two totally different sets of autofocus points. There are many combinations of AF settings that can be applied to these buttons, but in general most people will probably want to set up one button for single point AF and the second button for a dynamic group of AF points. This means you can switch back and forth between single point AF and an AF grouping just by moving your thumb to a different button.
An example of when this might be useful would be photographing an owl that is perched on a post. With the own sat still you would use a single AF point to make sure you are getting your focus in the right place to get nice sharp eyes. When the owl raises its wings to take off though, you can shift your thumb to the dynamic AF button which will be much easier to use when tracking an erratic and fast moving bird.
Can Your Nikon Camera Use This Focus Method?
Setting up any kind of back button focus requires the ability to customize the function of at least one or two buttons on the back of the camera. Some lower end DSLR models don’t offer this option, but if you’re using a mid range DSLR or higher, it shouldn’t be a problem. Double back button focus is certainly an option on the D500, D850 and the D5 but I can’t be certain about earlier cameras. Thankfully manufacturers seem to be more aware that people like the option to customize things, so I think these features will most likely trickle down to lower models in the coming years. If you aren’t sure if your camera can do it, the easiest thing is just to try and follow along using your camera menu. I think it’ll be pretty obvious when an option I mention in the list of steps, isn’t available in your menu. Since the technique we’re talking about doesn’t really have an official name (double back button focus is something I came up with), it’s not really possible to just search the user manual.
How to Set Up Double Back Button AF
Note that the screenshots in this tutorial come from a Nikon D500. It’s possible that the order of menu items and menu style might differ for your camera.
Part 1 – First Button – AF-On
You have a couple of choices here. Firstly, you can set the AF-On button so that it activates the currently chosen AF settings. This means that you still have control over things and can quickly change them if you need to. The second option is that you set it up to activate a specific set of AF settings, which is what I’m going to do because I think it’s a better demonstration of the adaptability of these buttons and settings. Once you’ve read though this, you’ll have the knowledge and understanding to choose whichever option makes the most sense to you.
Step 1.
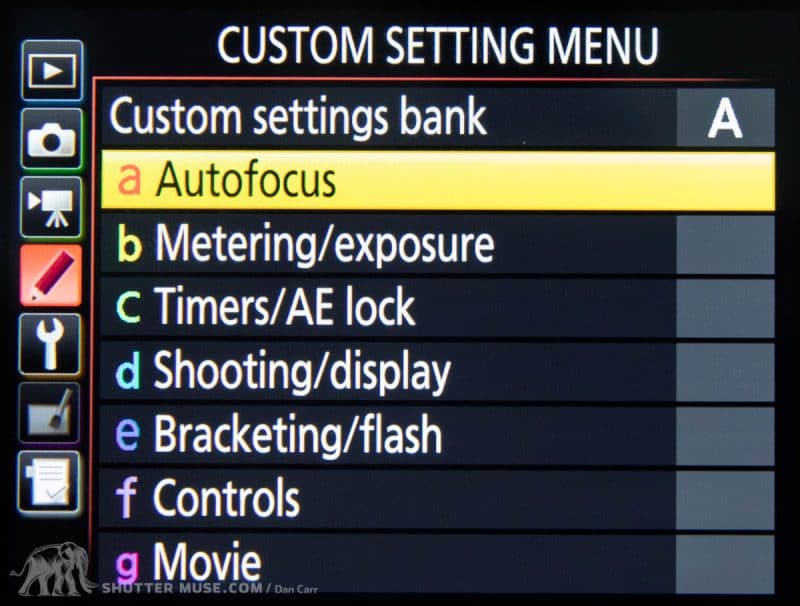
Select Custom Setting menu (red pencil icon).
Step 2.
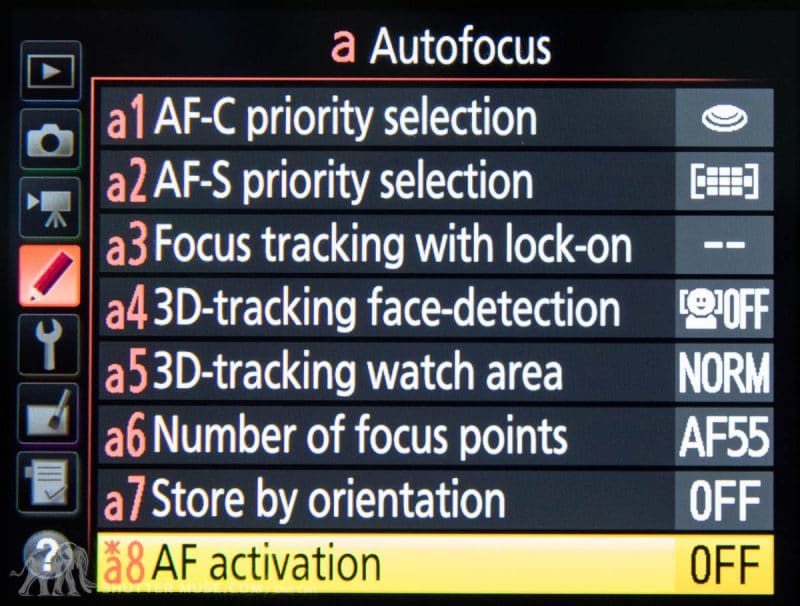
Select (a) Autofocus from the top of the menu, then scroll down to (a8) AF Activation. You’ll notice that in the screenshot above there is an asterisk above the a, which means that a setting in this section has been changed from the default setting. When you first encounter this menu, the default is for AF activation to be ON.
Step 3.
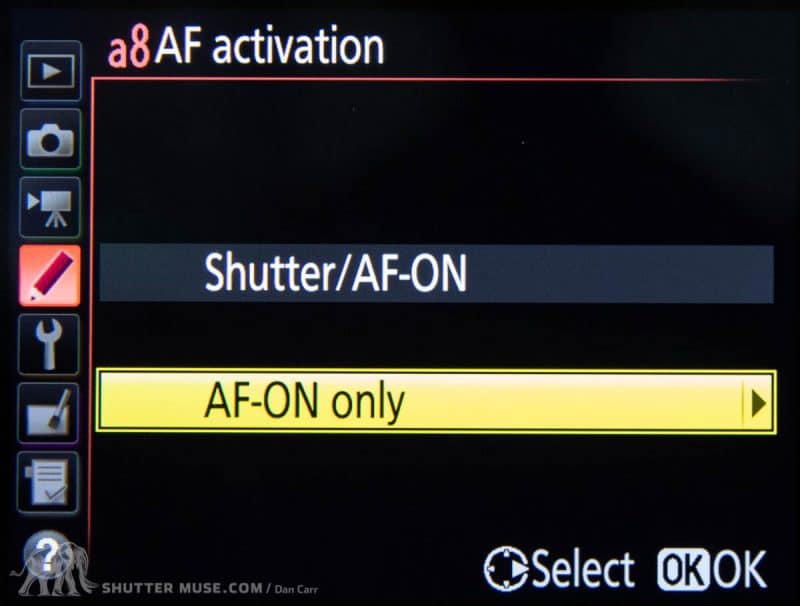

Select a8 and then select AF-ON Only. Press right on your 8-way controller to open the sub-section, and change Out-of-focus release to Enable. Once you then return to the (a) Autofocus menu, you will now see that a8 AF Activation is set to OFF. Frankly, the chosen terminology for this part of the setup process is awful, and it’s easy to get confused as to what is going on here. Essentially, this is where you are removing the AF function from the shutter button so that a half press of the shutter button no longer triggers AF activation.
Step 4.

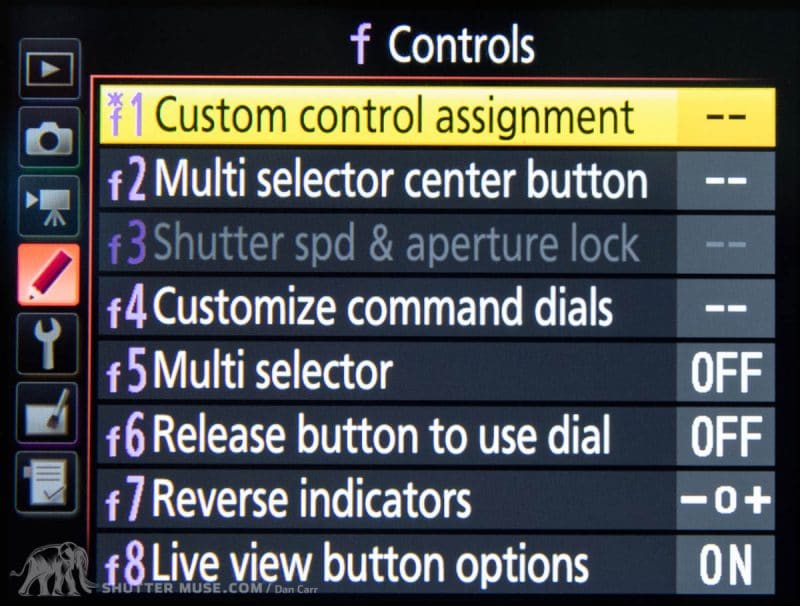
Next you need to head back to the custom setting menu and choose (f) Controls, and then (f1) Custom Control Assignment.
Step 5.
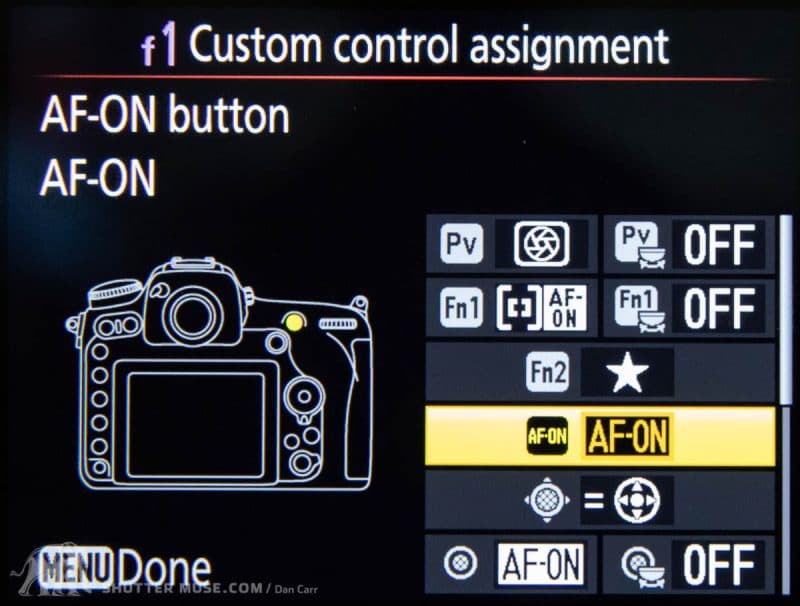
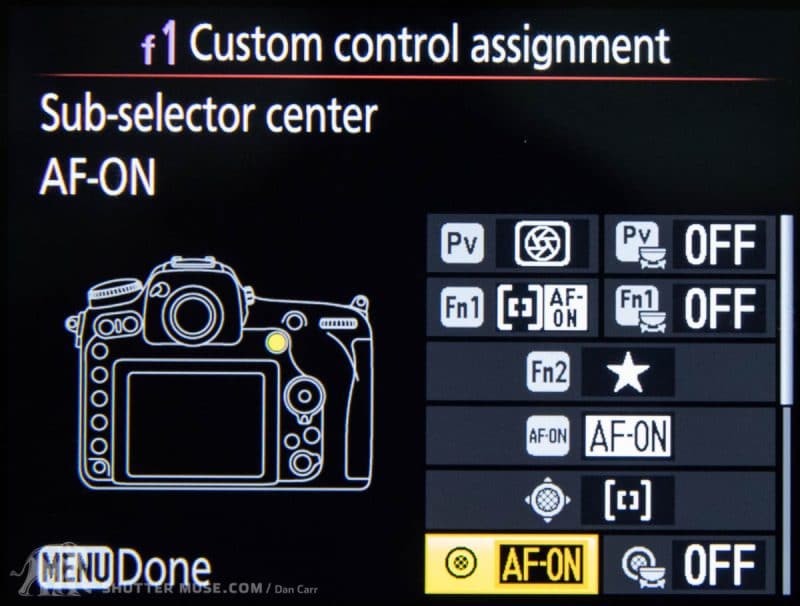
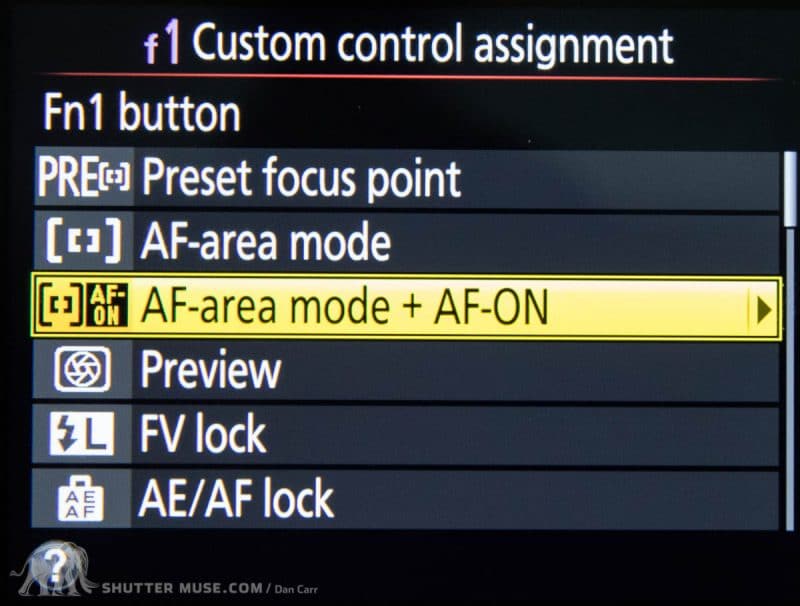
In this menu we get to specify the function of many of the camera’s buttons. By default, the majority of Nikon cameras that have an AF-ON button have it set to AF-ON in this menu already, just like in the photo above. This means that when you press the AF-ON button, the currently chosen AF settings will be activated. For this tutorial we are going to make a change though, so go ahead and select the AF-ON button in this menu.
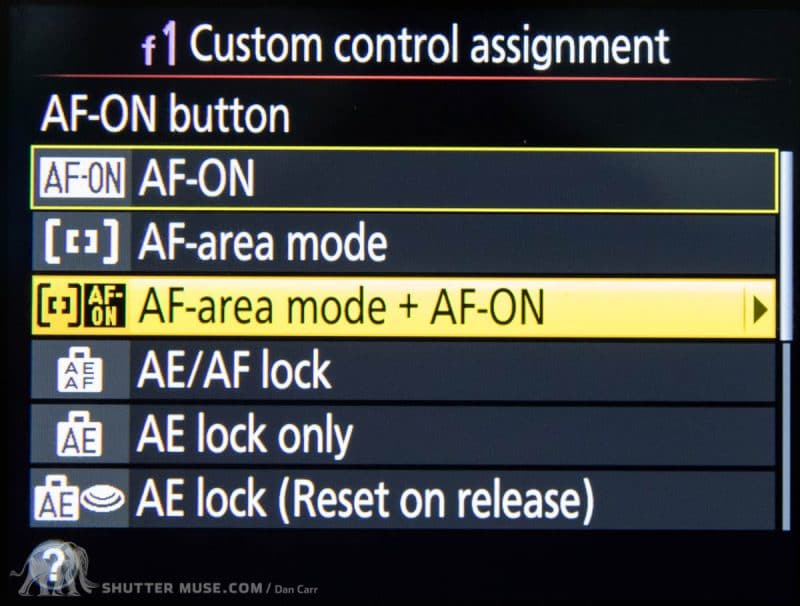
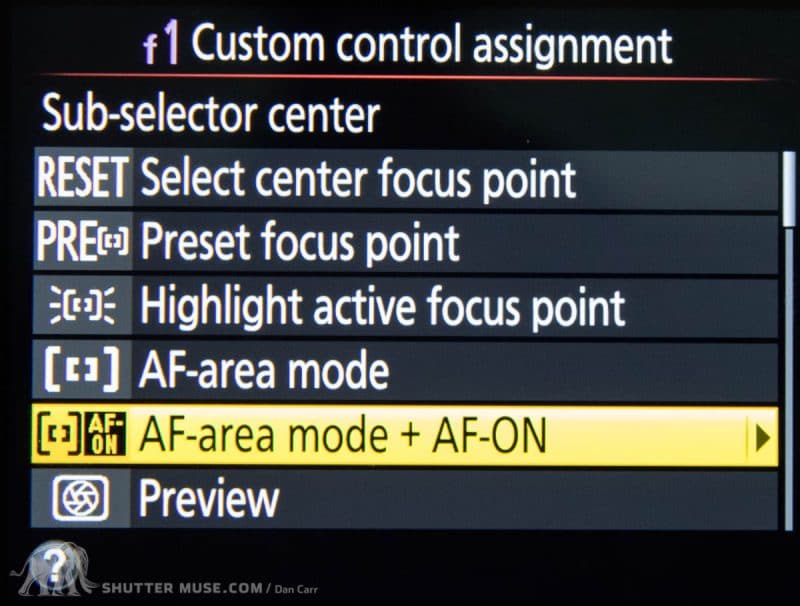
This next menu is where things start to get interesting! Even though the button is called (and labelled) AF-ON, you can actually choose from a plethora of different functions. The third option is the one we are most interested in so move your selector down to that one.
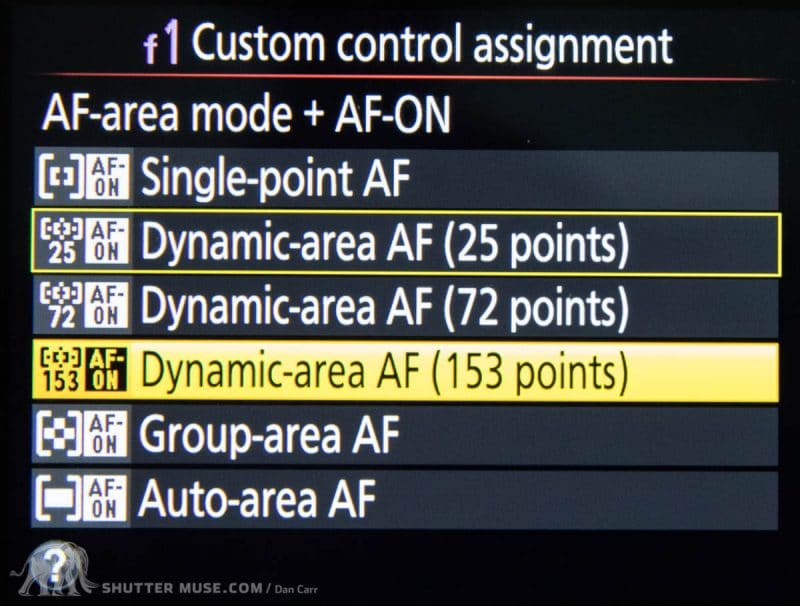
Step 6.
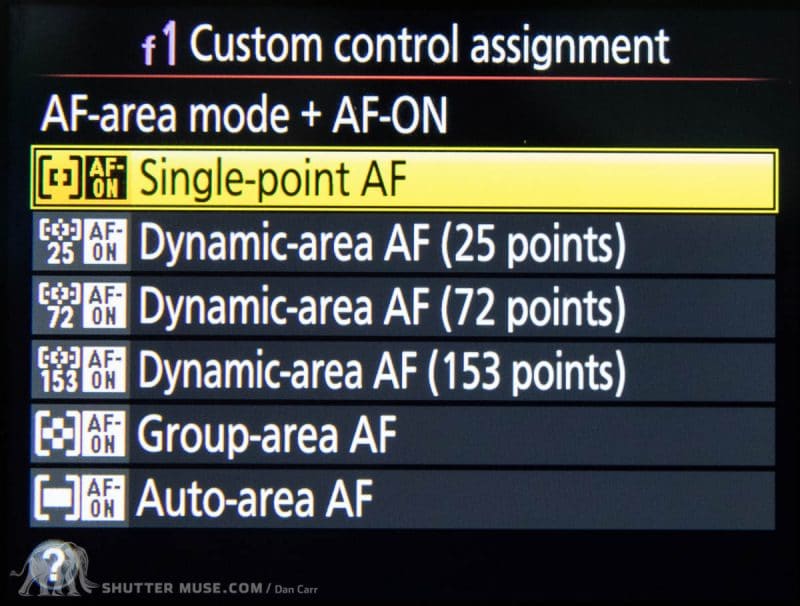
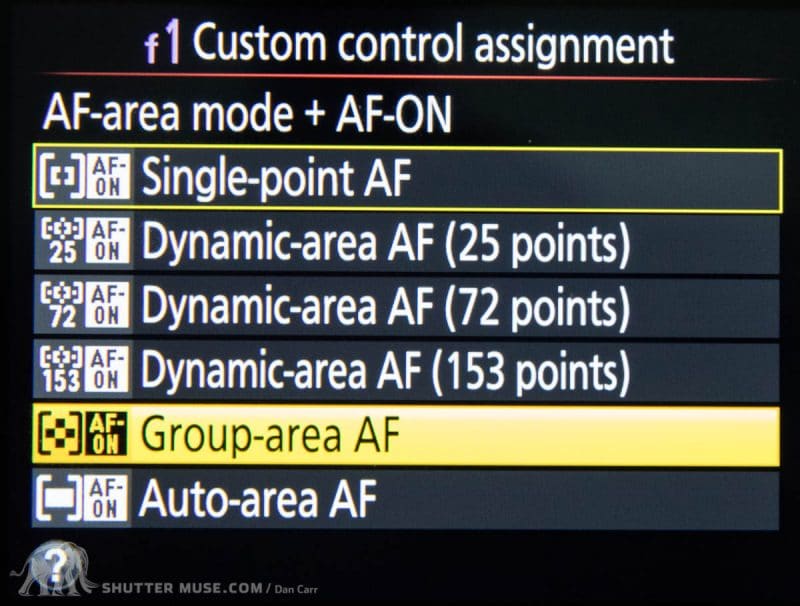
In this menu you can see that you’re able to choose the type of autofocus function that is activated by the press of the AF-ON button. For this example I’m going to choose Single-Point AF, but the choice is yours.
Part 2 – Second Button
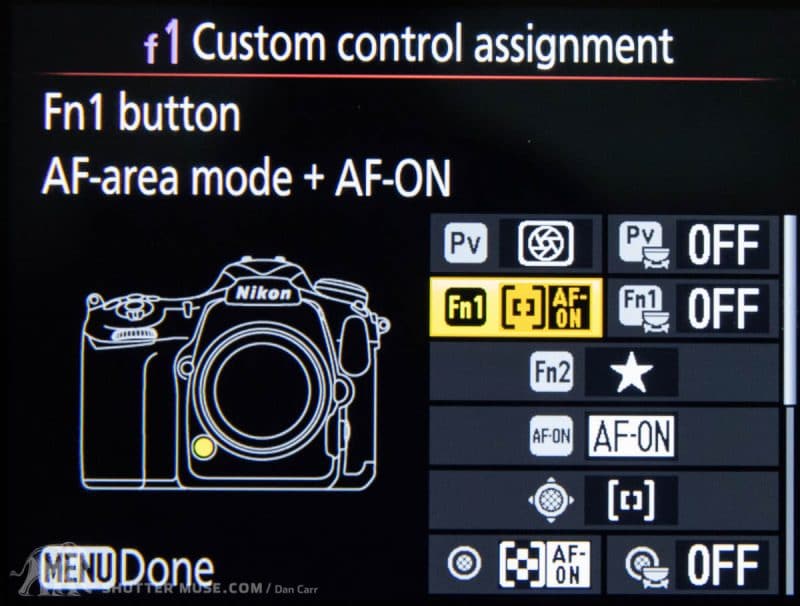
Basically the process is going to be repeated for this second button, except that this time you’ll choose a different focus area mode. Exactly which button you choose for the second button is again, up to you. Nikon generously gives you several options on most cameras, including function (fn) buttons, and the depth of field preview button on the front of the camera. For this example, I’m choosing to use the sub selector centre because it is closest to the AF-ON button which makes it faster to switch my thumb from one to the other. You can see that I chose Dynamic 153-point or d153.
That’s it! With these settings, you can press the AF-ON button to use single-point AF, and a press of the sub selector button to activate d153 focussing. One thing that’s worth noting is that the AF Mode (AF-C continuous, AF-S single shot) isn’t affected by these buttons. So you still need to choose that, and then the two AF-ON buttons you’ve setup will just activate whichever mode is currently selected. The vast majority of people will want to simply select AF-C and leave it there though, because AF-S is somewhat redundant when you use any kind of back button focus. Simple press the AF-ON button quickly to focus, then release it, and you’ve basically got a single shot mode right there anyway.
Want to Take It Further?
If you don’t need to use the customizable buttons for anything else, you could even assign a third set of AF settings such as Group-Area AF to one of the buttons on the front of the camera, such as DOF preview button of Fn1. Be careful not to make things too complicated for yourself though!


Hi Dan – great article – thanks!
I have a question about opening up more options with back button focusing (by reversing the buttons / focus options that you show in your article)
On my d850 – I use the sub-selector/joy-stick for Single Point Focus, and I set the AF-ON for AF-ON (using the Customer Control Assignment).
Here’s my question….if I change the Dynamic Range to say 25Point using the AF button and scroll front wheel, is that what my AF-ON button will become? If effect I am setting the back-button focus of AF-ON to 25Point. If I need to, I could change it to Group if that what the shot requires. If this is correct – then there are more options for Back-Button focus….the sub-selector is always Single Point focus, and the AF-ON button is whatever I want by using the AF button to change the dynamic range.
If I’m correct – your set up has 2 permanent focus areas because you lock those in the Custom Control Assignment. In my method – I have one permanent (single point focus on the joy-stick) but I have flexibility to use the AF-ON to whatever Dynamic range I choose
I’m keen to get your feedback as I dont really know if I can use the AF-ON button in this way
Thanks a mill
I’m sorry but I think this is going to fall into the category of things I can’t test. I don’t have a D850, and with every camera being slightly different there are just some things I can’t try out. As you have the camera, give it a try and see what happens!
Under Part 2 – Second Button: i also want to assign my other AF option to the sub-selector button. But there is no AF-On option in the D850’s sub-selector menu.
I’m afraid I don’t have a D850 here so that is going to be a tough one to troubleshoot, but I don’t believe that this is an option. Not all options are available to every button unfortunately.
I bought a Nikon D850 recently, and the settings I was confused about were answered but you! Thanks so much for your wonderful article Dan!
You’re very welcome Dennis!
Dan, This well written article is the most helpful tutorial I’ve found for setting back button autofocus. I’d like to share what I think is an unintended consequence of setting the Control/F1 setting the AF On button from its default AF ON to “AF Area Mode + AF On”. I’m totally on board with back button autofocus and have taken thousands of images that are incredibly sharp–I’ll never go back to focusing with the shutter release. But with autofocus set to single point/3d with face detection on this control f1 setting, the focus point never moved/tracked with my subject–the single selector stayed where I initially put it and never moved at all. It turns out that with AF Area Mode + AF ON the focus selector will never move. Changing it back to AF ON has restored 3d face detection so it works as expected now (now I’ll find out if if 3d face detection will work out for me). Thanks again for helping me understand this very unintuitive menu. BTW the behavior was identical for both my D850 & D500. BTW those mountain/skiing images in your related article are technically and artistically gorgeous.
Thanks. This is a useful reference to cite for advice etc. The Nikon manuals are obscure on how to do such custom setups. An important reason why we need Double BB and in fact more custom options is because modern Nikon DSLRs have inherited the fossil feature from the early AF controls of SLRs of the film era circa 30 years ago. This is the clumsy control camera-left + scrolling the front-wheels!?! Nikon’s Z cameras have moved forward, which is obvious as these cameras have lost the internal AF motor.
The D850 is very similar to the D500 and the head of the Nikon Triumvirate – D5.For wildlife I have the A,C,D Menu banks on the D850 setup for Triple-Back-Button Focus (TBBF) using AFC ONLY. This is the simpler name for my setup, but not quite as detailed below.
1. AF-On is set to AF-On+d25 [but this is flexible)
2. sub-Selector is set to AF-On+Auto-AF
3. Pv is set to AF-On+Single-Point
NOTE 1: I have Fn set to Single-Point Exposure, so pressing Pv and Fn together with the AF cursor on the subject’s eye grabs sharp focus at the correct exposure. If subject then starts moving/flying use your thumb to either of either Back-Button with respective AF-cursor setting.
NOTE 2: Setting the sub-Selector to AF-On+AF Cursor-setting is a crude fix, as Nikon dropped the AE-L/AF-L off their Triumvirate of DSLRs. YASDIT!!! Yet Another Stupid Decision In Tokyo
NOTE 3: Crucially, I have the Red-Record button setup to scroll between Photo Setup Banks. A, C and D are identical in TBF (also AutoISO), except A = 14bit lossless RAW versus D = 12bit lossless RAW. Bank C is also identical except the sensor shoots 1:1 format in lossless RAW. (Bank B is for landscapes: AFS, ISO64.
NOTE 4: Scrolling A D is very fast, and it’s only an extra “Click’ to Bank C if you choose to crop in camera. Obviously if want a DX / custom crop, do this in Post.
Final point – In yet more YASDITs, Nikon reversed away from almost all these BBF options in the Z6 and Z7. You cannot even set AF-On+AF mode. This loss together with inferior AFC continues to cripple these otherwise excellent cameras to shoot action. Showstoppers for many photographers (Oh Nikon?!!).
Unfortunately, Nikon persist in ignoring the urgency to fix these showstoppers in the Z System. The i-Menu is a great setup forward, which they will hopefully build into any future DSLRs. As the situation stands 1+ release of the Z System, the message is do NOT buy a Zed Nikon until they update the Custom Menus with Firmware.
Yes Z7 seems to be problem child for many. I set Fn1 to focus tracking and Fn2 to AF mode/Area. Running in AFC and 3d hitting Fn1 then allows to set the area you want to be tracked and in AF very simple. Hitting Fn1 again removes the ability to set this AF area and plain reverts to 3d. The lens is know were you want it. Essentially you get the same as we have in the D850 and it seems to me simpler. Check it if this may work for you.
Excellent article Dan. Truly appreciate your knowledge and willingness to share the same. Instructions and intent are clear and concise. Thank you!!