
Although I live among the mountains of British Columbia, I’m not all that far from the Pacific Ocean. One of my bucket list goals has always been to buy a sea kayak and use it to photograph more of the coastal environment that are on my doorstep, and this past summer I finally began to take steps towards making it happen.
Finding the Kayak
Firstly I researched many different types of kayaks until I found one that suited my specific needs. I wanted one that would offer a stable photographic platform, and it also needed to have a large cargo volume because I knew I would want to carry a lot of camera gear on some of the adventures I had in mind. On top of that, I tried to find one that was relatively lightweight, because I often work alone and wouldn’t be able to count on someone else to help me carry the boat to the water or lift it on and off my vehicle all the time. Finally, I also wanted it to be relatively manoeuvrable on lakes and wide rivers so that I wasn’t entirely limited to using it in the ocean.
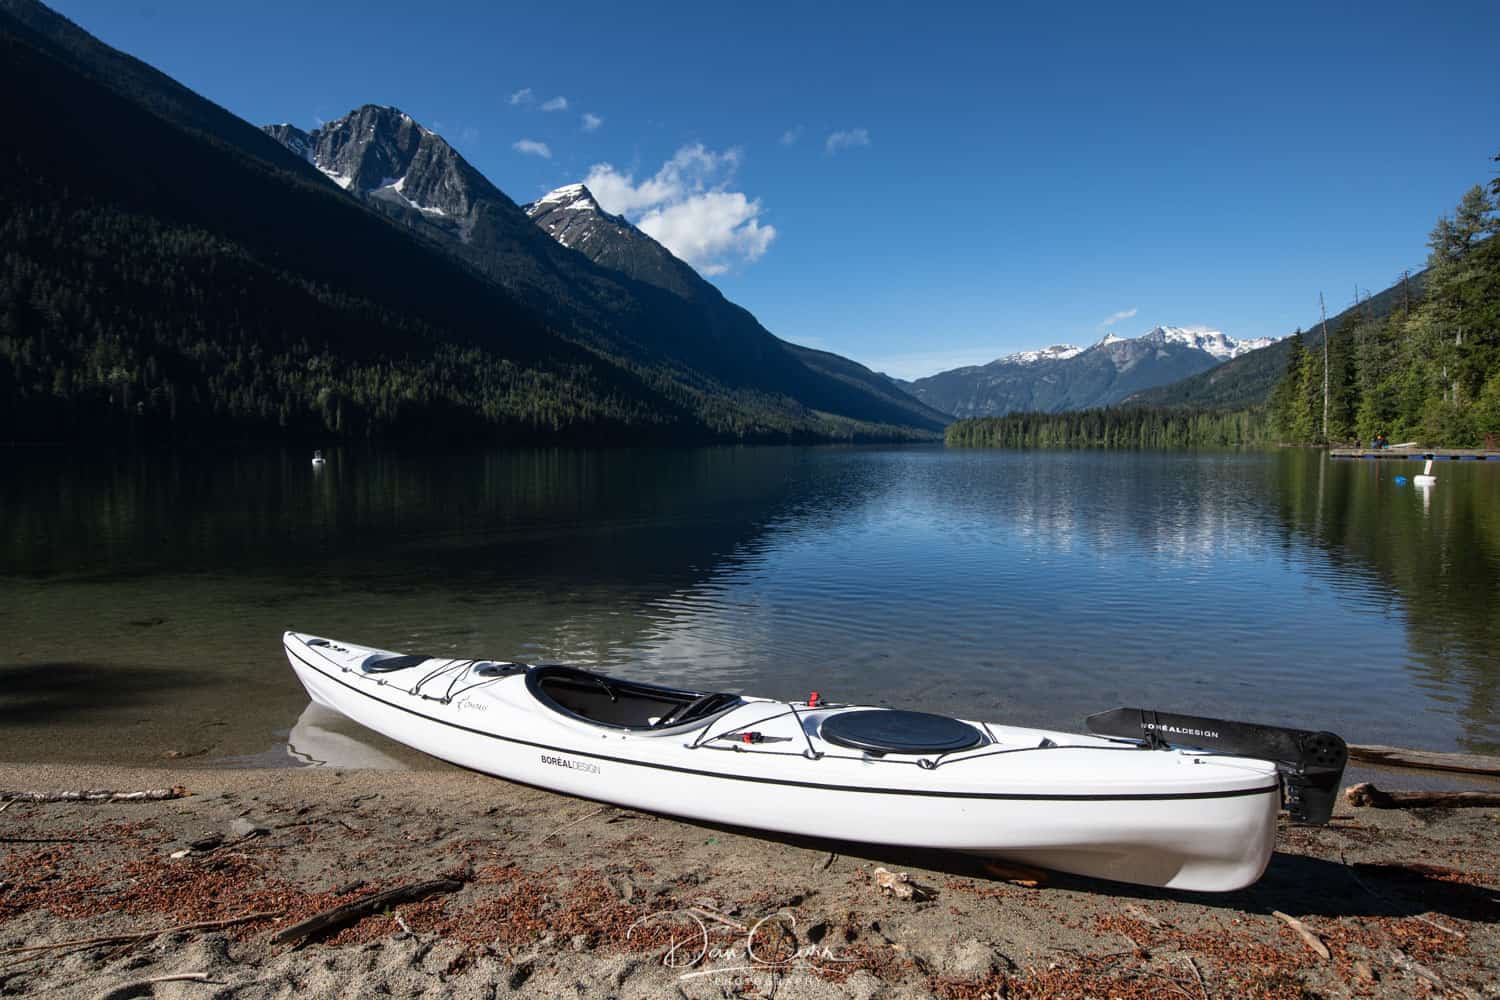
It proved quite tricky to tick all those boxes, and it was something that probably kept this goal of mine from being achieved for some time. In 2018 though, a Canadian company called Boréal Designs launched an Ultralight version of one of their popular touring kayaks, the 14ft-long Compass 140. Finally I had found my boat, and I excitedly placed an order with a local dealer.
I’m not entirely new to kayaking, or photography from a kayak. In fact many of my grizzly bear photos that have been regularly used in articles on this website have been shot from another kayak that I already own. That kayak is a bit of a different beast though. It’s a technically a lake fishing kayak and therefore fairly useless in the open ocean, not to mention heavy and lumbering, with no watertight bulkheads. I’ve had great success with using it as a wildlife photography platform, but this time I needed to tackle some different challenges.

Paddle Preparation
While I waited for my new sea kayak to arrive, I brushed up on some old skills, and taught myself some new ones such as open water navigation. I’ve always loved that photography gives me a reason to learn so many other different skills, and I tend to dive headfirst into new challenges like this one.

Once the kayak arrived, my first task was to figure out how to safely carry camera equipment with me on my next adventures. Some equipment could be stored in dry bags in the watertight hatches at the front and back of the boat, but I also wanted to have a camera and at least a couple of lenses close to hand while I was paddling. After some lake-based trial runs, I determined that the best way to carry the camera was to have it in a Pelican case that was strapped behind me on the deck of the boat. Initially I tried using a similar setup on the front of the boat, but I quickly decided that I also wanted to capture some interesting point-of-view images on my trips, and this would have left them all with a big bulky Pelican case in the centre of the shot.
My final setup was to use a Pelican Storm im2050 case to hold two lenses, and a second Pelican Storm im2075 case to hold the camera body with a lens attached to it. As you can see in the photo I sensibly tethered these cases to the deck rigging so they couldn’t float away if they were swept off the boat by a wave.


With my new kayak all set up and ready to go, I was itching to have my first big adventure in it.
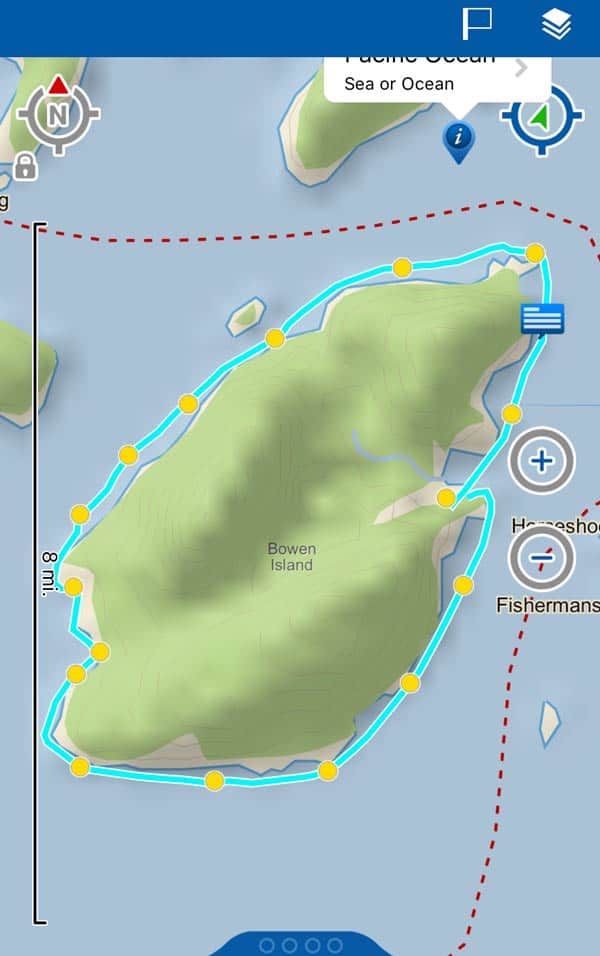
Some years ago I had read about a kayak race around Bowen Island, a small island off the coast of Vancouver that’s just a couple of hours south of where I live. I’ve explored the island by car on a couple of occasions, but I was excited by the idea of circumnavigating the whole thing on the ocean and getting a different perspective of some of the gorgeous ocean views I had seen from the land.
The total distance around the island is 32KM. While this seemed like a heck of a long way to paddle in a day, I reminded myself that people do race that distance every year so it must be within the realms of possibility. Whilst I hadn’t ever paddled a great distance in the ocean before, I was feeling fit and well prepared from a safety standpoint.

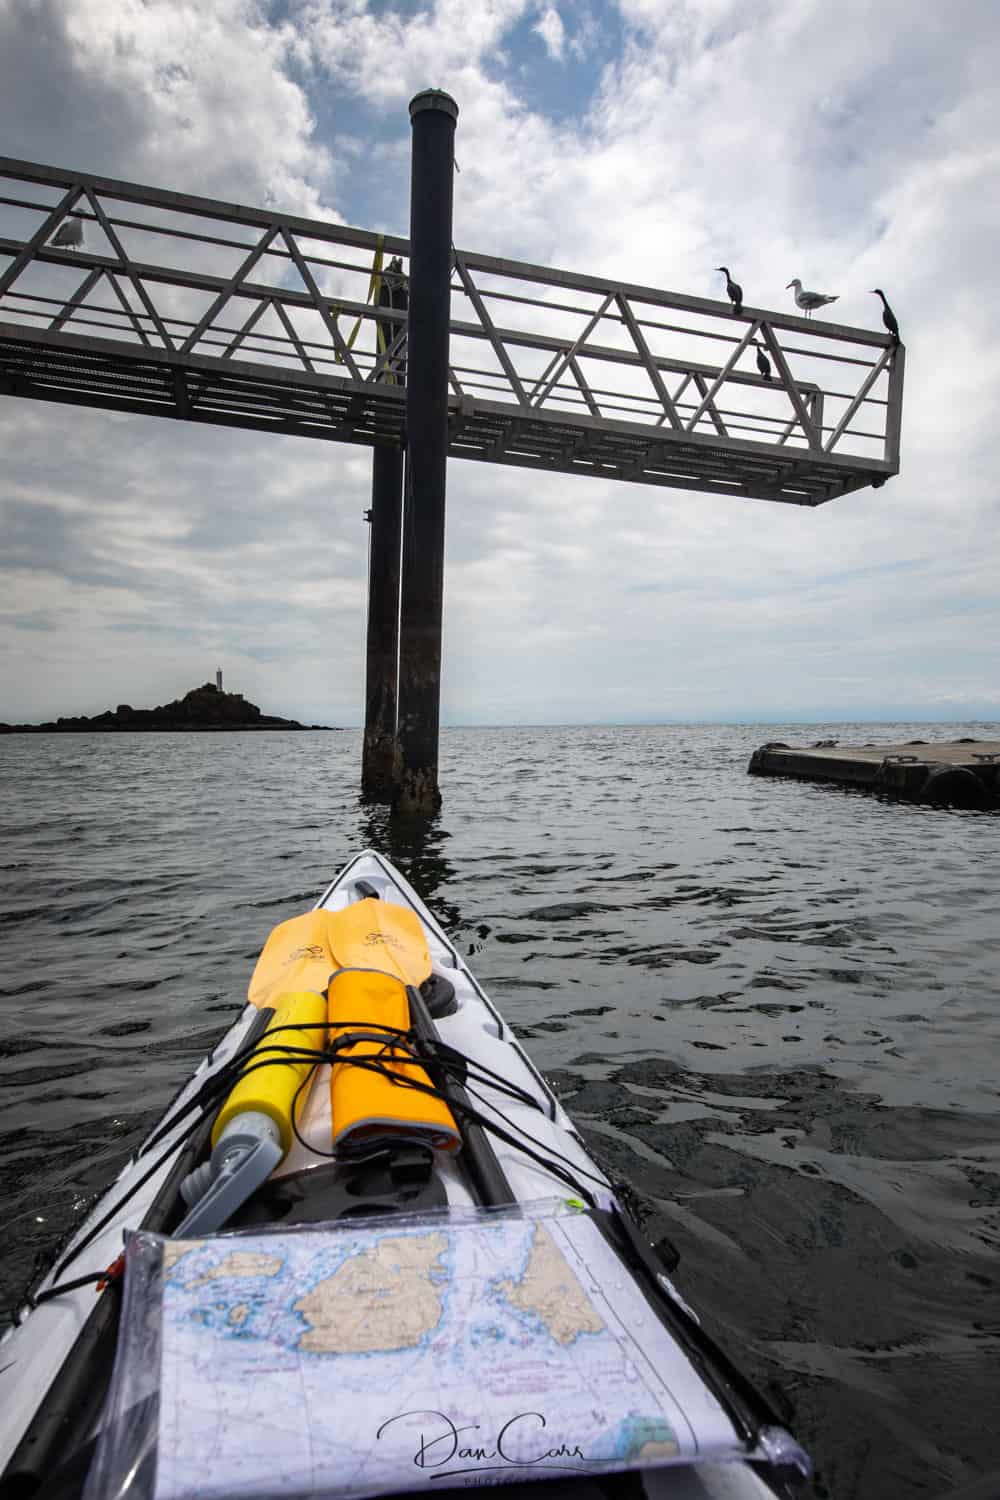
My plan was to leave my house at 4:30am to make the 2-hour drive to the ferry terminal near Vancouver. A quick 20-minute ferry would then take me and my kayak over to Snug Cove on Bowen Island, and I should be in the water and on my way by about 8am. As the ferry crossed the narrow straight to the island I took some time to scout the area from the deck, and in particular I wanted to pinpoint the paths of several ferries that leave the mainland terminal. In my research about the circumnavigation, one of the constantly mentioned warnings was the heavy ferry traffic in the area. Some of these ferries are huge, carrying several hundred cars on their way to Vancouver Island, and I didn’t much like the idea of being too close to them in my tiny plastic kayak…
As we neared Snug Cove I also noted stronger winds that I had really wanted to find. The problem with paddling a circle entirely around an island is that it doesn’t matter which direction you choose to paddle, there will always be one stretch of it where you’ll be paddling into a headwind if things keep blowing in the same direction all day. Had I bitten off more than I could chew for my first longs distance ocean adventure? Should I really be heading out there on my own? These were just a couple of the questions that were running through my mind as we pulled into the cove.

Now, I say “alone”, which is true in the sense that there was nobody else paddling with me, but I wasn’t going to be totally cut off from the outside world. I always carry a Garmin InReach Mini with me so that I can send an SOS message in an emergency, and so that my partner can keep an eye on my progress. If you aren’t sure exactly what an InReach is, read my InReach Mini Review here.
For this trip I set up the InReach to ping a new GPS marker point to a map every half an hour, and that way I don’t need to manually send her messages with my location while I’m paddling. She can sit at work all day and just refresh the map every now and again to check that I’m making progress. It’s a wonderful system, and as you can see from some of the included screenshot in this article, it’s a great way to keep track of all your past adventures too.
The Paddle
I won’t lie, this was really tough.
It turns out that 32KM really is a long way to paddle a kayak in the ocean, particularly when you’re facing choppy seas and headwinds. You can see from the GPS track that I ended up achieving my goal and finishing the solo circumnavigation, but it took just over 8 hours of nearly constant paddling, and I barely had anything left in the tanks when I pulled back into Snug Cove in the afternoon.

During the preparation of my kayak prior to departure, I had meticulously packed my camera gear and various safety devices that everyone should have with them in the ocean. Unfortunately, I hadn’t been quite so meticulous about packing my lunch! After battling a headwind for several hours on one leg of the journey, I pulled into a quiet cove full of sailing boats to enjoy my lunch, only to discover exactly where the phrase “swearing like a sailor” comes from. Luckily I had packed several sets of energy chews and plenty of water, so I wasn’t totally sunk, but I could have done without that particular moral dive at the half-way point. I won’t make that mistake again!
Of course I had known all along that this would be physically challenging, and the chance to push my body with a totally new sport was one of the reasons I chose the route. But I also wanted to get a few great photos from the experience, and on that front I wasn’t too sure what to expect until I got out there.

Alongside my Canon 5D Mark IV I packed my ultra-wide Canon 11-24mm lens and my Canon 24-70 f/2.8 II, assuming I would probably use a combination of the two throughout the day. As soon as I began taking photos with the ultra-wide in Snug Cove at the start of the journey though, I realized right away that I should keep that lens on the camera all day. This lens is the widest rectilinear lens on the market and the insanely wide field of view really immerses you in a scene, as long as you can place an interesting foreground in the image.
In my case the foreground was the kayak, and a quick look at the first shots on the back of my camera convinced me that this POV first-person style of image would be perfect to document my first ocean adventure. Not only did it make sense for me to document my journey from my perspective, but it also created some really unique looking adventure images that I knew would be useful to have for stock sales at some point in the future.
To be honest, I thought I would stop to take more photos than I did. As I pushed on through the ever-changing ocean swells and currents though, I quickly realized it was going to be a very long day and confined my photography to the bare minimum needed to tell the story. Luckily, my early morning exit from Snug Cove was greeted with those incredibly dramatic skies, so I knew right away that I had got a “hero image” from the day, and everything past that was just icing on the cake and a grin on my face.
Paddling this route in a day turned out to be a fantastic way to gain experience with this kind of kayaking and the challenges I might face while trying to photograph an adventure like this. Every time I turned a corner to tackle the next leg of the route, the winds, currents and swells changed quite dramatically. Sometimes there would be stretches of calm water that allowed me to fine-tune the efficiency of my strokes and make great pace, and then I’d turn a corner into a headwind, or have huge ferry wakes lifting me up from behind.
It was a tough day, but I learnt more paddling this demanding 8-hour route, than I probably would have done paddling 30 shorter, easier and less physically challenging trips! I’m so happy to have crossed another item of my personal adventure bucket list, and I’m also really excited to have gathered all these new skills and experiences that can aid and inspire future photographic adventures.
I’m already dreaming of all the other interesting places I could paddle a kayak in the world: The Lofoten Islands, Alaska, Svalbard… Stay tuned!


Hi Dan, Did you use any protective gear for your camera while shooting? I kayak also and so far I’ve only used my phone in a plastic pouch, I’m looking for a solution for using my DSLR with some degree of protection.
No I didn’t use anything. The way I figure it, how often do you drop your camera on the floor when shooting on land? There’s no real reason why you would drop your camera while sitting in the kayak! Once I’m not shooting, the camera goes right back in the watertight Pelican case. You could potentially use one of these for a little added piece of mind when holding the camera: https://shuttermuse.com/peak-design-clutch-review/
Hi Dan,
how are you?
Well done, that’s a long day a lot of paddling.
That’s a beautiful sleek looking vessel you’ve got there, it would be awesome where I live, I live on an island (eastern side faces Chile). Love the white colour too, can I ask you approx. how much it cost you.
I noticed you’ve updated to the Mark 4, you may have done that a while ago I guess.
I have wondered for a while now just how you managed those incredible bear shots, not only could you get close with a whopping 600mm lens or similar, but you weren’t on land, as I naturally thought.
I very much enjoy reading all you have to say & write, always informative.
If you’d like to come to N.Z. & visit the island then don’t hesitate.
Cheers, Stephen (N.Z.)
Hi Stephen! Thanks for the kind comments. The kayak cost me about $1800 Canadian. Not as expensive as a full composite kayak, this is using new rotomoulding plastic techniques which get the weight similar to a composite kayak but for much less money. I think it’s something that will spread in the market soon, but right now not that many companies have adopted the technique yet.
Yes I have has the Mk4 since the first week it began shipping several years ago 🙂 The kayak is nice for bears because their natural enemy is not from the water, so they pay less attention to things in the water and it helps you get closer. The lens is the Canon 200-400 in the photo, so actually I often do not need 600mm. I don’t have a 600mm yet, although I’m hoping to buy the new one that Canon is about to launch in the next couple of weeks.
What is the name of your island? I’d love to look it up on Google and see where you are! I love hearing from people around the world.
Hi Dan,
I live on the fourth largest island in New Zealand, Great Barrier Island. It lies roughly 50 miles east of Auckland City, North Island, N.Z.
It is actually part of the Coromandel Peninsula but over eons of time…, a great swath of sea now surges between the mainland (Coromandel Peninsula), & the island.
Dan, I have my heart set on buying a new camera & lens. I initially imagined that I would simply buy it for the best price possible & that was through B&H. Although this seemed like the logical way to go, after talking to a local photographic shop this is what he told me.
What I thought I would save (shop price NZ$5,399.00), (B&H – Sony Alpha a7R III Mirrorless Digital Camera Body with Accessories Kit
US: $3,399.00 – NZD: 5,082.18
Reg $3,619.00 -$220.00 Instant Savings), he said would be soaked up by paying my government duty tax (something like that). But the clincher was the fact that the warranty/guarantee if bought overseas would not cover me in this country. Can you help me to understand this mess please Dan.
Cheers, Stephen.
There will be some duties and GST to pay. There’s a calculator here: https://www.customs.govt.nz/personal/duty-and-gst/whats-my-duty-estimator/
You’ll have to try that and see if it eats up all the savings. With regards to the warranty, yes it’s almost certain that the warranty would not be valid in NZ. If you ever had a warranty issue you would have to ship it back to the US to get it sorted out. For many people that’s a risk they take because savings are still worth it.