
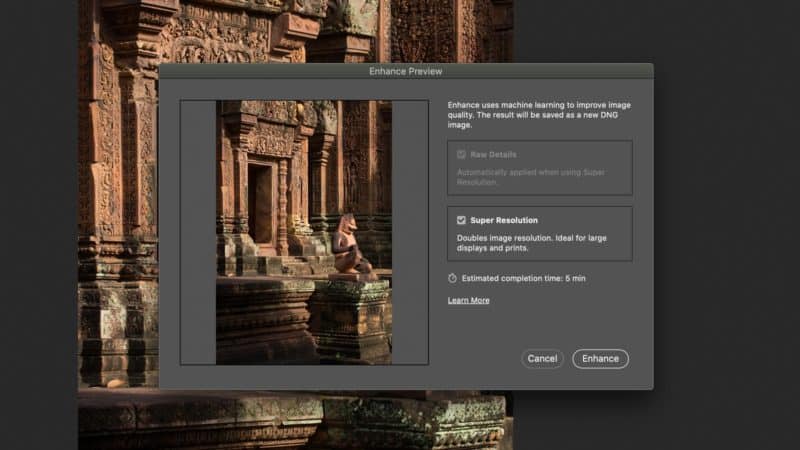
Adobe engineers have been hard at work adding new AI-based features to their software, and in March 2021 they added the most important one yet. The new Super Resolution feature builds on the Enhance Details feature that was added to Photoshop and Lightroom in 2020. Enhance Details uses AI machine learning to add additional fine details to your existing image, and correct aliasing issues. It then spits out a new DNG file that contains the new, more detailed image.
With Super Resolution, Adobe is taking this a step further. Once the Enhance Details option is selected (photo>Enhance Details), you can now check the box that says Super Resolution. When this option is chosen, Adobe Camera Raw will enlarge the image so that the longest edge is now twice as long. Afterwards, you’ll end up with a new DNG file. All previous Camera Raw edits will be automatically applied to this new DNG.
Note that this process does not double the number of megapixels in your photo, it quadruples it! For example, a 24MP photo has a pixel dimension of 6000x4000px. Super Resolution will double the longest side, giving you a new image with a 12000x8000px size. That’s 96MP!
This new feature opens up a world of possibilities for people that want to create large prints with smaller resolution cameras. Or people that would like to go back through their archive and print older images that were taken in a time when digital sensors were lower in resolution.
How to Find and Use The Super Resolution Feature
Several comments on this post are suggesting to me that it’s not intuitive to find this Super Resolution option in Adobe Camera Raw. Here is a step-by-step guide:
- Open your image in Adobe Camera Raw (see additional notes below if you don’t know how)
- Right-click on the image
- Select “Enhance Details”
- Check the box for “Super Resolution”
- Click “Enhance” button.
At launch, this feature is only available in Adobe Camera Raw, but it will be coming soon to Lightroom CC and Lightroom Classic. It should also be noted that it is not limited to RAW files. You can perform a Super Resolution enhancement to a JPEG or a TIFF, too.
Opening an Image In Adobe Camera Raw (ACR)
For those that usually work in Lightroom and are not familiar with Adobe Camera Raw, you can open it by simply dragging a RAW file from your file browser to the Photoshop application logo in your application bar. Or, if you are looking to work on a TIFF or JPEG, the easiest way is to use Adobe Bridge to browse your files, then right-click on the one you need and click “Open in Adobe Camera Raw”.
Testing Super Resolution With an Older Image
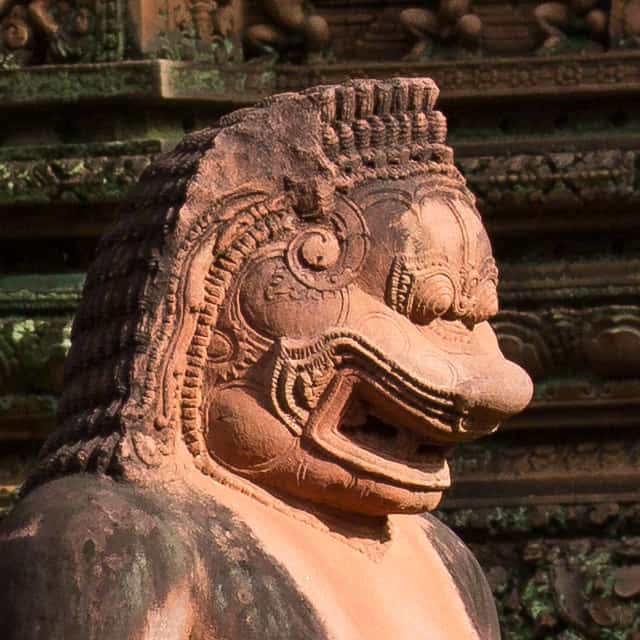
As soon as I heard about this feature, I had to test it out for myself. For the first test, I chose a challenging image with a lot of details in it. This photo was taken in Cambodia some time ago with a Canon 5D Mark III. At the time, the 22.3MP sensor was cutting edge stuff. While I’m actually still incredibly impressed by the amount of fine detail in the original file, 22.3MP is somewhat limiting when it comes to making large prints. This image is a prime example of one I might go back to in my archive, and consider printing much larger if the Super Resolution feature can perform some magic.

Here is an overview of the original image so that you can see what we’re working with:

Original 100% Crop
Next we can see a 100% crop from a detailed part of the original image:
Bicubic Enlargement 100%
Adobe’s standard method for image enlargement uses a process called bicubic smoothing. This is the process that is used if you simply open an image in Photoshop, then go to Image>Image Size and enter image dimensions that are larger than the original image.
To get a baseline on how well the new Super Resolution feature performs, I think it’s important to take a look at results of the older process.
As you can see, this isn’t a great result. The original image details have been lost, and printing an image using this version would yield only marginally better results than simply using the original image with a lower DPI.
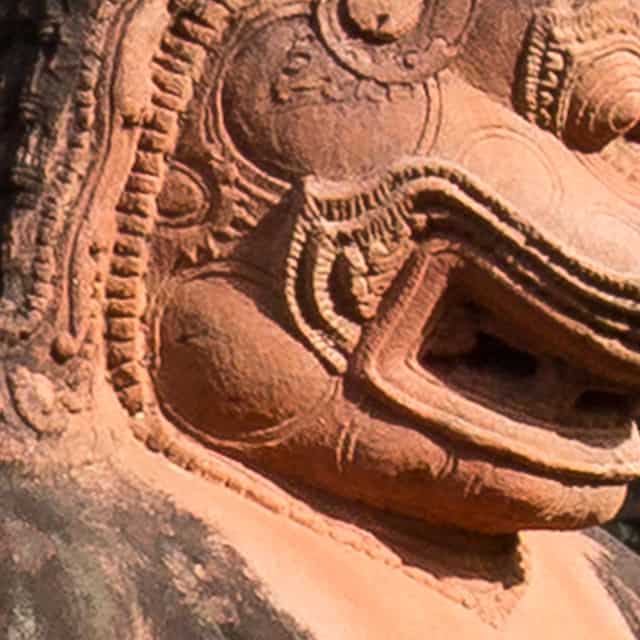
Super Resolution 100%
Now let’s run the exact same process using Super Resolution. Here is the new 100% crop from what is now an 89MP image file:

When I first opened the full image and scrolled around it in Photoshop, my jaw hit the floor. Look at the difference! If anything, this new image looks a little too sharp! ACR is obviously doing some sharpening during the interpolation process, and I think it might take a little experience to judge how sharp of an image you want to feed into it. Perhaps you don’t need to apply much, if any, sharpening to your original image to get the perfect output from the Super Resolution version.

What I’m not seeing at all, are any weird artifacting issues or any additional noise over and above what was in the original image. Honestly, I think this might be the most impressive Photoshop/Lightroom feature I have ever seen.

Please keep in mind that displaying the results in a compressed-for-web JPEG form is not really going to do this the justice it deserves. If you think the results are pretty good in this example, just wait until you try it for yourself! This is a 22.3MP photo that has been turned into an 89MP photo in a very useable way. Incredible stuff.
Initial Conclusions
My firsts tests with this feature produced amazing results. There’s no doubt in my mind that this will help many people create larger prints with their images. What is nice is that for many people who already subscribe to the Creative Cloud, this is a major new feature that they are getting for no cost. And one that previously would have required a relatively expensive plugin to get somewhat comparable results.
Topaz Gigapixel AI will still have a market for those that don’t use the Creative Cloud, but I would imagine that CC users will start to lean towards using the Adobe Super Resolution feature, particularly once it does arrive in Lightroom CC and Classic.
From a workflow point of view, it’s relatively simplistic at the moment. It would be nice to see some batch processing capabilities in the future, similar to those that are offered by Topaz Gigapixel AI. I’d also like to see one or two more options regarding the output size. For many people, quadrupling the image size is going to be overkill. I’d like to see a lesser option, particularly when you take into account the enormous size of the Enhanced DNG file that you end up with.
A head-to-head comparison with Gigapixel AI will come very soon. Stay tuned!


Weird. I can’t find that option in photoshop camera raw. Even though the fancy splash screen told me about super resolution.
I have added a section to the article to explain this in more detail.
I have a TIF open in PS and no option to enhance when I right click. Why can’t I find it in PS?
I’m not seeing instruction on this, thank you.
Same here…also on my raw 13.2 (which should show it) and on newly updated photoshop 22.3… but absolutely Nada…nothing… no ENHANCE wording in Popup window showing.
The Adobe ENGINEER , ERIC Chan, who promoted this on ADOBE website, might know more.
I wonder how many do not have that option actually showing up
Strange.
BTW. I removed the email address for Mr Chan. It appeared you were trying to post his private email address publicly. Not a good idea.
“What is nice is that for many people who already subscribe to the Creative Cloud, this is a major new feature that they are getting for no cost.”
For LR users: The monthly cost for CC is exactly for this. If you look at the relative minimal innovation (approx. one new feature a year) compared to the cost of LR since it went subscription based (after version 6) its about time that the $120/yr price got some innovative features vs just a means to make color grading easier. LR 6 as a program used to cost around $150 so looking at it you are nearly paying for a new program every year. We SHOULD expect more from Adobe as a subscription service.
Your analysis fails to take into account that you get access to LR and PS. Sure, LR used to cost $150, but Photoshop used to cost over $500.
People love to hate on the Adobe model. But if you don’t like it, there are plenty of non-subscription applications out there that work great. Affinity Photo, Luminar, Capture One…
My analysis takes into account that I do not ever use PS so that part of the equation is irrelevant to me and always has been.
I have transferred from Nikon NX-2 to LR. Moving again is a royal pain to learn the tricks of a program.
But you transferred in full knowledge of the cost, and the fact that you don’t use PS. I don’t know what to say, except that clearly you will always be annoyed by this, so perhaps you should take the time to switch. You are paying for features you don’t use, and then that cost is annoying you. Seems like a prime candidate for a switch, to me.
Folks, there’ll probably be no changing Charles’ opinion on this, so I won’t try. But for others who might be reading, here’s a tip from a retired IT pro: Subscription services for software aren’t just for new “innovative features.” They also cover costs of maintaining the product: fixing bugs, security flaws, maintaining compatibility as the operating system changes and is similarly maintained; etc. Coming from the field, software subscriptions are a good business model — for the consumer as well as the publisher. (And no, I wasn’t a developer or even in the private side of IT.)
Where exactly is this located in Photoshop?
I have added a section to the article to explain this in more detail.
Thank-you, Dan! Nice demo/intro. Will look forward to testing it out.
Hummm, maybe I should get that R6?
Exiting news, looking forward to using it in lightroom cc when the update comes..Thankyou for the info.
That will be a nice update to the workflow when that comes, yes.
Thanks Dan. I can get it to work with RAW files but when opening a JPEG or TIFF file in ACR & right-clicking, the ‘Enhance’ option is missing?
You need to drop the the jpeg/tiff in Bridge, then right click and export as a DNG. Then do the process with the new exported DNG from jpeg/tiff file.
Hi Dan , thanks for the article . Any idea why Lightroom doesn’t want to recognise and import the newly supersized DNG saved in my folder next to the original DNG file ? many thanks
No idea! Perhaps support for those DNGs in Lightroom will only come once Lightroom offers native support for the feature.
It did not work for me. I saw no discernible improvement after the process. I tested on raw files from a 46M Nikon D850 and from a 10M D40x. Neither showed any perceptible increase in resolution Quite disappointed after all of the glowing reviews
I was just playing with Super resolution and a jpg file. Once I have the higher resolution file, I rimported it into lightroom, and there, the resolution is shown as the original resolution, not scaled in any way?
Ever since I read this review back in March, I wanted to test it myself. Thanks for pointing this feature out for us. Strangely, Adobe apparently did not bother making it very public, did they?
Well, I finally got the long awaited opportunity to test it myself, and I am every bit as fascinated as you were, Dan. I even think I have a use case that you did not explicitly describe.
I was on an alpine hike with my family last Wednesday, when all of a sudden I discovered a juvenile Capricorn. I aimed my 5d iv with 100-400 ii x 1.4 iii at it but this did not give me the reach I really needed for the situation. I nevertheless took a few pictures with super res in post already in mind. I find the result indeed quite convincing. After cropping, I still have enough res for decent print or high res screen.
Cheers,
Urs
You are right, that is a good use for it! Since I first wrote this post, I’m happy to see that you can now do Super Resolution from inside Lightroom, too. You do not have to rely on Photoshop so they have made it even easier.