
In this post, I’m going to teach you how to photograph a lunar eclipse. I’ll walk you through the process of shooting the entire eclipse from start to finish, followed by a Photoshop tutorial to combine the images into an amazing looking sequence. As a bonus, I have also added a discussion about how I shot a second, very different type of lunar eclipse photograph that went viral all over the internet, and was even featured on national news in the USA.
I learned a heck of a lot shooting these two images, and I did a lot of research to make sure I came away with the right results from these two rare events. With lunar eclipse photography, you really can’t afford to get it wrong because the perfect scenario might not come along for many more years. Case in point, the second shot we will talk about will not happen in that same way for another 18 years!
Table of Contents
Gear Needed to Photograph a Lunar Eclipse
Which Lens for Lunar Eclipse Photography?
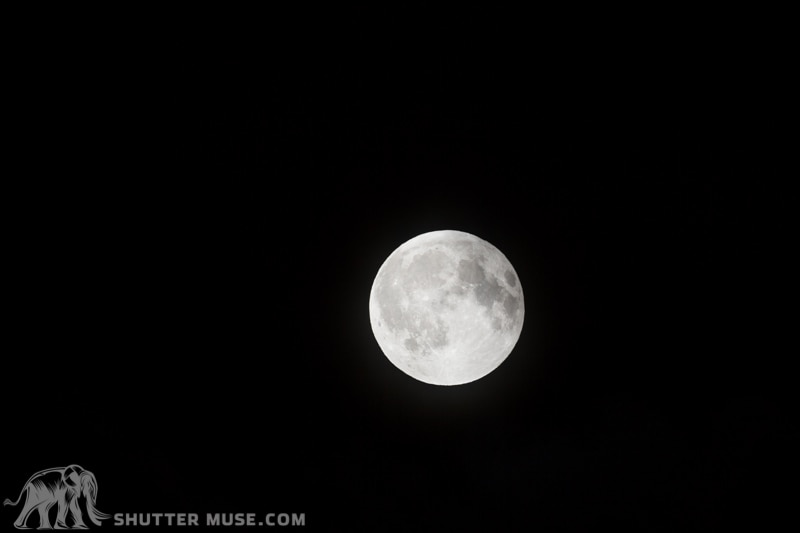
Let’s get this out of the way first because I don’t want to rain on anyone’s parade later on. To get great moon photos you’re going to need a telephoto lens with a focal length of at least 400mm, but preferably even more.
For the photos in this tutorial, I used the Canon 200-400mm with its built-in 1.4x extender engaged and an external 1.4X extender added to the rear of the lens. This gave me a focal length of 784mm, and as you can see from the sample image above, even then, the moon was just a tiny fraction of the frame.
If your plan is to create a single image where a single moon is filling most of the frame, your best option is to use a 600mm lens with a 2x extender to reach a focal length of 1200mm. Of course, not many people own lenses like this, but you can always rent them from LensRentals. Just make sure you book the rental some weeks in advance when an eclipse is approaching. You won’t be the only one with this idea!
On the other hand, if your plan is to create a composite image of the moon’s transition into and out of the eclipse, as we will be doing in this tutorial, you do have some more leeway. In this case, we will be cutting the individual moons out of several different images, and creating one final image in Photoshop. We want that final composite image to have a good resolution, but the individual moons within it can be a little smaller and cropped out of a much larger frame.
What About Sensor Size?
If you’re using an APS-C cropped-sensor camera, your field of view will be equivalent to the focal length multiplied by either 1.6x or 1.5x depending on your camera brand. This gives you a good advantage for lunar photography. For example, you would only need a 490mm lens to create a moon that fills the same proportion of the frame as I did when I used a 784mm lens on my full-frame camera.
So, the longer the focal length the better, but on a cropped-sensor camera, a 100-400mm lens or a 100-500mm lens will create a large enough moon for cropping and composition into a lunar eclipse phase sequence. If you have a 300mm and a 1.4x extender, that will get you to 420mm, or you could use a 70-200mm f/2.8 with a 2x extender.
On a full-frame camera, you should aim to use at least a 150-600mm lens or the Sony 200-600mm lens for Alpha shooters. If you have a focal length extender, use it! Remember that 600mm with a 1.4x extender is still only 840mm. Not a huge amount more than what I shot with, and the moon was still quite small within my frame.
These kinds of focal lengths will be fine for creating the sequence of moon phases that we are going to look at in the first part of this tutorial. And they will also be fine for creating a landscape image that includes the lunar eclipse within it, as we will see in the second part of this tutorial.
Just remember what I said before, though. If you actually want to fill the entire frame with the moon, or get close to that, you are going to need to roll out the big guns and use something like a 600mm f/4 with a 2x extender.
Tripod + Tripod Head Requirements
Once you start using a long lens it becomes much harder to keep the camera steady at slow shutter speeds. You are going to need a good-quality, solid tripod to work with your telephoto lens setup, as well as a good tripod head. I always use a tripod that is rated to hold at least twice as much as my camera and lens combination weighs.
For your tripod head, a ball head can work, but again, it needs to be of very high quality. A common issue with cheap ball heads is that when the ball lock is tightened, the ball moves and changes the view through the viewfinder ever so slightly. It’s barely noticeable through a wide-angle lens, but when your focal length is up near 800mm the slight shift could be enough to move the moon completely out of the frame!
Another issue that can occur with cheaper ball heads is creep. This is where the head cannot completely support the weight of your camera and begins to move very slowly. With these long focal lengths, even a fractional amount of ball head creep will result in a blurry photo, so it’s extremely important to use a great ball head and lock it up tightly before taking your shots.
An even better option, if you have one, is a gimbal head. Gimbals can be perfectly balanced with your lens and camera combination. Once in perfect equilibrium, there is very little force in any of the head’s axis of movement, so creep is not an issue. With a gimbal head, it’s also much easier to make fine adjustments to the position of the camera when you are framing the moon in the viewfinder.
Pro Tip: If your tripod has an extendable centre column, leave it in the collapsed lower position when photographing a lunar eclipse with a long lens. Extending a centre column dramatically reduces the stability of your tripod, and with these long focal lengths, you need to create the most stable platform available to you.
Shutter Release

Pressing the camera’s shutter button will introduce vibrations into the system that will easily soften your photos when working at these long focal lengths. The answer is to use a shutter release, either a wired one or a one that is Bluetooth enabled. If you don’t mind messing around with your phone, all of the major camera manufacturers also have apps that will give you a remote shutter release.
You might think that you could forgo the shutter release also use the self-timer function on your camera, to allow some time for vibrations to dampen after pressing the shutter. For landscape photography, when a wide-angle lens is used, that can work. However, I do not recommend it for lunar eclipse photography. The long focal length magnifies all of the microscopic vibrations, and some will still be present after a 5 or 10-second timer.
The other problem presented by the self-time method is the speed of the moon as it moves across the frame. I guarantee that you will be surprised by how fast the moon can move from one side of your frame to the other. If you try and use a self-timer, there is every chance that the moon will be partially out of the frame by the time the shutter opens.
Pro Tip: Don’t underestimate how cold you can get when you stand outside for 4 hours. Take plenty of extra layers, a good pair of photography gloves, some food and some water. Staying fed and warm will keep your photography senses sharpened!
How to Photograph A Lunar Eclipse
Now that we have the gear requirements all sorted, we’re going to look at two different types of lunar eclipse photos and how to create them. The first is a sequence that focuses on the moon and the different phases of the eclipse. We’ll talk about how to shoot the images for the sequence, and then I’ll explain how to combine them in photoshop to create one final photo.
The second image is a landscape photo that includes the lunar eclipse within it. Getting these right requires some detailed planning before the event, so I’ll share my process with you and talk about the required camera settings for creating such a unique image.
Image #1 – How to shoot the moons transition
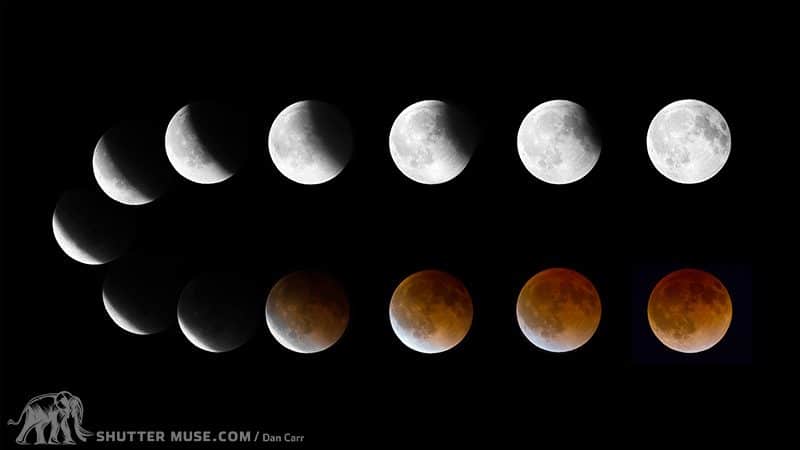
This particular eclipse took place in April 2014 and was the first of a tetrad. 4 consecutive total lunar eclipses, without a partial eclipse in between them. Tetrads are quite rare, but they aren’t evenly spread throughout history due to the change in the Earth’s orbit. This century we are lucky and there will be 8 tetrads, but from 1582-1908 there wasn’t a single one.
This example is also a so-called “blood moon“, but of course the tips in this tutorial are relevant for any other kind of lunar event that you might want to be shooting. NASA best described the blood moon phenomenon, when the earth, sun and moon fall into perfect alignment as if someone standing on the moon was “seeing every sunrise and every sunset in the world, all of them, all at once.” At this point, from the moon, the earth would appear as a dark silhouette with a bright red ring around its circumference as it completely blocks the sun. The light from that red ring is cast upon the moon and turns it this incredible shade of dark orange.
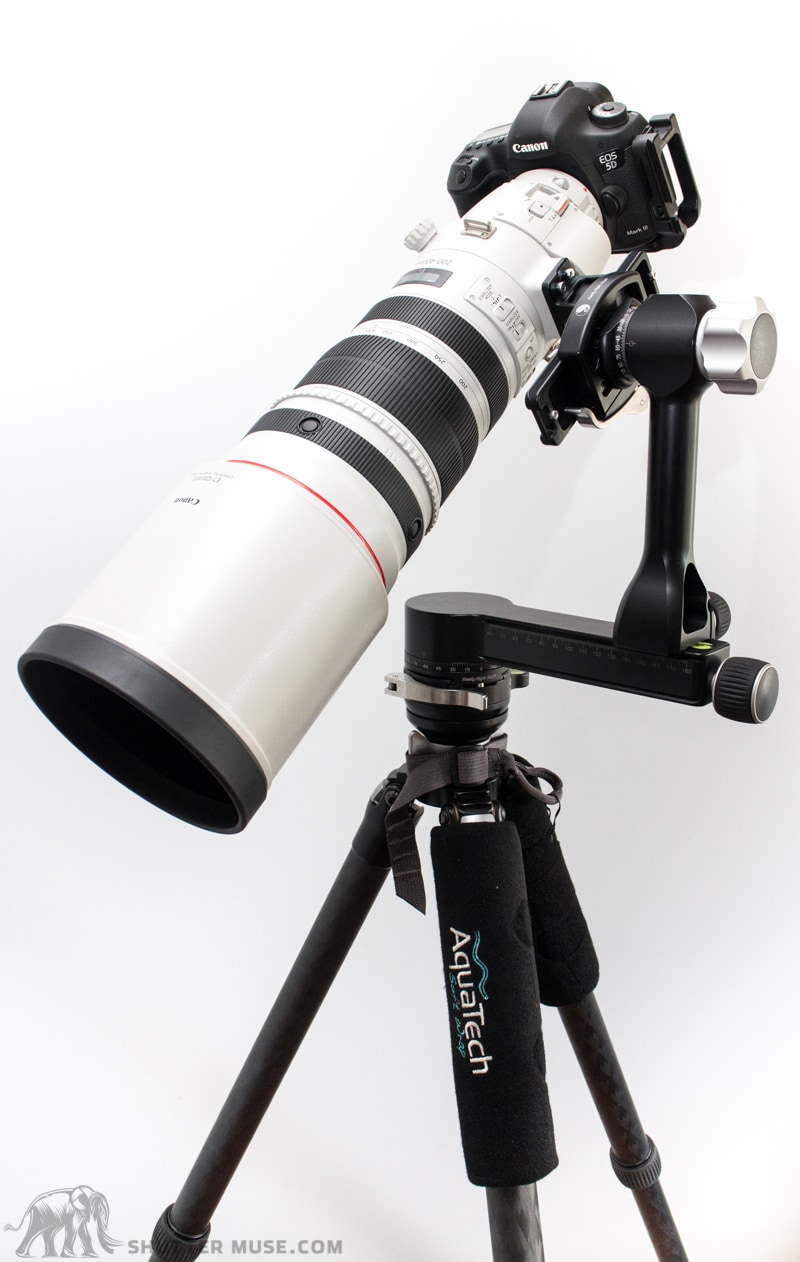
Gear used for this shot
- Canon 5D Mark III full-frame DSLR
- Canon 200-400 f/4 L IS 1.4 Ext
- Canon 1.4x Extender MKIII
- Really Right Stuff TVC-24L Tripod
- Really Right Stuff PG-02 Gimbal (read the review)
- Adobe Photoshop
- Adobe Lightroom
How to Focus on the Moon
Before we start taking our shots, we need to make sure the moon is in perfect focus. The best way to do this is using the live view display, and then making use of whatever magnification factor your camera will allow you to get to. Once you have zoomed right in on the moon, use the manual focus ring on your lens to get it as sharp as you can.
At this point, I would recommend setting your lens (or camera) to manual focus mode so that you do not accidentally alter the focus position while you take the photos. The moon will not move from your plane of focus, so there’s no need to focus again once you have things set up before the shoot. In fact, you might even go so far as to use a piece of gaffer tape on the focus ring to make sure it doesn’t get accidentally moved during the night.
Getting the Shots and Correctly Exposing Them
To get the exposure correct, I highly recommend using the histogram and the flashing highlights option on your camera to warn you when the highlights are blown. If you simply peer at your camera’s LCD screen in the dark, everything appears to be much brighter than it actually is. Getting fooled by this is a rookie mistake! Trust the histogram, and make sure you capture as much of the moon’s light as you can without blowing out the highlights.
As the moon goes through the eclipse cycle, getting darker, and then brighter again, you will need to regularly adjust your exposure, while continually checking your results using the histogram view. At its brightest, I was shooting at ISO 500, f/10 and 1/250 of a second.
There are no “magic bullet” exposure settings that I can give you to use for your own lunar eclipse photos. The brightness of the moon will be highly dependant on atmospheric conditions, as well as your own latitude on the planet. What I will say, is that you need to prepare yourself for exposing some very dark images at the mid-point of the eclipse cycle.
When you start off with a nice bright full moon and a relatively low ISO, you’ll be thinking “This is easy! I’m getting great shots”. But things will begin to deteriorate quickly as you approach the moment of the eclipse. It’s a good idea to have a sense of what exposure settings you might have to push to, in order to capture images that can easily be matched into a sequence.
Remember that my bright white full moon photo was shot at ISO 50, f/10 and 1/250? Well, the blood moon frames of the sequence, the darkest ones, were captured at ISO 5000, f/8 and 1/3 of a second. That’s a huge difference!
If you’ve done some astrophotography before, you might be wondering why I don’t further lengthen my exposure time when the moon gets that dark. It is after all, common to use exposure times of up to 30 seconds when photographing the Milky Way. A longer exposure like this would allow me to use a much lower and less noisy ISO. But the problem is that you actually get motion blur from the moon’s own movement.
Under such high magnification, you can actually see the moon’s movement through the viewfinder. A relatively short (in astrophotography terms) shutter speed is needed to freeze the moon’s motion and maintain some of its detail. Even at 1/3 of a second, I was actually losing detail from the surface of the moon due to motion blur. But at that point, my only other option would be to use a higher ISO.
I knew from experience that past ISO 5000, my camera would start to lose detail due to the build-up of noise. This left me with a juggling act to perform. Push the ISO and get a noisier image with less detail, or drag the shutter speed and lose some fine detail, but maintain somewhat manageable noise. Having a solid understanding of how your camera performs at these dark limits, is a real benefit at moments like this.
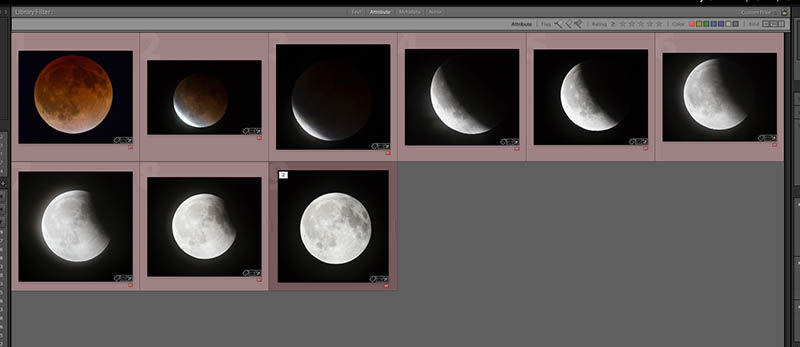
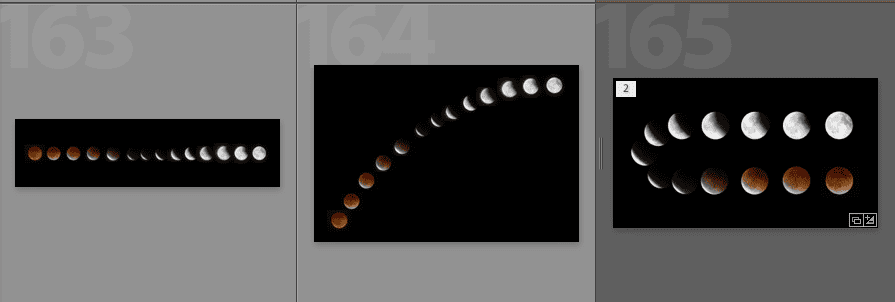
How Many Shots Do You Need?
The entire eclipse event lasted for 4 hours. As you can see, I used a total of 13 shots in the final composition of this image. It’s really up to you how many shots you take during the event. I personally felt that I needed at least 13 shots to show the transition into the eclipse. I did also shoot the transition back out of the eclipse, too, but decided against using them in the final composition.
Over the course of the night, I shot around 100 images. Many of these shots were experiments with different ISO values and different shutter speeds as I constantly tried to hone in on the best combination of exposure settings to get the sharpest images. My recommendation would be to do a similar thing. Keep experimenting throughout the night, and by the end of it, you should have more than enough good frames to pick from.
Photoshop Tutorial Video
Lunar Eclipse Photoshop Step-By-Step Tutorial
As I explained in the video, there’s a couple of ways to do this. The first method, which is slightly quicker, will probably be just fine for 95% of people looking to create an image like this. The second method is a bit more time consuming but it does give you ultimate control over the end quality of the image. I’ll run through them both here, and you can choose which one suits you.
Method #1
I’m going to assume that you are using Adobe Lightroom, but if you aren’t, and you want to load the images directly into Photoshop then please watch the video where I show you this method.
1. Choose your images in Lightroom and perform all the necessary adjustments that you need to, like exposure, contrast and clarity. With higher ISO images, don’t forget to perform your noise reduction at this point and add any additional sharpening that might be necessary. Then, crop the images into a square around the moon and select all of the images that you want to use in your sequence.
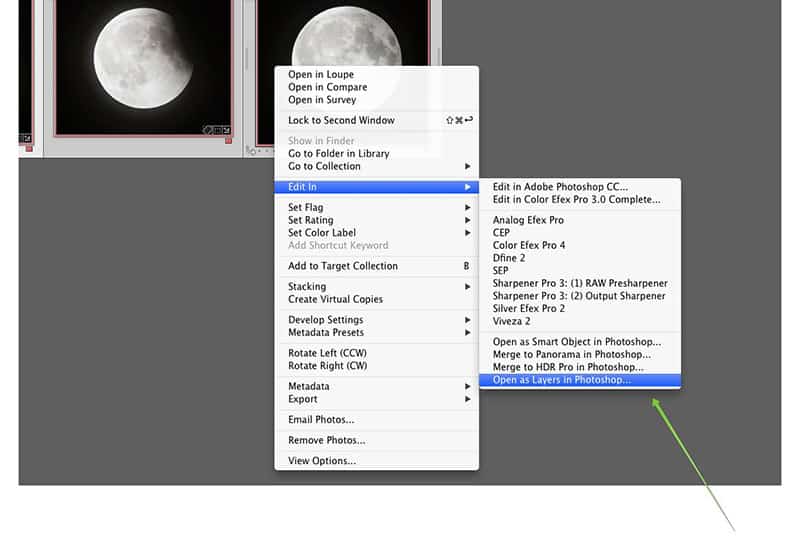
2. Right-click on one of the selected images, go to “Edit In” and then choose the bottom option which says “Open as Layers in Photoshop”. This will open Photoshop and create a new document where each individual moon is on its own layer.
3. Click on the add new layer button in the layer palette and drag that layer to the bottom of your stack.
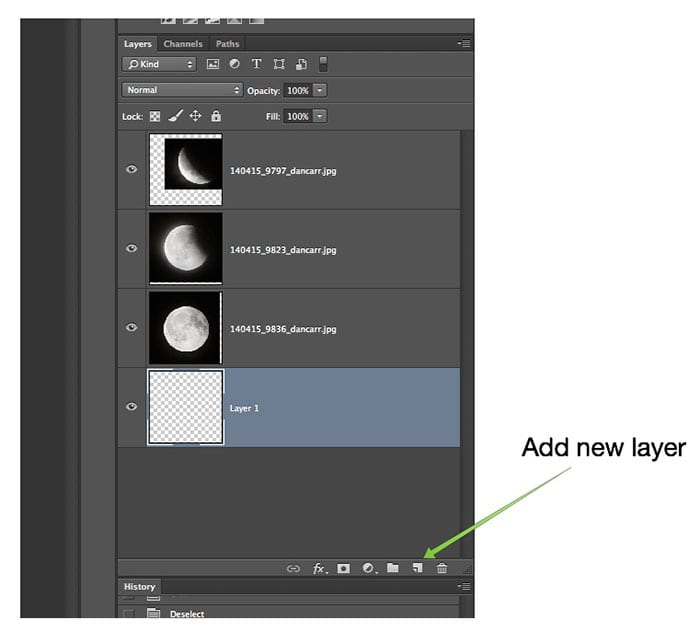
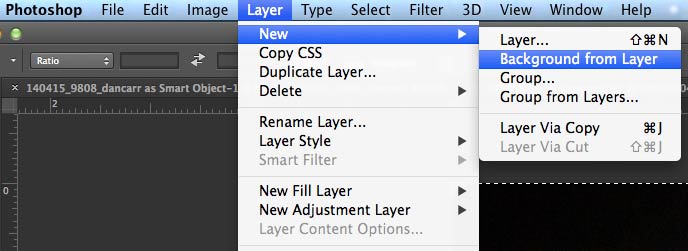
4. With this new layer selected, go to “layer” in the main menu, then go to “new” and choose the option “Layer from background” to turn this new layer into your background layer.
5. Grab the paint bucket tool and fill the background layer with pure black. This will become our night sky.

6. We need a much bigger canvas to work on, so the next step is to expand the current one by going to the “Image” section of the main menu and then down to “Canvas size”. Change your canvas dimensions to something much bigger. You can always expand again later, or crop off any unused portion so don’t worry too much about the size you select just as long as it seems much bigger.
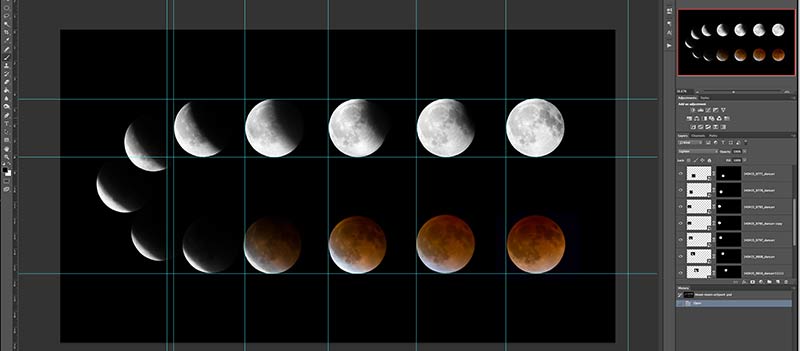
7. Hit the V key to get your pointer, and drag your various moon images around into a rough sequence. Then select all of your layers in the layer palette and change the layer blend mode to “Lighten”. This will change the blend mode of all layers and will allow you to put your moons closer together while you rough out the design for your sequence. Only the bright parts of each moon frame will now be showing.

8. Use the circular selection tool whilst holding the shift key to draw a circle around the first moon in your sequence. Try to get the selection as close to the edge of the moon as possible. You can refine your selection by going to “Select” in the main menu, then “Modify” and choose either “expand” or “contract”. When you are happy with your selection, make sure you have that layer selected in the layers palette and click the “Add layer mask” button.
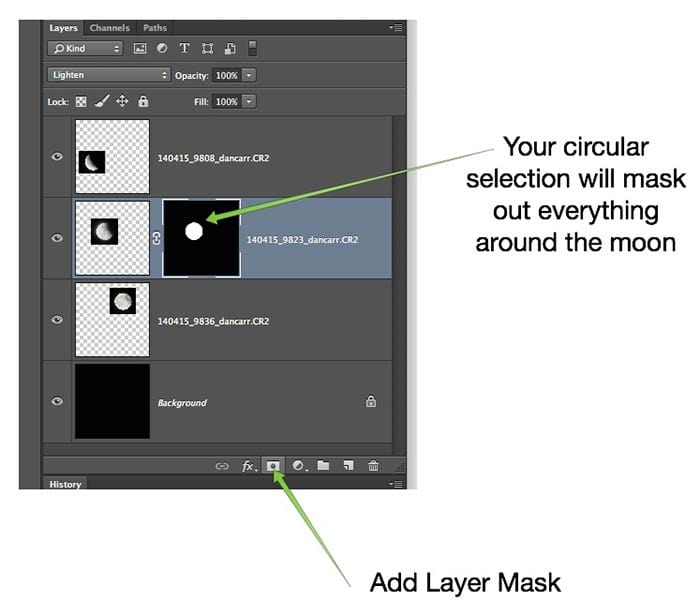
9. Zoom right into this first moon in your sequence (300% or more) and grab the brush tool (B key) with the colour set to black, being sure that you have the layer mask selected for that layer and not the actual image itself. Brush carefully around the edge of the moon to mask off the rest of the unwanted sky.

10. Repeat this process for all your other moons, then finalize your design. Give yourself a pat on the back.
Method #2 – Using Smart Objects
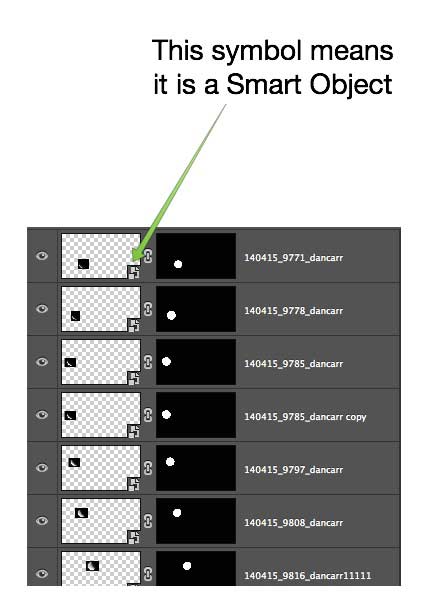
A Smart Object is a special type of layer in Photoshop that is linked to the original image type. In the case of a RAW photo, it means that you can, at any time, double click the Smart Object to open the RAW file adjustment panel and make further teaks to your original RAW file.
Note that some steps in Method#2 are the same as in #1. Where this is the case, I have not included the screenshot diagrams a second time.
1. Choose your images in Lightroom, but this time right-click on just the first image, go to “Edit in” and choose “Open as Smart Object in Photoshop”. The image will open in Photoshop but you are still maintaining the ability to modify the RAW files in Adobe Camera Raw.

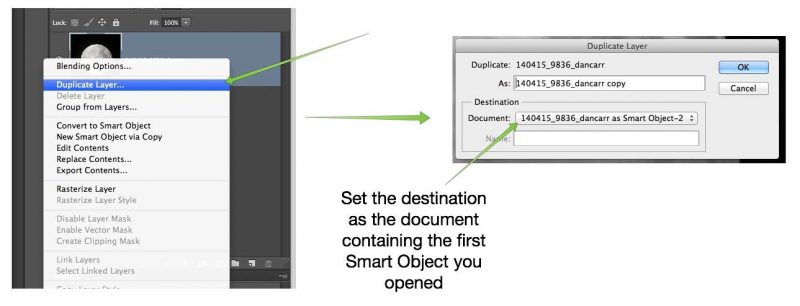
2. In Lightroom, select the second image in your sequence and perform the same action. Once this image is open, right-click on the layer in the layers palette and choose the “Duplicate Layers” option. When the box pops up, under “Destination” you need to drop open the options and choose the file name of the FIRST image that you loaded as a smart object. This will copy this second smart object into the first one as a new layer.
3. Repeat this process for all of your images and you’ll end up with one single file that contains all of your smart objects.
4. Click on the add new layer button in the layer palette and drag that layer to the bottom of your stack.
5. With this new layer selected, go to “layer” in the main menu, then go to “new” and choose the option “Layer from background” to turn this new layer into your background layer.
6. We need a much bigger canvas to work on so the next step is to expand the current one by going to the “Image” section of the main menu and then down to “Canvas size”. Change your canvas dimensions to something much bigger. You can always expand again later, or crop off any unused portion so don’t worry too much about the size you select just as long as it seems much bigger.
7. Hit the V key to get your pointer and drag your various moon images around into a rough sequence. Then select all of your layers in the layer palette and change the layer blend mode to “Lighten”. This will change the blend mode of all layers and will allow you to put your moons closer together while you rough out the design for your sequence.
8. Here is the really cool part of this second method, and why it’s worth the extra time if you ask me….. You can now double click any layer in the layer palette to open that image in Adobe Camera Raw and make the necessary adjustments.
This means that you are seeing all the images side-by-side just as they will be in the final sequence. It’s much easier to match their looks and choose the overall style of your image when you can edit them in this way. If one image looks a little off from all the rest, just double click it, edit in Camera Raw and then save it and the change will be passed back into the Photoshop document. This is the best non-destructive way to work with this kind of image, and you can perform these edits at any point in the process.

9. Use the circular selection tool whilst holding the shift key to draw a circle around the first moon in your sequence. Try to get the selection as close to the edge of the moon as possible. You can refine your selection by going to “Select” in the main menu, then “Modify” and choose either “expand” or “contract”. When you are happy with your selection, make sure you have that layer selected in the layers palette and click the “Add layer mask” button.
10. Zoom right into this first moon in your sequence and grab the brush tool (B key) with the colour set to black, being sure that you have the layer mask selected for that layer and not the actual image itself. Brush carefully around the edge of the moon to mask off the rest of the unwanted sky.
11. Repeat this process for all your other moons, then finalize your design.

Try Different Designs!
The great thing about the methods I have outlined here is that once you have it all completed, you can easily drag the moons around into different positions. Obviously, my image takes a pretty artistic approach to displaying the moon’s actual orbital path that night, but for me, it worked aesthetically to display this number of images. You could try an arc, a circle or a diagonal line, all with just a few clicks of a mouse.
Image #2 – Put the moon in its place

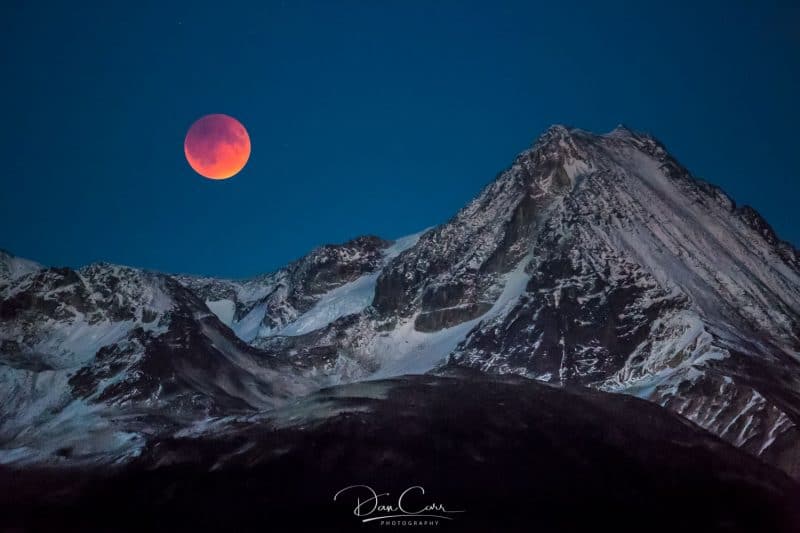
The moon transition sequence is a nice trick, but you may also want to consider this second type of image, where the moon is grounded in a specific location. If you happen to live in a place that’s often photographed and has distinctive features, then there’s even more reason to take this second option.
When I took this shot, I lived in the resort town of Whistler, British Columbia. Home of the 2010 Winter Olympics. We have several recognizable features around the town, including mountains and man-made objects like the Olympic Rings. When another Blood Moon occurred, and this time it coincided with a Super Moon, causing it to appear slightly larger in the sky, I knew I had to get a new shot. This “Super Blood Moon” is quite rare, and would not take place again for another 18 years after this occurrence.
Since this was a rare event, I spent some considerable time looking at various options for the image, and in particular, using the PhotoPills iOS app to show me the Moon’s position on the day of the eclipse. From this research, I determined that the best option for me would be to work with Wedge Mountain, one of our most distinctive local peaks.
The hardest part was determining how high I would need to climb up the mountain on the opposite side of the valley. I did not want the point of total eclipse to appear to happen too soon or too late in the image. Controlling my altitude allowed me to position it correctly, with relation to the peak of Wedge Mountain.
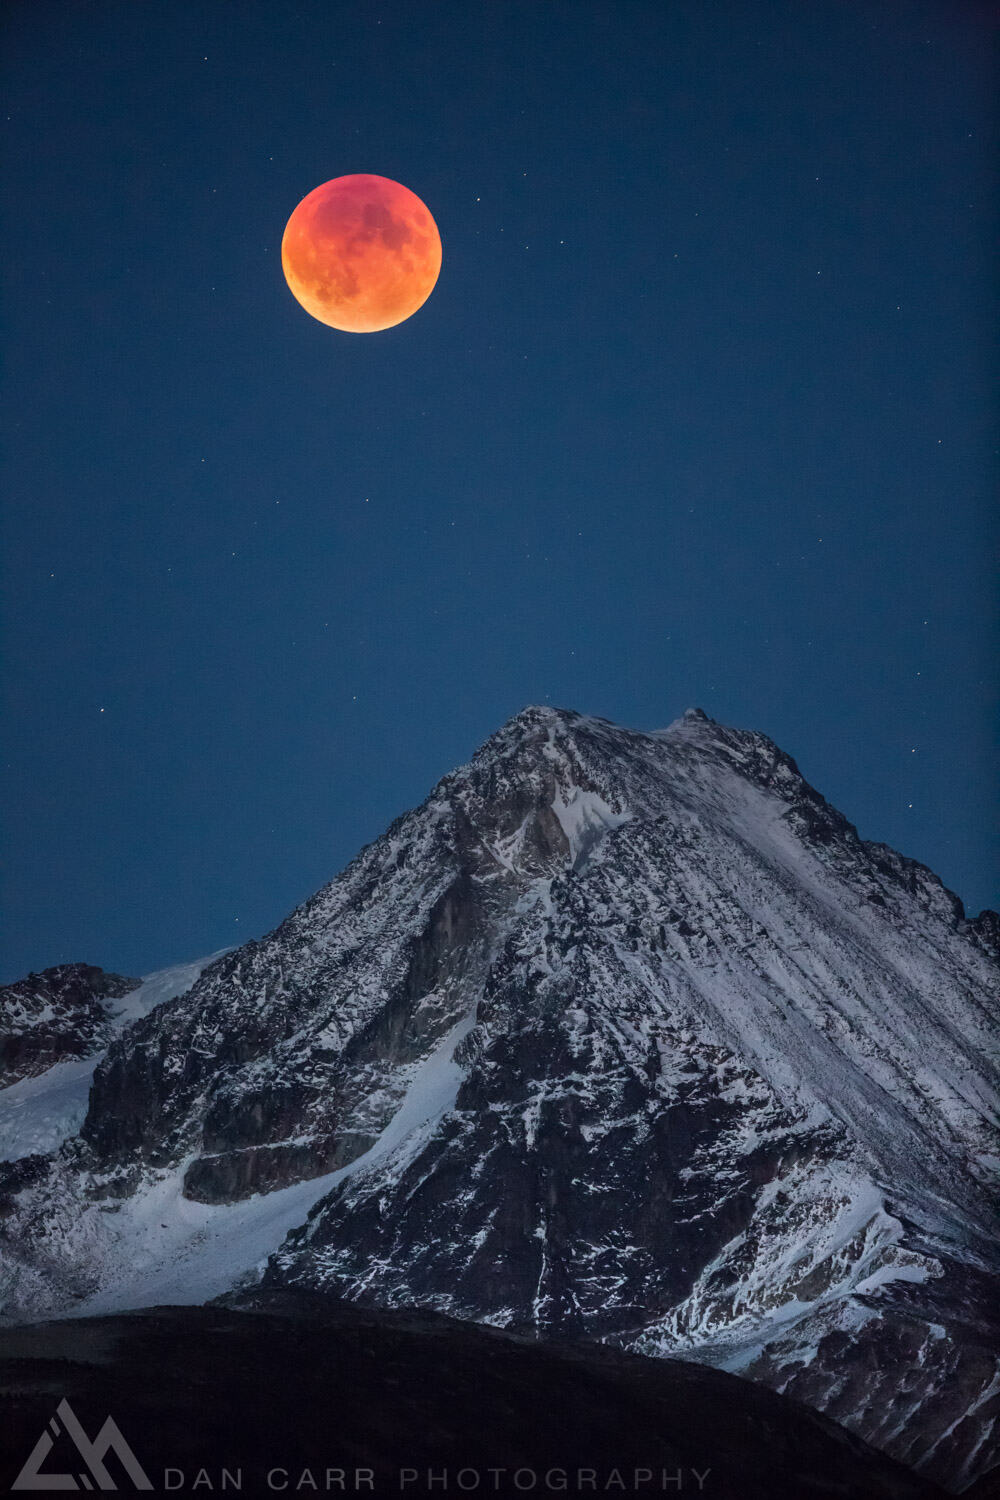
For these shots, I used identical equipment to the previous image, although this time I only used the 200-400mm lens at 300mm. After choosing my framing, the next consideration was shutter speed. When the moon is low in the sky like this, it appears to move very quickly. You can easily see the movement in your viewfinder, and I knew that once the moon first appeared above the horizon, I would only have about a minute to get everything right and get the shot.
What’s more, the moon would only be in the absolutely perfect spot for a few seconds. There would be no time to fuss around with different exposure options if I also wanted to try a few different focal lengths on the zoom, and get both a horizontal and vertical frame.
From previous moon shoots, I knew I needed to maintain a fairly decent shutter speed in order not to blur all the crater detail on the Moon’s surface. I made the decision to work with very high ISOs (6400-10,000), in order to get fast shutter speeds that didn’t require me to fully lock the lens on the gimbal between shots. In hindsight, going as far as ISO 10,000 wasn’t necessary. 5000 probably could have done the trick, but I was very wary that this wouldn’t be happening again for a very long time, and I wanted to make sure it wasn’t missed.
In order to process such high ISO images, I recommend performing your edits in Lightroom and then exporting them into the incredible Topaz DeNoise AI application. When I first took this shot, DeNoise AI wasn’t on the market and I just did my noise reduction in Lightroom. A few years later, when DeNoise AI became available, I went back and re-processed this image using the Topaz Labs’ algorithm. I was blown away by how much better it was! A good reminder to occasionally revisit some of your work once the technology has moved on.
The great thing about shots like these is that they are very sellable shots for publications looking for images of that location. They are rare and unique and ground the moon in this specific location. As soon as I posted the first image from this moon+mountain series to the web, it went viral and was picked up by lots of other sites and even NBC’s primetime national news show! Many millions of people saw the image on just the first day!
Wrap-Up
Photographing a lunar eclipse is a fun challenge. Even if you are a seasoned Milky Way photographer, there are many things that can be learned by turning your focus to the moon on these special occasions. Take a look at Nasa’s lunar eclipse page to find out when the next one will be, and make sure you are well prepared beforehand.


Thanks for the How-to tutorial, Dan! Going to give it a try this evening…
You’re welcome. How did you get on?
Thanks Dan,
I tried this technique and was quite pleased with the results I got for my first try ever with composite:
https://500px.com/photo/123463899/red-slope-by-simon-armstrong
I will definitely use it again!
Thanks again and keep up the good work 🙂
You’re welcome! Nice shot mate!
Really great article. Thanks for taking the time to explain things in such great detail in a way that is easy to understand!
You’re welcome! Thanks 🙂
This is cool. Keep up the good work.
Love this tutorial, especially using Smart Objects in PS. Interestingly the best eclipse pictures I ever got were on a Canon XT or T1, with only a 70-300 and little patience due to the cold.
Having recently picked up a Lumix F2500 for travel fun – I might see what it can manage (the zoomed focus view is really good).
Thanks, Nigel. Good luck!
Hi Dan – I’ve tried before, when we had a magnificent “harvest moon” – and I’ve tried on other occasions. But it seems to me this is an area for astro telescopes – camera lenses might go to “infinity”, but they seem to be designed more to capture something closer than that, and kind of blurry at that distance.
Which makes our shots rather disappointing. You go to a lot of trouble, get a longer lens, and perhaps an extender, and you might have done almost as well with one of those super-zoom starter cameras.
Most blur in lunar photography comes from a poor tripod, not using a cable remote and using a shutter speed that is too long. I have had great success with lunar photos using the techniques explained in this tutorial!
It is really hard to find a text between advertisements. 🙁
I’m sorry you’re having trouble. Unfortunately, without having ads there would be no website or tutorial at all.