
These days, having a website to display your work is an absolute must, but it doesn’t need to be a daunting or expensive task. There are many ways to create a photography website but my personal favourite is to use WordPress (Wordpress for Photographers: Beginners Guide). WordPress began life as a blogging platform but has since evolved into one of the most powerful content management systems in the world and it’s used by millions of people. The WordPress software itself is free but this widespread adoption is great because it means that many powerful add-on tools are available to us for a tiny price, and also quite often for free.
I know that some people out there feel like they don’t know where to begin when it comes to making a photography website so I wanted to show you just how easy and fast it is to get a professional looking photography portfolio website online from scratch.
Here’s What We’re Going To Do
- Buy a domain name (www.yoursite.com)
- Set up a web host for the domain
- Install WordPress
- Download and install a WordPress Theme
- Add a photo portfolio, contact details and a biography
What’s more, I’m going to show you how to do it all in under 5 minutes!
Step 1 – Get Your Domain Name & Hosting
You’re going to need to get a web domain and some hosting for your site. I recommend using BlueHost and they’ll give you a domain name for free, as well as 30% discount on your hosting if you head to their website here with this link. Start by clicking the big green ‘Get Started Now‘ button and you’ll be presented with the screen you see in the photo below. This tutorial assumes that you don’t already have a domain name but if you do, the process is much the same and they will guide you through the setup. If you ever get stuck there is a very useful Live Chat box where you can quickly connect with a help desk agent.
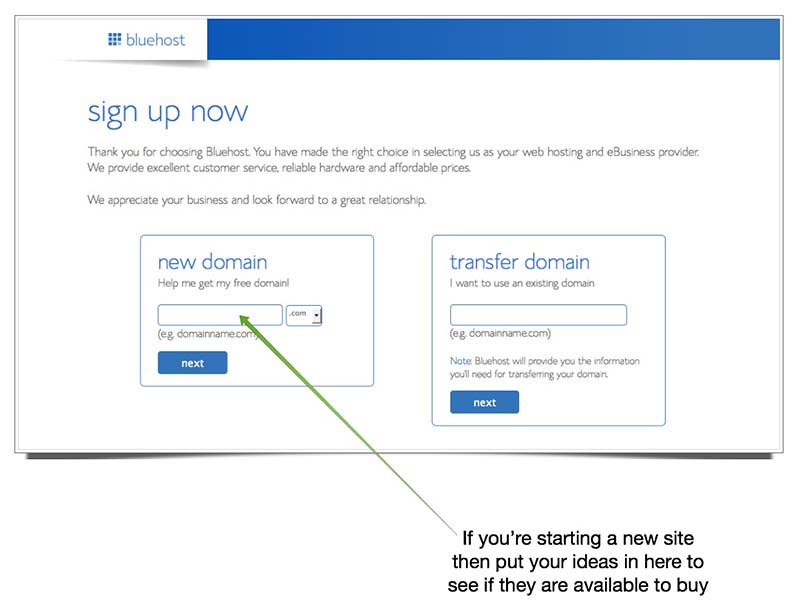
Try to find a domain name that isn’t too long and personally I would avoid using hyphens in the URL if at all possible. www.yournamephotography.com is always a good and simple option. If you already have an existing URL that you’ve purchased in the past then you should put it into the box on the right-hand side and it will walk you through the process of setting up your existing domain.
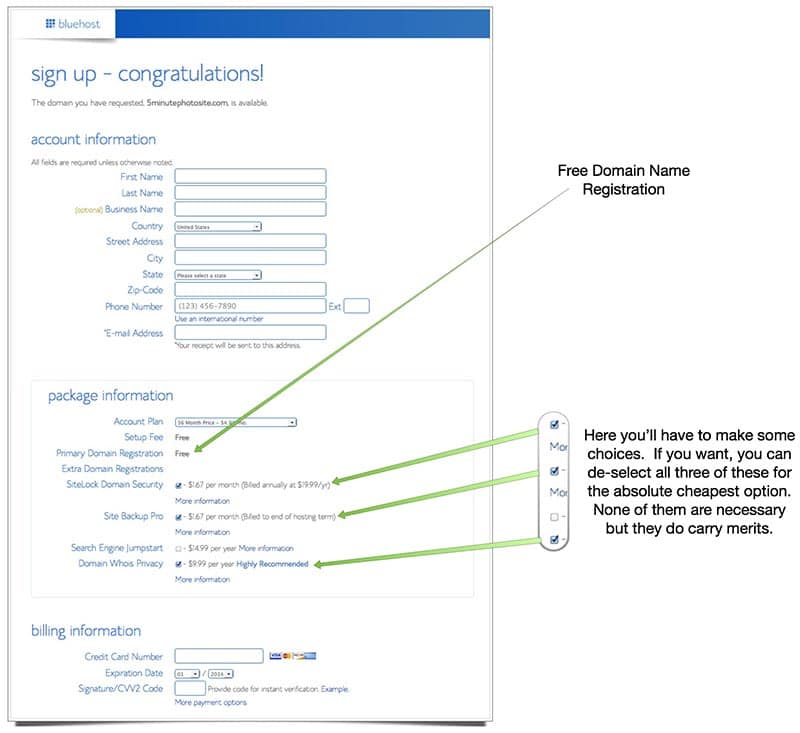
If your chosen domain is available then it will move on to the next screen below where you’ll have to fill out your billing information and choose a few pricing options. All the options with the check boxes are up to you. Your website will still function without any of those options so it’s up to you to read the ‘more information’ sections provided and make a decision based on your needs and budget.
Once you click ‘Next’ they will process your payment and your account will be created. Congratulations! You now have a photography website 🙂
Step 2 – Create Your Password & Log In To BlueHost
Next you will be asked to create your account password. Please don’t use things like birthdays or pets names and don’t re-use a password you use for other things. I recommend using passwordsgenerator.net to generate at least a 10 character random password. This is a key security step for your website so please take note.
Step 3 – Install WordPress With One Click
This right here is why I recommend using BlueHost because they have simple one click install for WordPress which makes things super quick and easy. No messing around downloading files and uploading them via FTP.
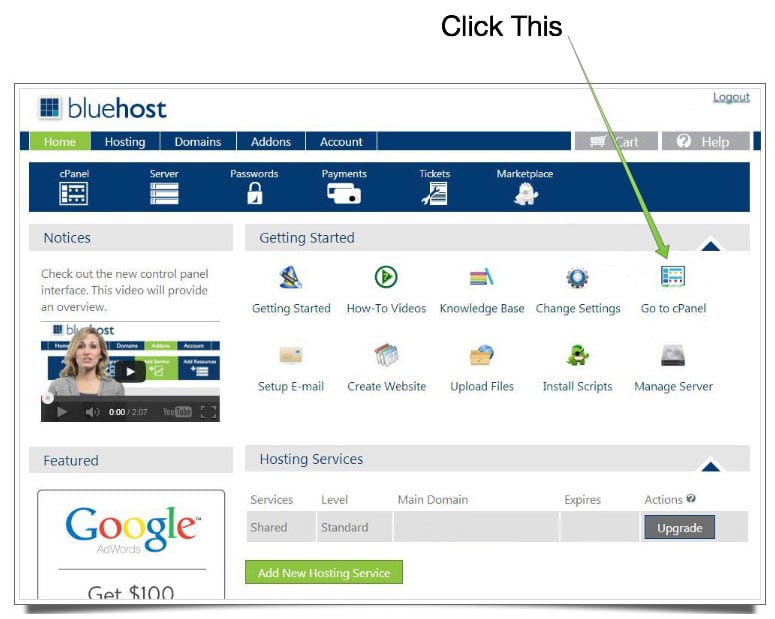
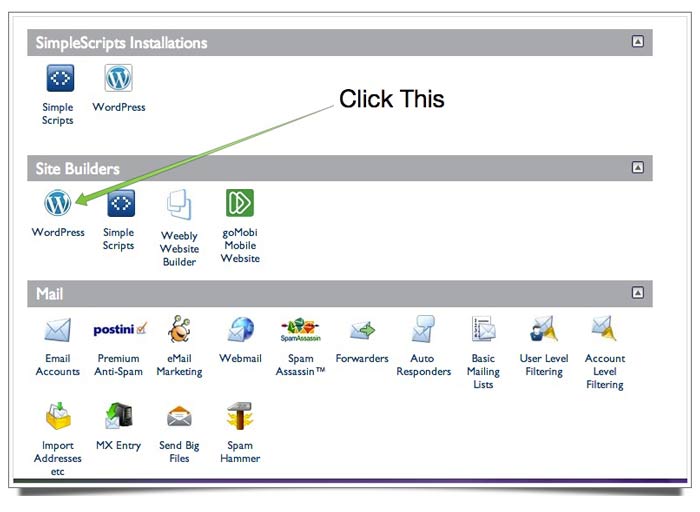
Once logged in to your BlueHost account you’ll see a button on the screen that says ‘Go To cPanel‘. This is the control panel for your website. In cPanel you can scroll down to the section that’s called ‘Website Builders‘ and click on the WordPress icon. Then click the ‘Install Now‘ button.
Then….
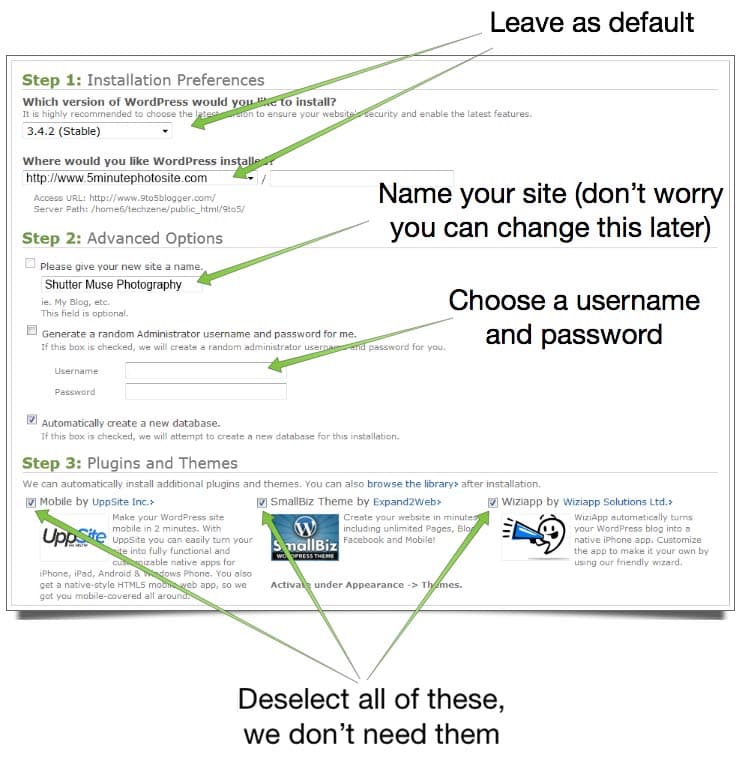
They’ll give you a few options which you can leave as the default settings except that I want you to un-check all of the options in the ‘Plugins & Themes‘ section, we don’t need any of those. What you will need to do though is choose a username and password for your WordPress website. This is different to the username and password for BlueHost so please use the password generator again and record these details somewhere safe. Refrain from setting your username to something simple like Admin.
The last thing to do is check the box at the bottom to confirm that you have read the terms and conditions and then hit the ‘Complete‘ button at the bottom.
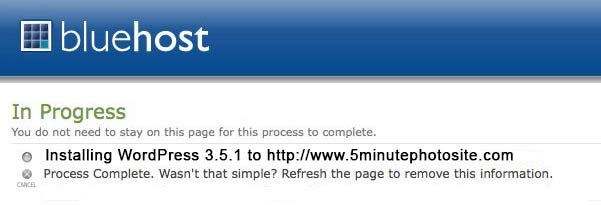
When the installation is complete you’ll be able to log into your WordPress site by visiting http://www.yourdomain.com/wp-admin and entering the username and password that you just selected. This will access your WordPress Dashboard.
Step 4 – Choose A WordPress Theme

WordPress comes with a very bland default blog theme which by this step you’ll be able to see by visiting www.yourdomain.com, but we need to install a photography specific theme to really show off our portfolio. I recommend Graph Paper Press for photography specific themes. Not only do they have the largest collection of photography specific themes, they also have excellent customer service via their support forum. As a friend of Shutter Muse you can use the coupon code “ShutterMuse” to get a 25% discount on their themes if you decide to use one of the paid ones.
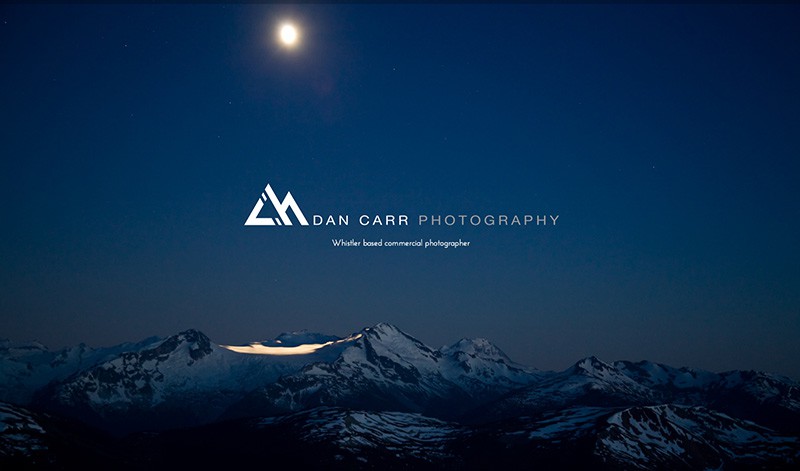
Open a new tab in your browser and head on over to Graph Paper Press and click the “Themes” button to see their collection of more than 45+ WordPress themes. The one that I used in this tutorial is called Onesie, and you can find it in their free theme section.
Once you have chosen your theme and signed in you can hit the download button at the top of the theme’s page and save the resulting ZIP file to your hard drive somewhere safe. Do not unzip the file!
Step 5 – Installing The Theme To WordPress
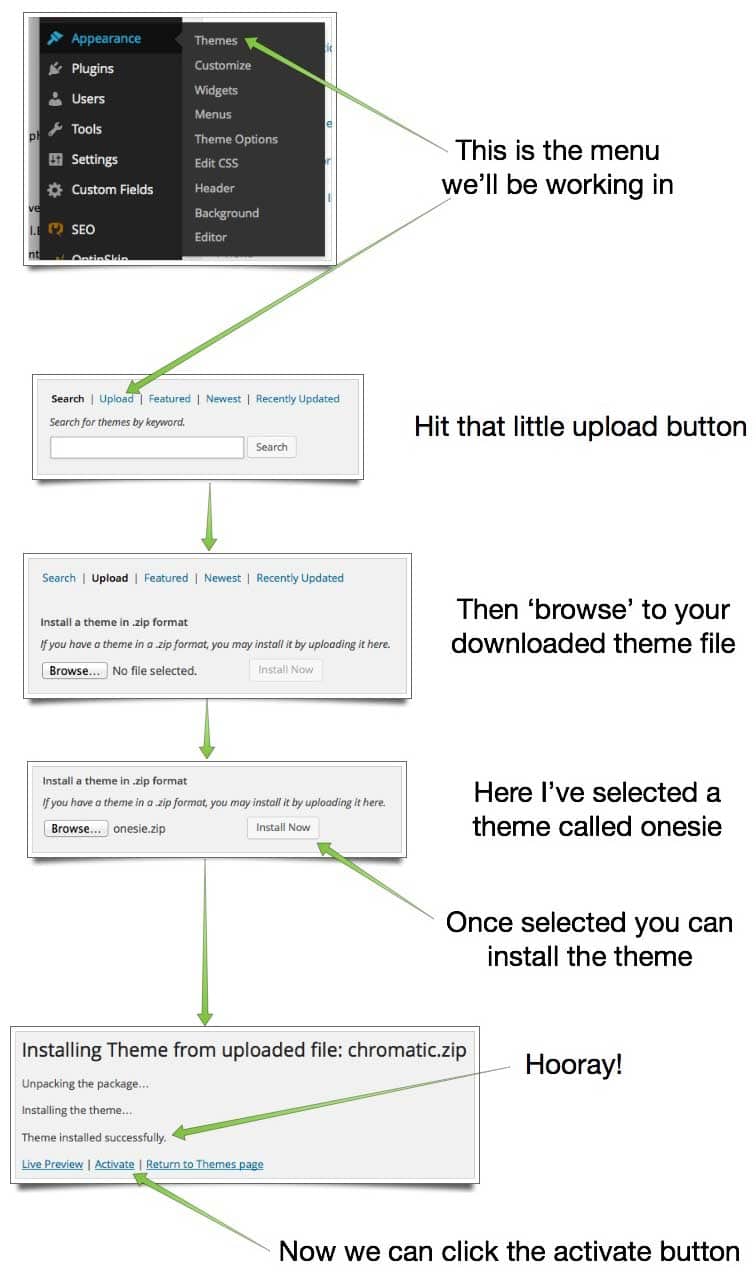
Now go back the browser tab that has your WordPress Dashboard and hover your mouse down the menu bar on the left until you get to ‘Appearance‘. From that menu select ‘Themes‘ and from the top of that page hit the ‘add new‘ button. The next screen will open up a search bar but we actually don’t need that as we’ve already got our theme so we need to click the ‘upload‘ button just above that search bar. Use the ‘Browse‘ button to select the ZIP file of the theme you downloaded from Graph Paper Press and then hit ‘Install Now‘. After a few seconds you’ll see a screen that says the install has been successful and beneath it is a button to ‘activate‘ the theme.
NOTE: The theme that you select for upload must be in ZIP format. For this reason I do not recommend using Apple’s default Safari browser for this process. When using Safari to download a ZIP file, it automatically un-zips the file into a folder and this will not work for uploading to WordPress. If you are having any issues at this stage in the process, switch to either Google Chrome, or Mozilla Firefox and make sure you are selecting a ZIP file for upload.
Step 6 – Customize Your Theme
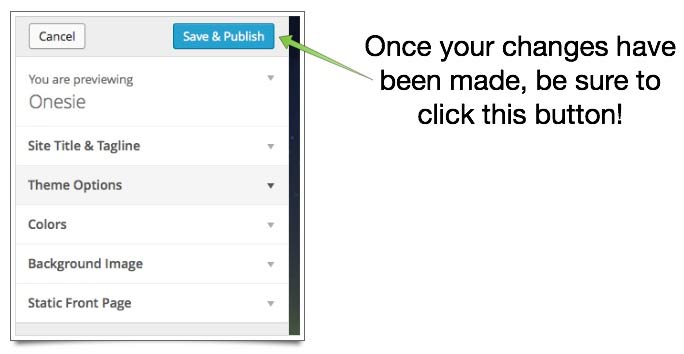
Once activated you’ll be presented with the main theme screen that shows you all of the themes you have installed. If you’ve signed up for a pack of themes with Graph Paper Press you can install them all and then easily switch between them to figure out exactly which one it is that you like the best. Once a theme is activated you’ll see a button that says ‘Customize‘ which will open up an editor to help you change all of the options. Here you can do things like add your logo, change the background image or pick a new font for the site title. With the customizer you’ll be able to see the effects of the changes you make in real-time. Once you’re happy with your changes make sure you hit the ‘Save & Publish‘ button.
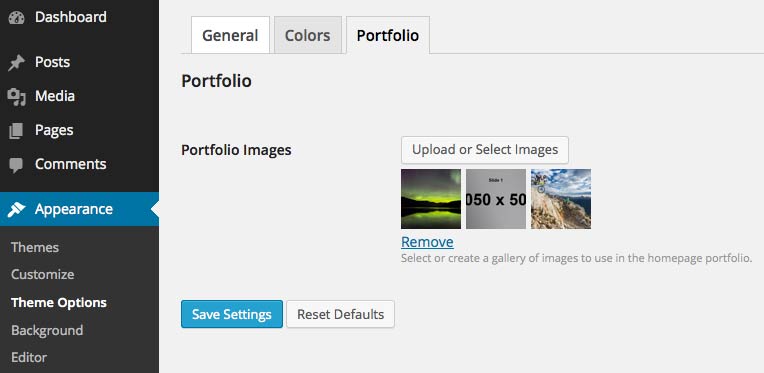
Since all themes are slightly different there may also be some further options for you to customize outside of the main customize screen. These can generally be found by hovering over the ‘Appearances‘ option in the Dashboard menu and then clicking on ‘Theme Options‘. In the video walk-through you’ll have seen that for my chosen theme I had to go to this section to upload the portfolio images and to add text to the biography section and contact section.
Keep It Simple!
All too often I see people with overly complicated and slow loading websites. Most people have pretty short attention spans and I know that if I come across a website that gives me a big loading wheel I’ve usually moved on before it’s even got to 50%. There’s really only a few key things that you absolutely must have on your photo portfolio website so let’s run through them quick and use the one I built in this tutorial for a reference.
In no particular order, these are the must-have things you’ll need on your site:
1. Some sort of branding.
I think that a little effort in this department can really go a long way. I’m not saying that you need to have a fancy, expensive or complicated logo, it may be as simple as choosing a great font, but at least spend a little time comparing all the options instead of sticking with the default font that’s given to you. If you have the opportunity to get a logo made up for you then you can use the service on 99 Designs to get amazing work done for very little money. Once you have figured out some branding, STICK TO IT! Don’t use one font on your website, one on a Facebook banner and a different one on your business cards. Just a little effort in this area projects a much more professional image to your potential clients.
2. Clear and easily accessible contact details
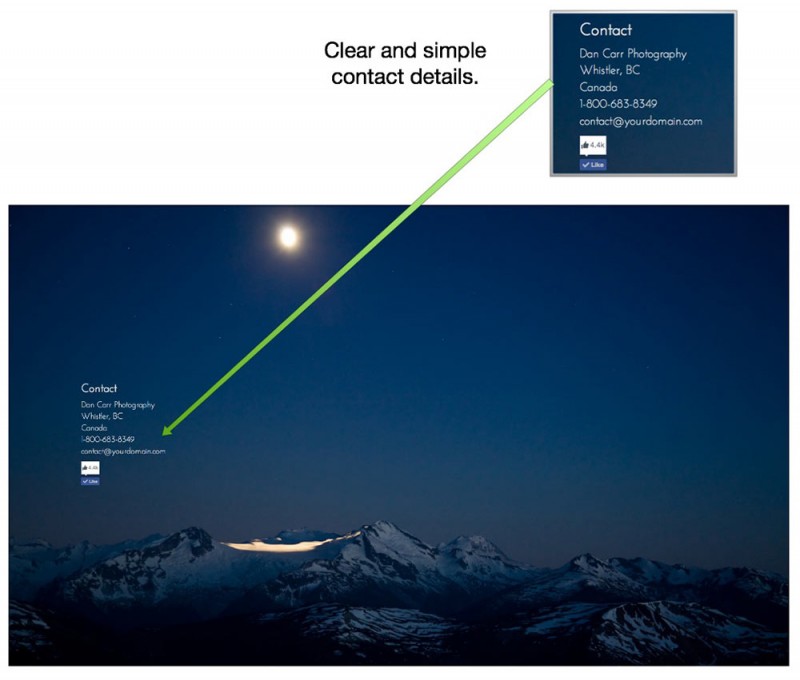
You can use a contact form if you want to but I’d advise against using one of those annoying CAPTCHA spam protect things if you do. If you want to add a proper contact form to a WordPress site then I recommend Gravity Forms, I use them on all of my sites. Whatever you do though, make the contact button extremely obvious and don’t bury it down in a multi layer menu. When you look at the front page of someones website you should be able to determine a method of contacting them within 5 seconds. People will naturally look in two places, firstly in the menu bar if you have one and then secondly at the bottom of the page by scrolling down. Don’t try and be clever, keep it simple!
3. A small portfolio

It’s tempting to want to show off all your favourite images but I urge you to resist that temptation and create a well edited concise portfolio. If you want to include hundreds, or thousands of images on your site that is fine, but put it in a section called ‘Gallery Archive’ or something similar. Your regular portfolio sections should contain 8-12 images. Most people won’t even get to #12 before they move on to look at something else so anything more than this is over complicating and bloating your site.
4. A well crafted ‘About’ section

Whilst most people remember to add this to their site they often assign it less importance than they should do. When you start tracking your website stats you’ll become aware of the fact that this is a page that gets viewed quite often and second to your opening page photos it’s the best chance you’ve got to make a good impression with potential clients. Let people know where you’re from and what your photographic specialties are. If you have a couple of customer testimonials this can also be a good place for them. It’s really important to have other people read this section of your site though. It’s hard to write about yourself so you’ve got to get opinions from other people as well.
And that’s it! Yes you can add social sharing buttons and Facebook widgets and all these things, but the 4 things in this list are the only things that are an absolute necessity. Don’t get bogged down trying to create something super complicated, I think you’ll all agree that this site I just built looks great and it look me less than 5 minutes!
Recap The Deals We’ve Got You
Just to recap (and make sure you save as much time and money as you can) here are the three special deals that are going to help you here:
- Free domain name and 30% off hosting with BlueHost
- 25% discount on your chosen Graph Paper Press WordPress theme when you use the coupon code ShutterMuse. Or you can also use the free GPP themes as well to start with.


Great work, Dan.
Wordpress is indeed a great platform to build a website, but do you really think of it as an option for portfolio website? It does allow a lot of customization’s, but for every new feature you need to find an appropriate plugin and even pay for some. And even a little tweak in the design may need you to get into coding, which for me is daunting.
I’ve shifted to Pixpa instead, and with a decent portfolio builder they’ve allowed me to integrate my own store of products within the website. Almost every feature that a photographer needs is available with them.
I’m glad you have a solution you’re happy with. I haven’t heard of Pixpa myself but I’ll try and take a look sometime. I guess it depends what your needs are. There are lots of services like Smugmug and Photoshelter etc, that all cost more annually, than the WP plugins most people would need to buy. I’ve also found my blog to be a HUGE thing for my business. I can’t tell you how many emails from clients I have gotten that start with “I was just reading your blog and….” Nobody does blogging like WordPress.
I think these days the website choice comes down to how you want to do your marketing. If you want to take total control over SEO, blogging, lead generation with email newsletters etc. then I don’t think anything comes close to WordPress. If you want to use your site as a place to show images, and then do your marketing in more traditional ways, in person or through advertising then there are probably lots of other ways to build a great site, as you have discovered.
Maybe this would be a good topic for a blog post…
I’ve tried both, and it depends on what functionalities you’re looking for. You will always miss out on some functionalities while choosing either of them. Wordpress is a little difficult to setup but offers a high level of customization while Pixpa is one of the easiest platforms to use but the functionalities are limited to photography and design related. I’m a graphic designer and photographer by profession and Pixpa works best for me. I blog regularly and have seen results in the search engines because of it. However, if you’re looking for something more complex and multi-level hierarchies in menus, Wordpress would be the best option.
Thanks for your insight!
The guidelines are really helpful for any photographers to want to start their own photography website.
I have found one more plugin that can help you to design an attractive portfolio – Portfolio Designer WordPress plugin. It is a helpful plugin for photographers to present their photography portfolio.
It has different types of layout like the grid layout, masonry layout, slider layout, etc. to make a stunning portfolio.