When I created our photography gift guide, I included some fantastic vintage cameras turned into desk lamps that I found on Etsy. I recently needed to get a gift for a photographer myself, so naturally, I turned to my gift guide for some inspiration! I looked at those camera lamps again and wondered if I could make one myself? As it turns out, the answer is yes, and it wasn’t nearly as difficult as I thought it would be.
In this tutorial, I’ll walk you step-by-step through the process of creating your vintage camera lamp. We’ll start by discussing the perfect camera, and then I’ll share with you everything you need to buy to complete the project. You do not need anything other than highly rudimentary electrical knowledge to make this lamp! It’s all straightforward.
Table of Contents
The Perfect Camera – A Kodak Brownie Hawkeye

When I went shopping for a vintage camera, I wasn’t sure what would work best. Luckily, my local vintage goods store was full of cameras, allowing me to compare different models and styles. The shelves were filled with cameras dating back nearly 100 years. In hindsight, I should have taken a photo of the other models. The place looked more like a museum than a store.
After fiddling around with options on the shelf, one thing became clear to me; not all cameras are easy to dismantle. I wanted this project to be accessible and not require too many tools. I also needed to find a camera that had some easily accessible space inside if to hide the power cable.

The Kodak Brownie Hawkeye (1949-1961) camera is the perfect solution. In the mid-20th century, these cameras were plentiful. That means they are readily available on the second-hand market. Scores of them are available on eBay, but you’re better off checking your local thrift stores first as you won’t have to pay eBay shipping fees that can be equal to the cost of the camera.
Not only is the Brownie Hawkeye is readily available, but it’s also an excellent price for a classic camera with a very cool look to it. I was able to pick up a working model, in fair condition, for just $35CAD (roughly $30USD).
Necessary Tools
- Small Phillips head screwdriver
- Small hacksaw or Dremel
- Drill with various bit sizes
If you take my advice and use a Brownie Hawkeye, you’re going to need a screwdriver to dismantle it. The screws are small, so you need something similar to a screwdriver designed for working on electronics.
A few cuts also need to be made into the camera’s plastic film holder. I used a Dremel rotary tool with a plastic cutting disc, but you don’t need to purchase that if you don’t already own one. Instead, simply use a mini hacksaw or even just a hacksaw blade.
In most cases, I would expect people to already own the necessary tools for this project or borrow them from a friendly neighbour.
Necessary Purchases

- Kodak Brownie Hawkeye camera – $25-35
- Lamp making kit – $14
- Vintage-looking “Edison” Bulb – $5
- Lamp parts kits (extras) – $8
- Total cost: $52
Lamp making kits are readily available from hardware stores. I have linked to one on Amazon, but do note that, although similar, it is not the exact one I used for my project. My lamp making kit was purchased from the Canadian Tire hardware store. Depending on the specific content of the kit you choose, you might need to buy a few extra nuts, washers and nipples, available as a lamp parts repair kit.

Instructions – How to Make a Camera Lamp
Step 1

The first step is to open the latch on the camera and remove the back cover. Holding the front portion of the camera and looking back into it towards the lens, you’ll see a pair of small Phillips head screws. Using your screwdriver, carefully remove these screws. Be careful as you remove the film holder. The lens will also be loose, and the metal plate that protects the shutter mechanism.
At this point, it’s worth taking a look at the shutter mechanism. If it still works on your camera, fire off a few shots and marvel and the simple genius of the spring-loaded design. Things were a lot simpler in the 1940s! Set aside the rear shutter cover and the lens for later. We will be reassembling this before the lamp is completed.


Step 2


The next step is to take the camera’s back and drill a hole for the power cable. The Hawkeye camera is made from an early form of plastic called Bakelite. This plastic is very hard compared to many modern plastics, and it’s also reasonably brittle. I recommend starting your hole with a very small drill bit, and gradually widening the hole with progressively larger bits until you get to a large enough size for the pipe nipple to fit snuggly.


Once the hole is complete, screw a nut onto either side of it to secure it into the back of the camera. Optionally, add a brass or chrome washer to the exterior to give it a nice look.
Step 3

Repeat the hole drilling process on the top of the camera, making sure that you leave enough room for the components of your particular lamp making kit. It’s a good idea to mock it up first and hold the parts in place.
Step 4


Pass the power cord through the back of the camera and up through the hole in the top. Follow the instructions of your lamp making kit to make sure that you then connect the correct side of the wire to the correct terminals on the lamp. Most kits feature a brass terminal and a silver terminal, with the brass one being for the positive side of the cable. Again, your lamp making kit should come with a diagram and detailed instructions for this part.
Step 5

The final step is to cut the film chamber to piece the camera back together again. With the power cable inside the camera back, we need to create a little extra room. I used my Dremel rotary tool for this, with a plastic cutting disc. If you don’t have a similar tool, you can make these cuts with a mini hacksaw.

Technically you could make these cuts in the film chamber without removing them from the camera. Still, the Bakelite creates very fine dust that would subsequently get into the rest of the camera and likely ruin the shutter mechanism. For me, it’s worth the few seconds it takes to dismantle the camera, and the chamber is more easily handled during the cutting process.
Step 6
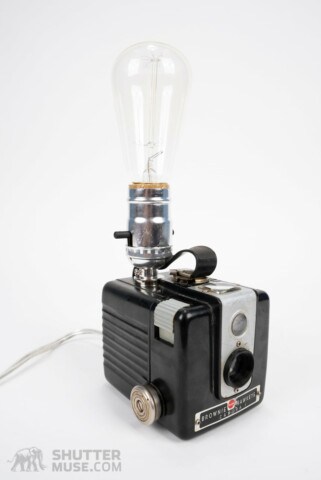
The next step is to piece it all back together with the film chamber modifications complete. Place the metal shutter mechanism cover over the shutter, then the spring washer, followed by the tiny lens. The film chamber holds these pieces in place once you have tightened the two screws. Now, all that is left to do is slide the camera’s back into place, secure the latch and screw in your bulb!
Wrap Up
I hope these instructions are helpful to you. Whether you copy the process entirely or merely use it as inspiration for your variation with a different camera, let me know how it went in the comments!