

My home town of Whistler in British Columbia is something of a mecca for mountain bikers. Not only do we have one of the best trail networks in the world running through our valley, but we also have the very best lift access mountain bike park in the shape of the Whistler Blackcomb Bike Park. I don’t shoot a lot of mountain bike photos for the simple reason that I enjoy it too much myself and rarely feel like ruining a good ride by encumbering myself with a camera. At the end of this summer, I got it into my head that it would be fun to be the focus of one of my own photos though and mountain biking was the perfect subject for this since our local scenery is beautiful. I have a bunch of PocketWizards from all of my remote flash work with action sports photography and I also have a remote trigger cable that allows you to fire a camera remotely by connecting the PocketWizard with the remote cable socket on the left-hand side of your camera.
The Setup
Most people are familiar with the concept of firing a remote flash using a PocketWizard in your camera’s hot-shoe and a receiver attached to the flash. With the addition of a trigger cable running from the camera’s remote port to a receiver, you can also fire a camera remotely simply by pressing the ‘test’ button on the transmitting PocketWizard in your hand. What a lot of people don’t realize though is that it’s relatively easy to add an outside trigger to that transmitting Pocketwizard and this was the key for my setup. There’s no way I could comfortably ride my bike whilst pressing the test button on the transmitter, at least not riding some of the more technical things I wanted to tackle for some more extreme shots. I needed a switch that I could press without moving my hand from the handlebar.


The necessary wiring for such switches is relatively simple when used with PocketWizards and most people likely have a lot of what they need lying around at home. A quick raid of my toolbox was all I needed for the wires and then I purchased a couple of different SPST-NO (Single Pole Single Throw-Normally Off)switches from my local electronics store for just a couple of dollars each. These are sometimes referred to as “momentary” or “push-for-on” switches, but essentially they are just standard push buttons that complete a circuit when pushed and break it again when they are released. They only have two terminals and you simply connect the two wires from a regular mono phono cable to these terminals. On the other end of the wire, you’ll need to have a 3.5mm mono jack to go into the PocketWizard’s socket. I sacrificed a few mono flash cables that I had lying around and with five minutes of soldering, and a lot of electrical tape to cover up my shoddy workmanship, I was ready to roll.
NOTE: PocketWizard actually manufactures these switch/cable combos themselves. For some reason, they are harder to find than other cables but often available on Amazon for about $30. The PocketWizard BT1 cable is here, for use with Plus series and Multimax, this cable is 40cm long. A 91cm long version called the BT3 is available here.
It’s cheaper to make them yourself, but that does require a soldering iron. Making it yourself also allows you to swap out the switch design quickly for different uses but if you want to get up and running quickly, the BT1 or BT3 is an option.
Heading up the mountain I packed all my gear up into my Mindshift Rotation 180 pack which I love because it allows me to split up my flash gear and camera gear into two distinct parts of the bag. I also carried with me my Really Right Stuff TQC-14 tripod. I just love that little thing, it’s been all over the world with me this year because it’s just so small and light, you can fit it into any bag. It was perfect for this as well because I needed something sturdy, yet small enough that I could strap it to my pack without feeling its weight swinging all over the place as we rode our bikes around. Yeah I know it’s kinda pricey for a tripod, but for other action sports guys who find themselves hiking/biking/skiing around a lot, trust me when I say it’s worth it!
For the PocketWizard setup, there’s a couple of ways you can approach this. The important thing is that you CANNOT simply put the remote camera and the remote flash on the same channel and expect the flash to be visible in the photo. It’s not that simple, but it’s also not a whole lot more complex so don’t worry! You see when you press the transmit button the flash goes off almost instantaneously, but the remote camera takes a little longer to fire by a fraction of a second. I won’t go into the reasons for that here but the delay in the camera is based on all sorts of variables and every camera is different. In fact, the delay even varies depending on what aperture your lens is set at! To get around this problem we have two options as I mentioned:
Option 1.
The receiving PocketWizard is plugged into the camera with a remote cable and is also sitting in the hot-shoe of the remote camera. The receiver is set to RELAY mode. What this does is it receives a signal on the channel that you have set on the front of the device, and then as it triggers the camera shutter, it sends out another trigger signal one channel higher than the one it just received on. You then set your receiver on the flash to that one channel higher. Voila! The flash fires in sync with the camera because it’s being triggered by the remote camera’s transmitter rather than the one in your hand.

Option 2.
The receiving PocketWizard is plugged into the camera with a remote cable and the receiving channel is set to the same as the transmitter in your hand (or on your bike!). A second Pocketwizard sits in the hot-shoe of the remote camera and this PocketWizard is set to transmit mode and has a different channel to that of the transmitter in your hand, it doesn’t matter what channel it is though. The fourth PocketWizard is the receiver for the flash and this has the same channel as the transmitter that is in the hot-shoe of the remote camera. So your hand-help transmitter triggers the remote camera which in turn fires the flash via the hot-shoe mounted transmitter.

This second option requires the use of four PocketWizards in total, whereas the first option needs only three. So why use option 2? In fact, I DID use option 2 for this image and let me explain why…
I’m a big fan of the Hypersync function that’s available on the PocketWizard TT5 and TT1. This function lets you shoot at much higher sync speeds than your camera will typically allow for. There’s a tradeoff, you get a little less power to your flash, but in most cases, the loss of power is less than the ambient light crushing shutter speed that you gain back so you’re still ahead of the game in overall exposure. This allows you to have much more control of shooting in bright sunshine, particularly with fast-moving subjects. Hypersync deserves a whole post on its own at some point so stay tuned! Now to use Hypersync you have to use a TT5 as the transmitter for the flash. You could use a TT1 but I would NOT recommend it since the range of the TT1 is vastly inferior to that of the TT5. Spend a few extra bucks and get the TT5 and save yourself some headaches!
So we’ve established that I need to fire my flash with a TT5 to be able to control my sync speed a little better with Hypersync. The TT5 also has a RELAY mode though so it’s perfectly possible to use a TT5 in Option 1 as well, by putting it in the remote camera’s hot shoe and also plugging it in with the correct remote cable. Here’s the catch though; as a receiver, the TT5 doesn’t have as good a range as the Plus series transceivers. This means that you are more likely to experience firing troubles if the distance between you and the remote camera is quite a lot. This could be made even harder as the transmitter (you on your bike) is moving whilst triggering. Assuming the distance between the remote camera and the flash is less than the distance between you and the remote camera, you’re going to have more success using option 2. This maximizes the range of the Plus series transceivers, and also the capabilities of the TT5 (Hypersync). Using the best of both tools to get the best results.
Of course, all of that doesn’t matter if you don’t want to use a remote flash with all of this! If you just want to fire a remote camera then all you need is a simple pair of PocketWizards and a remote trigger cable. For this, I would recommend getting a pair of Plus IIIs simply because they have the best feature set for not a lot more money than the Plus Xs and they also have the pre-trigger capability when using an ACC cord.


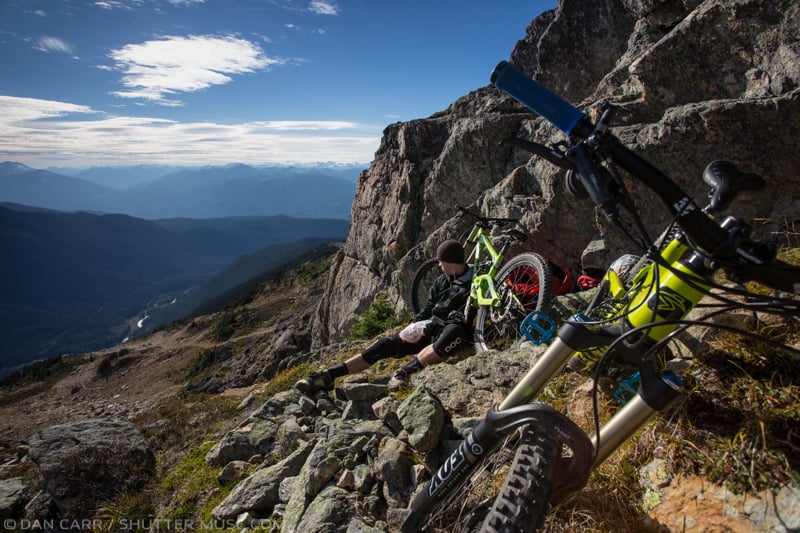
This photo also has the bonus addition of a second rider in the shot Vs. the one that I filmed for the video above. The second rider is my buddy Rowan Thornton who was helping me carry all my gear up and down the mountain and being the subject of some other photos that we set up on the way down. Having him in the shot meant we had to time things right because the two paths we were taking cross over and once I’m going down that rock there’s no stopping! Thanks for your help, Rowan!
Lighting This Image

Whilst the light was great on the evening of this shoot I still wanted to use a flash to throw a touch more light onto the rock and in particular onto me and my bike to really make the yellow frame pop. I used just one flash for this since we were somewhat limited to how much gear we could carry whilst riding down afterwards. Nearly 5000 feet of black diamond vertical had to be descended afterwards by only the light of our headlamps since the sunset just minutes after this photo was taken.
I chose to use my Einstein flash again, which has become my location light of choice due to its small size and excellent power to weight ratio. Something which I’m always thinking about when moving lighting gear around on mountains, and an area where other brands such as Profoto and Elinchrom fall behind the Einstein flash (despite it being a fraction of the price). The other determining factor in that choice was the fact that the Einstein has a very slow flash duration when set to absolute full power. This makes it an ideal candidate for working with the Hypersync functionality that’s available with a Pocketwizard TT5 or TT1 (at the time of writing, there are the only two that can provide this function). Why a slow flash duration is best for this will have to be the subject of a further post since it’s too complex to explain here without going down a serious rat hole!
The Einstein was positioned just out of frame on the right-hand side, atop a 10ft light stand. I tend to like putting key lights up high on stands because it adds a touch more contrast to the image. The further you get that flash of the line of the lens the more contrast it will create. Most people remember to position it off to the side but forget that you can also move it up high to add to the effect even more. In this case, I also wanted to mimic the direction of the sun a little bit, albeit a few degrees off its direction, so that the use of flash was not so obvious in the photo.
An aside: Filters in sports photography
The use of filters is most often associated with landscape photography and you’d actually be hard-pressed to find a sports photographer that has what you might term a “filter collection”. Why is this? I think it has a lot to do with the perceived necessity for fast shutter speeds, but of course, that doesn’t really apply when you’re using flash as I was in this main image. With filters typically causing a 1 to 2 stop loss of light, in many cases, this can be made up for with using a higher ISO these days, for only a minor reduction (if any) in image quality. Using a circular polarizing filter and a 2-stop soft edge neutral density filter in this image really helped to bring out the colour and drama in the sky. Whilst it would have been possible to imitate some of this in Lightroom and Photoshop, the effect of a polarizing filter is not possible to recreate to perfection and all of that would have added time to this. In essence, this image came out of the camera ready for print, with only 15-20 seconds of slider manipulation needed to get it to the state in which you see it. I for one LOVE the challenge of getting it right in camera and I think a lot of people outside of the landscape photography niche are missing out on some interesting possibilities that can come from the use of filters.

For this shot, I used a Formatt HiTech filter holder with a 4×6 2-stop soft-edged neutral density filter in it. On the front of the holder was a 105mm HiTech circular polarizing filter. Using a holder such as this one allows you to rotate the filter on the front at any angle. This particular situation called for the filter to be positioned at an angle indicated by the diagram above so as to not dull the exposure over me and the top left corner of the rock face.
Further Photos

Here’s another couple of photos that were shot using the same remote trigger system, although these ones do not involve any flash.
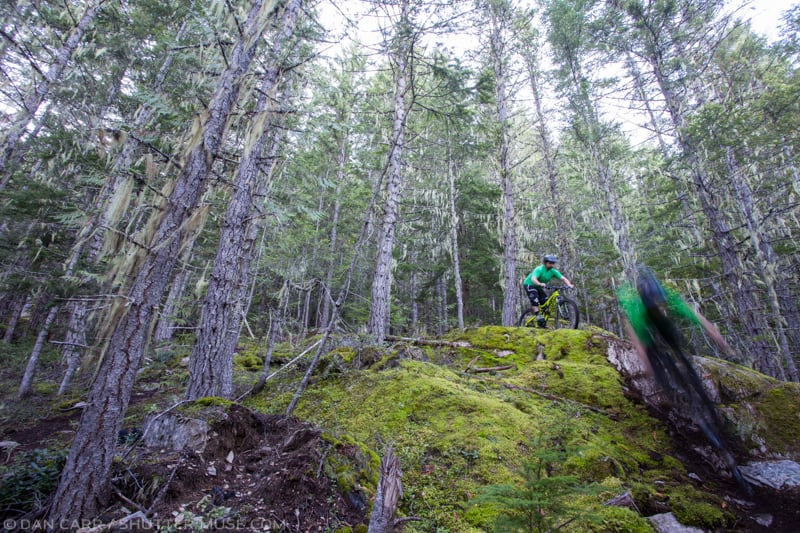
This last image here might have a few of you wondering how I did it. In fact, it is a single exposure but there are two bikers. I wanted to give some sense of speed so we set it up with me going relatively slowly at the back and my buddy Rowan, riding the bike at the front much faster. We experimented with both of us riding quickly, hence both of us being blurred, but in the end, I preferred this version and the act that we are both dressed in green has the effect of making it look like a double exposure of some sort.
Direct Purchase Links – This is what you’ll need
- You’ll need at very least a pair of Pocketwizards
- You’re also going to need a switch, and to be honest there are a million different ones out there that could work.
- PocketWizard trigger cable to go from receiver to remote camera


Hi Dan,
Great post, I spend the entire afternoon trying to fire from my TT1 my D600 with a TT5 on the hot shoe and 2 SB900 with TT5. I got it in Basic trigger mode (no TTL and HSS). In your video you said that you can use the TT5 in relay mode on the top of your camera to fire your flash using HSS. I can’t figure out that part. Could you tell us more about this configuration (settings of the TT5). I’ll do more test tomorrow.
Thanks.
More info here: http://www.pocketwizard.com/inspirations/tutorials/auto_relay_mode/
Thanks Dan,
I went back to the PW website and read FAQ, Wiki, look at the tutorials, and … It seems not possible to run continuous triggering from a miniTT1 to a flexTT5 on the camera hotshot firing the flashes connected to the other TT5 in controlTL mode.
Here is what PW says: “With the default settings, a remote camera can be triggered in single shot mode and there will be a delay between subsequent triggers until the camera’s viewfinder LCD deactivates. Continuous triggering for motor drive bursts is possible if the FlexTT5 attached to the camera has either Disable Shoe Communications or Basic Trigger Mode set via the PocketWizard Utility. It is not possible to combine continuous remote camera triggering with advanced features like TTL and FP/High Speed Sync. Relay Mode with TTL is only available in single shot mode.”
It’s pretty clear.
If I set the TT1 and TT5 on the camera to Basic trigger and the other TT5 receiving on the standard channel, then I can use continuous fire but loose the Hypersync capability, I’ve got clipping starting at 1/250th s.
Do you experiment the same behavior?
It’s possible I’m doing something wrong, but can’t figure out what. Feel free to direct me.
Thanks
Ok well this is adding a further variable… continuous triggering. I’ve never tried that so it would need some further experimentation. In the setup I used to take the photos of me I just took one photo. No need to take lots of photos because I’m in control of the framing and when the photo is taken so I take the photo at the exact right time for the composition I want in the image. No need for other photos, and also shooting on continuous, with flash, is pretty useless and flash don’t generally recycle fast enough anyway.
Also Hypersync ( what I said in the video) is not the same thing as HSS. Read more on that here: http://wiki.pocketwizard.com/index.php?title=Understanding_HyperSync_and_High_Speed_Sync
Yes it’s all rather complicated!
Right I made a mistake, I want to say Hypersync, not HSS
There is another option that doesn’t require hardware: triggertrap. They have an adapter + app combo that lets you use your phone as a sensor (sound, motion, …) and works pretty well. For riding selfies I’ve had good luck with the sound sensor and just yelling when I want it to fire.
Camera is an x100t, which is tiny so easy to ride with. And since it has a leaf shutter it works well with just hotshoe flashes even at riding speeds.
Example (no flash, just riding lights): https://flic.kr/p/CZe8Jc
http://www.triggertrap.com/
Thanks for the comment. Interesting idea!