I recently did an upgrade of my backup hard drives, something that every photographer will end up doing at some point. I was left with a stack of drives on my desk which I’ll sell on Craigslist or through my local buy and sell forum. They all work perfectly so I’m sure someone will want to put them to use. There’s an important step to perform before you sell any computer or hard drive, though!
Erase doesn’t really mean gone..
I’m sure that everyone takes a basic precaution when they sell a hard drive, and deletes all the files and folders off the drive. But did you know that it’s usually extremely easy to recover that data? Even basic data recovery software could potentially give someone access to all the data that was on your drive, should you sell one.
I wanted to make sure that you guys know this!
Now, I’m a Mac man, so I’m afraid I can’t speak about PC solutions to this problem, but if you’re a PC user then at least now you know, and you can go off and do a little research. If you use a Mac, there’s a couple of easy ways to help make the drive selling process a bit more secure.
Firstly you can enable what Apple calls FileVault. On new Macs this is enabled by default, but if you have an older one then it might not be. Check the Security section of Systems Preferences to see whether it is on or not. When FileVault is on, every file on your internal disk is encrypted. If you were to take the drive out of the computer, the data would not be accessible by anyone.
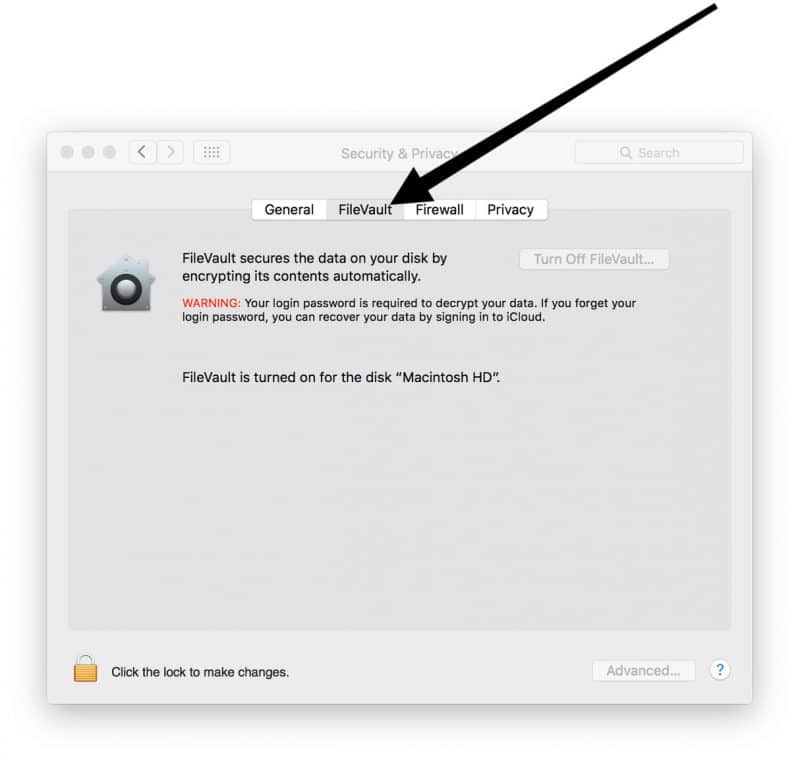
Note that externally connected drives are NOT encrypted by FileVault as a default. To add external drives to FileVault, you need to find the drive in the left hand menu of the Finder window, then right-click on it and choose the “Encrypt…” option. There are some negative performance issues with FileVault as your computer has to constantly encrypt and decrypt files on the fly over your USB or Thunderbolt connection. With large files, this could lead to slower performance. Personally I don’t encrypt external drives, but my faster SSD in the computer is encrypted.
So if your external drives aren’t encrypted, and you want to sell them, you’d best take a few extra precautions. Once you’ve erased the contents of your drive in the normal manner by dragging to the trash and emptying it, we can now securely erase the free space that’s left behind. Essentially this means writing a bunch of random data over the top of your old data!
We can do this by using Disk Utility which is best accessed by pressing Command+Space bar and then typing “Disk Utility” into the spotlight search bar. Disk Utility is a tool that allows you to reformat drives, partition them and also securely erase their content. There’s multiple security levels you can do it at, and the video below will walk you through the process.
How to Erase Free Space in OS X El Capitan
This video below shows you how to get to the options to securely erase the space on your drive, as long as you are using OS X El Capitan or later. Earlier versions of OS X did include the function, but it wasn’t in the same place as it is in this video. If you do have an earlier version, just go to Disk Utility, select your drive and you’ll see a button that simply says “Erase Free Space”. Apple created some confusion when they launched El Capitan because not only did they move the feature and redesign Disk Utility, they also don’t call it “Erase Free Space” anymore, now it’s lumped under settings for “Security” during the disk erase process.
Alrighty guys, I hope that’s useful to some people. I know I can’t be the only Mac user out there that wants to sell a hard drive from time to time, so now you know how to do it in a more secure manner!


