Are you planning your next photo trip or a photography workshop to a dream location and wondering how to manage your Adobe Lightroom catalog while away from home? If so, you’re not alone. Judging by the number of times I have received questions about this topic, it’s a sticking point for many people. Likely because there are many ways to skin this photo feline, and the best option isn’t obvious.
The good news is two-part: Firstly, it’s not as complicated as you think it is–Lightroom has built-in features to help with this scenario–and secondly, I’ve experimented with all the workflow variations and figured out the best one for you. I’m going to share that with you now.
Table of Contents
Lightroom Classic and Lightroom CC
As I write this tutorial, Adobe still offers two versions of Lightroom: Lightroom Classic, which is still what most people think of when they think of Lightroom, and Lightroom CC. This tutorial speaks specifically about Lightroom Classic catalog workflow while traveling. In the future, I plan to append a second section to the article discussing the best travel workflow for Lightroom CC users. For now, it makes sense to start the conversation with Lightroom Classic because, though very powerful, the adoption rate for Lightroom CC is low, and I rarely receive questions about it.
External Drive Requirements
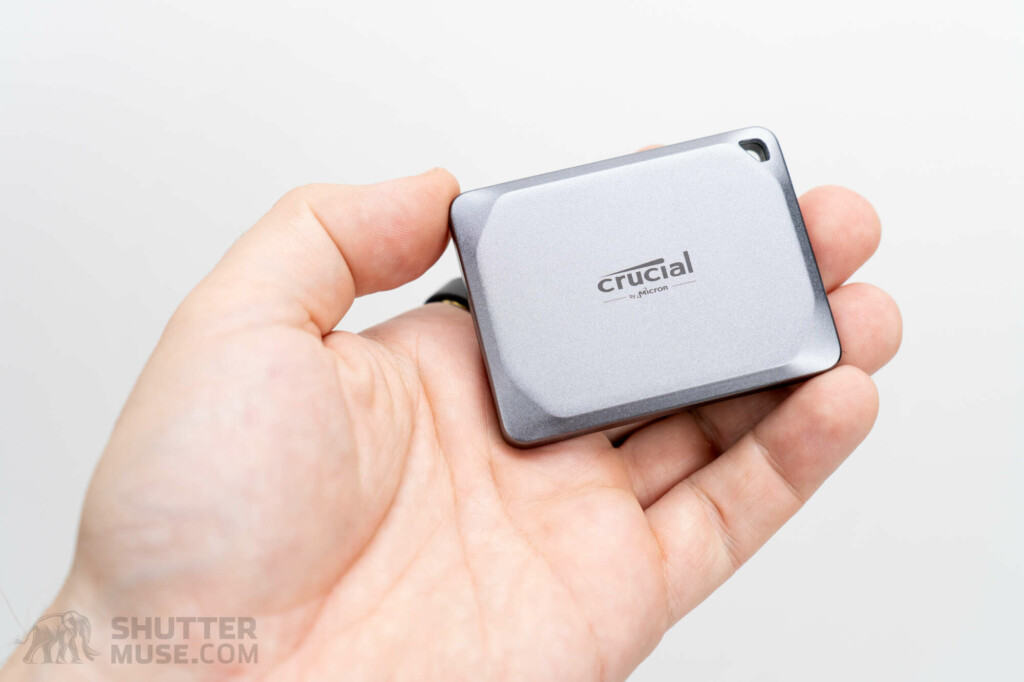
Regular readers will know that I’m always banging on about the importance of maintaining a good backup routine to protect your hard-earned, and often expensively acquired, photos. This can be a challenge while you travel. I don’t want this article to get sidetracked into discussing travel backup strategies. For now, it’s enough to say that when you’re traveling, at a bare minimum, you should be carrying an external SSD to store one copy of your photos, with a second copy on another SSD or still on your memory cards. The preferred Lightroom workflow I discuss in this article relies on an external drive.
And yes, I mean an SSD (solid state drive), not a hard drive. SSDs have come down in price and increased in performance now to the point that hard drives are not the way to go. Get yourself a good USB or Thunderbolt SSD that is bus-powered (doesn’t require a separate power supply) and fits in your pocket.
How Do You Use Your Laptop?
Is the laptop you’re traveling with the same computer you use at home with your primary Lightroom catalog, or do you use a laptop for travel and a desktop computer at home? For this tutorial, the answer to this question doesn’t matter. I recommend using the same workflow for both scenarios. Why do I bother asking the question, then? Simple. If I didn’t underline this here, I’d be inundated with questions like, “Do you still recommend this workflow if my laptop is my main computer?” So, yes, however you use your laptop, I recommend the workflow laid out below.
Lightroom Classic Travel Workflow
Step 1 – Create a new Lightroom Catalog
For every photography travel trip, I create a new catalog (File>New Catalog)and store the catalog file on my laptop’s internal drive, not the external SSD. This will be a temporary travel catalog that later gets merged into your main Lightroom catalog once you return from your trip. Using a new temporary catalog for each trip helps to simplify organization, speeds up the eventual merge process with your main Lightroom catalog at home, and ensures you have a nice, bloat-free catalog running at full speed during your travels when time download and sort images can be limited.
While traveling, this Lightroom Catalog .lrcat file and all the various .lrdata preview cache files should be stored on your computer’s internal drive, not your external SSD. This is because your internal drive is faster than your external drive, and we want to give Lightroom the quickest place to create and store the all-important preview files. The faster the location of the Lightroom catalog, the faster the previews will render after importing photos, and the quicker the catalog will feel.
Step 2 – Import Images
You need to fill this new travel catalog with photos from your trip, but before you do that, here are a couple of recommendations for the pre-trip setup of your Lightroom Import settings.
Step 2.1
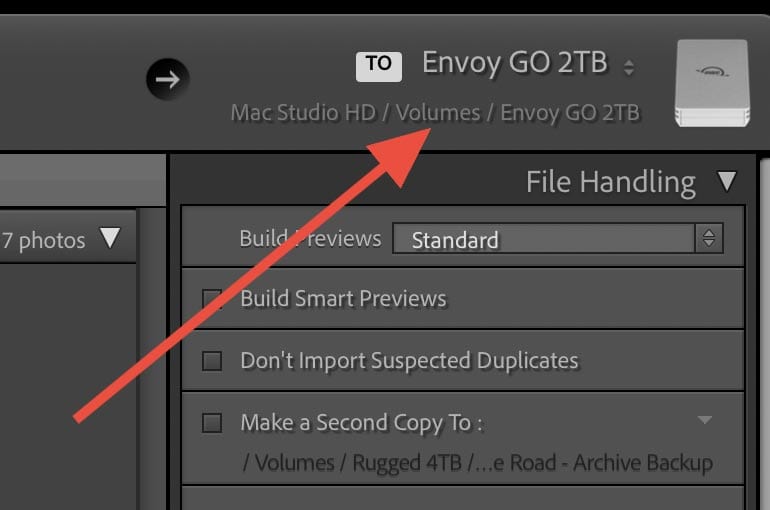
In the Lightroom Import interface’s top-right corner, select your external SSD as the TO location.
Step 2.2
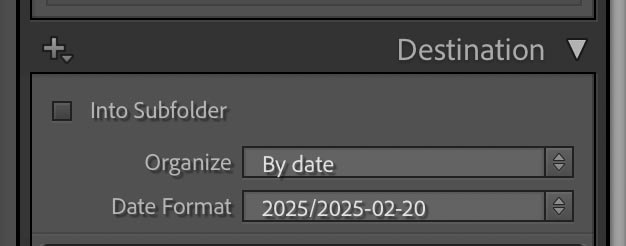
In the Destination panel of the Lightroom import interface, ensure you set this up the same way you have it for your main Lightroom archive at home. The importance of this won’t become apparent until the end, but trust me, it’ll make things easier. My preference is to organize by date and then create subfolders for each day of shooting.
Step 2.3
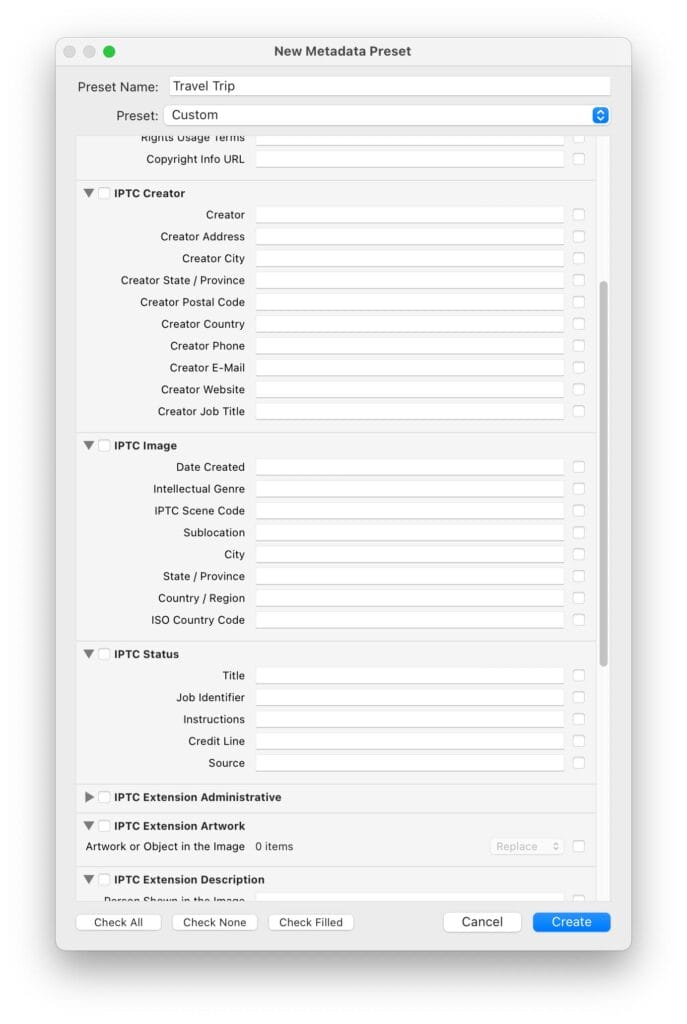
Finally, creating a Metadata Preset for your trip is a good idea. Apply During Import>Metadata>New. This should include all your standard copyright information, contact details, and shared location information, such as country or state. The final box in the preset creation panel allows you to apply any metadata keywords that may be common to all photos from the trip. Perhaps this is the name of a photography instructor, a tour company, or a type of photography you’ll be doing on the trip. Remember, this will be applied to all images that you import to this travel catalog. Save this preset and select it in the Apply During Import panel on the right-hand side of the Import dialogue File>Import Photos and Video.
Step 3 – Lightroom Catalog Backup or XMP File?
In Step 1, we created a new Lightroom catalog and stored it on the computer’s internal drive to ensure it runs as fast as possible. Then, we import photos into that temporary travel catalog on the trip but store the actual image files on an external SSD. Hopefully, you’re also planning to create a backup of that external drive or keep your photos on your memory cards to ensure you have at least two copies of the images.
While this is the best way to ensure a fast temporary catalog for our travel needs, it opens us up to one potentially significant vulnerability that needs to be patched. The Lightroom catalog file on your laptop doesn’t contain the actual image files; they’re safely on your external drive. However, it does include all your flags, ratings, selections, collections, edits, and editing history.
It’s easy to follow my advice and always keep your photo backup drive in your pocket or camera bag when you leave your hotel room or other accommodation. Still, it’s never as easy to keep your laptop with you. This leaves your computer, and by extension your Lightroom catalog file, at risk of theft, fire, or flood while not in your possession. Whether this is a real issue for you and the best way to tackle this vulnerability depends on how you work on the road. Let’s look at the two options.
Option 1 – Write changes into XMP files
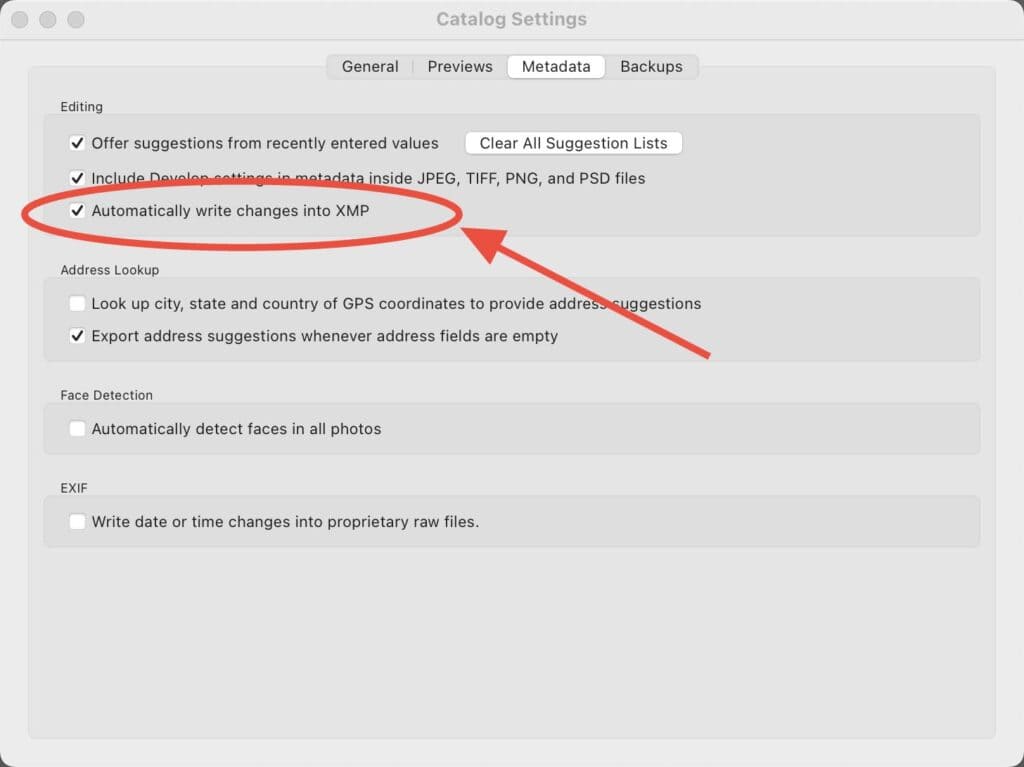
Suppose you’re like me and only do some basic edits for quick social media sharing on the road and some basic ratings tasks. In that case, I recommend going to Catalog Settings>Metadata and choosing Automatically write changes into XMP. When you do this, Adobe creates an XMP sidecar file alongside the original image on your external SSD. This file contains information about the edits you’ve made and the ratings you have applied. If you ever lost your laptop to theft or disaster while traveling, as long as you have your external SSD, you can import the photos into a new Lightroom catalog and it’ll find the data in the sidecar XMP file and automatically re-apply your edits, metadata and ratings.
Option 2 – Lightroom Catalog Backup
Experience has shown me that Option 1 is enough to cover what most photographers need when they’re on the road. Usually, our priority is getting out there to explore and create new photos, not spending hours and hours organizing and editing every night in Lightroom. That said, there may be instances where you find yourself with time on your hands during a more extended trip, or maybe you just want to stay on top of things because you know you’ll never get to it when you get home. If that’s the case, we need to discuss what is NOT saved into an XMP file.
Automatically creating a sidecar XMP file gave us a handy way to keep edits and ratings alongside the original files on our external SSD. Still, there are some more complex situations it can’t handle. An XMP file will not save:
- Virtual copies of images
- Image stacks
- Image editing history
- Image editing snapshots
- Image collections
- Smart collections
- Anything you have created in the Book, Slideshow, Web or Print Lightroom modules
So, if you’re happy with having the current edit point and rating saved as a backup, an XMP file has you covered. However, if you’re going to create virtual copies of images to experiment with different edit styles, then take snapshots of various points in the process, or if you want to walk your way back through the editing history of the file, you may want to consider creating a backup of your Lightroom catalog file on if the thought of losing all that pains you.
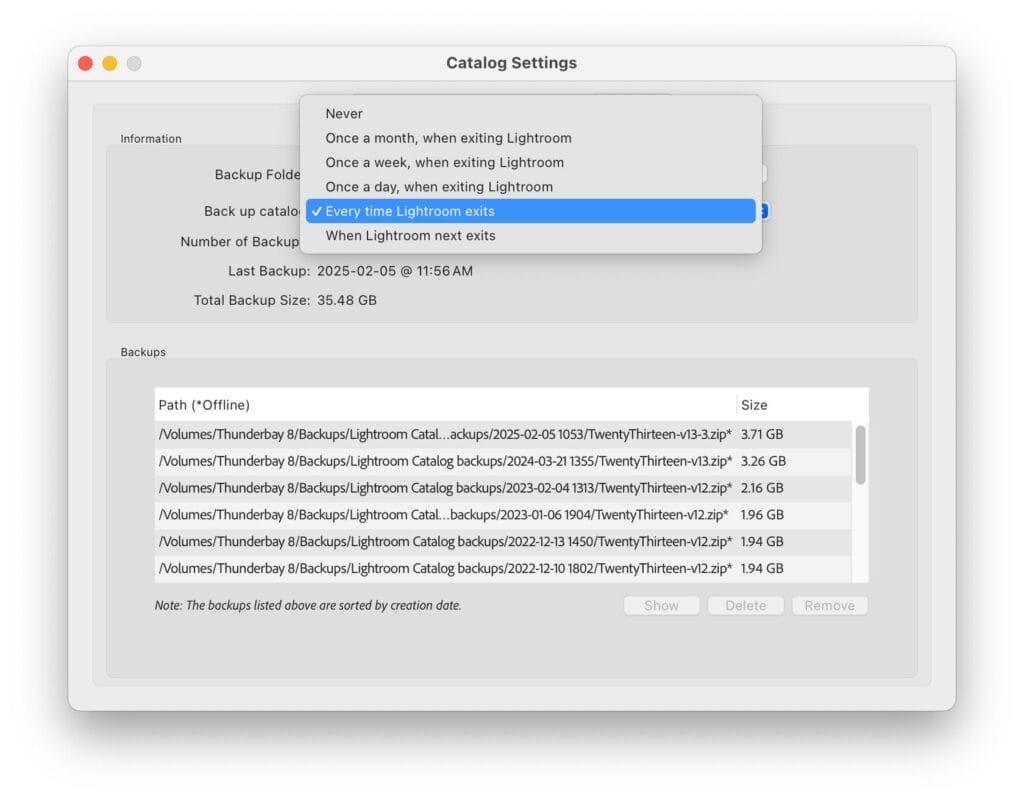
The backup options are available in Lightroom’s Catalog Settings>Backup menu. I generally set this to Every time Lightroom exits. It will always give you an option to skip the backup, so you won’t waste time if you haven’t made any new edits. You should store this catalog backup in a folder on your external SSD to always have it in your pocket or camera bag. Since the catalog file doesn’t contain your original image files, only a low-res preview cache, the backup will not take up any significant space on your external drive.
Step 4 – Back Home – Move Your Catalog File to External Drive
Now that you’re home from your trip, you will want to bring all your new photos into your main Lightroom catalog, including edits, IPTC metadata, editing history, virtual copies, collections, snapshots, and stacks you created on your laptop while you were away. You’ll also want to copy your new photos off the small external SSD you used during your travels onto your primary photo storage location that holds the rest of your archive while ensuring your main Lightroom catalog understands where they are.
This sounds daunting, but it’s not at all. Lightroom has a simple function that handles all of these tasks simultaneously. At this point, there is a slight variation in the process, depending on how you use your laptop. Please follow the relevant instructions.
Option 1 – Your travel laptop is also your main computer at home.
If this is the case, please skip immediately to Step 5.
Option 2 – You used a laptop while traveling, but use a desktop when you’re home
If this describes your situation, we need to copy your temporary travel Lightroom catalog onto the external SSD that holds all your new photos. The reason for this is that we need to make the temporary travel catalog accessible to your desktop computer so that it can perform the merge with your main Lightroom catalog. If you shot many photos on your trip and have multiple drives with new images, you can copy the travel catalog folder to any of the drives.
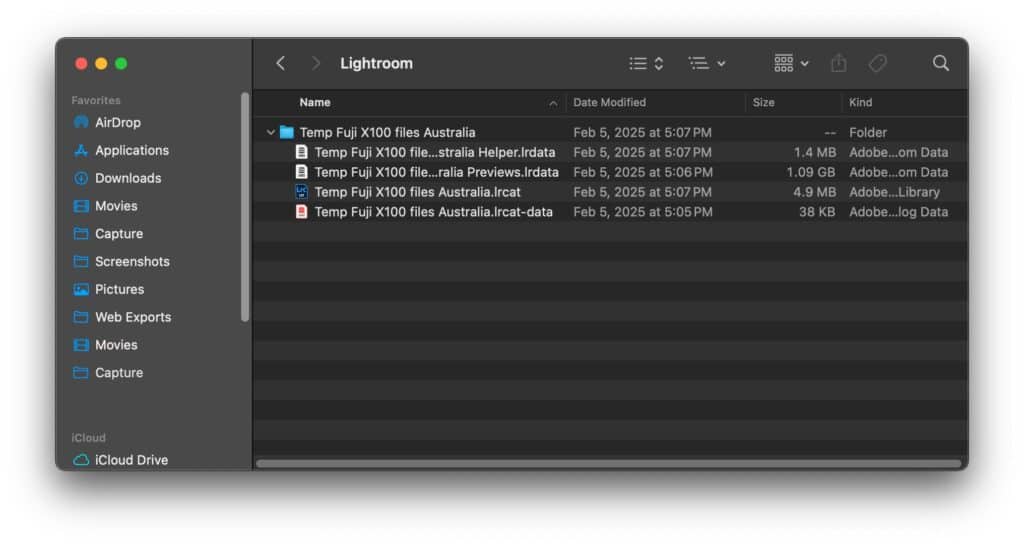
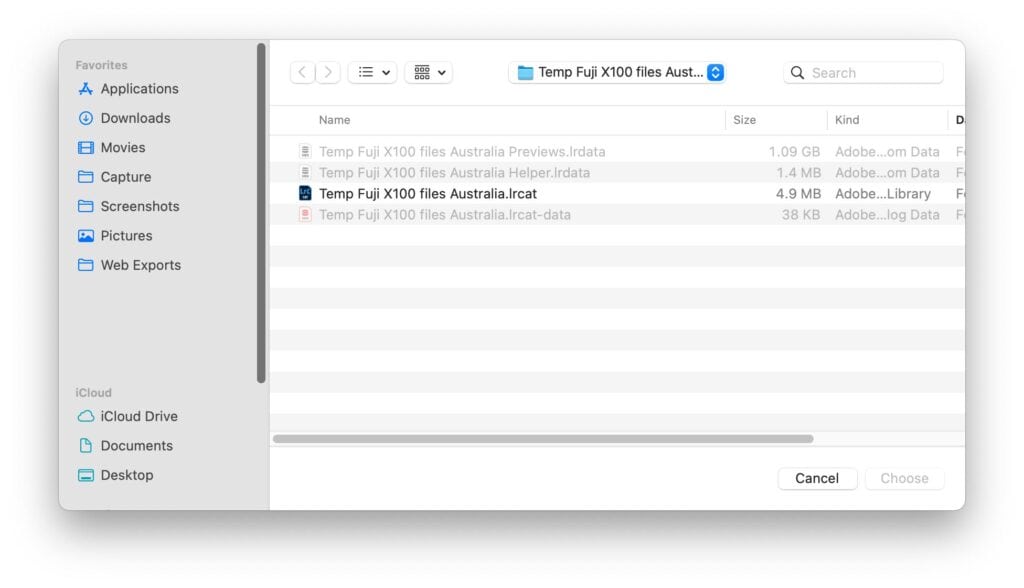
When you create the temporary travel catalog back in Step 1, Lightroom will make a folder with the name of the catalog. Inside that folder are the .lrcat catalog file and various .lrdata files that contain the low-res preview cache. The easiest way to prevent mistakes at this stage is simply to copy the entire folder onto the external SSD that includes all your new photos. Now, everything is portable. You have your travel catalog file and all your new pictures on an external drive, and we can move it all to your desktop computer.
Step 5 – Import and Merge Catalogs
This is where the magic happens! It’s also the most critical stage of the whole process, so I’ll break it down into bite-sized steps.
Step 5.1
Open your main Lightroom catalog on your main at-home computer, whether on the same laptop you just had on your trip or a separate desktop computer. This is the catalog where you want your new photos from your trip to be imported.
Step 5.2
Plug all external SSDs containing new photos from your trip into the computer. Things get much more complicated if you try to do things in stages, so I highly recommend plugging all drives in at once.
Step 5.3
Go to File>Import from another catalog and navigate to the folder that contains the temporary travel catalog file. The .lrdata file is the only one selectable in the folder. Select it and click Open (Windows) or Choose (macOS).
Step 5.4
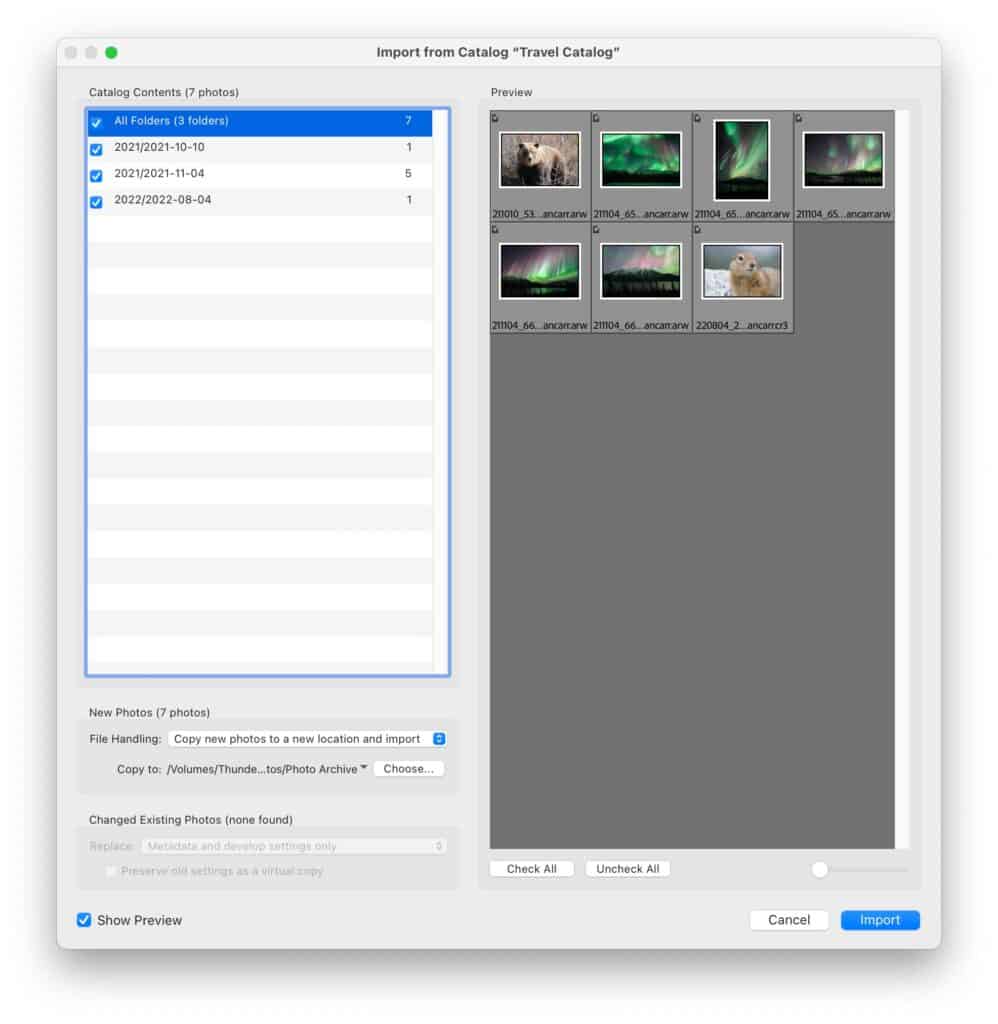
Lightroom will open a window showing a list of folders containing images. These are the folders on your external SSD that hold all the new photos from your trip. Please ensure all folders are selected. Note that the date-based structure in my screenshot results from the recommended import settings we chose in Step 2. Your folder structure may look slightly different if you had reason to deviate from my advice.
Step 5.5
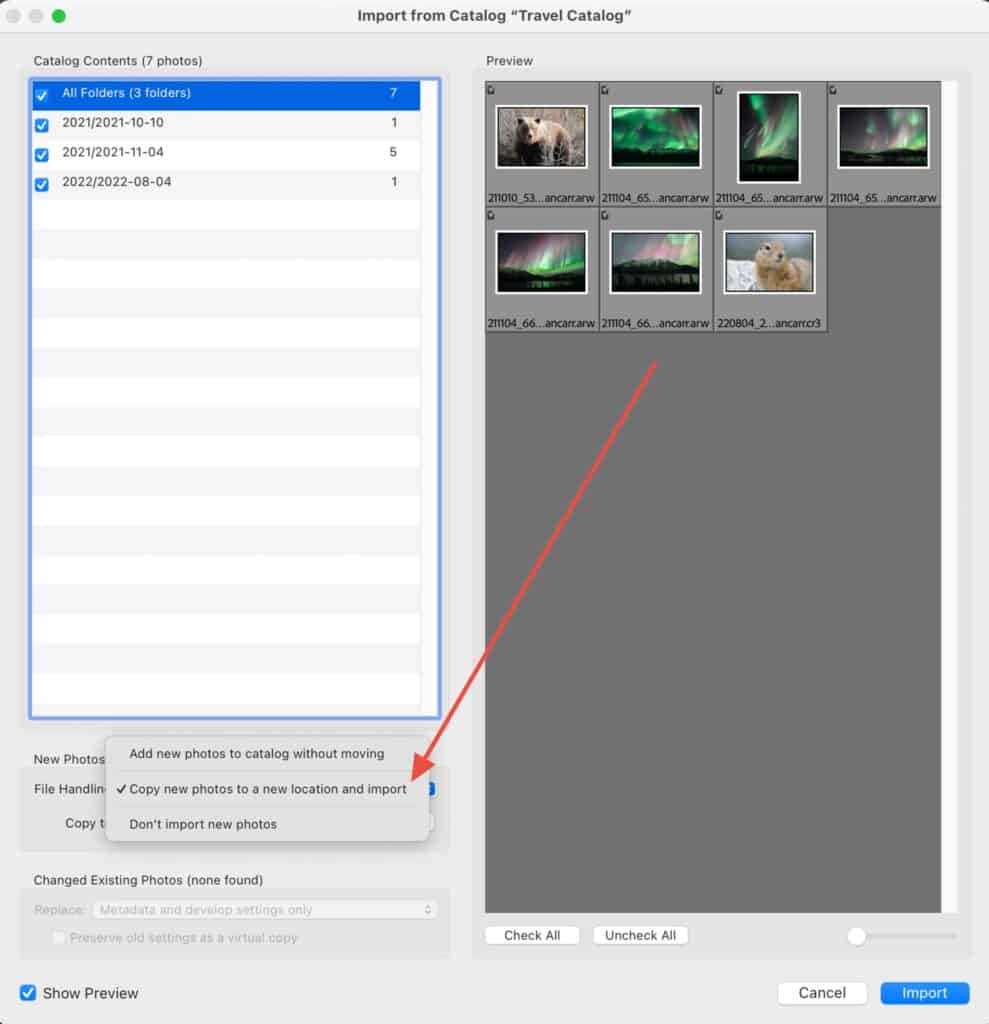
In the File Handling section, choose Copy new photos to a new location and import.
Step 5.6
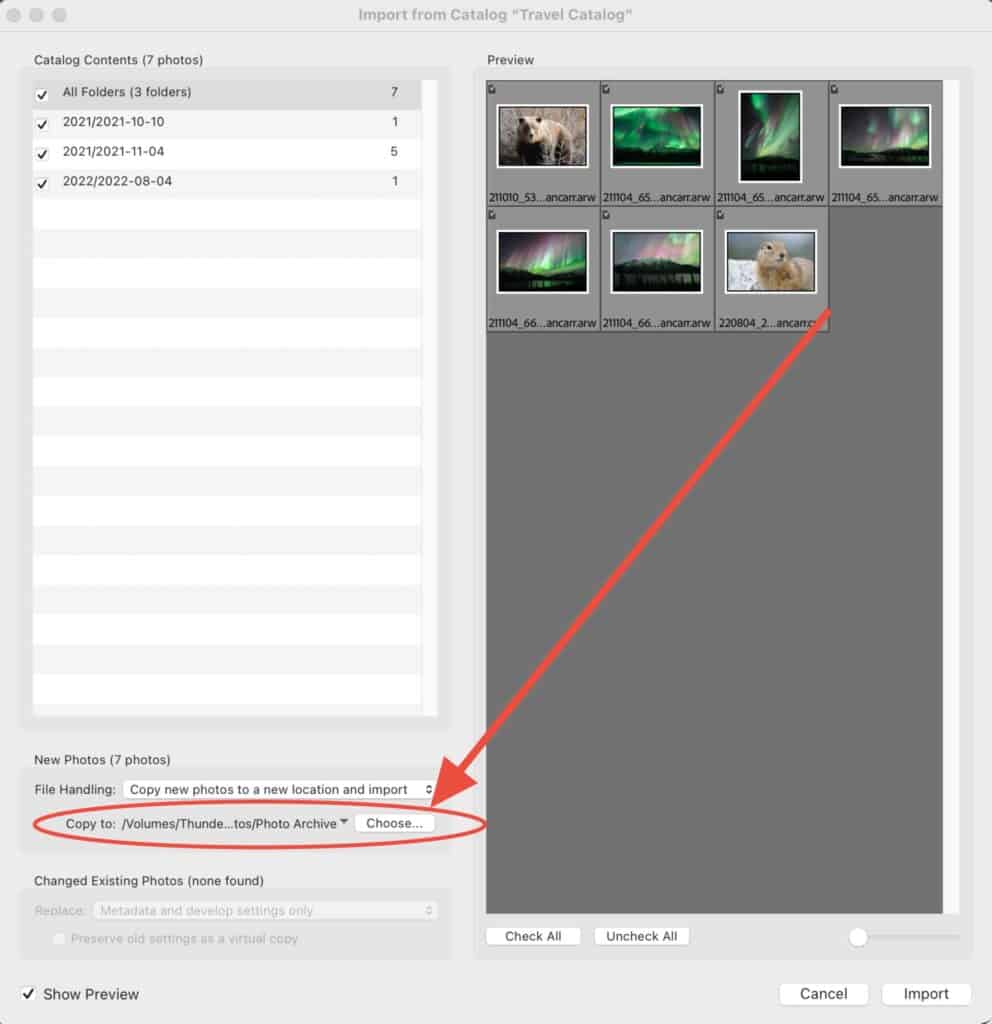
In the Copy To section, select the location of your primary photo archive. This would be the drive and folder that contains your photo collection. My folder is called Photo Archive. During the catalog merging process, the folders and folder structure displayed on the left-hand side of the import window will be copied from your external travel SSD to the Copy To location. Notably, the contents will be merged if some folder names already exist.
This is why it was preferable, back in Step 2, to import photos onto our travel external drive using the same folder structure you like to use in your at-home photo archive. If you do this, everything will fit neatly together. Any date-based folders from your trip will drop neatly into the already-existing year-based folders in your main photo archive folder.
Step 5.7
Hit the Import button, go off, and make yourself a coffee. This process is not fast, particularly if you are dealing with terabytes of photos. Lightroom will copy all the photos off your external SSD and put them into your photo archive folder, wherever that is located. At the same time, all these new photos will be imported to your main Lightroom catalog, and preview data will be merged from the temporary travel catalog into the cache of the main catalog. Any edits you made on the road will be applied to the photos in the main catalog, including all edit histories, stacks, and virtual copies. All collections you made in your travel catalog will be merged into the main catalog. All metadata added to your photos while you were traveling, as well as flags, star ratings and color ratings will appear on your photos in your main Lightroom catalog.
Step 5.8
Job done! Well. Nearly. Once the import process is complete, take some time to check things. I have never seen any errors or issues at this stage, but there is always a chance. Please take a look through the newly created folders in your main Lightroom catalog to make sure you see what you’re expecting. You should also navigate to the folder location of the actual files to ensure they have been copied to the expected location in your main photo archive.
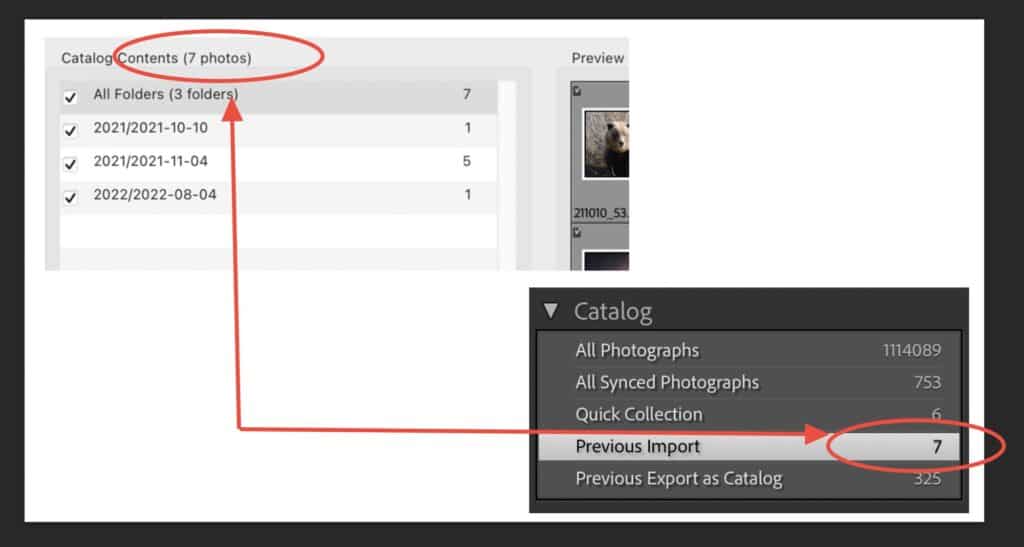
As a further step, you should open your temporary travel catalog and note how many images there are. Does that number match the number you saw in the Import from Catalog dialogue in Step 5.4? After the catalog merge, it should also match the number in the Previous Import section of the Catalog panel in your main Lightroom catalog.
Wrap Up
Here, we conclude my guide to managing Lightroom Classic catalogs while traveling for your photography. The guide is quite long, not because it is complex, but because I wanted to be thorough. If anything is unclear, please leave a comment so I can help you figure it out.
I’m sure some people will tell me they do things another way. Great! You folks can keep doing what you’re doing. I’m just here to help those struggling to figure out a good workflow and looking to learn from someone, a real person, no less, who’s been doing this for a long time.


Hi Dan,
Very clearly written! I use the same method when I travel, and I have a couple of additional suggestions that you might consider covering for folks. I had to learn these myself, and some might find it a bit daunting without your help.
You might explain how folks can transfer their master keyword list from their main LR catalog at home to the newly-created travel catalog on their notebook computer. Until I learned how to do this, coming home from road trips inevitably bloated my master keyword list.
You might also help folks through the process of prepping their LR Classic for extended time off-grid, so that they don’t get locked out of LR when they are truly away from the internet. Periodically my trips take me off-grid for weeks at a time, and this can be a critical bit of prep work that needs to be done right before your trip begins.
And one last note is a bit of a caveat / field report regarding external SSDs:
I spent much of last December in the Okavango Delta and Kalahari Desert photgraphing wildlife. Daily temperatures routinely reached 45 degrees Celsius (114 deg. F) and did not significantly drop overnight. My in-field workflow always ends the day transferring images from cameras to SSDs (incl. backups). This is normally very time-consuming. So, for my December trip I brought along a CalDigit Thunderbolt 4 hub and OWC Thunderbolt 4 SSDs to help speed things along, so that I could get my backups started on USB 2.2 drives before going to bed. Both are wonderful products that I have routinely relied on since your original reviews of them.
However, … Significant problem: even the overnight air temperatures were too hot for my Thunderbolt gear. The hub and drives became very, very hot and file transfers slowed to a crawl. I gained no significant advantage by using my beloved T’bolt SSDs in those extreme temperatures. Much as I love this setup for temperate climes, I’ll likely just carry lighter little USB 2.2 SSDs on future summer trips into the world’s deserts. And I’ll also likely leave my T’bolt hub at home too – though that’s a harder call.
I hope this message isn’t too long to be useful. Please feel free to reply offline (or not at all) if it better suits.
Best regards as always.
Thanks for taking the time to add your valuable experience to the conversation, Michael! You make some excellent suggestions regarding offline access and keyword lists. I want to expand this post to include people using LR CC. Once that is done, I’ll look at adding your suggestions 🙂
Regarding the SSDs, can you specify which OWC SSDs you were using? I recently switched to the OWC 1M2 drives, which are almost one big heatsink in the way they are designed (review: https://shuttermuse.com/owc-express-1m2-review/). I’d be amazed if they suffered the same slowdown, but I can’t say I have used them in 45-degree conditions.
Hi Dan, I have the OWC Envoy Pro FX model. Like you, I wondered if the 1M2 design wouldn’t have solved the problem. Alas, I don’t yet own any of the new design (although I’d read your review of the new model when you originally posted it). But next time. : )
Great idea, on the work shoots LR catalogue, Dan! Thanks! I’m going to try it for an upcoming trip in AB. Here’s a suggestion for an article, how to use Ai to set up your next photo shoot, wildlife, landscape or night sky. I just used “ChatGPT” and was amazed how useful and quick it was collating useful info. including prime locations, optimal timing, camera settings, essential gear etc. with one detailed, well-worded question. Heck, it even created checklists in pdf and Excel format.
Fabulous thread and great explanations. Do you have a workflow that can be applied to travelers using Lightroom mobile on their iPad mostly offline?
Marc
Unfortunately, that’s not a workflow I have experimented with.