
I love the experience of hitting the road, chasing the light and weather in search of landscapes and wildlife. This often takes me to places that are far from hotels and motels, so I decided that a portable photography base camp would be a great idea. In this article, I’m going to give you a tour of my photography adventure trailer and share some of the things I learnt along the way while I modified it for my purposes.
Table of Contents
Trailer Make and Model

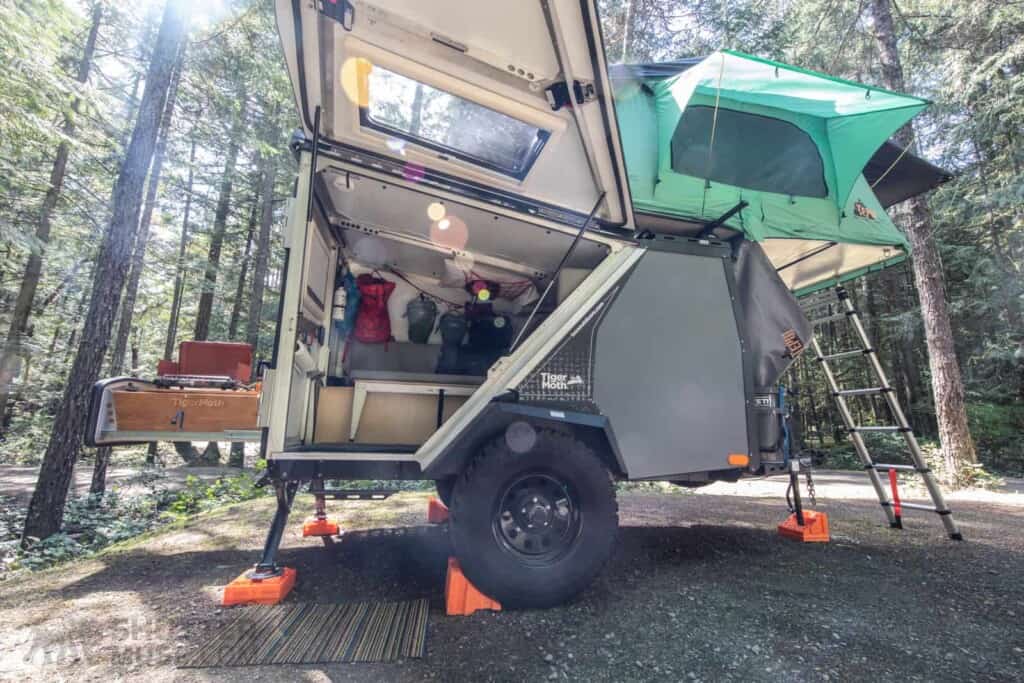
The trailer is a Taxa TigerMoth. It was designed by an aerospace engineer at Taxa that used to design habitation units for NASA and the international space station. I was drawn to this particular model because the dry weight was only 900lbs, which makes it towable by medium-sized cars such as my Subaru Crosstrek.
Compared to a teardrop trailer, the TigerMoth also has much more height inside it, allowing you to sit upright on the bench seating. In my opinion, the internal space is much more versatile than those teardrop trailers that simply have a door on the side that allows you to crawl inside to the bed. The TigerMoth interior can be both a bed or a living space.
If you are doing research into this particular model from Taxa, note that there have been several different versions of the trailer. Some of them were built with a steel frame and weigh much more. Some were entirely made from aluminium and are much lighter. My 2017 model has an aluminium frame, but steel accessories and falls somewhere in the middle. The weights of the various models are vastly different, so keep that in mind if you are looking at them to see whether they can be towed by your car. Please direct all weight-related questions to Taxa. I’m no expert in this area.
Camera Gear Storage
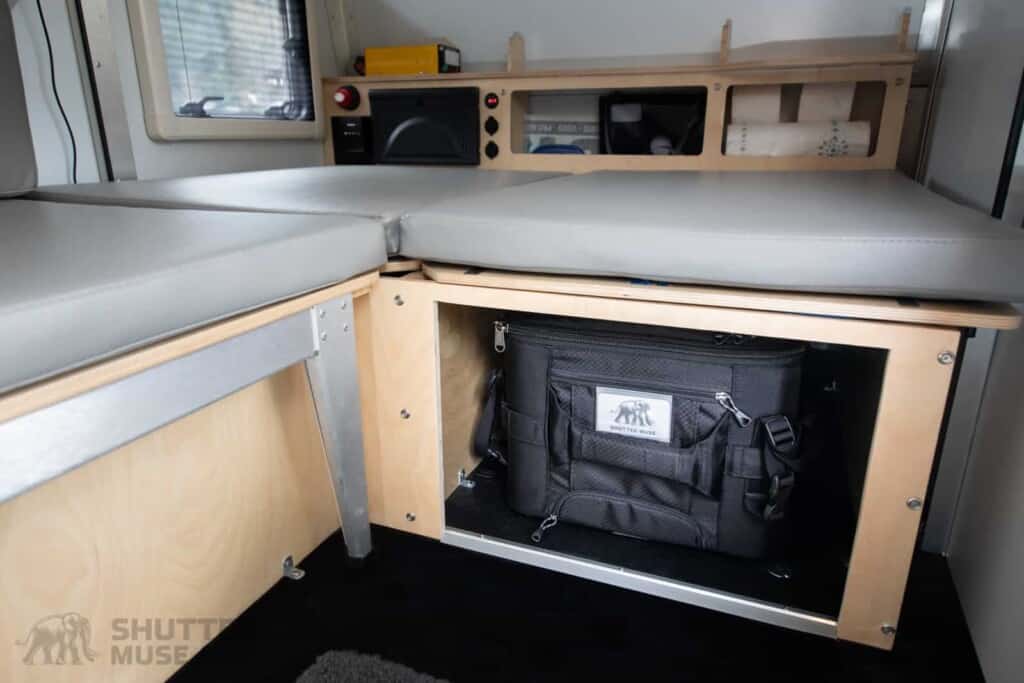
The first thing I did was to use some daisy chains from my climbing gear to give me plenty of places to hook various camera bags and hiking packs. After that, I contacted my friends and Think Tank Photo for some help and they sent me over one of their largest rolling camera bags, called the Logistics Manager.

The Logistics Manager is huge, but I was able to cut a hole in the side of the under-seat storage compartment that would allow me to slide the bag in and out when I need to grab some new gear or stow things away before hitting the road again. It’s the perfect setup!
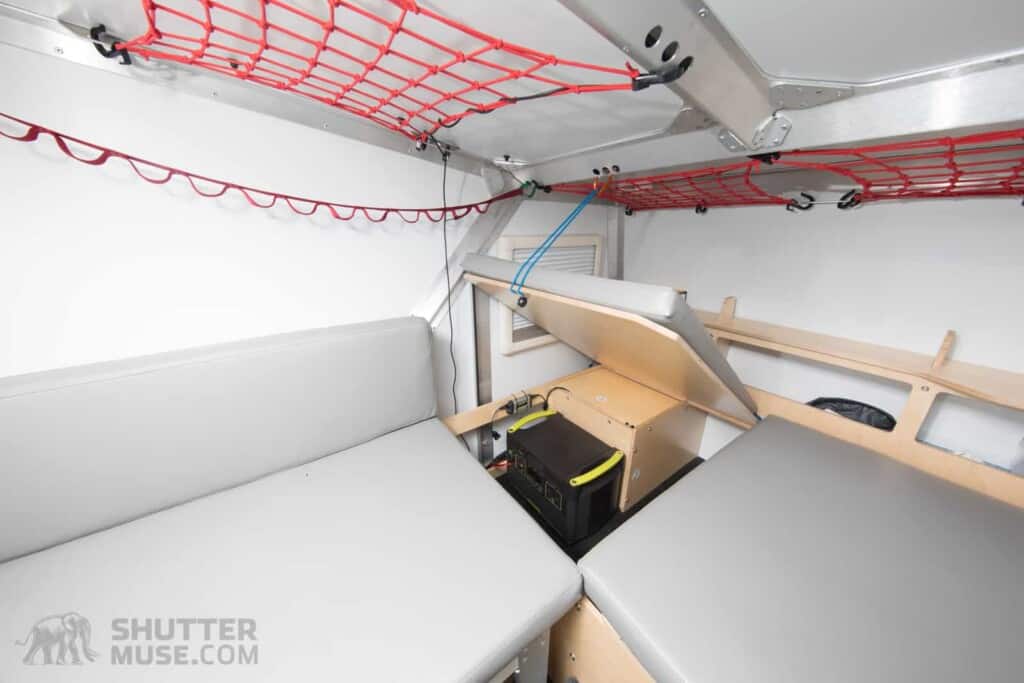
The other thing that’s visible in this photo is the red elastic cargo netting that I use to organize pillows and bedding. Netting like this is often used in space to stop things floating around, and I’m fairly certain that this was the intended use for all of the little holes that are dotted around the roof of the trailer.
Kitchen and Cooking
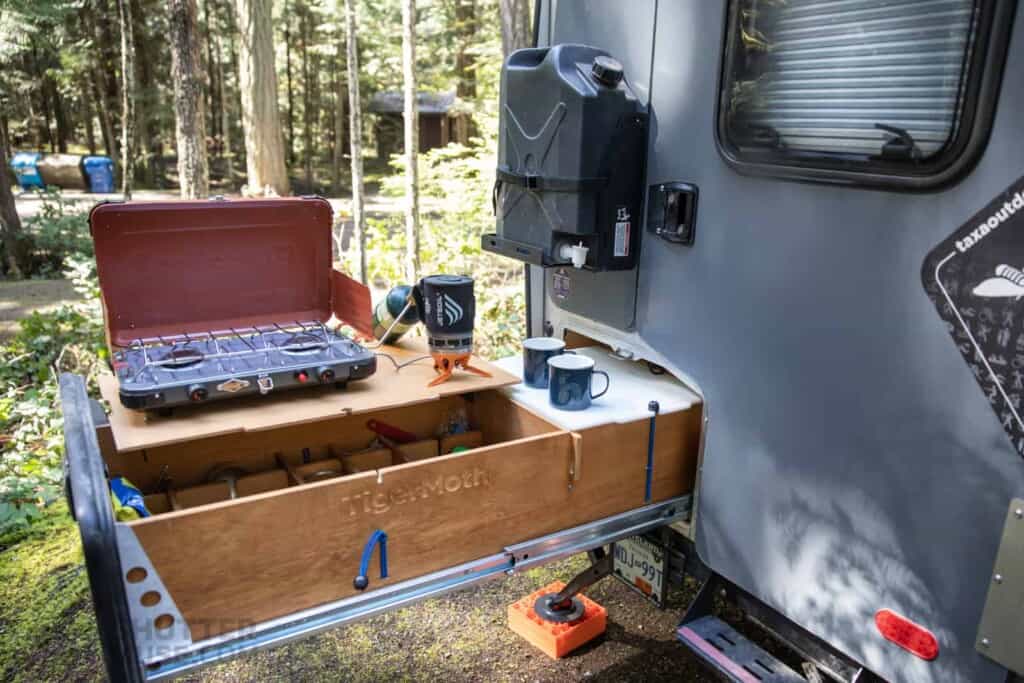
The “kitchen” on the Tihgermoth trailer slides out from the back. A segmented storage box holds all of your utensils and dry food, as well as providing storage space for a gas cooker. On the right-hand side (under the mugs in the photo) there is a chopping board that covers a larger storage bin for pots and pans.
The sliding design of the kitchen is very clever, but the obvious downside is that it’s open to the elements, and the bugs in the summer. There’s an ARB awning that does provide some shelter, but you do have to be prepared for a full outdoor cooking experience.
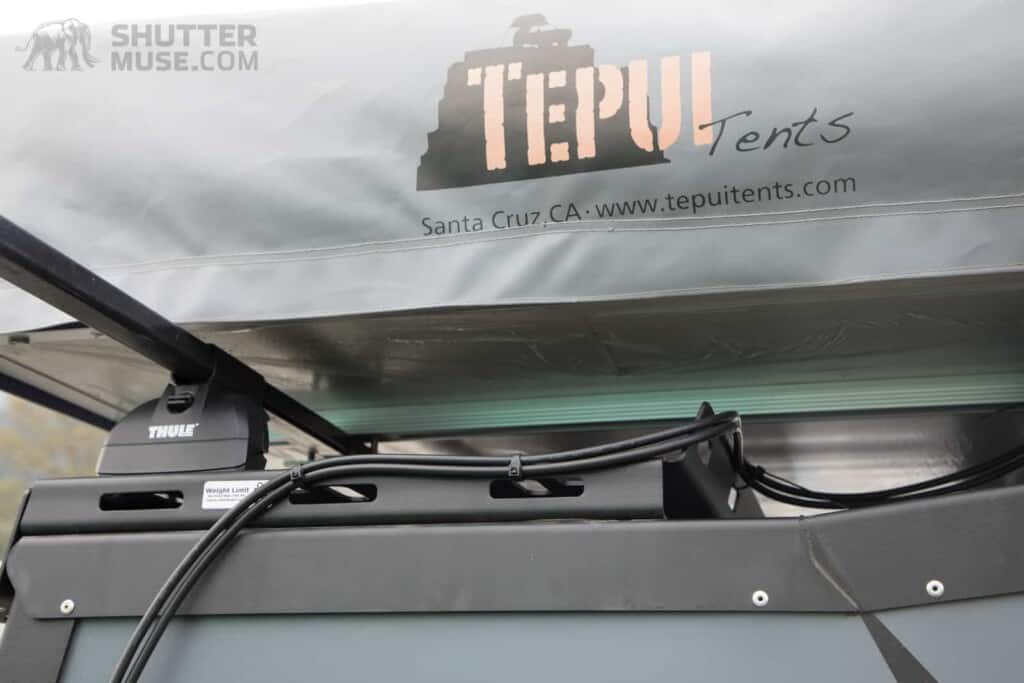
Rooftop Tent

The trailer comfortably sleeps two people when you convert the couch into a bed. This works fine as long as you aren’t bringing too much additional gear with you. For my setup, I opted to add a Thule Tepui rooftop tent. Not only did this give me a more comfortable, cooler place to sleep in the summer months, but it also means that I can leave the “downstairs” set up in a consistent way, with the couch and sometimes my laptop on a small table.

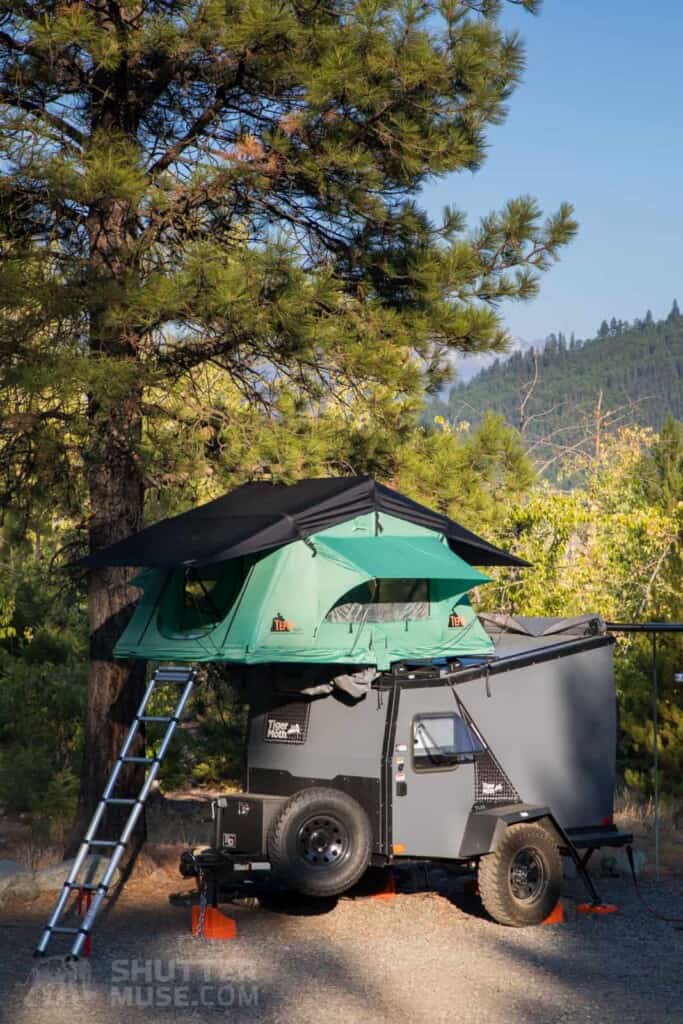
With a bit of practice, I can get the tent set up in about five minutes and enjoy the elevated views and additional space that is provided. It’s a 3-person model, so even when I’m travelling with my partner, there is still plenty of room for our two dogs up there too. Although you do have to give them a fireman’s lift up and down the ladder!
The only real downside to the tent, if you can really call it one, is that it attracted even more attention. Whenever I parked the trailer in a car park or even stopped at traffic lights, people would come over to take a look, or simply yell questions at me as they passed by. If anyone then saw me deploying the rooftop tent in a campground, the fascination was elevated to a whole other level.
Arctic Ocean Trip – Dempster Highway

Another benefit of the rooftop tent was that I could remove it from the trailer and put it on the roof of the car. Much as I love the trailer, there are times when it is more practical to travel without it. One such trip was when I drove over 4000KM on the Dempster Highway, through the Yukon and Northwest Territories to reach the Arctic Ocean at Tuktoyaktuk.

Before leaving on that trip, I had heard horror stories about the quality of the road. I was assured that I would suffer many punctures, and if I caught bad weather I could easily find myself stuck in the mud at several points along the journey. Not wanting to deal with the added difficulties of towing a trailer in either of those situations, especially as I was travelling solo, I opted to put the rooftop tent on the car for that trip. It was the perfect setup.
Power and Charging
Powering the Trailer
The trailer came with a standard 12V marine/RV battery. This was wired up to power the LED lights on the inside and outside of the trailer, some built-in USB ports and a 12V cigarette-lighter-style port that I was using to run a 12V Dometic fridge. Four standard 120v wall sockets were also installed next to the fuse box, but these only received power when the trailer was hooked up to a 30 amp outlet in a campground.
This was a bit of a dilemma for me. I needed to be able to run my laptop for hours at a time, as well as constantly charging camera equipment such as cameras, flash packs and scores of AA batteries. The 12V output was of no use to chargers that run off 120V, and the pair of USB ports was only good for (slowly) charging my phone.
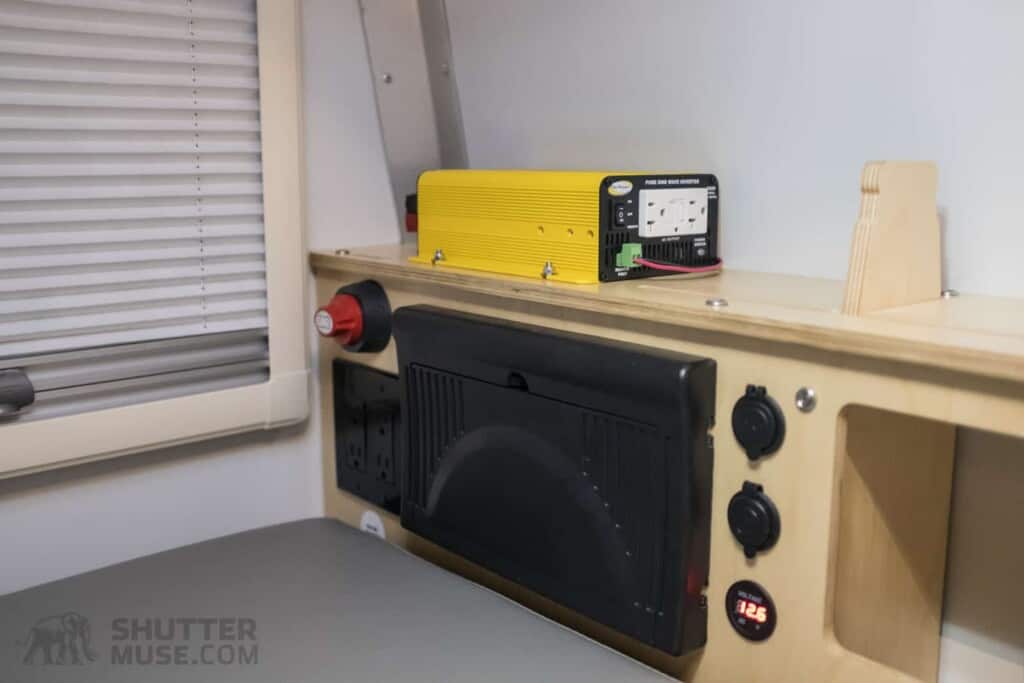
The first part of the solution was to install an inverter for the built-in 12V marine battery. I chose a 300W inverter from GoPower because it fitted neatly on the shelf above my fuse box and battery storage. This minimized the amount of wiring that was needed and was a very easy upgrade. All that is needed is a pair of wires to the positive and negative terminals on your 12V battery. It couldn’t be simpler.
Now I had a pair of standard 120V plug sockets that could be used anywhere, and I thought I had everything solved. However, I discovered on my first trip with this setup that my laptop and camera equipment consumed power much faster than I anticipated. The 12V marine battery was being depleted far too quickly under the combined load of that gear and my 12V fridge. I was going to need more power.
Powering and Charging Camera Gear
At this point, I decided that I would separate my power and charging needs. The factory-installed 12V marine battery was doing a fine job at powering my fridge and the other trailer systems, but it struggled when I added the charging requirements of my laptop and camera gear.
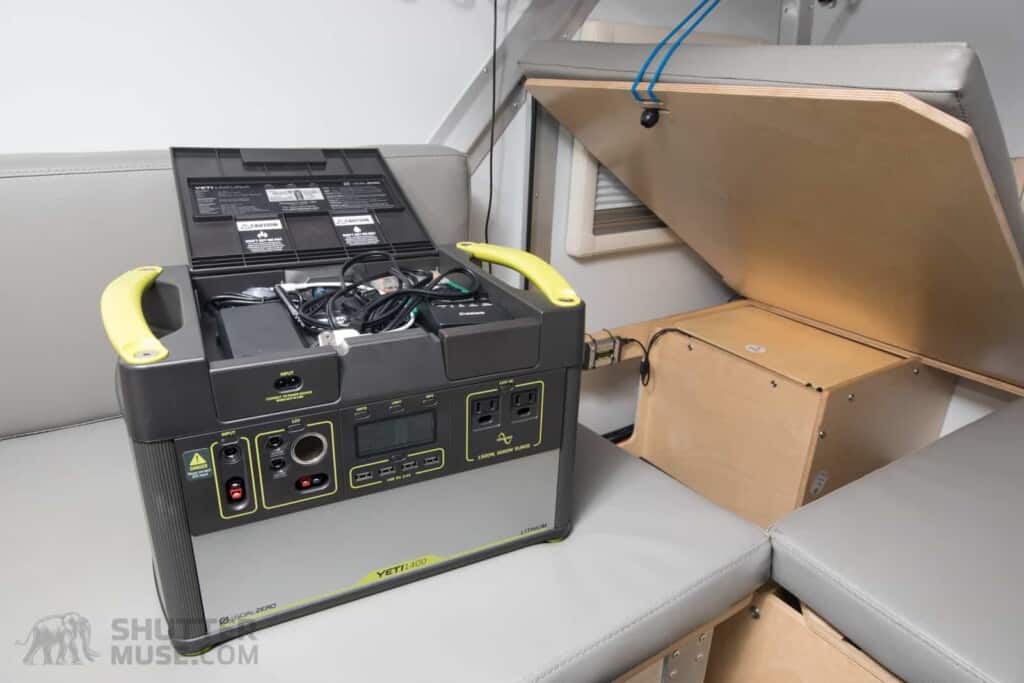
One option was to expand the capacity of the existing 12V system by installing more 12V marine batteries. This would be a relatively simple task, but I decided to go a different route that would give me some future flexibility. Instead of adding more 12V batteries, I got my hands on a Goal Zero Yeti 1400 Lithium power station, supplied by my friends and website partners, B&H Photo.
The Yeti 1400 is an all-in-one off-grid power solution that gives you multiple 12V outputs, multiple USB outputs and multiple 120V outputs. You can recharge it using standard 120V power, 12V power from your car or solar power. It’s an impressive piece of kit that also includes an LCD screen to show you how much power is coming in or going out of the battery at any given moment.
The reason I chose to use this battery over simply installing more marine batteries, was the portability of the system. With the Yeti, I had an entire power station that could be easily removed from the trailer. If I wanted to take my laptop and set it up at a picnic table or camp table outside for the day, I could simply grab the Yeti and move it. At home, if I ever had a power cut, I could use the Yeti indoors to power essential equipment for many hours. And yes, I also moved the Yeti into my car on the aforementioned trip to the Arctic Ocean when I left the trailer behind.
The installation of the Yeti turned out to be the perfect solution. Now I had the internal functions of the trailer, and my fridge running off the original 12V marine battery, while my laptop and camera equipment was running and charging off the Yeti.
I probably could have run everything, both camera gear and trailer off the Yeti. Had I built the trailer myself, from the ground up, that is what I would do. But the original 12V marine battery was tightly integrated into the trailer’s electrical wiring and fuse box. It simply didn’t seem worthwhile to dismantle all of that.
Adding Roof-Mounted Solar Power
The two batteries in the trailer can be charged by my car’s alternator while I’m driving, using the powered trailer hitch. But what happens when I set up camp in one place for several days? It’s possible to hook it up to a standard 30 amp supply in a campground, but the whole point was to equip it for off-grid adventures and make use of Western Canada’s vast empty spaces where there are no campgrounds.
To solve this problem I had two choices. Either I carried a small generator and several can’s of gas, or I went with solar power. For me, the choice was simple. Attaching solar panels to the trailer would add far less weight and take up far less space. Not to mention it would be silent, and fully automated. I didn’t want to be that person who was spoiling the peace and tranquillity of the wilderness with a dirty generator.

There was no requirement to use Goal Zero solar panels with my Goal Zero Yeti 1400 battery, but I really love the solid build quality of their products and the great customer service you get from them if you ever have technical questions about your setup.
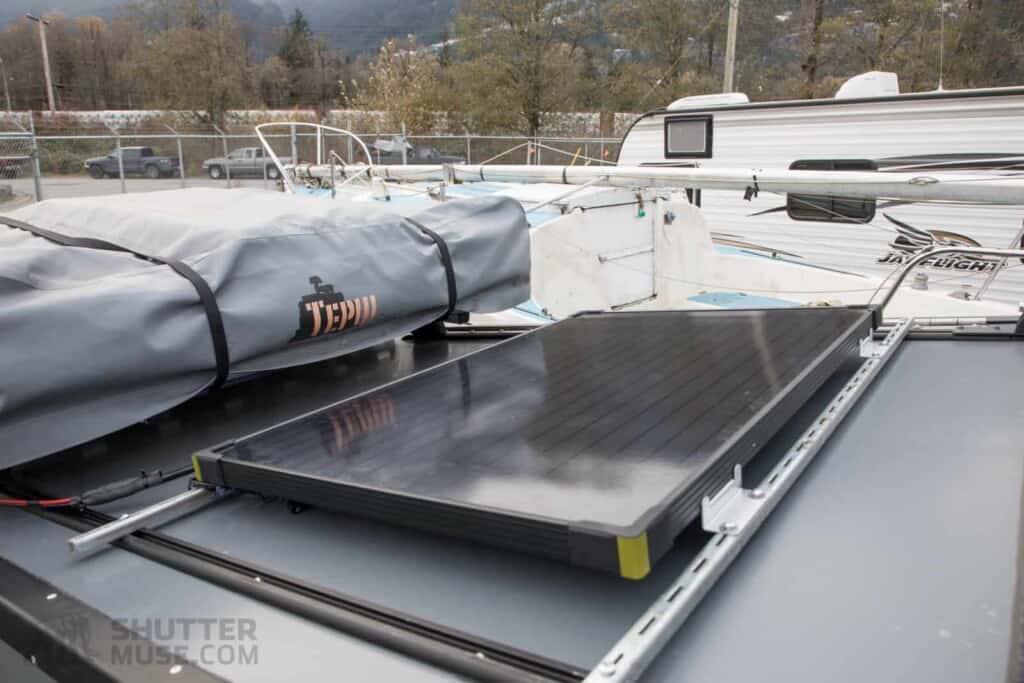
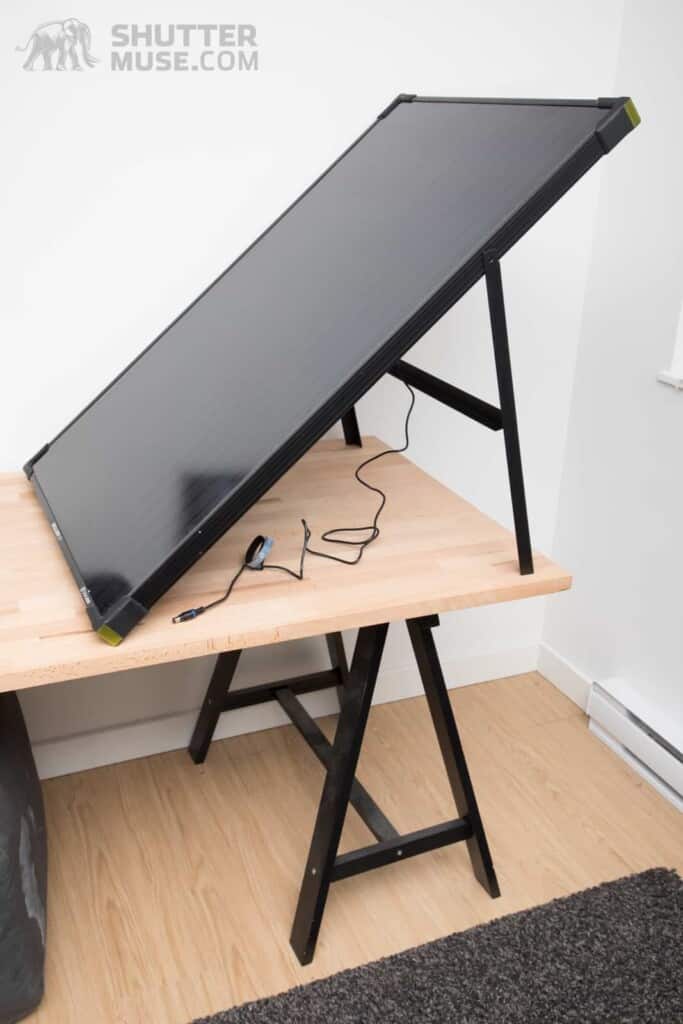
I opted to use a Goal Zero Boulder 100 panel which was kindly supplied by my friends at B&H Photo. This 100W panel was mounted to the roof using the existing factory-supplied Thule roof rack rails and some scrap metal bars that I picked up from the local junkyard. The panel was mounted to the bars using some simple Renogy solar panel Z-brackets that I grabbed off Amazon.

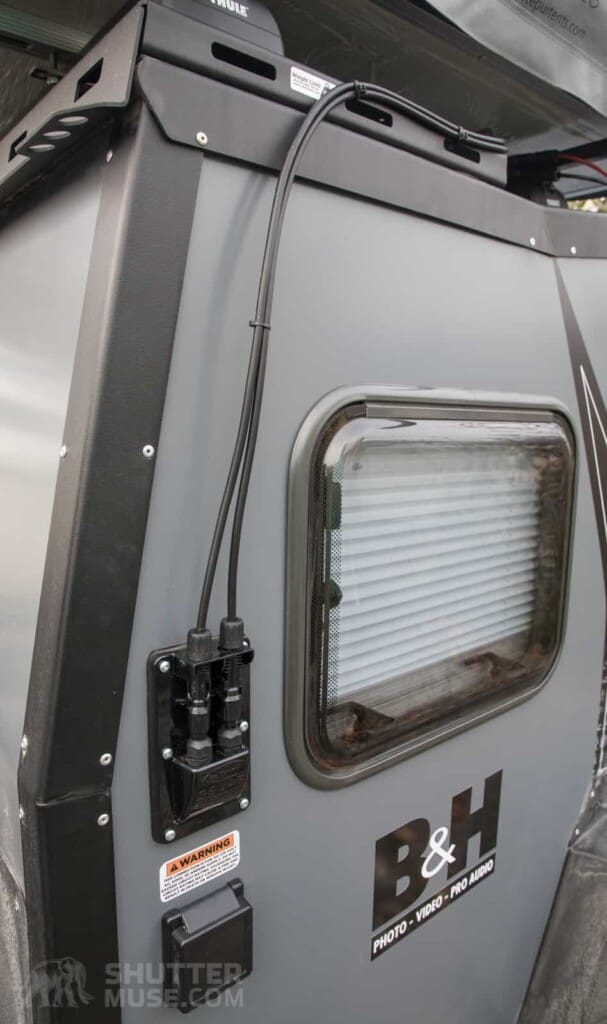
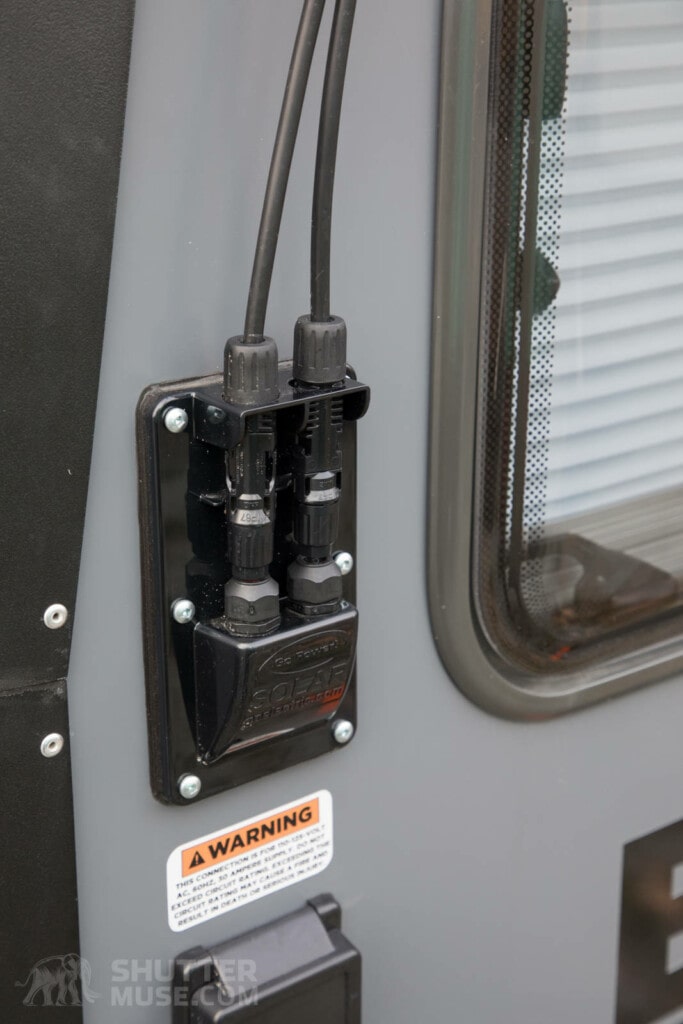
Solar Input Ports
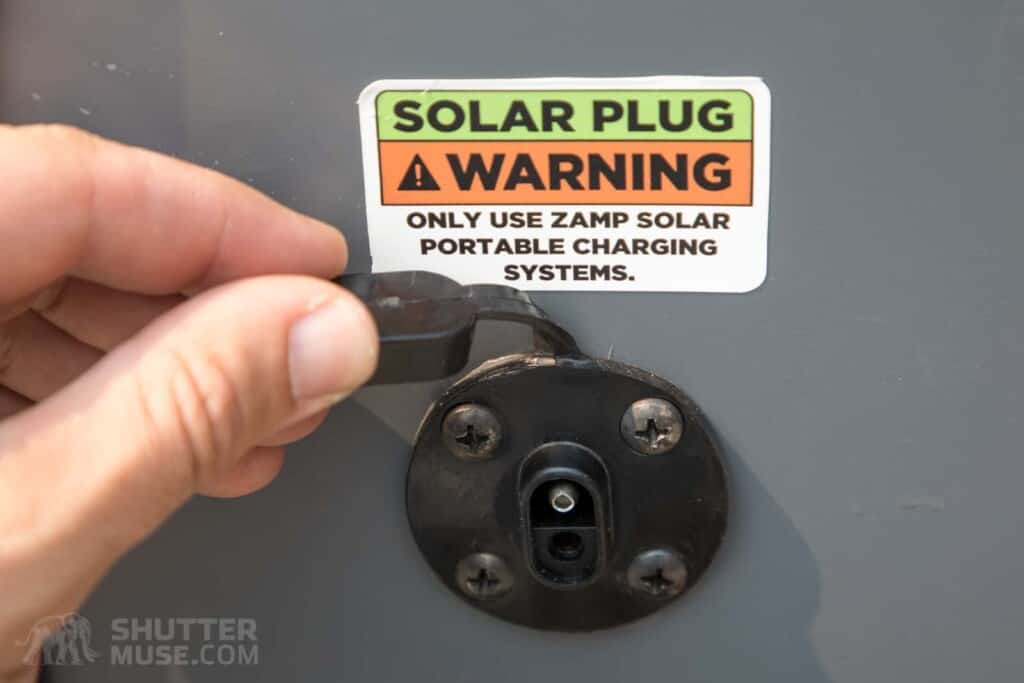
The trailer had come factory-equipped with an external solar input port, wired for the Zamp brand of solar panels. This is a very basic port that uses SAE electrical connectors and was only designed to have a panel connected to it when the trailer was parked. To create a safe and secure permanent connection to my new roof-mounted solar panel, I removed the basic Zamp connector and replaced it with a waterproof GoPower input box that used heavy-duty MC4 solar connectors.


Secondary Solar Panels

The roof-mounted solar panel worked very well. Not only did it add a charge to the batteries while I was parked up at my chosen camp spot, but it also charged it while I was driving, and kept the batteries topped up when I was parked at home. It also mean there was no need to trickle charge the batteries with a 120v charger when the trailer wasn’t in use.
The only downside to this setup is that the efficiency of solar panels is greatly affected by their angle to the sun. They are also heavily affected by shade that’s cast by nearby trees. Of course, when I parked my trailer I would pick an unshaded spot and get it all pointing in the right direction for maximum efficiency, but during the day this would all change, and I wasn’t about to reconnect the trailer every few hours to alter its position.


The solution to this was to add a solar input splitter to the roof that would allow me to connect additional solar panels when the trailer was parked. These panels can be deployed on the ground around the trailer as needed, and of course, they are much easier to position for perfect efficiency.
Initially, I used a Goal Zero Boulder 50 panel, but then I discovered the Jackery SolarSaga 100W folding panels. Although the metal-framed Goal Zero Boulder panels are the right choice for a roof-mounted panel that needs to withstand the elements, the Jackery folding panels are a better choice for ground deployment. They are lighter and pack down smaller than the Boulder 50 while delivering twice the power. I now have several of these and will pack as many as there is space to do so. With the combination of a roof-mounted panel and a couple of groud-deployable panels, I think I arrived at the perfect solution.
Solar Charge Controller
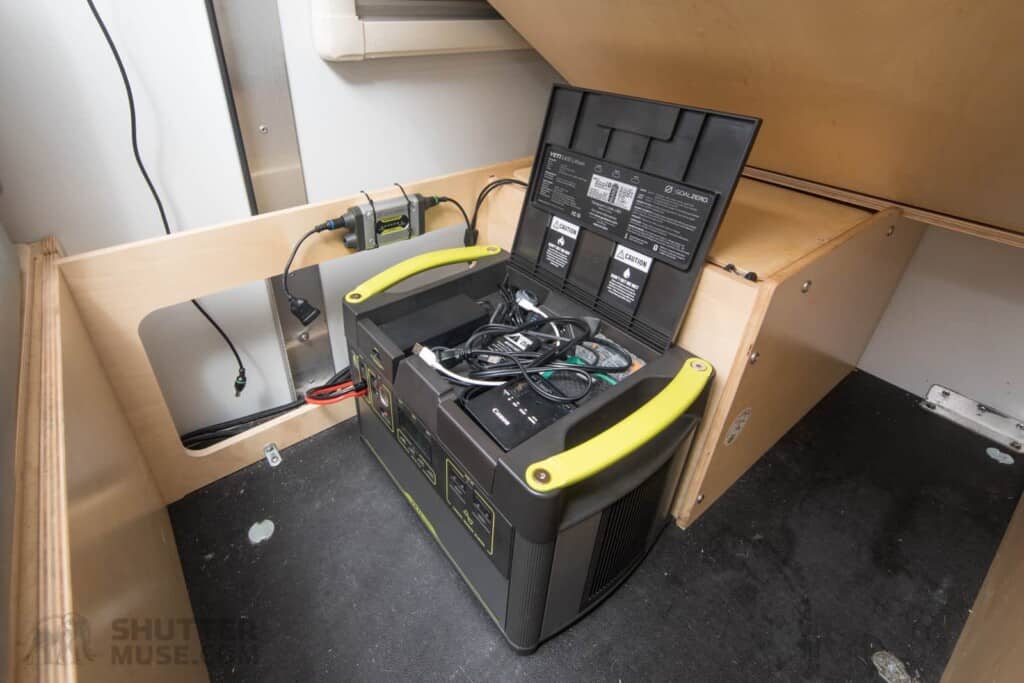
When power is collected with a solar panel, an intermediary device is needed to regulate the power that goes to your battery. This device is called a solar charge controller. Lithium power stations such as those from Goal Zero and Jackery have the charge controller built into them, it is one of the great benefits of these all-in-one solutions. For my 12V marine battery, I needed to install a charge controller on the inside of the trailer.
Again, I chose to keep this simple and use the basic Goal Zero Guardian 12v controller. If I had more space in the trailer, I could have opted for a fancy one with an LCD screen that displayed how much power was coming in from the panels. Note: The Goal Zero Guardian seen in the photos has been discontinued and replaced by one that they call the Goal Zero 20 Amp Charge Controller.
Wrap-Up
This was some slightly different content compared to my usual photo gear reviews and tutorials. Hopefully, it gives some of you a few ideas and perhaps some inspiration to build or buy a similar solution. Feel free to share links in the comments to photos of your own adventure rigs!


Dan, thanks for this. A great article that is not only interesting to read but also very informative. Units like your Goal Zero, Jackery and others have greatly improved the ease of ‘portable power’. That is one slick trailer and tent setup. I’ve owned two teardrops.
Dan, I like what you have put together. Unfortunately, I spent seven years, two months and twenty nine days in the military. A certain portion of that time was spent in the jungles of Southeast Asia. I have done all the “roughing it” I want for the rest of my life. Lynette and I will never compromise on comfort.
My next mobile vehicle that will accommodate both of us will be at least 38 feet long, have a queen sized bed in the back, a 25 CF refrigerator, a shower, a generator, solar, and such will probably cost us about $600,000.
Thanks for the overview.
Regards,
Rick
Very ingenious!
Hi Dan,
that’s definitely a pretty cool functioning setup you’ve built there.
I clicked on the link for the Go Power inverter and it says its input is 24V. Do you have two marine batteries connected in series to make up the required input voltage?
Hi Dan,
That look amazing – really nice job !
I’m a photographer, but also was a yacht captain for 26 years & so the problems are oh-so-similar: Limited space, limited power, but lots to charge & store.
We had no solar back then, so would only get good power when we ran the generator every day.
We had exactly the same problems with the standard 12v cigarette sockets, which are totally useless on a boat bouncing about on the waves, as of course the plugs fall straight out.
We changed to a more sturdy screw-in plug/socket that was designed for 220v (in the UK) to be sure it was going to cope with loads & stay plugged in in a hurricane.
Looks a Fab set up & I am sure you have loads fo fun with it all.
Andy
Wow, what an absolute beast Dan, not jealous at all! 😉
Is it Grizzly Bear or Black Bear proof ? It looks like it would be cougar & coyote proof.
Hey Dan, what an awesome solution. Now considering how best to do it here. Cheers.
Love this Dan! Such a wicked setup, and I love how much you value the need for flexibility in your setup to accommodate different adventures.
I’m currently fitting out my Ford Transit Custom from a bare cargo van into a camper (obviously not for adventures as rugged as yours though!). I’m loving the design and build process, and flexibility is key for me too – I’m planning a variety of trips involving photography, MTB, surfing, kayaking and snowboarding. Sometimes solo, sometimes with my partner and dog.
It’s so rewarding coming up with a custom solution that works for you!!
So yep, I loved seeing what you’ve come up with and why, always keen to see more content like this 👍
Very impressive, great article to read.
Thank you for such an interesting article on our new trailer. It certainly has everything well layed out and a fantastic set up providing the maximuim space and comfort.
I fancy the elevated tent idea dispite having to climb the stairs to gain access.
Enjoy you future travels using the trailer.
Amazing! Thank you for sharing! I enjoyed your tour very much!
Chad Stevens