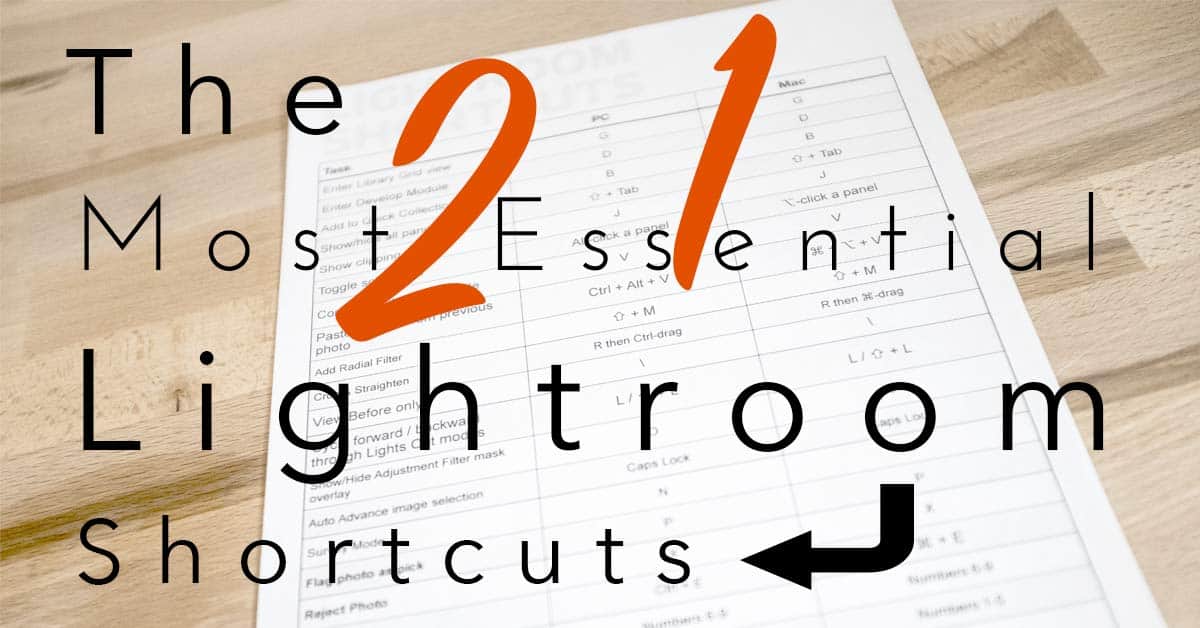
I recently published a free downloadable PDF guide to all the Adobe Lightroom Classic CC keyboard shortcuts, but it occurred to me that it might also be useful to have a second simpler download that was just a single printable page. The full guide is really useful, and well worth a read because it’ll probably teach you a few things about Lightroom that you didn’t even know it could do, but a condensed one-pager of the most useful shortcuts also sounds like a great idea, so that’s what I’m bringing you here!
It’s not possible to memorize the hundreds of shortcuts in the full guide, but it should be possible to memorize the ones on this shorter list, or you can just stick it to your wall next to your computer. Quite simply, these are the shortcuts I find myself over and over again, and they vastly improve my workflow. With over 8 years of Lightroom experience, including a stint as an ambassador for Adobe, I’m confident that anyone taking the time to download, print and learn these shortcuts will benefit from it.
Free Downloads
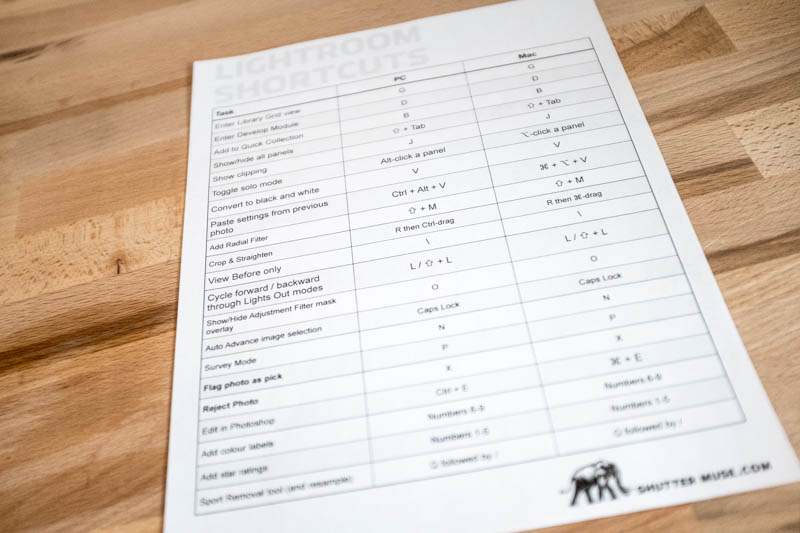
Want both the full PDF guide of all the shortcuts AND the printable shorter “best-of” version? Don’t worry, I figure this will be the case for a lot of people so I’ll send both PDFs to your email. You’ll find the download option at the bottom of this page 😀
Keyboard Symbol Guide
| Option Key | ⌥ |
| Command Key | ⌘ |
| Shift Key | ⇧ |
| Control Key | Ctrl |
| Tab | ⇥ |
Best Lightroom Keyboard Shortcuts
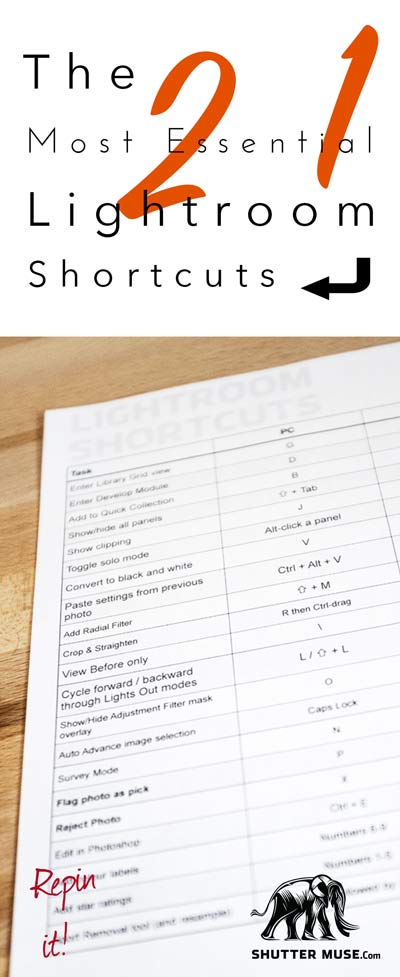
1. Enter Library Grid View
Shortcut: G
Possibly my most used Lightroom shortcut is the G key which takes you to the Grid view in the Library panel. Once I’m done editing an image, or at least playing around with it in the Develop module, I always hit the G key to return to my Library.

2. Enter Develop Module
Shortcut: D
Pretty self-explanatory, but important to remember! This will open the selected image into the Develop module for you to begin the editing process.
3. Add To Quick/Target Collection
Shortcut: B
In the Library module you can hit the B key at any time to add the current image (or selection of images) to your current Target Collection. By default, the Target Collection is the Quick Collection, although you can change this to set any collection you like as your Target Collection by right-clicking on the collection and using the “Set as Target Collection” option. The B key shortcut will add the current image or selection to that Target Collection. An absolutely invaluable time saver when organizing your work after the import process.
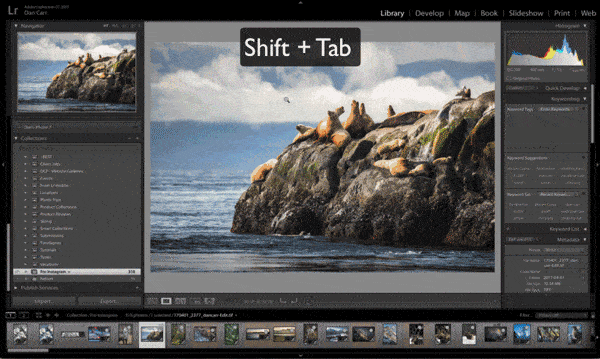
4. Hide All Panels
Shortcut: Shift + Tab (⇧ + ⇥)
This immediately hides all side panels and toolbars giving you a much larger look at your current image. I prefer this to using the F key which access fullscreen mode, because in fullscreen mode you can’t do anything except zoom in and out. The Shift + Tab shortcut gives you an image that’s nearly as big as you’d get in fullscreen mode, but you maintain the ability to access the panels by hovering the mouse at the extremities of the screen.
5. Show Clipping
Shortcut: J
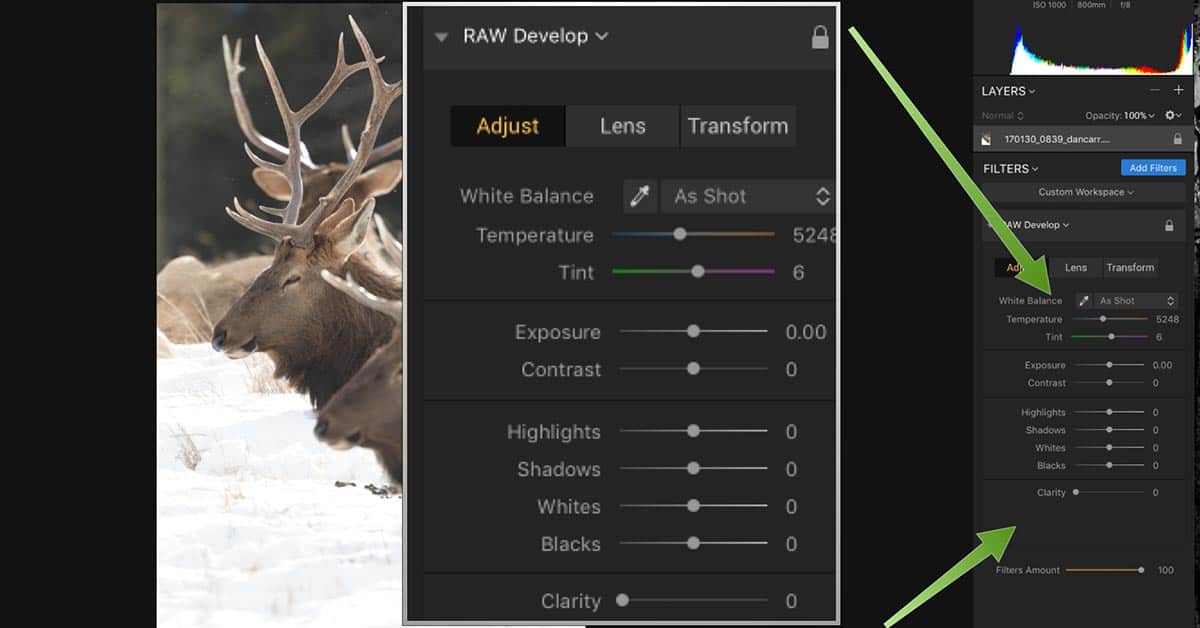
You might know that you can toggle black point and white point clipping on and off by clicking the triangle shapes in the top corners of the histogram in the Develop module, but a much better way to do it is simply hit the J key. This instantly toggles both black and white point clipping on and off so that you can see where you’re losing details in your image. NOTE: This only works in the Develop module, not the Library module.
6. Toggle Solo Mode
Shortcut: Alt-click a panel (PC) or ⌥-click a panel (Mac)
With an image opened up in the Develop module the number of sliders and options in the right-hand panel can be a bit overwhelming and easy to lose track of. The first time you perform this shortcut it will collapse all panels except the one you have clicked on. After this, Lightroom will automatically only keep one panel open at a time. When you click to the next panel, using just a normal click , no need for the shortcut again, it will open that new panel and collapse the previous one. It will continue to work in this way, only keeping one panel open at a time, until you perform the shortcut again to exit Solo Mode. I find that this really helps me keep a methodical approach to my photo editing as I move down the list of panels, working with each one in turn.

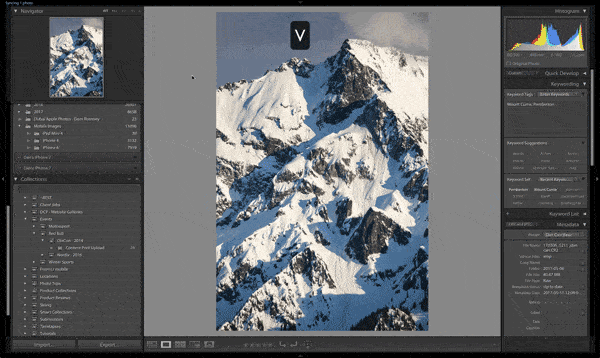
7. Convert to Black & White
Shortcut: V
I you want to get some initial sense as to whether your image might look good in black and white, you can simply hit the V key! The extra cool part about this shortcut is that you can use it in either the Library module or the Develop module, and even when you’re in Grid view in the Library! This means that if you don’t like the image in its B&W state, you don’t even have to enter the Develop module to continue tweaking it. Simply press the V key a second time to return the image to colour again. Note that when Lightroom does a black and white conversion in this way, it applies some secret sauce algorithms to the process, it’s not simply desaturating every colour channel! Colour balances for the conversion are tweaked on a per-image basis and you can check this out by going to the B&W panel in the Develop module once you have pressed the V key.

8. Paste Settings From Previous Photo
Shortcut: Ctrl + Alt + V (PC) or ⌘ + ⌥ + V (Mac)
If you’re working on a group of similar photos then you can quickly paste the settings from the previous photo onto the next photo. If the photos were shot in the same lighting conditions in relatively quick succession then this will give you an instantaneous starting point for the edit of this next image. Wedding, sports and event photographers pay particularly close attention to this one!! It’s a massive time saver.
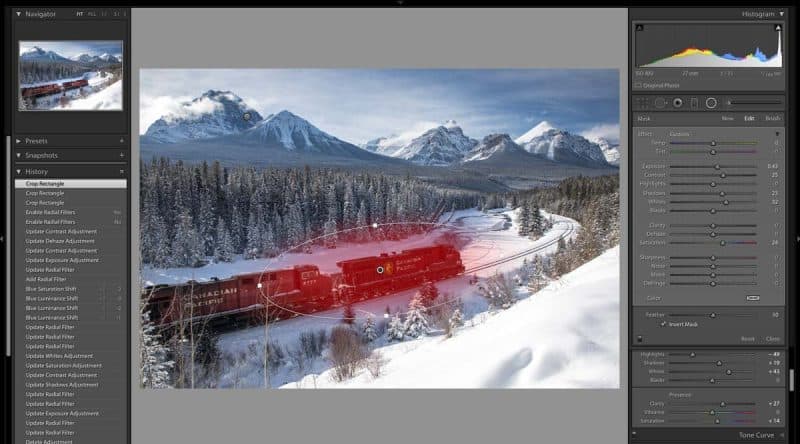
9. Add Radial Filter
Shortcut: Shift+M
In general I like to work with the selective adjustment tools rather than the global ones because this allows me to really direct people’s vision within an image. By far my most used tool of this collection is the Radial Filter which can be accessed quickly with the shortcut: Shift+M. If you just hit the M key on it’s own, you’ll open the Graduated Filter.
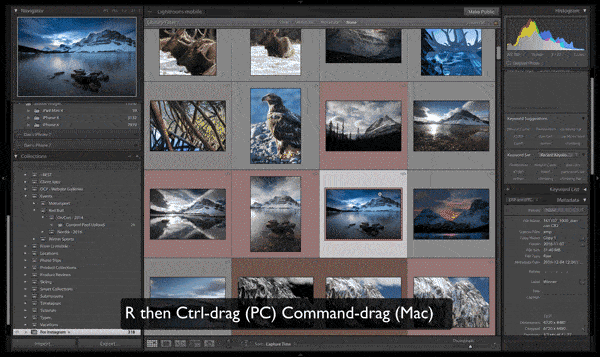
10. Crop & Straighten
Shortcut: R then Ctrl (PC) or ⌘ (Mac)
The first part of my editing process is to crop the image and make sure that horizons are nice and straight. Use the R key to get into crop mode, and then enable the straighten tool with Ctrl on a PC or ⌘ (Command) on a Mac. A little ruler symbol will appear and you can draw a straight line with it along your horizon to automatically straighten it!
11. Before/After
Shortcut:
Once you’ve made some edits to your image in the Develop module, you can hit the backslash ( ) key to view what the image looked like before the adjustments were made. Hitting the same key a second time will return you to your current edit point, giving you a fast and easy way to view the before and after effects of your editing!
12. Cycle Through Lights Out Mode
Shortcut: L
The L key turns on Lights Out mode which dims the surrounding parts of the Lightroom interface to focus your attention on the image. In the preferences menu you can control the amount of dimming, and the background colour, although I find the default settings to work just fine. Lights Out mode works in all panels, as well as in comparative view modes and grid views of the Library. Combining this with the previously mentioned Shift+Tab shortcut will really give you a great view of what you’re working on.

13. Show/Hide Adjustment Filter mask overlay
Shotrcut: O
If you’re using a selective adjustment took such as the Radial Filter, the Adjustment Brush or the Graduated Filter, you can use the O key to quickly reveal the area that the adjustment is being applied to.
14. Auto Advance Image Selection
Shortcut: Caps Lock
After your initial import to your catalog you’ll likely be doing some culling and rating of images using flags, stars and colours. With Caps Lock turned on, the image will automatically advance to the next one in the library once a flag or rating has been applied. This removes the need to manually advance to the next image using the arrow keys.
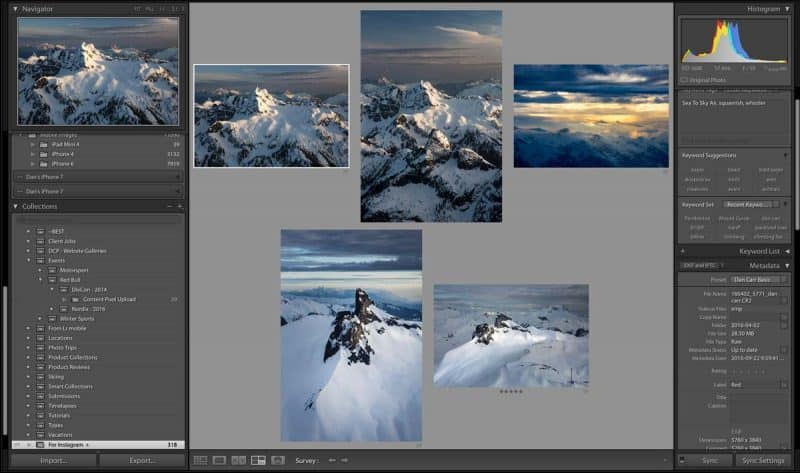
15. Survey Mode
Shortcut: N
With multiple images selected in the library module, you can use the N key to display them all on screen at the same time for comparative purposes. Helpful if you are trying to pick one image from several very similar ones. Every time you click the X in the corner of an image in Survey Mode, that image is removed from the Survey until you just have one left. I usually combine this mode with the Lights Out mode that was mentioned previously in this list.
16. Flag Photo as Pick
Shortcut: P
A quick way of sorting your picks from a shoot is to initiate Auto Advance using the Caps Lock trick explained above, and then use the P key to flag your picks. You can then use the view controls in the Library module to just display your flagged images that need editing.
17. Reject Photo
Shortcut: X
This shortcut is mostly used in conjunction with the P key as you work through images. Flag your picks with the P key and Reject they bad images with the X key.Rejected images appear greyed out in the Library module so that you know very clearly that they are either to be deleted entirely, or at very least ignored from the editing process.
18. Edit in Photoshop
Shortcut: Ctrl + E (PC) or ⌘ + E (Mac)
Opens the selected image in Photoshop
19. Colour Labels
Shortcut: Numbers 6-9
I tend to use the colour labels much more than star ratings because Lightroom displays the colours much more prominently in the Grid view by turning the thumbnail’s surrounding box a totally different colour. At a glance, I can pick certain colours our from hundreds of images. Colour labels can be assigned through menus, but the fastest way is to use numbers 6-9 on your keyboard.
20. Star Ratings
Shortcut: Numbers 1-5
A somewhat similar organizational tool to the colour labels, but one that many people prefer as it is more universally understood across different platforms. Rating your images can be done quickly and easily with numbers 1-5 on the keyboard. Remember to employ the Auto Advance mode using the Caps Lock key from further up this list!
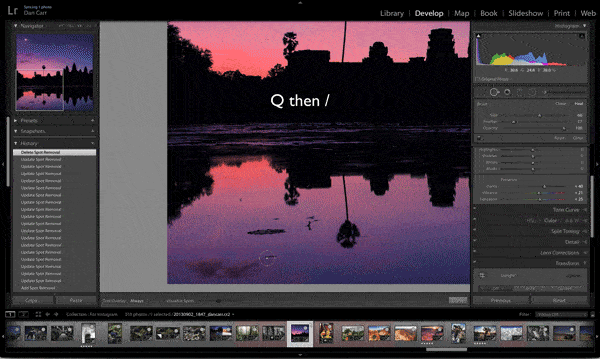
21. Spot Removal ( & Resample)
Shortcut: Q (followed by / )
The spot removal tool can be quickly accessed by using the Q key from any module. In and of itself, that’s a handy shortcut, but I must also tell you about a little known secret! When you use the spot removal tool Lightroom guesses at an area of your image to sample for the cover up. It does a pretty awesome job most of the time, but sometimes in tricky scenarios that involve areas of high contrast it can trip up. Once you have applied the spot removal, you can use the / key to force Lightroom to take a new guess at an area to sample from! Hit the key as many times as you like until you get a great result.
Download the Printable PDF Now!
Hit the button below to fill out your email address and I’ll send you the full set of Lightroom CC shortcuts, as well as the simple, printable version of the shortcuts on this page. Perfect to stick on the wall next to your computer.
Pin This Page!
If you found this page useful, it would really mean a lot to me if you saved it to your Pinterest board to help spread the knowledge!


when i got the LR shotcuts download, i didn;t get the short version. can you help
Yep, let me send you an email, John. Keep an eye out for it.
Hi, nice article I’m already using some shortcuts. I tried to download the pdf both, yesterday and today with no success. I hope I can get them! Thanks
Hi Juan, I’m sending you an email to fix this.
Both Please( No pretty Please)
Both what?
Great tips here. Learnt some new things. Thank you 👍
great
Hi, these are great, thanks.
The last command on the Essential version is the ‘Sport Removal Tool’ – does this work for all sports or just Ice Hockey?
Hahah! Amazing. I can’t believe I never noticed that. Since I’m in Canada, Ice Hockey should actually be the only sport it does NOT remove 😉
The shortcut list is so helpful. Thanks!
You’re very welcome, Lynn.
Nice one, thanks friend! So frustrating when the workflow gets stopped in its tracks because I don’t know the shortcut. No more Googling!!
You’re very welcome.
“Hit the graphic below to fill out your email address and I’ll send you the full set of Lightroom CC shortcuts, as well as the simple, printable version of the shortcuts on this page. Perfect to stick on the wall next to your computer”. Could you please send to my email REDACTED
Many thanks,
Simon Watts
Simon, I redacted your email address from this comment. You should never publicly post your email address online. It will open you up to a whole world of spam from the nefarious people out there. Please just fill out the form that appears when you click the graphic. That will allow you to enter your email in a safe manner.
Very nice collection, Many thanks
I tried to download the pdf today with no success. I hope I can get them!
it should have been emailed to you. If you are having problems with that, please use the contact form to get in touch and I will sort it out.
May I please request a PDF for Lightroon shortcuts/hotkeys
Jeff, there is a thing that says “click to get both PDFs” – please click this and follow the instructions. It seems I might not have made that clear in the article so I will look to find a better way to display it. Thanks!
Dan,
This is the best list I have found. Not every shortcut is needed, and this is just right.
I have for a long time programed a RGB keyboard to have specific keys color-coded for Lightroom, Photoshop, Photomechanic and so on. Each app activates a new color scheme on the keyboard. I just made a new color profile based on your shortcut list, which I’ve been meaning to refresh for a while. For example, Q, R, O and M are purple (tools) Z, C, L and \ are yellow (navigation) J (clipping) and X (reject) are red, V is grey (black and white) D and G are blue (modules) P is green (pick). 0-5 are white and 6-9 are color coded red, yellow, green, blue respectively. There are a few more but the rest of the board is blacked out. You oughta try it out, it really makes these programs easier to use. Thanks for the list!
Jeff Sellenrick
Thanks Jeff!
I am new to Lightroom and just trying to get around in it, and this is immensely helpful. Thanks for posting.
THANK YOU!!!!! I have been using LR(Classic) for hundreds of years but still the Keyboard shortcuts have been driving me crazy.
In particular, I make a lot of photo-books with text. When I type text into small text boxes I sometimes miss the box and the keystrokes can trigger all kinds of disasters.
It’s been driving me crazy!
Thanks again.
You are very welcome.
Hi, Dan! I suspect I may be too late, but I’d love both PDFs if they’re still available? Very helpful indeed. Thanks, David
There’s a big button on the page to get them, David. If you can’t see it, perhaps you have an adblocker enabled, which will sometimes wide out the button.
Dear Dan,
I would like the pdf for the lightroom shortcuts and short list of shortcuts.
Thank you!
Hi John, please go to this section and click the big red text to get access: https://shuttermuse.com/21-essential-adobe-lightroom-shortcuts/#download-the-printable-pdf-now
Posso solicitar um PDF para atalhos/teclas de atalho do Lightroon