
Sometimes lens flare can be beautiful and intentional, but the way that the flare is rendered in your photo is a combination of the lens characteristics and the angle of the sun in your composition. Not all lenses produce good looking lens flare, and not all lenses render flare in the same way at all angles. Sometimes you’ll have a lens that usually produces good looking or at least acceptable flare, but then you’ll find that if you place the sun at just the right (or wrong) angle, the flare suddenly becomes nasty enough to ruin a shot.
The ideal for most people would be for lenses to not flare at all. This would allow us to start with a clean slate, and simply add flare in post-production if we thought it would improve the ambience of the photo. In fact, Luminar from Skylum Software has a wonderful flare filter that I have demonstrated before.
The reality is that most lenses will flare to some degree, even the most expensive lenses that proclaim to have a host of expensive optical coatings to combat the problem. Thankfully, there is an easy fix to the problem that I’m going to show you today. I will be using Lightroom and Photoshop in this example, but the principals can be transferred to any other good editing platform. As you will see, the key to this technique is forethought in the field and a basic understanding of a couple of simple Photoshop tools.
Video Tutorial
Since I’m a nice guy, I have recorded a video tutorial and a written a step-by-step version.
How to remove flare in Lightroom and Photoshop
Step 1 – Image Capture
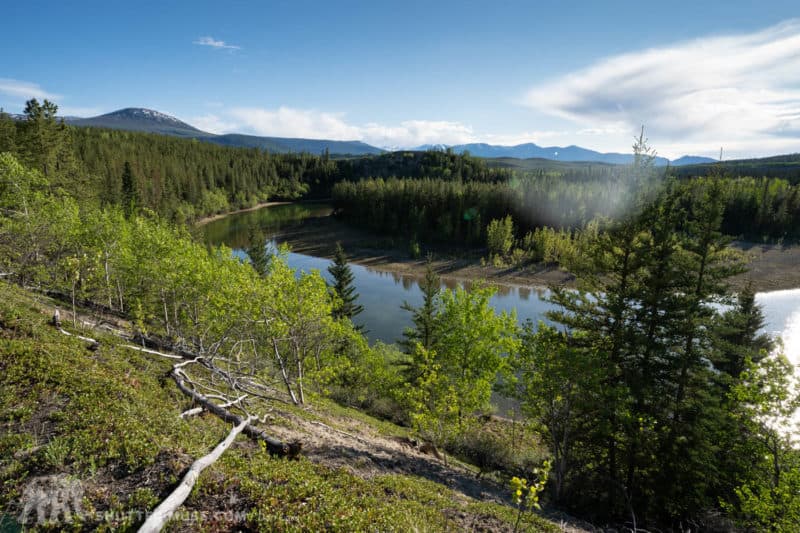
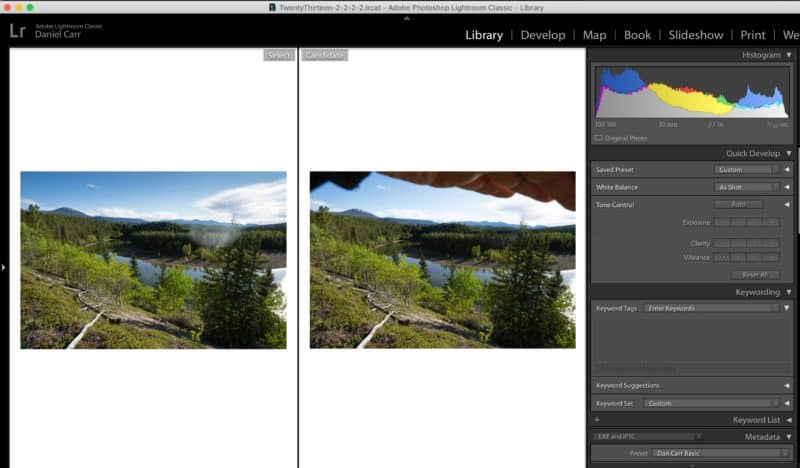
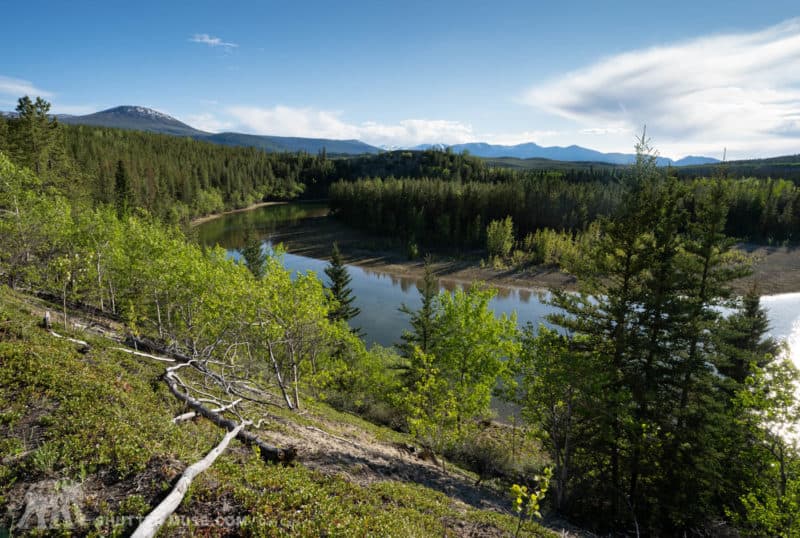
This photo was taken on an evening walk with my dogs in the Yukon. I happened to be carrying my Sony a9 II with the lovely little Sony 20mm f/1.8 G lens. It’s an incredibly sharp lens, almost G Master quality, but it’s definitely not immune to lens flare in quite the same way as a more expensive lens might be.
Even though I was using the lens hood, it was immediately obvious through the EVF that some nasty flare artefacts were appearing on the photo. For this composition, I was keeping the sun just outside the edge of the frame, which is where you are most likely to cause flaring. Unfortunately, my composition was a bit limited by my prime lens – no way to zoom in to move the sun further from the frame’s edge, and no way to “foot zoom” my way forwards due to the steep embankment.
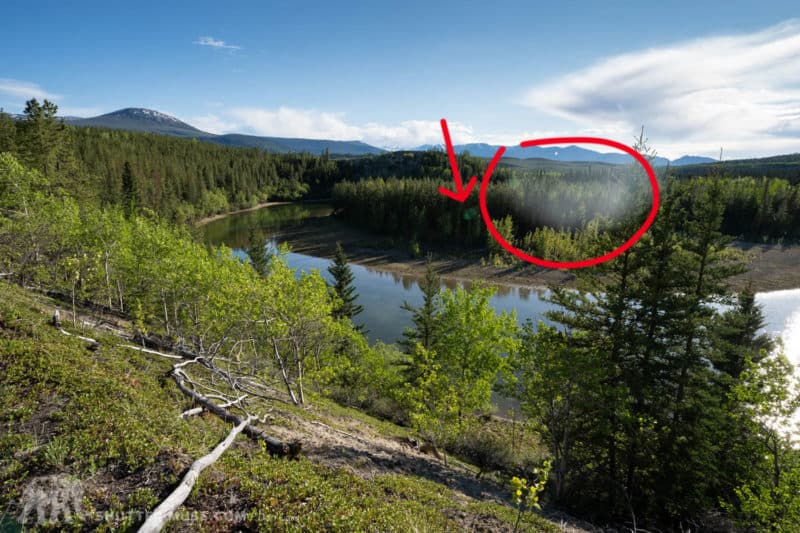
At this point, the first step to solving this problem is to see it, acknowledge it, and then go ahead and take your shot anyway, with the ideal composition that you want.
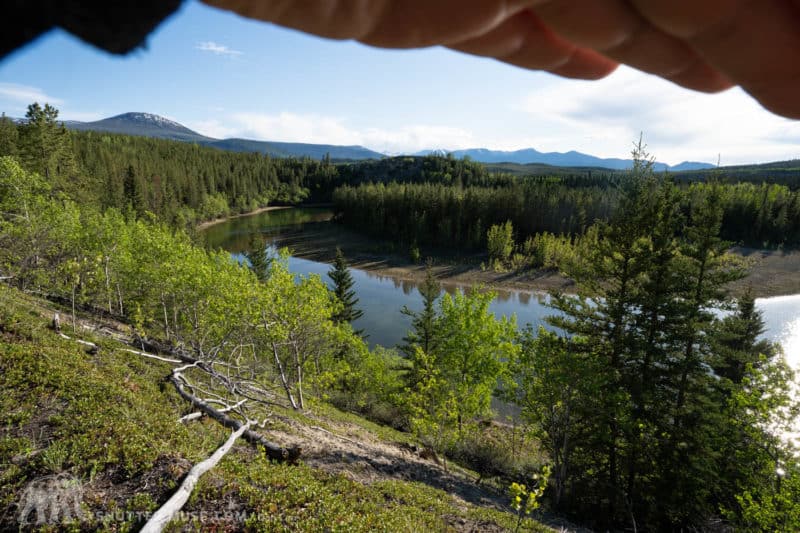
The second step is to place your hand above your lens and move it around until you block the rays of the sun that are causing the flare. This will almost certainly result in your hand being in the frame of this second shot, but it should not have to be too far into the frame. I find it easier to see the effects of my hand placement through the EVF of mirrorless cameras. For those shooting DSLRs, you might need to take some test shots and examine them on the LCD screen. Once you have that figured out, take this second shot, complete with your hand in part of the frame.
Step 2 – Image Organization
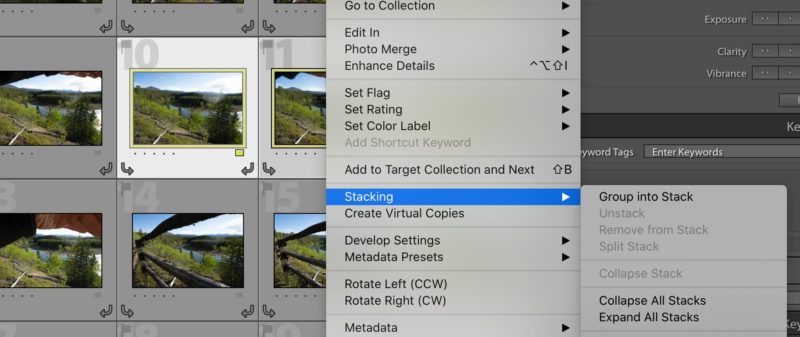
Once I have downloaded all my images into my catalogue in Lightroom, I like to locate the pair of images that were created and group them into a stack. This keeps things nice and organized. Simply select both images, right-click on one of them, move down to Stacking and choose “Group into stack”.
Step 3 – Image Editing
Now you are going to go ahead and edit your primary image – the one with the flare in it – as you normally would. Ignore the flare for now and just concentrate on your usual editing workflow: Exposure, levels, contrast, saturation, sharpening and noise reduction.
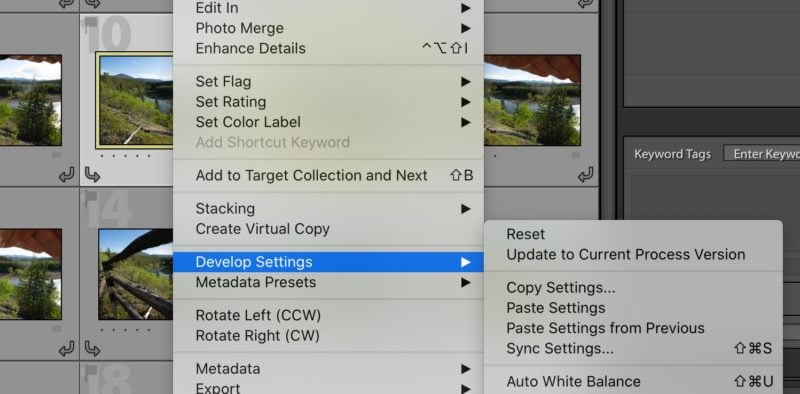
Once this is complete, in the Library module of Lightroom you want to right-click on the primary image, go down to Develop Settings and choose “Copy Settings”.
We need to apply the exact same edits to the second image. So right-click on that second image, choose Develop Settings and then click “Paste Settings”.
Now we have two identically edited images to work with in Photoshop.
Step 4 – Sending to Photoshop
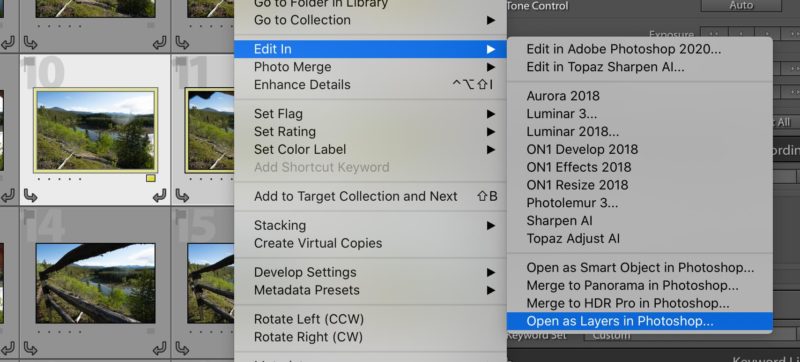
To get these images into Photoshop, you need to select both images simultaneously, then right-click on either one, go to Edit In and then choose “Open as Layers in Photoshop”.
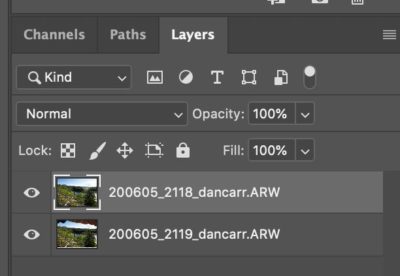
This will create a new file in Photoshop, and it will place each of the two images onto their own layer. Assuming you shot the primary image first, and the image with your hand in it second, it will stack them in that order in the layers palette, with the primary image on top of the secondary image.
Step 5 – Aligning the Images
If you used a tripod to take both photos, you can skip this step as both of your photos should be perfectly aligned already. If you shot them handheld, as I did for the example, we need to do a quick auto-alignment.
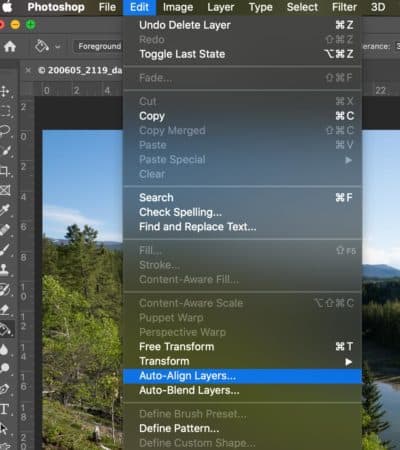
To do this, select both layers in your layer panel, then go to Edit > Auto Align Layers.
This brings up a dialogue box full of options, but for our purposes we just need to leave it on Auto and press OK.

Photoshop will perform some calculations and then make any necessary rotations of one image to perfectly match the second image.
Step 6 – Masking
To remove the flare we now need to reveal the good parts of our secondary image that is on the bottom layer. At this point, the wrong choice would be to choose the erase tool and simply erase parts of the top layer. Using the erase tool is a very destructive method of editing in Photoshop, and the whole point of layer-based non-destructive editing is that you try to keep as much info in your file so that you can roll back your changes really easily.
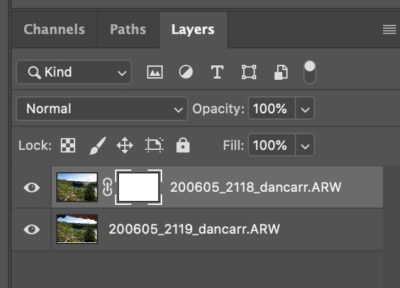
To do this, make sure you have your top layer selected, and then click the button to add a layer mask. Also available via the menu Layer > Layer Mask > From Transparency.
Now select your brush tool (shortcut: B key), and make sure the brush colour is set to black. You also want to make sure that you have selected the layer mask in the layer panel, and not the actual layer itself.
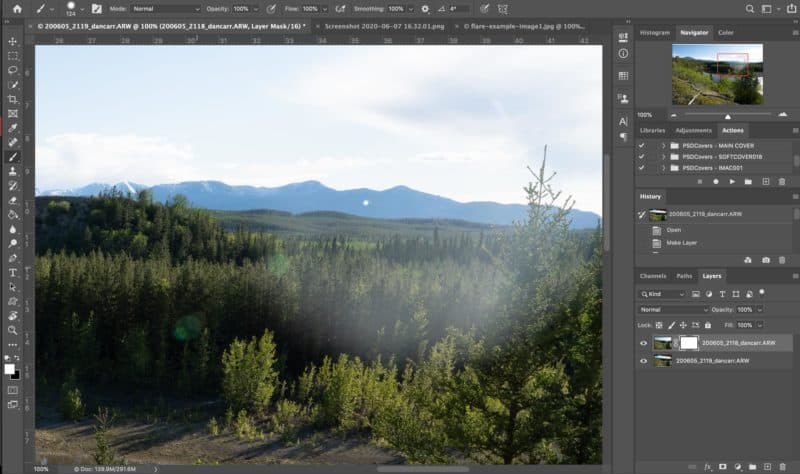
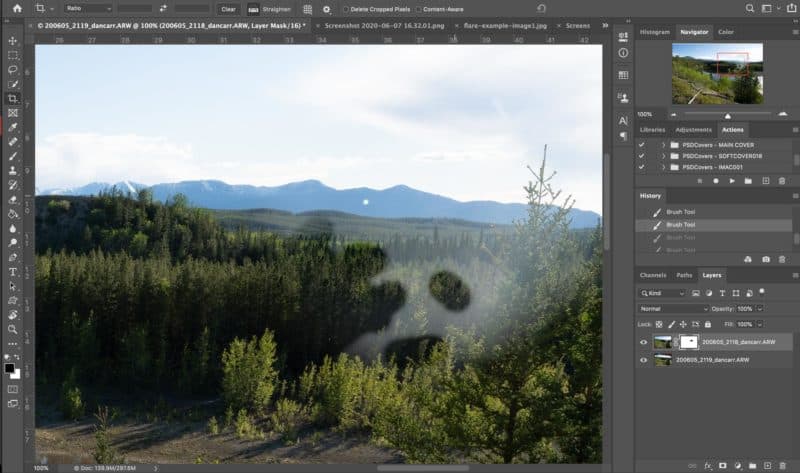
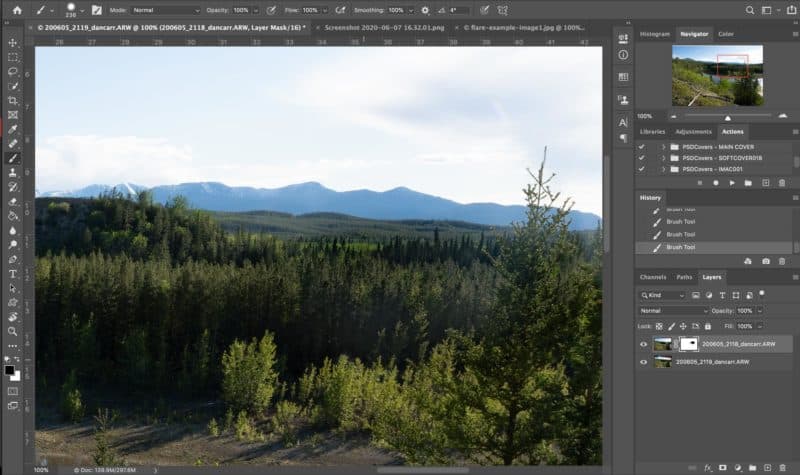
With this brush tool you can paint on the image over the lens flare and it will reveal the second image below it, effectively removing the flare from your photo.
If you make a mistake with your paint brush, you can swap the brush colour to white and paint back on the mask to reveal the top layer again.
Step 7 – Crop and Save
Once you’re happy with the flare removal, you’ll need to slightly crop the image if you performed a layer alignment in step 5. Then go to File > Save to save the PSD file and maintain the layers. Since we originally opened these files from Lightroom, Photoshop is smart enough to know this and it will automatically import the PSD file back into Lightroom right next to your original files.
Wrap Up
Using this technique the flare removal job was done in less than two minutes. It’s possible that you could have removed the flare using other techniques such as patching and cloning, but that would probably have taken ten times as long, and a whole heck of a lot more Photoshop experience.
The beauty of this trick is that if you’re primarily a Lightroom user, you only need a very small amount of Photoshop knowledge to get this done, and it creates a far neater result than any other method.


Excellent steps and so well-explained! Thank-you for this tip! I have used the brim of my cap or hat to create the same capture sequence to correct the flare or other unwanted effect but did not succeed figuring out how to use the layers mask, effectively. Your way is brilliant! Again, thank-you.
I’m glad you like it! Thank you.
Hi Dan, thanks for the video. After years of using Lightroom and Photoshop I am just finding time to explore using layers so this was very useful. I have moved over to using Photoshop and the Bridge for my editing as I was finding Lightroom a bit cumbersome for my workflow (long story). I was wondering if you can do the same without the first steps in Lightroom?
Yes you could definitely do this without Lightroom, you would just have to create the layers with the two images yourself. There are many ways to do that so it’s tricky to explain in the comments here. But basically you just have to know how to open an image as a layer, or use the “Place Embedded” command from the File menu. There are probably another ten ways to do it, haha, that’s Photoshop for you!