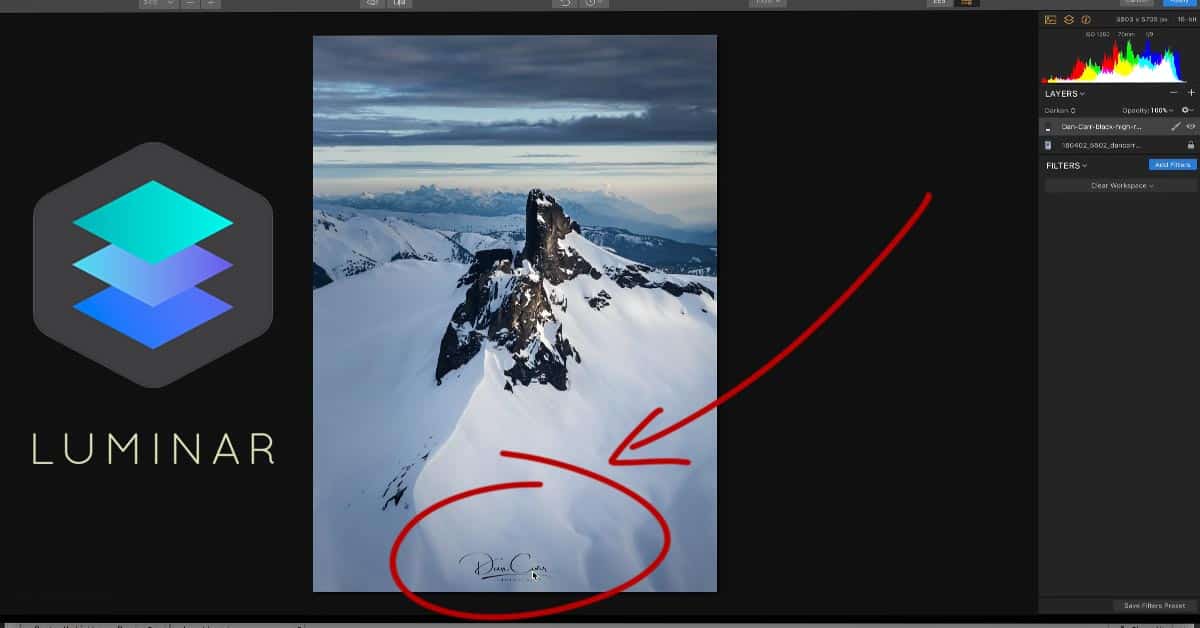
In this video I’ll show you how to watermark your photos using one of my favourite photo editing applications, Luminar. The logo that I’m using for my watermark was created by Photologo, a great service that makes hand-drawn logos for photographers. I’ve written a lot more about this service, and my experience as a customer, in a previous Photologo review.
Watermark Luminar Tutorial
IMPORTANT: Due to deficiencies in the way that Luminar handles images with a transparency layer, you will need to download this Luminar preset in order to follow along with this tutorial and use a white watermark. The video explains exactly how to install and use the preset. Note that you do not need this preset if you only plan on using a black watermark.


I watched your video on how to put a watermark on a photo in luminar. It all works up to the point where you say to right click and chose image mapping. Right clicking only gives an option to change the shade. I have a pc, was the video for mac users?
It was performed on a Mac. I know there are some slight variations between the Mac and PC versions but since I don’t have a PC that makes it tricky to check. One thing that confuses me though is that I have not heard of a function to “change the shade”. Are you sure that is the name it is giving you? Do you mean blend mode?
I love Luminar, but found the method of layering a watermark to be clumsy. I installed CameraBag, which does have a watermark function. Once I had my photo edited in Luminar, it only takes a minute to move he image to CameraBag and add the watermark. Hopefully, Luminar will hear photographers and make adding a watermark simpler.
Yeah I agree that it is too clumsy right now! I think they will add this as a bespoke feature when the DAM add-on is implemented later this year.
I’m having trouble adding the invert.lmp to the user presets.
Are you getting an error message of some sort? Can yo explain the trouble and then I can try and help.
Hi Dan. I just can’t figure out how to add the invert.lmp to the user presets. I open it in finder but when I try to unpack it it goes to a big blank black screen in luminar. I went to file and then add custom presets and drug the invert.lmp in there but it won’t open maybe because it’s not unpacked? There hasn’t been any error messages.
It sounds like you are using a PC which makes it hard for me to help. You might have to ask the Macphun people. But one thing I note… it doesn’t sound like you are simply dragging the preset into the custom folder. On your computer, are you not able to follow the same steps that I did in the video? You’ll see that I literally just dragged the preset file into the correct folder in my file browser. I didn’t do any importing in Luminar.
Yes you can’t drag it into the custom folder or just drop it into the program like you can with other presets. You have to find “library” on your hard drive. Pop it into “custom” in your library.
Yes, you cannot simply drop it into Luminar as you can with other presets. You have to find “library” somewhere on your hard drive. Then inside that folder look for “custom” and drop it there.
How do you batch process watermarking?
Unfortunately that’s not yet possible in Luminar because you can only open one image at a time. I hope that we will see batch watermarking as a feature when they launch the asset management features in a few months time. In fact, I’m hopeful we will see a dedicated watermarking method, instead of having to use this time consuming way.
Is there another solution we can use (outside Luminar) to add watermarks to Luminar processed images in a batch mode? Free or low cost colution is what I am interested in, but need batch mode
You could try this: https://photobulkeditor.com/
Although it is Mac only. But I’m a Mac guy so if you’re on a PC I’m less sure of the options.
Hello. Everything works up to the resizing of the logo. I downloaded the preset. I found the correct folder. It shows up in the Custom Presets. It works. But when I lock the aspect ratio it shows as locked, and then when I drag the corners part of the logo disappears. It does not act like it does in your video. Any ideas?
That sounds odd, and it sounds like it might be a bug. The first thing I would recommend is to check for updates to the software and make sure you have the latest version. If that still doesn’t work then the next suggestion I have is to try zooming in once you have locked the aspect. It might make the logo layer show up again. If that still doesn’t work then you’ll have to shoot them a support ticket I’m afraid.
Hi: I am using the PC version. (Sorry) I don’t seem to have a “Transform” tool. I was just wondering if it may be called something different on the PC. Hoping you may have heard. I know you use MAC. (Again, sorry) 🙂
Hi! Yes I have heard this from someone else as well. I guess there isn’t total feature parity between Mac and PC versions yet. Firstly, install the new update that came out this week and see if that adds the feature! If not, I’m afraid you’ll have to email Macphun and ask them about it because I haven’t ever used the PC version.
Cheers,
Dan
works a little different on Windows 10 … followed the instructions for the white watermark & cannot get it to do what it shows in your video. The preset just shows it entirely black like there’s nothing there to invert but there is. Stumped & white is my preference
Sorry to hear that! Unfortunately I have no way to figure that out myself. I suggest emailing Skylum support.
is the invert.lmp available on this website not compatible with “Luminar Neptune” When I try to use this preset, my tool crashes.
Sorry, you’ll have to ask the software manufacturers about that.
Dan,
Tried to use on Luminar 3, doesn’t seem to be recognized by L3. After I download it, I just dropped it into L3 looks folder, what am I doing wrong?
Hey Mike,
I haven’t had a chance to try his in L3 yet. It would certainly be a shame if it didn’t work. I have made a note to find some time to test and I’ll update this article one way or another.
HOW TO DOWNLOAD THE INVERT FOR LUMINAR ON THIS WEBSITE COS I COUNT FIND IT??? IF YOU COULD PROVIDE ME WITH THE LINK TO DOWNLOAD WOULD MUCH APPRECIATED. Cheers
The download link is right there in the article where it says DOWNLOAD THIS LUMINAR PRESET. Just click that and it’ll open a Dropbox page where you can download it. I don’t know what else I can do…
Hey Dan. Definitely appears to be the case that the Invert preset is no longer working with Luminar v.1.2.2 (Neptune). Would be enormously grateful if you can update it. It’s a BIG help for those of us who work with Luminar. Thx.
Unfortunately this invert preset was actually created and provided by the folks who make Luminar so I’m not entirely sure how to create a new version… I’ll try and find some time to take a look at it. It simply amazes me that they still don’t have a way to watermark images easily in Luminar….
Wasn’t working for me either; however, it is actually easy in Luminar 3. Follow this link.
https://skylum.com/luminar/user-guides/chapter-16-adding-a-watermark-or-logo
The bottom of the article tells how to make white.
Dan, does this watermark info apply to Luminar 4?
Can you tell me where the preset is on the web site so I can setup a white watermark