Many photographers use RAID storage systems as part of their 3-2-1 backup strategy. While a RAID drive is not a backup in and of itself, depending on the RAID modes offered, it can provide drive failure fault tolerance that is useful for business continuity and read and write speed improvements over using just a single drive.
In this review, I’ll be taking a look at a 2-bay RAID system provided by TerraMaster called the TD2. I’ll talk about the features of the drive, and then I’ll run through some speed tests in various RAID modes to give you some idea of the performance you might expect if you integrated the TerraMaster TD2 into your own backup routine.
Table of Contents
TerraMaster TD2 Features
- Number of disk slots: 2
- Disk Types: 3.5″ or 2.5″ SATA HDD or SSD
- Hardware RAID Modes: Single Disk, JBOD, RAID 1, RAID 0
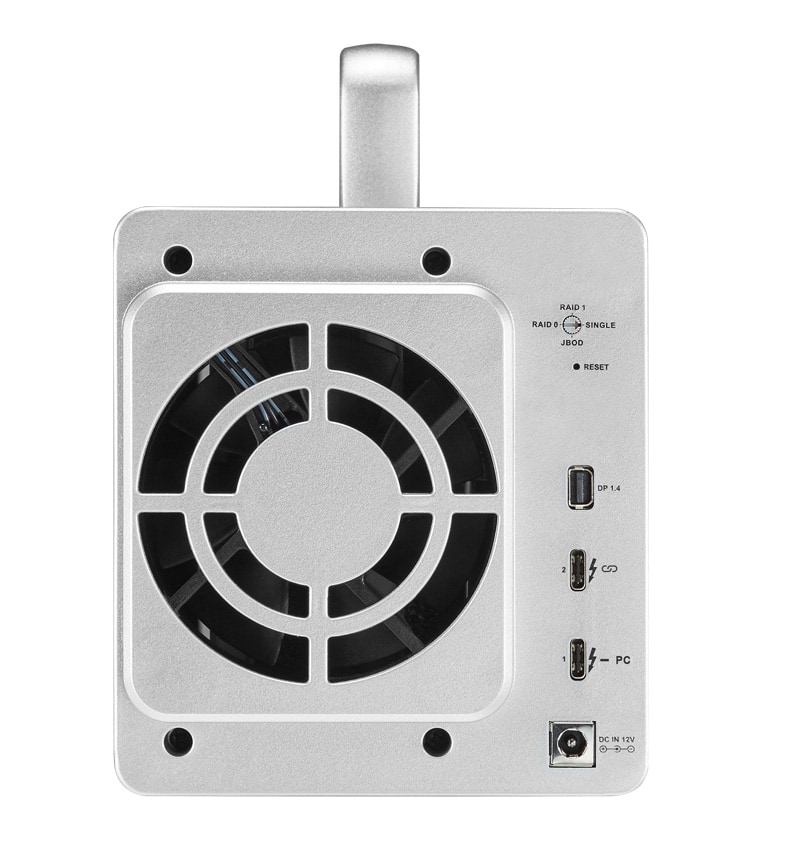
- Connections: 40Gb Thunderbolt 3 x 2 + Mini DisplayPort 1.4
- Quoted Max SSD Read Speed: 810MB /sec in RAID 0
- Quoted Max HDD Read Speed: 521MB /sec in RAID 0
- Quoted Max SSD Write Speed: 806MB /sec in RAID 0
- Quoted Max HDD Write Speed: 506MB /sec in RAID 0
- Size: HxWxD: 227 x 119 x 173 mm
- Weight: 1.4Kg
- Package Includes: Power Adapter + Thunderbolt 3 Cable + Screws for Drive Installation
Note About Discontinued Dock Model
While researching this product before the review, I discovered that there used to be two versions of the TD2 on the market. The first version is usually referred to as the TerraMaster TD2 Thunderbolt 3 RAID. This version has a pair of Thunderbolt 3 connections, the Mini DisplayPort connection and is readily available on Amazon.
You might also come across a similar product called the TerraMaster TD2 Thunderbolt 3 Plus Dock. At a glance, these products look nearly identical. But a closer look reveals several additional ports on the back of the “Plus Dock” version. This more expensive model featured a 1GbE ethernet port, two USB-A ports and a higher 85W Power Delivery output from the Thunderbolt 3 port. After learning about this “Plus Dock” version, but struggling to find it for sale, TerraMaster confirmed to me that it has been discontinued. The device remains, somewhat confusingly, on their website.
Drive Installation

The TerraMaster TD2 does not come with any drives. You can use HDDs or SSDs, but you’ll need to purchase those separately. While this is an extra step in the process, it’s usually much cheaper to buy drives yourself than purchase a RAID with pre-installed drives. The actual process of drive installation is straightforward and takes just a few seconds. No prior experience is necessary.
When you open the TD2 box for the first time, you will find a selection of screws and a screwdriver. Drive installation screws are standard, but I was pleasantly surprised to see the useful screwdriver. Yes, I have a screwdriver, but this just sped up the installation process.

Once you pop the latches on the drive trays they can be slid out. Next, you’ll use the screws to install either a pair of 3.5″ or 2.5″ HDDs or 2.5″ SSDs. The bags of screws are helpfully labelled with the drive types so you really can’t get this part wrong. Once the drives are attached to the drive trays, simply slide them back into the RAID enclosure and close the latches.

Installation – Email Annoyance
When you open the TD2 box, you’ll find a small piece of paper that gives you a URL to visit for a “Quick Start” guide. Annoyingly, when you visit this URL, you are prompted for your email address and name to access the setup guide and user manual. I was not pleased to see this. It is a cheap trick to try and get your email address. If you buy a product, you have already paid your dues to the company. You should NOT have to give up your contact details just to use the product. I cannot understate how much I dislike this tactic.
I never did give them my email address. I ignored the request, plugged the drive into my computer and initialized it using the Mac OS Disk Utility function. While this was an option for me because I’m familiar with the process of setting up new RAID systems, I’m sure most people feel forced into giving TerraMaster their contact details. If you don’t want to do this, know that you can avoid it by doing some basic Googling about formatting drives in Mac OS and Windows and reading the rest of this review.
RAID Mode Selection
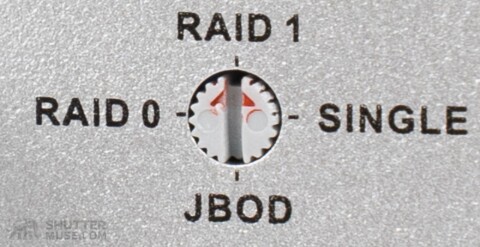
On the back of the TD2 is a small RAID mode selection switch that must be turned with the included miniature screwdriver. Once you have chosen your RAID mode, use the included tool to push the recessed RESET button beneath the RAID mode selection dial for 5 seconds. The available RAID modes on the TD2 are as follows:
- RAID 0 – Capacity will be equal to the sum of the drive sizes and read/write speeds will be double that of a single drive.
- RAID 2 – Capacity will be equal to half the sum of the drive sizes. There is no performance gain, but you are protected from a single drive failure.
- Single Disk – In this mode, the two disks appear as individual drives connected to your computer. There are no performance gains and no protection against drive failure.
- JBOD – In this mode, the capacity is equal to the sum of the drive sizes. Unlike RAID 0 and RAID 1, you can use disks of differing sizes but you will get no performance increase and no protection agains drive failure.
The TerraMaster modes all work exactly as described above. Note that the names they have given the different modes might differ from RAID systems you are familiar with. For example, what TerraMaster calls Single Disk mode is known more commonly as JBOD mode. And what TerraMaster calls JBOD mode is known, at least to me, as Span mode or JBOD span. Nonetheless, all modes worked without trouble.
TerraMaster TD2 Speed Tests

To test the TD2 RAID enclosure, I loaded it up with a pair of 8TB 7200rpm Seagate IronWolf drives. The brand and model of the drive will affect the potential read and write speeds, so I can’t tell you exactly what speed you will achieve. However, this should give you an approximate indication. You should choose 7200rpm drives from a respected brand such as Seagate, Western Digital or Hitachi for the best results. Ideally, it would help if you also used a pair of the same drives.
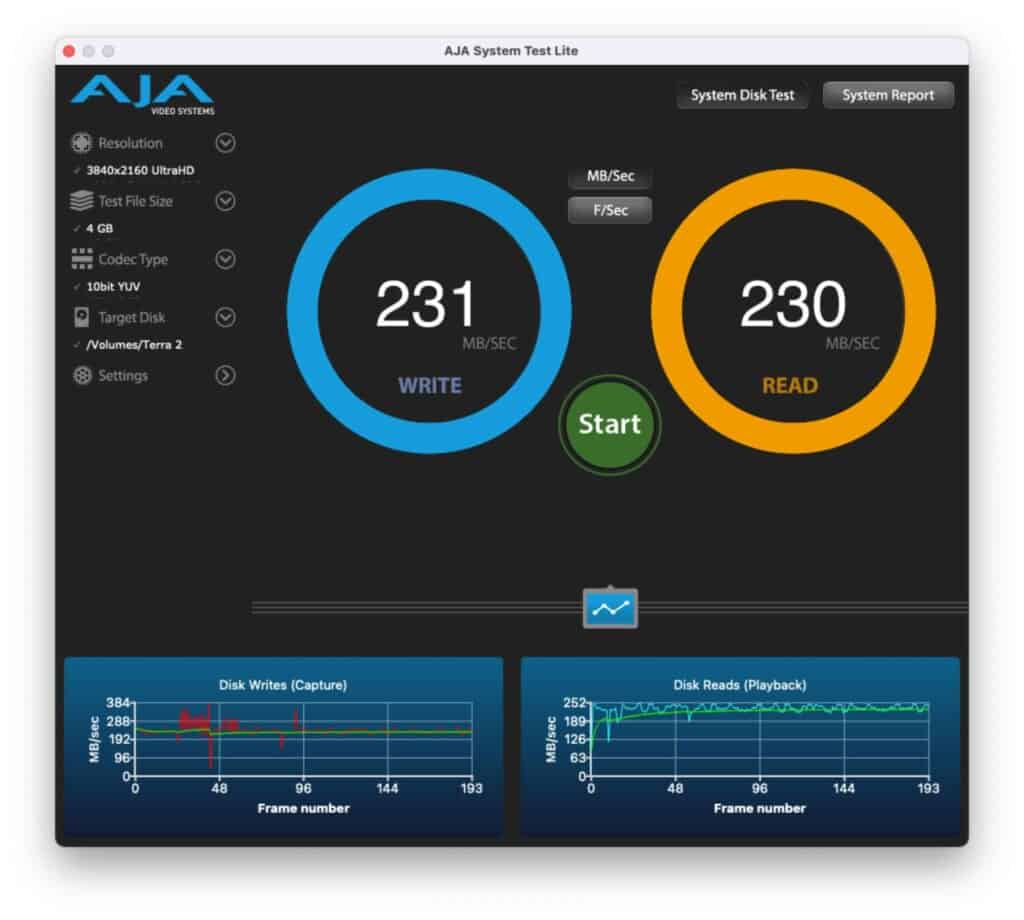
RAID 0 Test

RAID 1 Test

Single Disk Mode test

JBOD Test

Test Results
Nothing here was a surprise, which is good. The hardware RAID controllers are doing their job as you would expect. The results from the Single Disk mode show the closest approximation to the usual speeds of these individual IronWolf 8TB drives. JBOD mode is, as you would expect, very similar. RAID 1 loses a little performance from the single drive speeds, but again, this is normal, and you do gain that single drive failure tolerance that can be so important for continuity. And finally, as you would want to see, RAID 0 speed was almost exactly double the speed of the single drives.
None of these results is close to the quoted maximum speeds for hard disks given in the drive specifications. This is par for the course when analyzing drives and RAID enclosures. You will never get the same speeds as the manufacturer suggests because they spend time optimizing every tiny detail in their setup to achieve these things. There are too many variables: file size used for speed test, operating system, system configuration (RAM etc), drive make and mode. The list goes on.
What’s important here is that the IronWolf 8TB drives are a known quantity to me. I have been using them for many years and have tested them on many devices. The speeds I got from the TD2 are, to within a few per cent, what I would expect to see.
It’s also important to underline that these speeds do not come close to saturating the throughput capabilities of Thunderbolt 3. Many people look at Thunderbolt and wrongly assume it means a faster drive. It does not! If you’re only using hard disks or a couple of SSDs, these drives will never come close to making use of Thunderbolt 3’s 40Gbps capabilities. They don’t even saturate USB 3.1.
This means that if you do not need a Thunderbolt 3 connection, you can also use the USB-C version of the TD2, called the D2-310, and achieve the same results for a lower price. That’s not to say that the TD2 is a bad option. It’s not. But it’s only a good option if you actually need that Thunderbolt 3 connection. If you don’t, you might as well save some money at get the USB-C version.
Conclusion
The TerraMaster TD2 is a very affordable 2-drive RAID enclosure that produces precisely the kind of performance you’d hope. While the substantial throughput possibilities of a Thunderbolt 3 connection are not necessary for a 2-bay SATA drive, it does provide you with the possibility of adding the drive into a daisy-chain of other Thunderbolt devices and thus simplifying the connection process to your computer.
If you’re in need of a Thunderbolt-enabled RAID storage system, and two drives will suffice, I’m happy to recommend the TerraMaster TD2. If you don’t need that Thunderbolt connection, you should also be aware of the TerraMaster D2-310. Essentially, the D2-310 is a USB-C version of the TD2. It’s cheaper and will provide you with the same kind of speed.