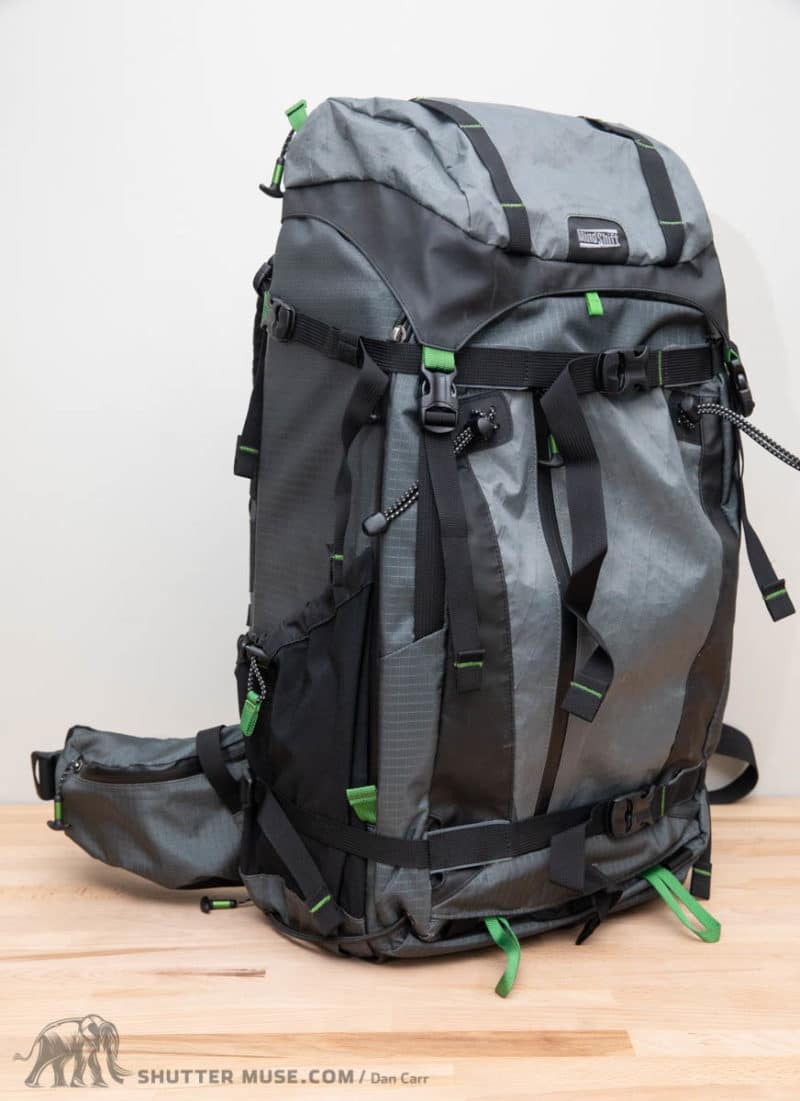
MindShift Gear, a Think Tank Photo subdivision, has launched a new high-end outdoor and adventure photography backpack called the BackLight Elite 45L. This bag sits right at the top of their BackLight backpack range, both in terms of volume and features.
To make it suitable for all your outdoor adventures, the bag uses a combination of technical materials and hardware such as waterproof, tearproof sailcloth and YKK AquaGuard zippers to keep the weather out.
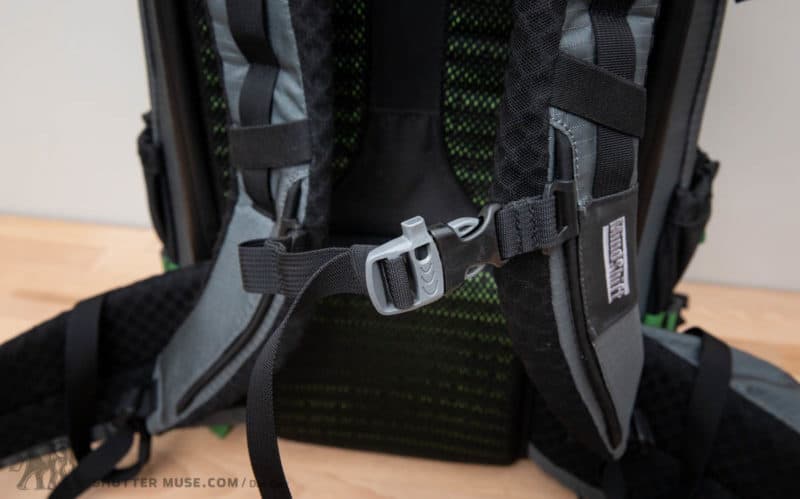
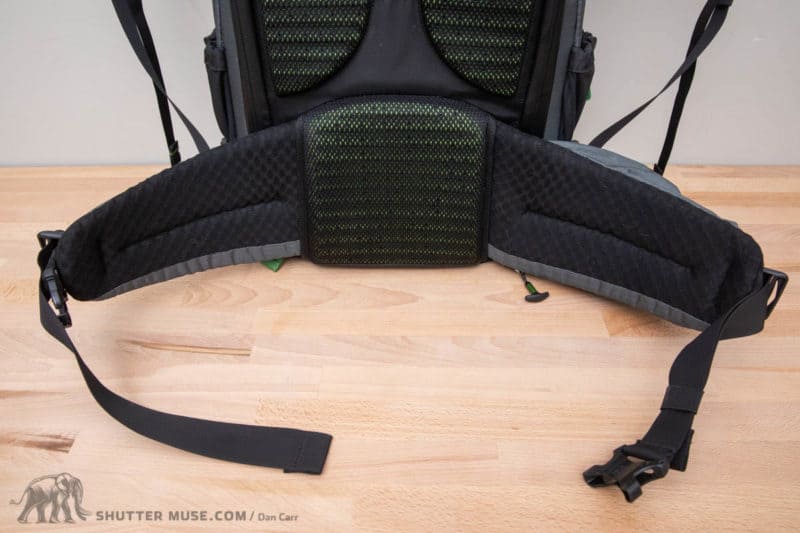
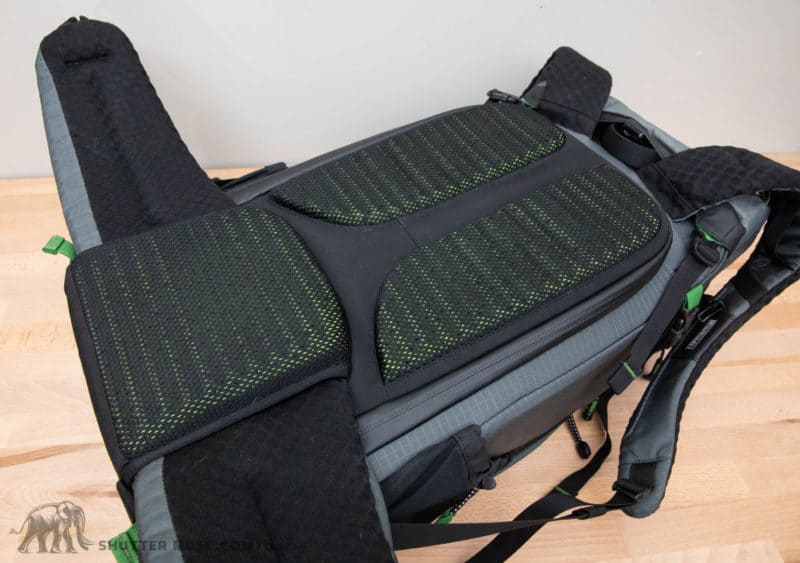
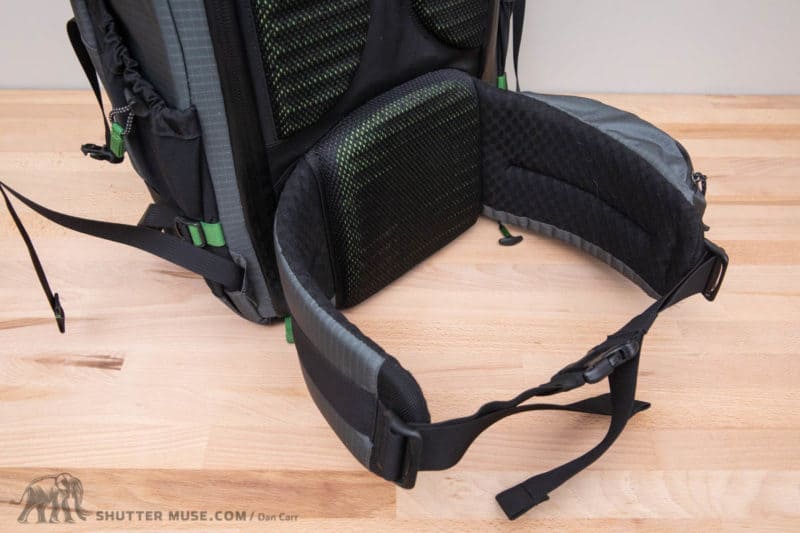
It also features robust, thick lumbar padding, a huge padded waist belt and a quick-dry back panel with the sort of foam ridges that are more often seen on top-of-the-line hiking packs.
In this review I’ll take a deep dive into all the features this pack has to offer, as well as sharing my experience with the bag from testing it out over the last two years of pre-production prototype development.
Headline Features
- Holds up to a 600mm lens
- Holds up to a 17″ laptop
- Meets most international and domestic carry-on requirements
- Large water bottle pockets and water bladder ready
- Top lid converts to a belt pack with removable waist belt
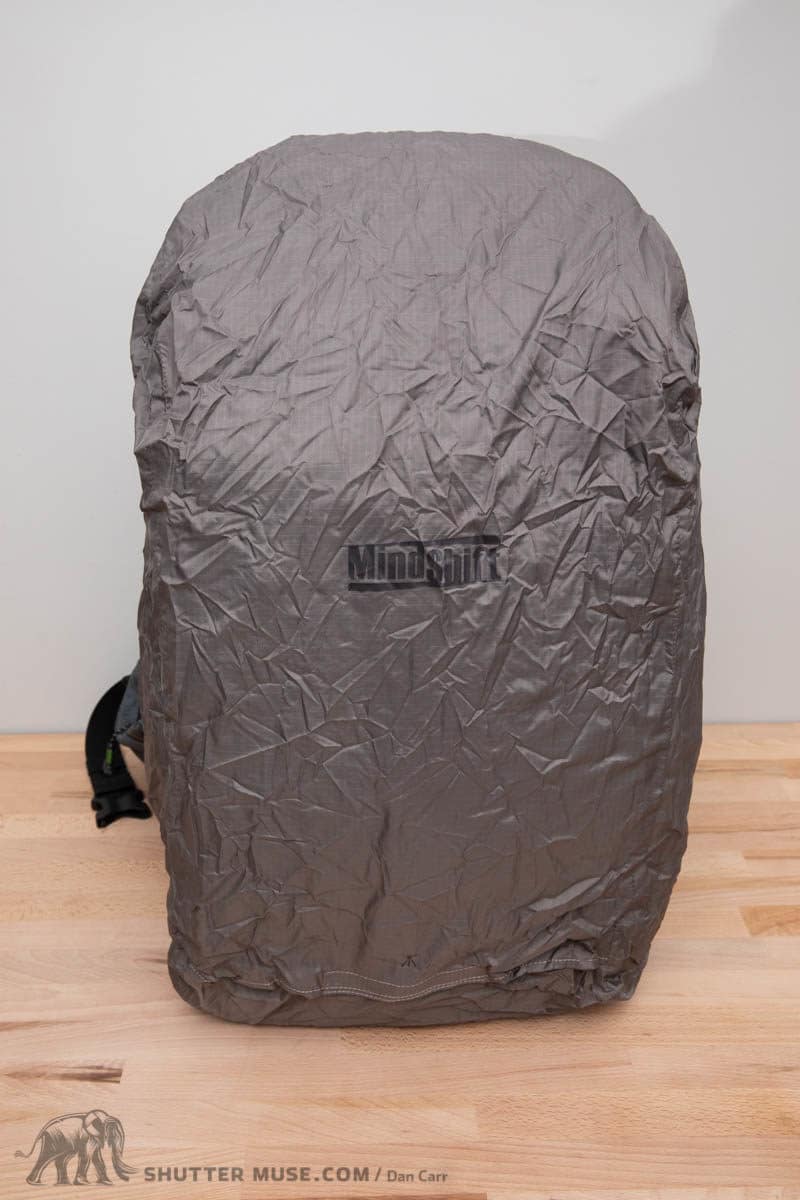
- Seam-sealed brown colored rain cover included to blend with environment
- Removable camera compartment with emergency backpack straps
- Multiple tripod mounting options
- Honeycomb mesh shoulder straps and complex foam ridge back panel for carrying comfort and improved airflow.
Development Story
I’m publishing this review right as this bag is publicly launched (long before any other reviews), but I have actually been testing prototypes and living with this as one of my primary packs for two years now. A tough secret to keep!
My own photographic business and interests span the full gamut of genres that this bag targets: Wildlife, landscape, travel, action and adventure. Since I’m also intimately familiar with the entire MindShift lineup from my work reviewing them on this site, it was the prefect opportunity to pass on my thoughts about necessary features for a bag like this, and test some of the prototypes in the field as the design was refined over several years.
My camera bag reviews are usually pretty detailed as it is, but in this case I’m in a position to be able to provide an unrivalled amount of detail and hands-on knowledge of this pack. That’s a good thing for you folks because this is a high-end product and as such, it doesn’t come with a cheap price tag.
I want anyone considering this pack to be sure it’s the right choice for them and their gear, and I’m confident that 99% of your answers are on this page. For that other 1%, just leave me a question in the comments and I’ll be sure to help you out.
Nobody has more knowledge of how this bag works in the field, and functions with a wide variety of photographic equipment and other outdoor gear. Throughout the review I’ll be able to provide insights into why specific decisions were made during the design process.

Specifications
- Exterior Dimensions (travel mode*): 13” W x 23.5” H x 8” D (33 x 59.7 x 20.3 cm)
- Camera Compartment: 11.4” W x 19.3” H x 6.8” D (29 x 49 x 17.3 cm)
- Laptop Pocket: 11.2” W x 16.1” H x 1”D (28.5 x 41 x 2.5 cm)
- Tablet: 0.6” W x 10.2” H x 0.6” D (27 x 26 x 1.5 cm)
- Total Volume: 45L
- Weight: 3.9–7.0 lbs. (1.8–3.2 kg)

BackLight Elite Carrying Capacity

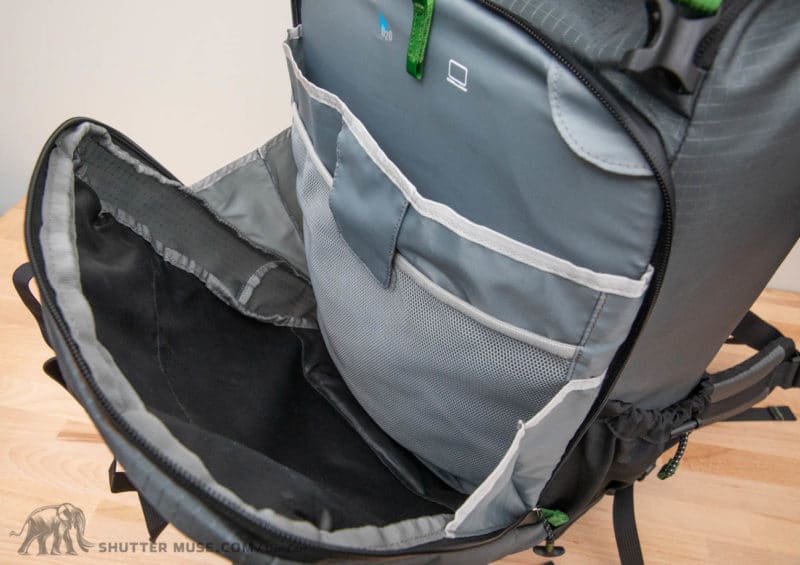
With 45 litres of storage volume there’s a lot of options for organizing your gear. One of the most important features of the entire BackLight range has always been the large capacity front pocket. On the Elite 45L pack, this front pocket gives you 17 litres of storage for your non-photographic gear such as extra layers, food, safety equipment or even a 17″ laptop and tablet if you want.

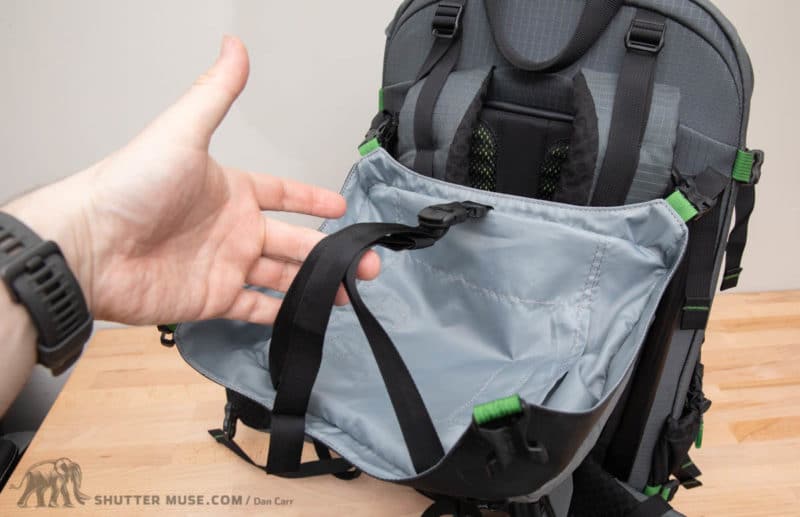
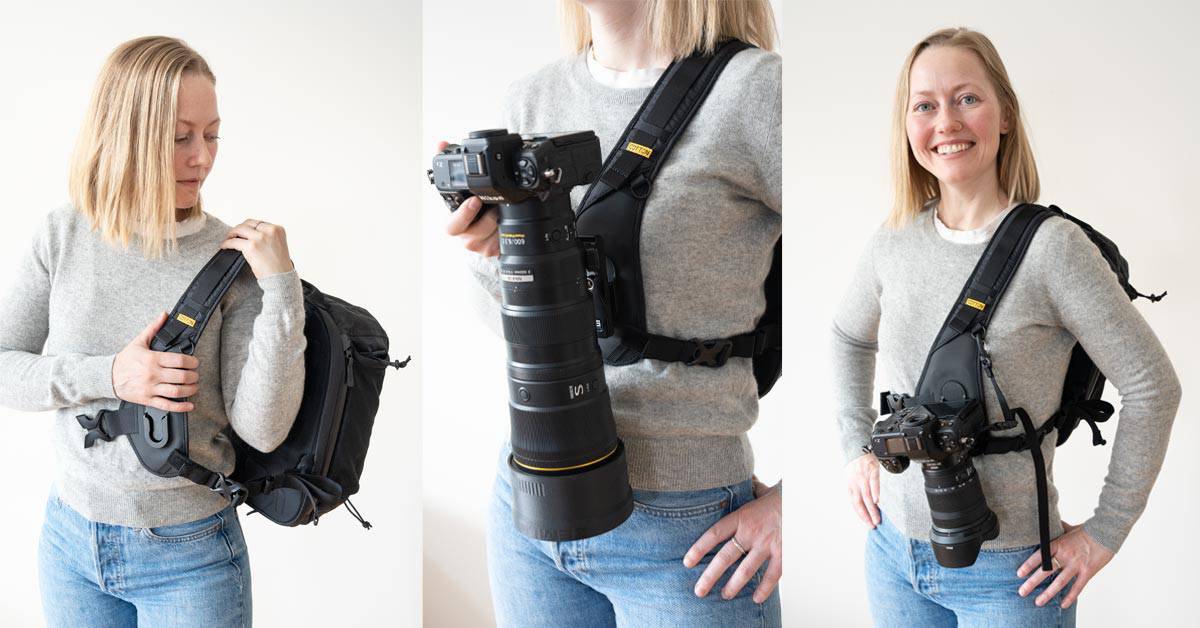
You also have the removable top pocket if you need even more space. This gives you about 4 litres of extra storage on top of the pack which works perfectly for small items such as your photography gloves, a hat, snacks, binoculars, head lamp and compressible down mid-layer. Ingeniously, the top pocket can be combined with the bag’s removable waist belt to create a lightweight belt pack.
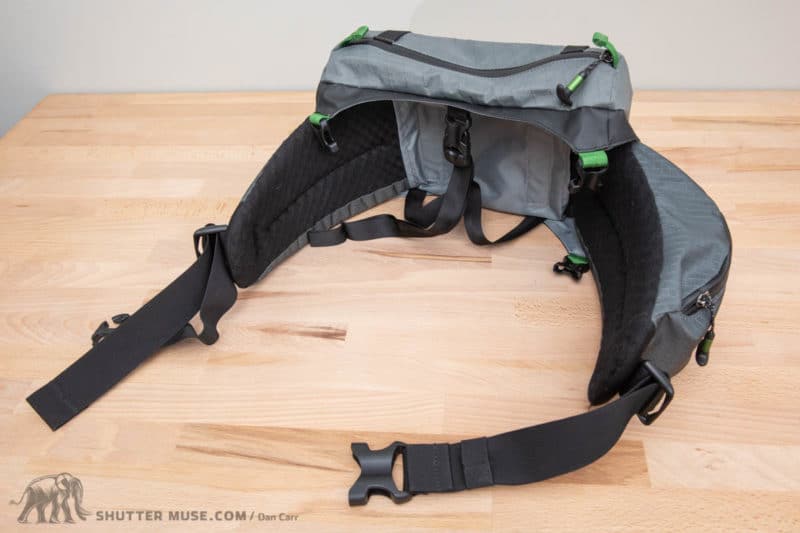

If you’re carrying a big lens on a tripod over your shoulder and just need a small pouch to carry an extender, battery and memory cards, this is a really cool and unique solution. Climbing photographers might also find it useful if you’re rapelling into position from above, with a camera cross-body over your shoulders, and just need a small pouch to hold some accessories or an extra lens. It’s always nice to have versatile options from a single product.

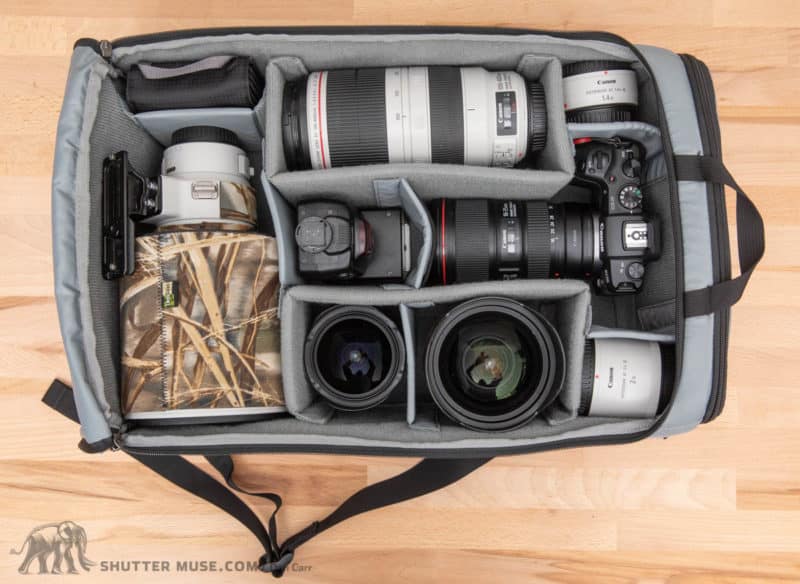
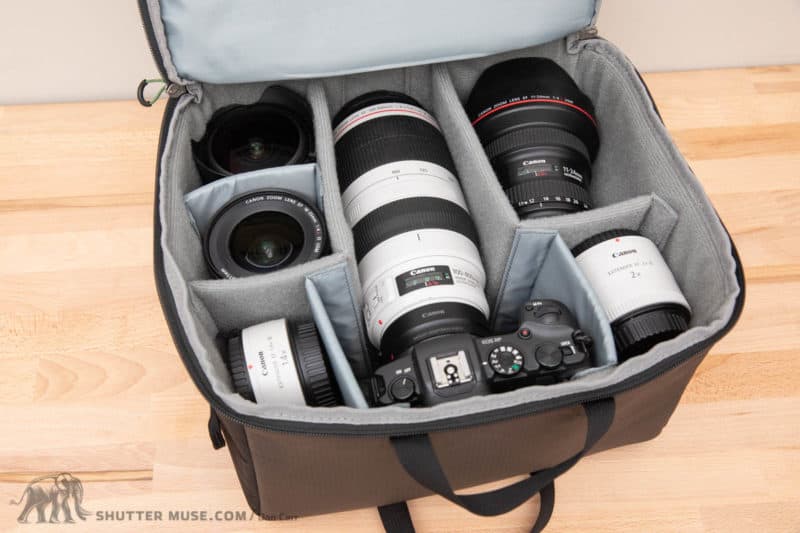
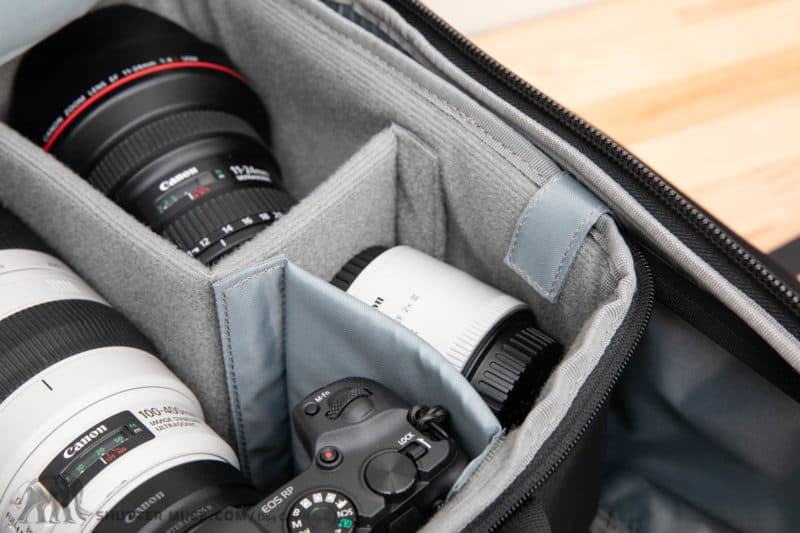
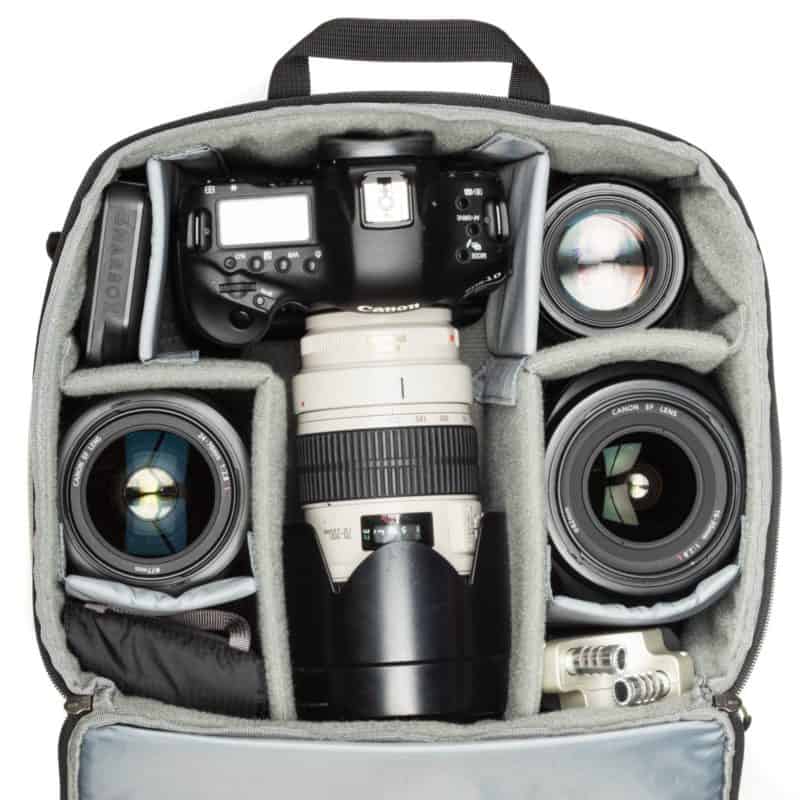
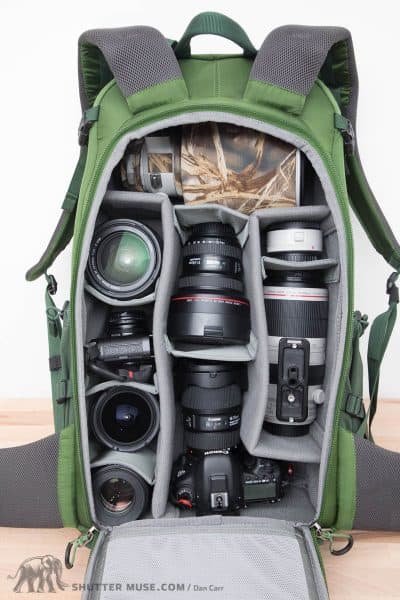
Moving into the main compartment of the pack there’s a large removable camera insert that’s actually tall enough to fit up to a 600mm lens. MindShift don’t really mention that it’s capable of carrying such a large lenses on their website, but I’ve done the measurements myself and it fits the Canon 600mm without a camera attached to it. It also fits a 500mm f/4 lens with a camera attached, or the Canon 200-400 f/4 and Nikon 180-400 with a camera attached. Of note to Canon wildlife shooters is the fact that it’s wide enough to fit the Canon 400mm f/4 DO IS II lens horizontally across the camera insert, as you’ll see in my own images. In other words, this bag has got you covered for pretty much any kind of lens kit you might have.
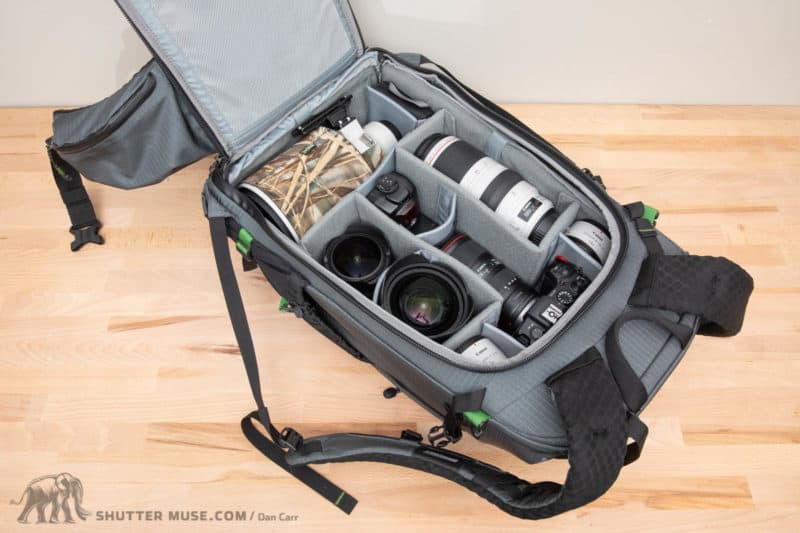
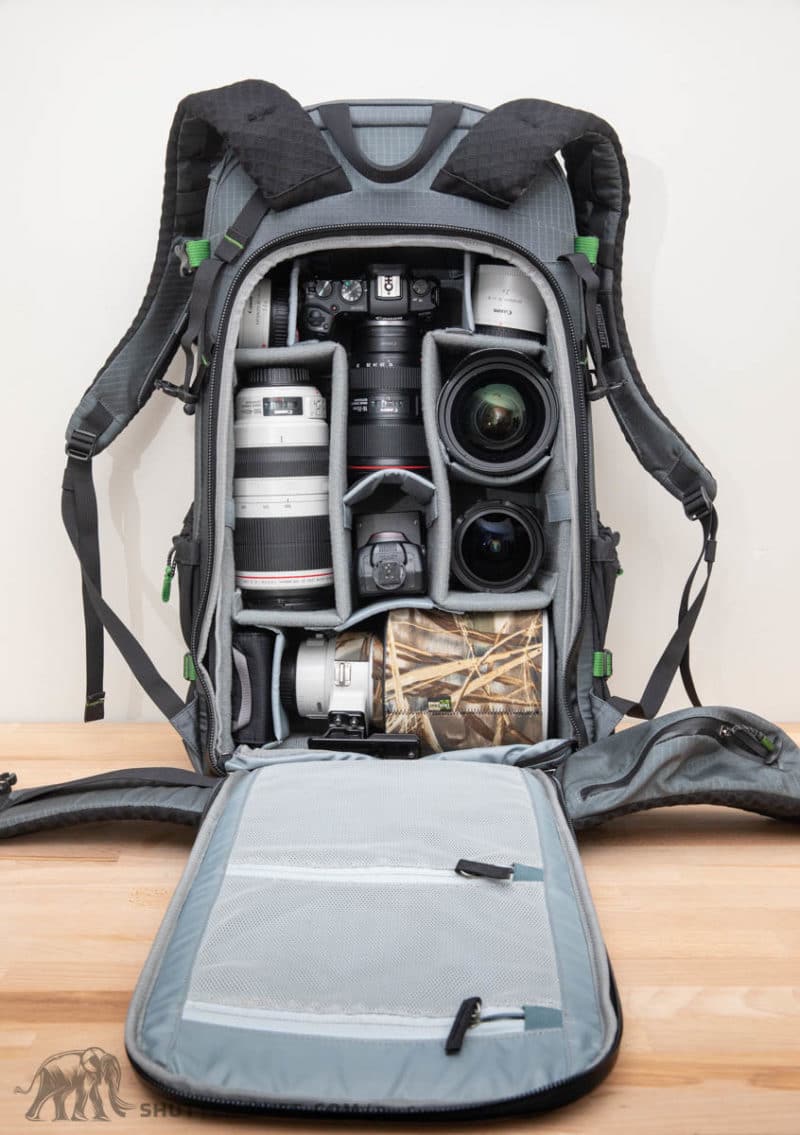
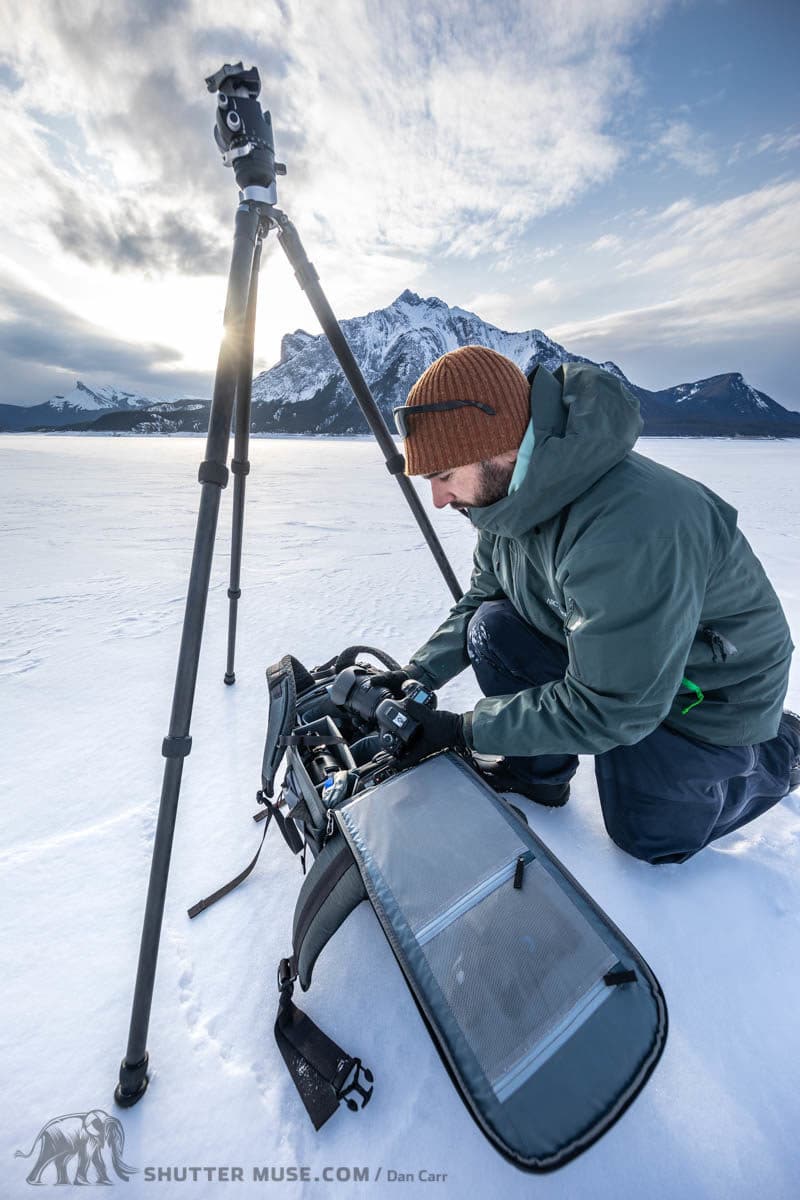
This camera compartment is primarily accessible from the back panel of the bag which is my preferred method of backpack access. When you inevitably have to put the bag down in the dirt or wet snow at some point, the harness and back panel are protected, and that dirt or snow isn’t then transferred onto your jacket when you put the pack back on.
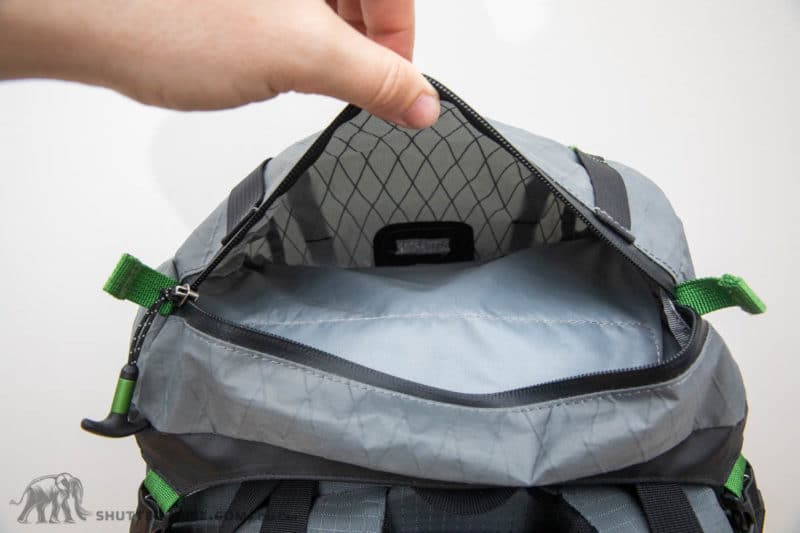
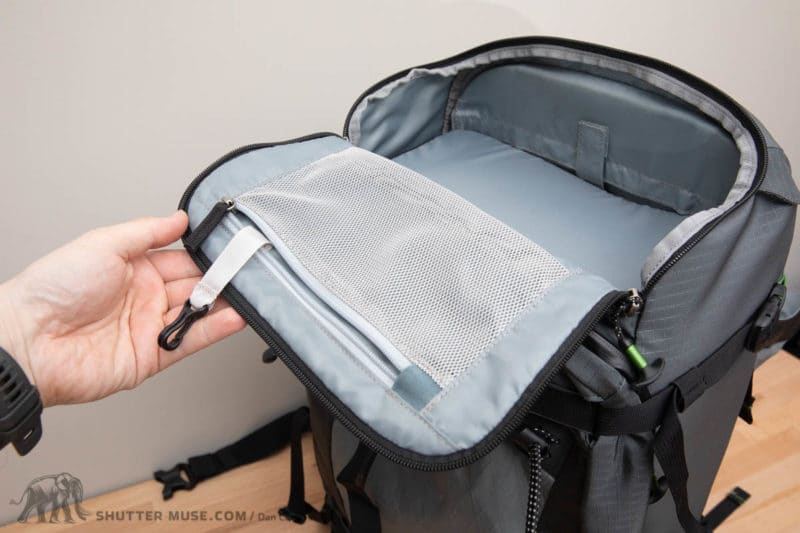
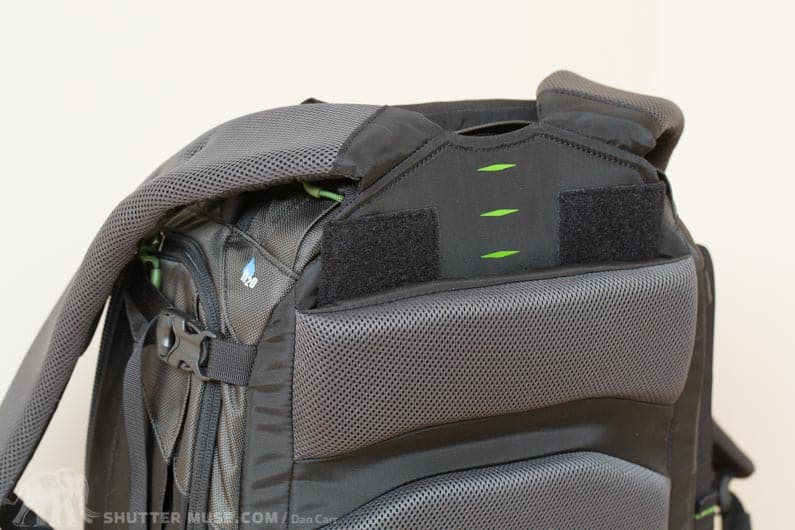
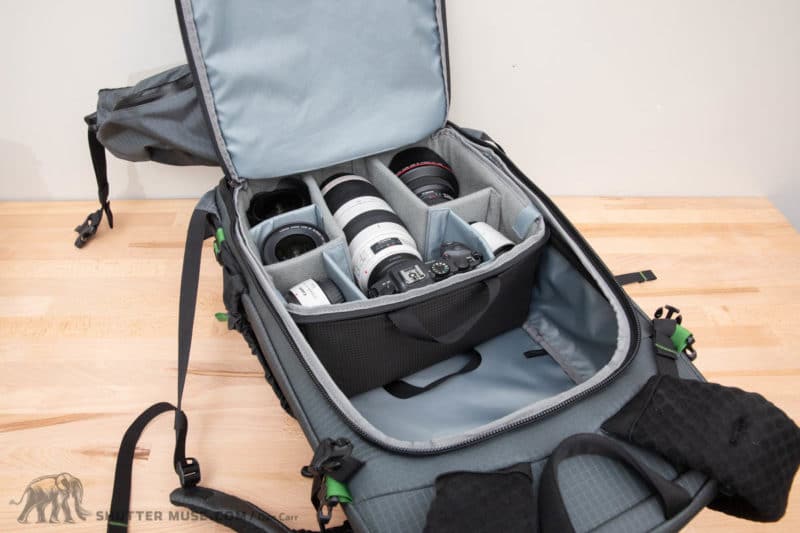
A secondary method for accessing the camera compartment is available from the top of the bag. Under the top lid, the bag zips open to reveal some additional storage space above the camera compartment, as well as a zippered pocket with a clip for securing your memory card holder. The camera compartment can also be unzipped at the top, allowing you to pull a camera vertically out of the bag if you’re in a situation where it might be unwise or difficult to open the back panel.

It’s useful to have this additional method of accessing your gear, but it does require some forethought. Clearly you’ll only really have access to the camera and lens that are located right at the top of the camera compartment, so prepare this accordingly before your adventure. Due to the size of the top opening to the pack, you won’t be easily able to pull a giant super telephoto lens through this top opening. I would limit it to something with a hood diameter close to a typical 100-400mm or Nikon 200-500.
There aren’t any other bags like this on the market that give you both top and back panel access, so this is a cool feature to have once you figure out how best to pack your gear and make use of it.
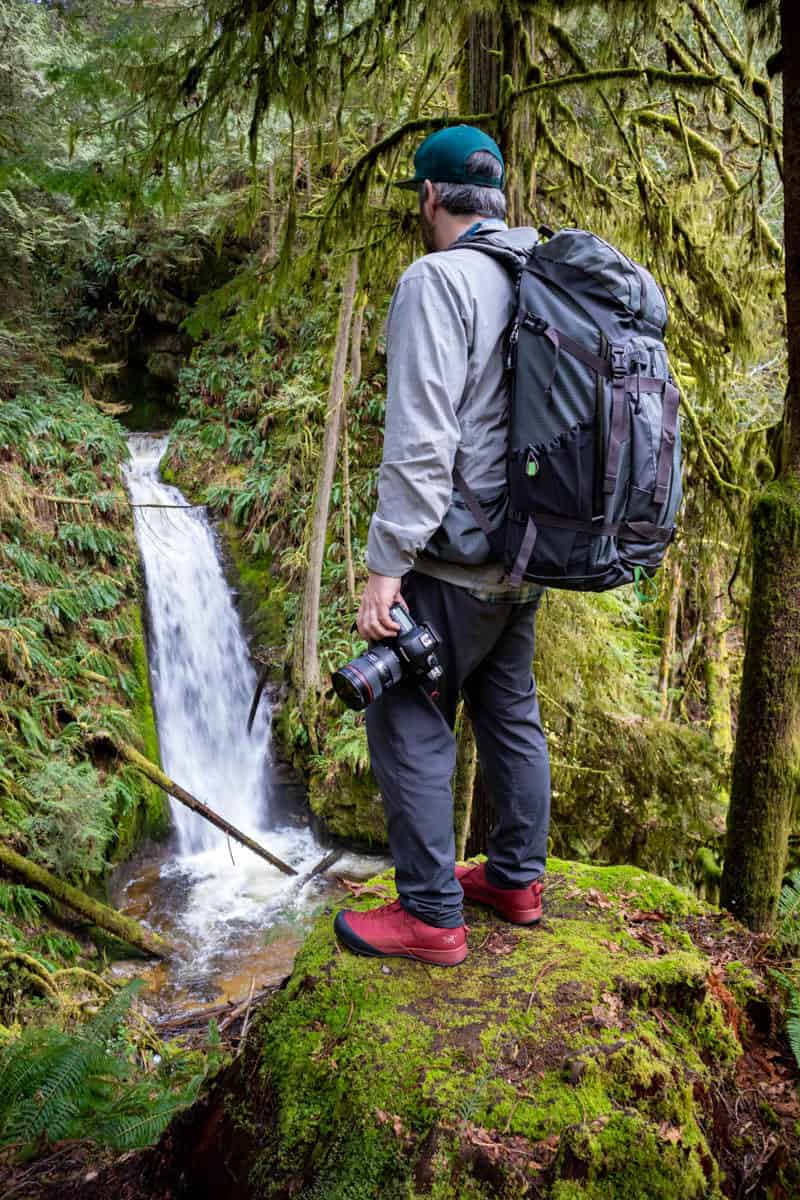
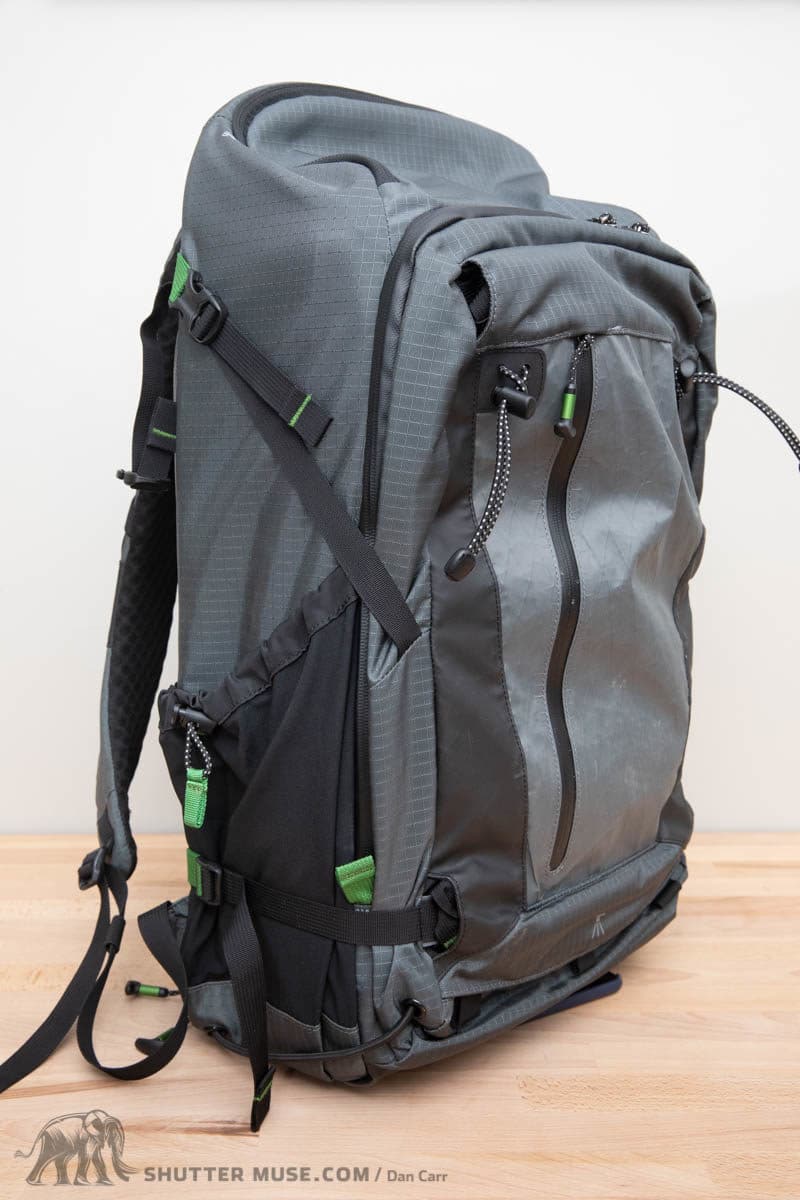
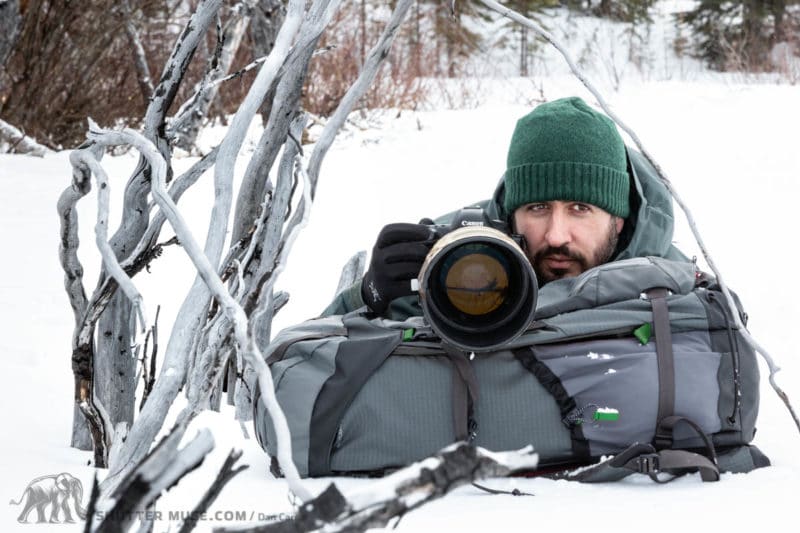
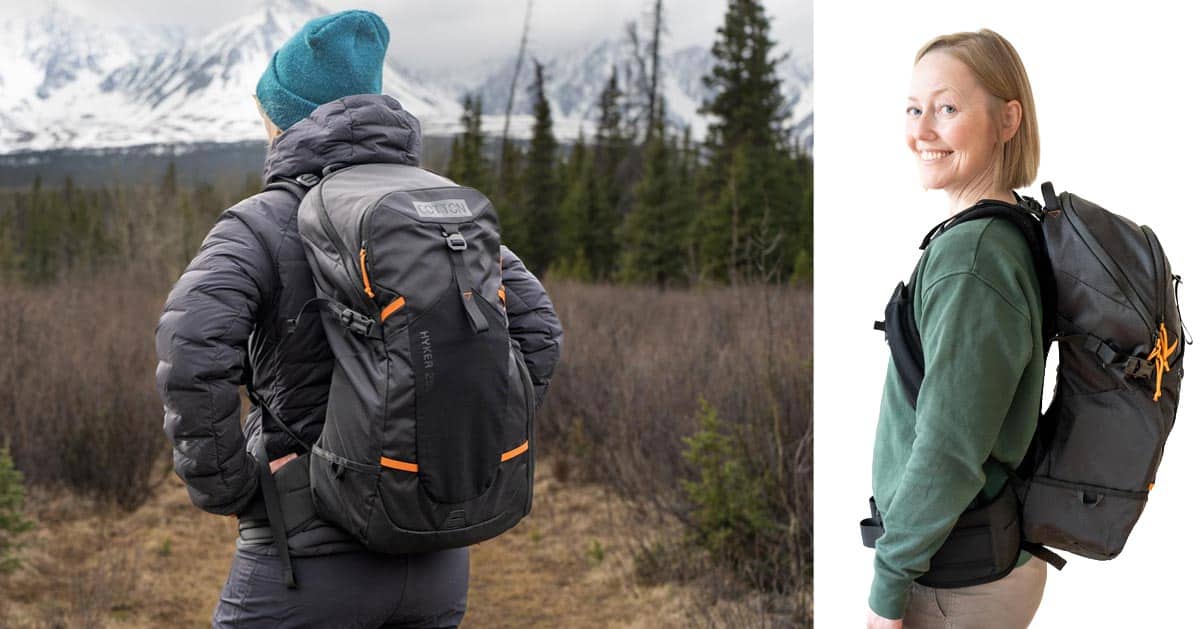
Carrying Comfort
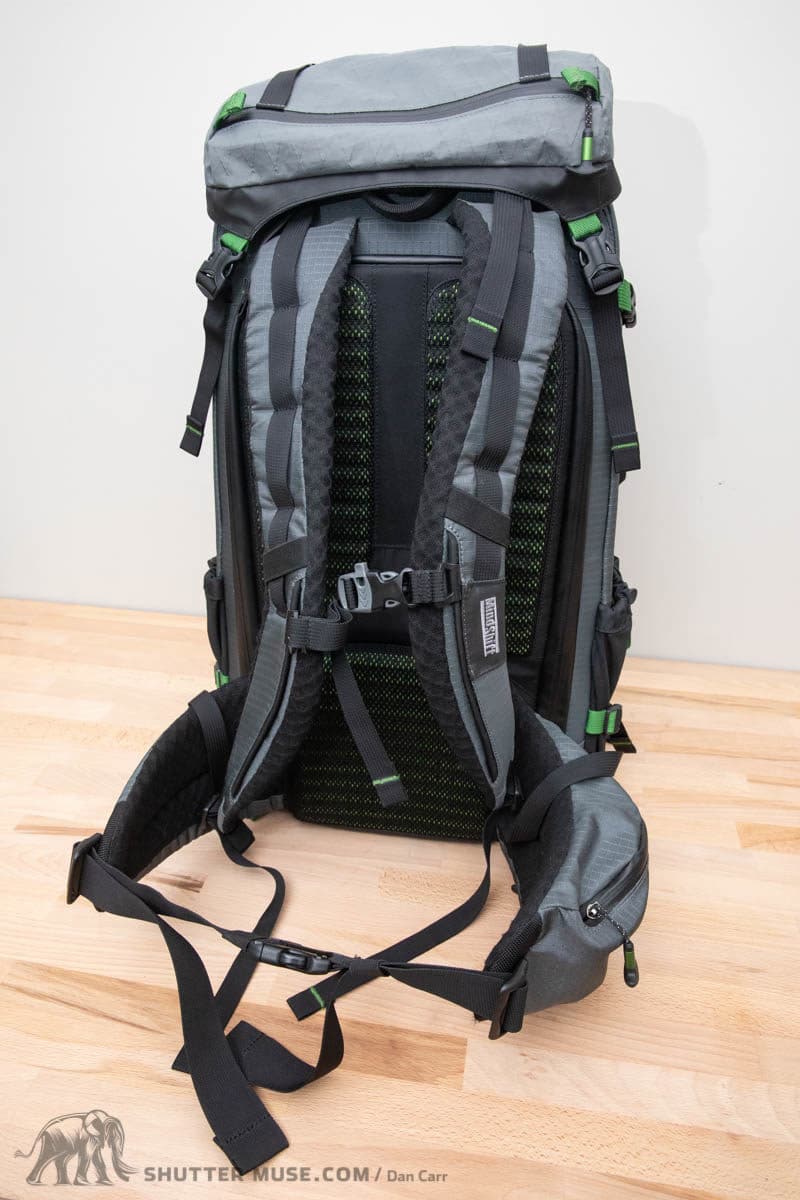
The photos in this section will give you some indication that this pack has really been designed with comfort in mind. More than any other camera backpack I have used, this looks and feels like a high-end hiking pack.
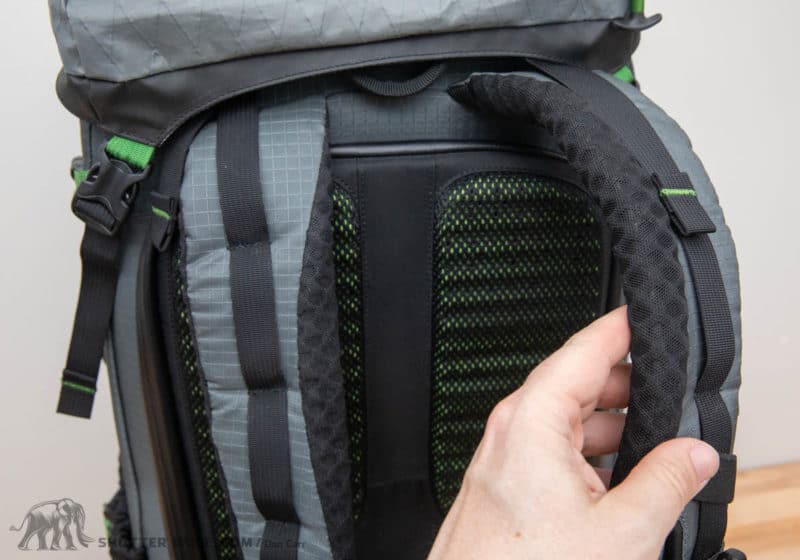
Most back panel opening camera packs from other companies simply have some sort of vague molded foam pattern against your back, but the Elite has huge ridged and ventilated foam panels to create airflow and lumbar support.
And it doesn’t stop there. The huge hip belt and shoulder straps are made of a thick honeycomb foam that breathes well, and also delivers comfort.
What you get with all of this is a camera backpack that carries a heavy load far more comfortably than any other camera pack I’ve ever tested. And it’s hardly a surprise when you look back through other reviews and compare the relatively simple harness systems on most camera bags. This isn’t just a little better, it’s a whole different league!
Finally there is an outdoor photography pack that can be recommended to those people who have always held off buying camera packs because their regular hiking pack is more comfortable, or they would rather ski or snowboard with their ski-specific pack because that is more comfortable.
FAQ About Sizing/Torso Length
After initially publishing this review and launching the pack, the majority of people’s questions were relating to pack sizing, with some people asking about adjustable torso size. There were so many questions about these things that I decided to add a new section to this review to address them.
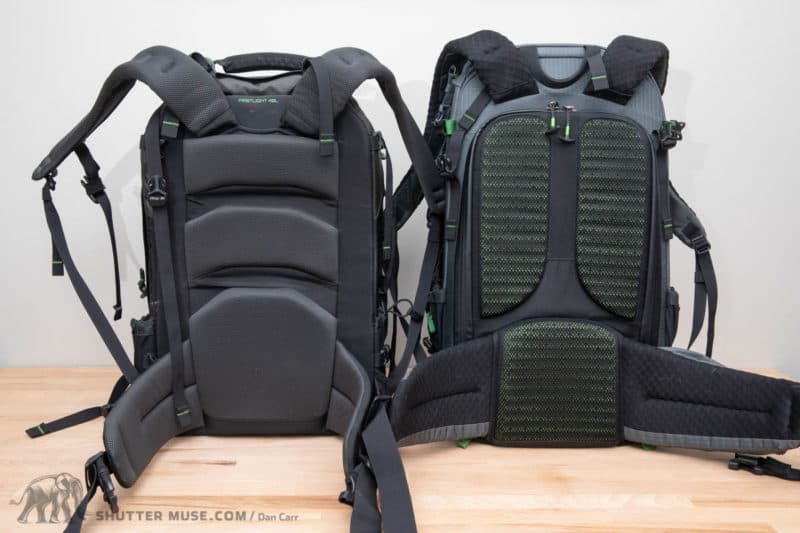
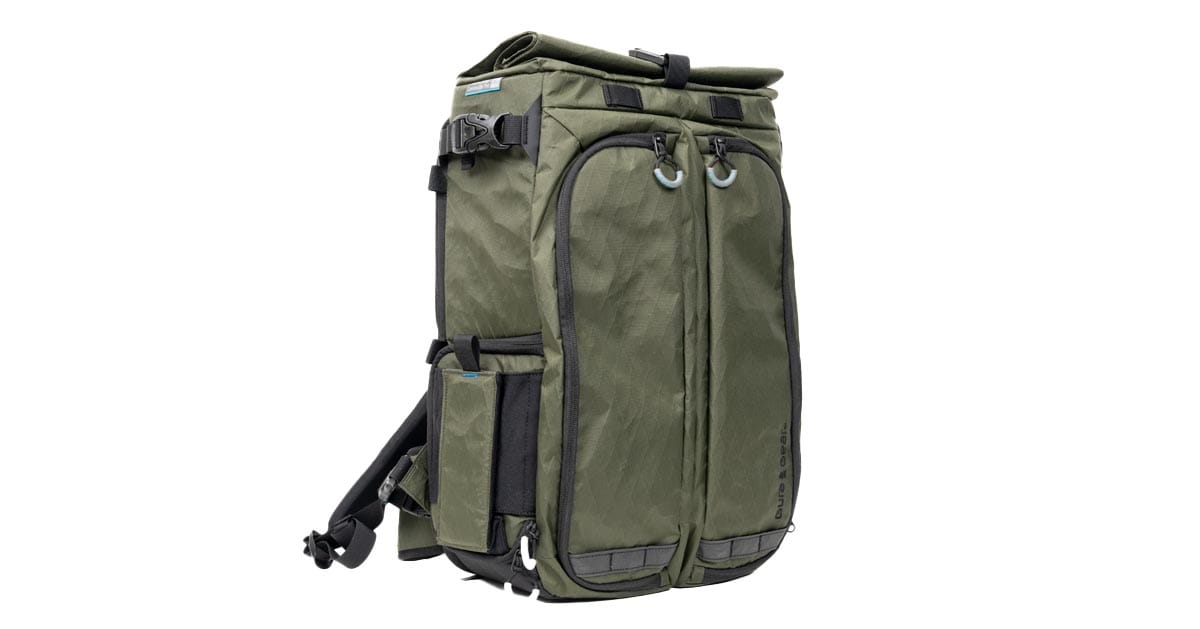
Does the BackLight Elite have adjustable torso length?
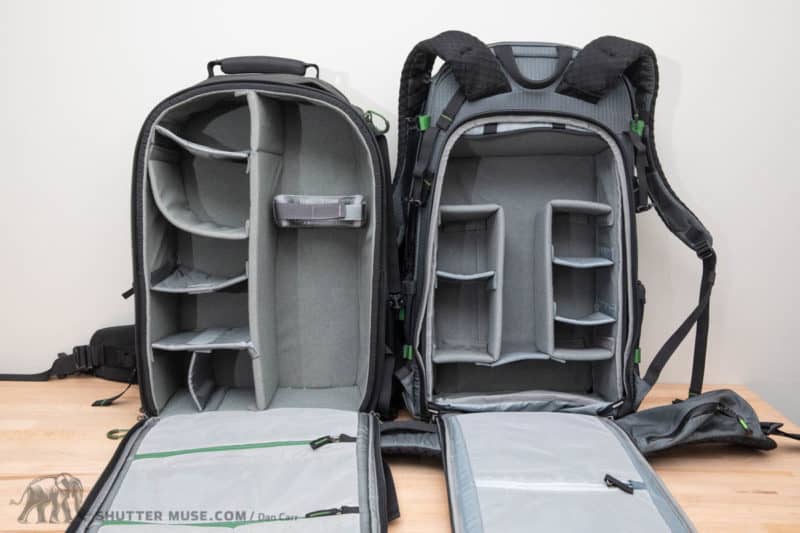
No, it does not. It’s not possible to efficiently add adjustable torso length to a backpack that has a back panel opening design. The back panel of the pack needs to be able to open and move away from the shoulder straps, therefore you can’t have the two connected with any sort torso adjustment.
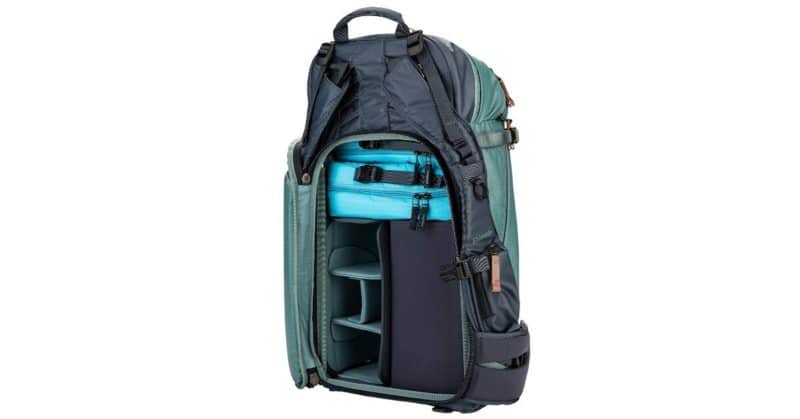
The only way you could make this work is to use a design similar to that which is used by Shimoda on their Explore packs. As the photo above clearly demonstrates, though, this has a dramatic effect on the size of the opening on the back of the bag. It would stop the bag working with large super telephoto lenses, and generally limit the amount of photographic gear in the bag if such a system was added to the Elite.
If you want a MindShift bag that does have proper torso length adjustment, that is the FirstLight series. All of the FirstLight packs have full torso length adjustment because they are front opening packs.
Why are there not multiple sizes of the Elite pack, then?
I’m paraphrasing this slightly, but one reader asked something along the lines of “why aren’t there multiple sizes of the same pack like you’d get from hiking brands?”
The simple answer is that the high-end photography pack market is many times smaller than the hiking bag market, so it’s simply a case of economies of scale. Yes they could make size variations of the Elite, or make a women’s version, but the price of the bags would increase dramatically if the sales numbers were split over several sizes. This would then push the bag’s price up above the other competitive bags in the market segment and nobody would end up buying it. Then the pack wouldn’t exist at all.
How tall are you?
I’m 5ft8.
What is the height range for this pack?
This is a really tough question because human height doesn’t necessarily correspond to torso length. Currently my recommendation is to reach out to their customer service team for some more direction on this. I’m only one man and only have one height. They have an office full of people with varying heights and can give you a better answer on this. I think it’s safe to say you will have no problems if you are a few inches either side of my height, but have a chat with them if you have concerns.
The good news is that if you buy from Think Tank/ MindShift, you can easily return it if you find the sizing isn’t going to work for you.
Back panel length?
The measurement from the shoulder strap attachment point at the top, to the bottom of the lumbar padding is 20 inches.
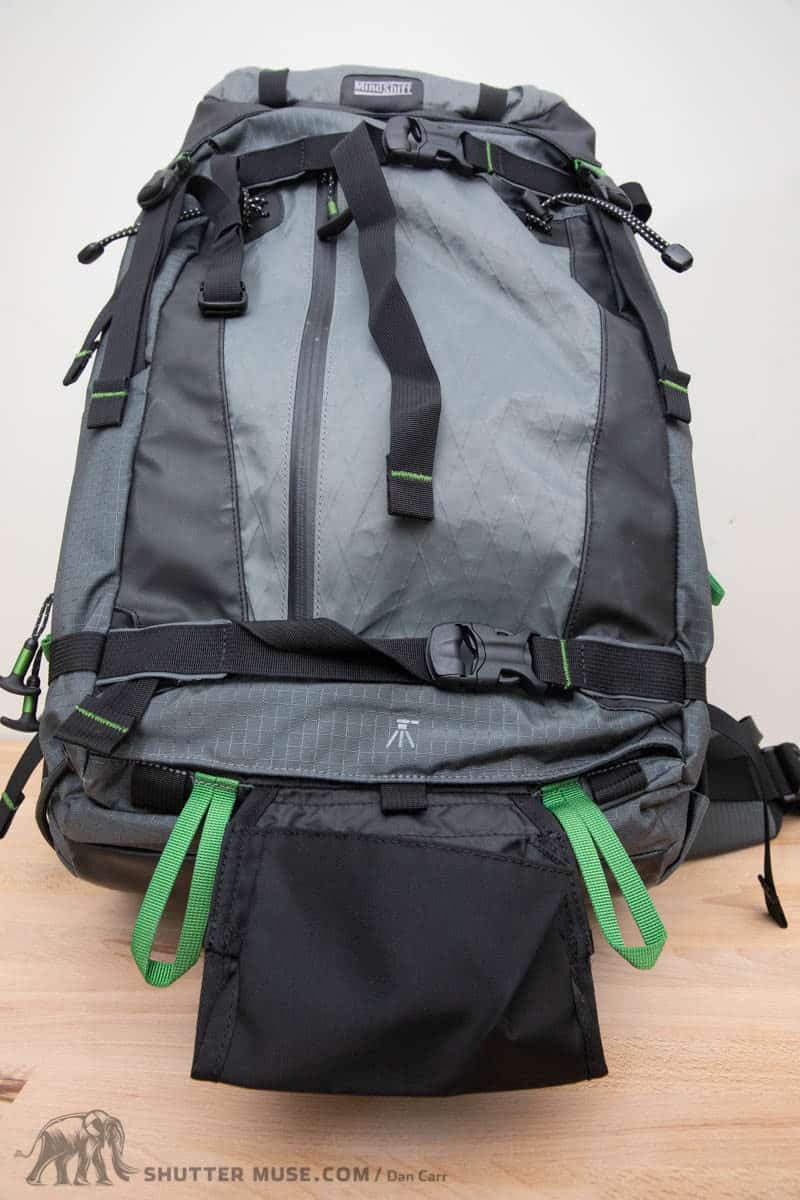
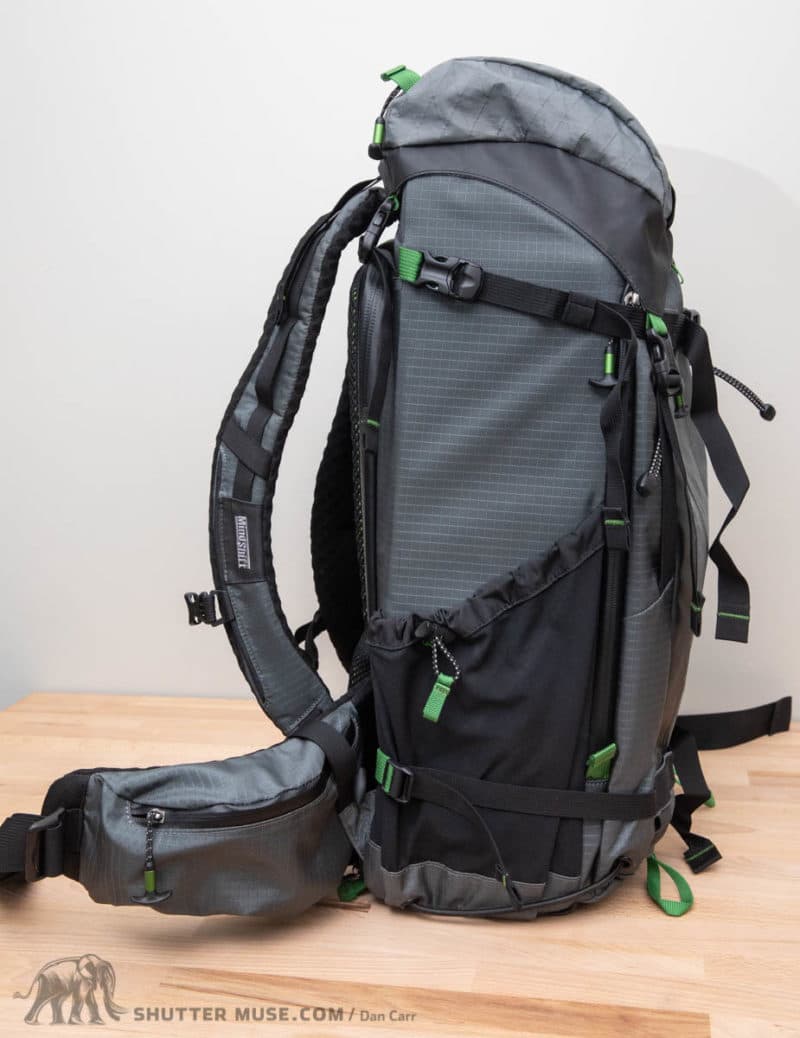
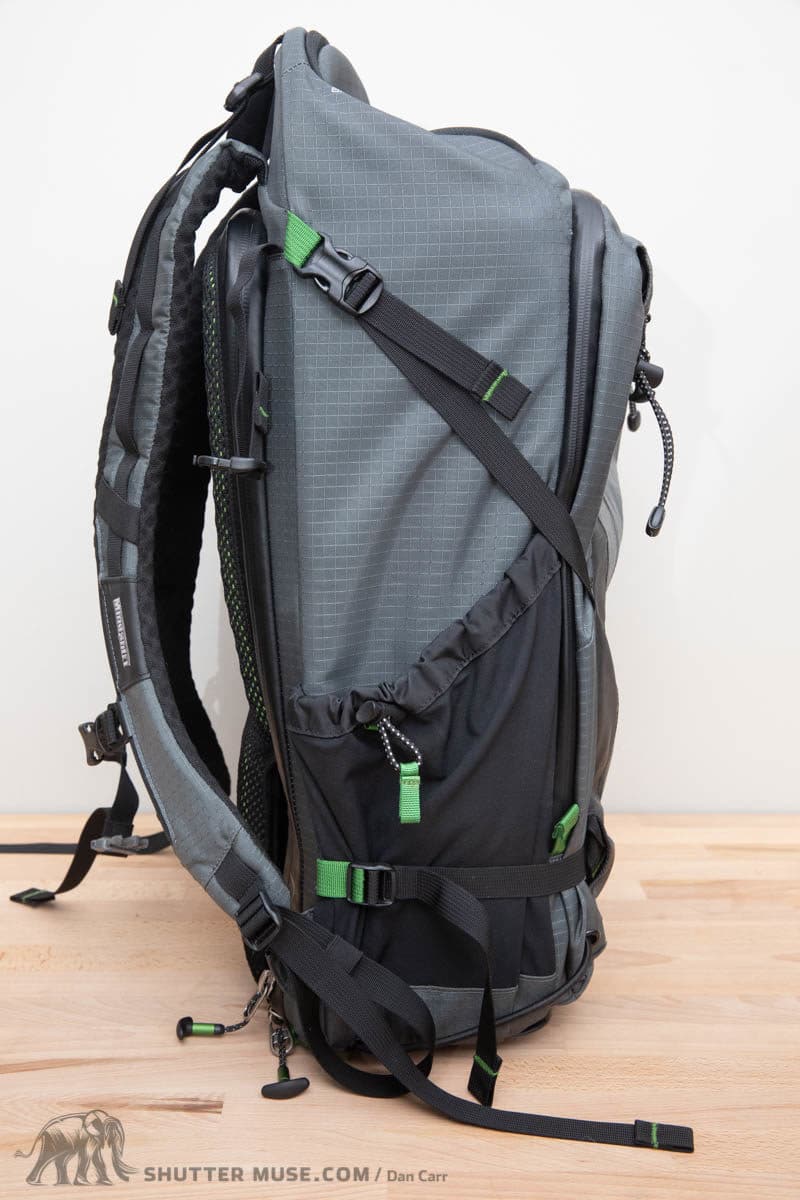
Carrying a Tripod


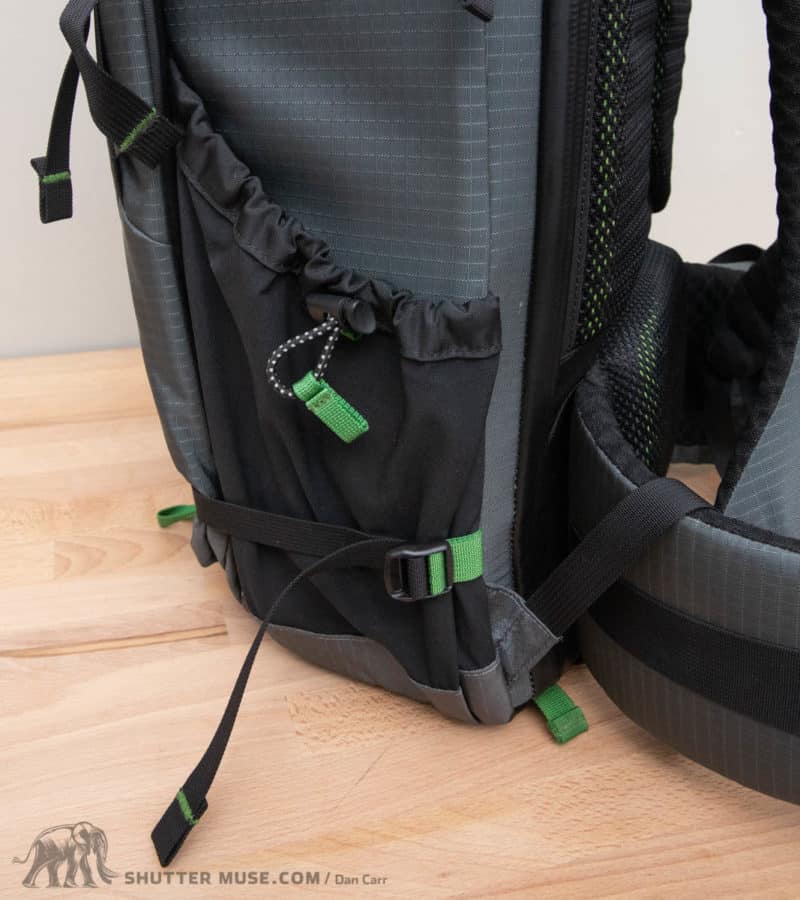
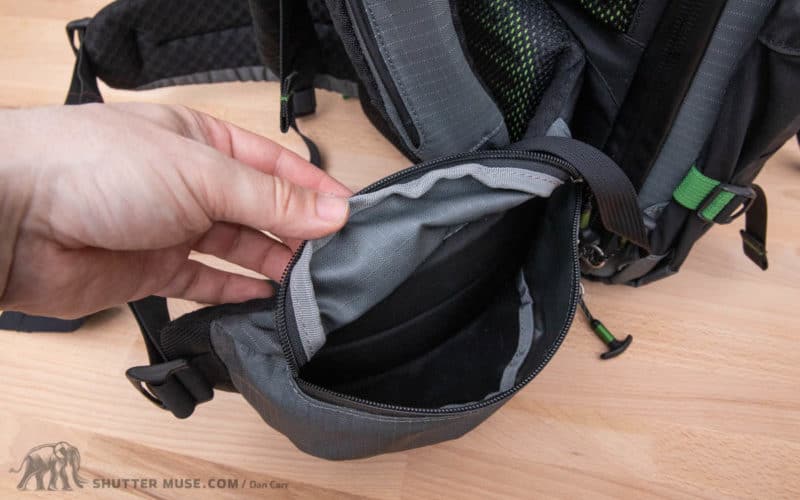
As with any good outdoor pack, there’s multiple options for carrying a tripod so that you can pick the best method to balance your load. The large stretchy side pockets are reinforced at the bottom so that they aren’t damaged by tripod feet, and a pair of compression straps on each side will secure even the largest tripod.
If you’re already using the side storage for another purpose, there’s also a fold-away tripod cup on the front of the pack that gives you that rear central tripod carrying ability.

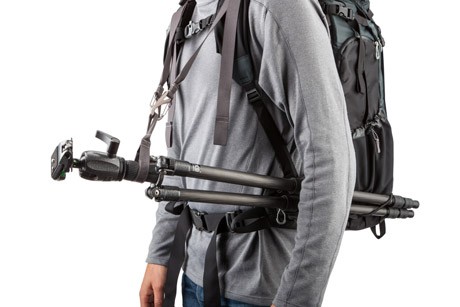
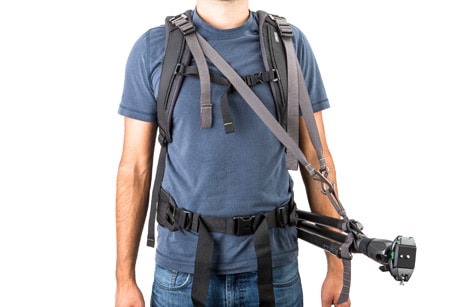
The third method is to use MindShift’s optional Tripod Suspension Kit. This clever set of straps helps to direct the tripod’s load more evenly onto the shoulder straps instead of pulling you to one side, or pulling you backwards. It’s also useful if you are making short hops from one shooting position to the next as you don’t have to remove your pack, then fully collapse and secure your tripod.
Travelling with the Elite 45L
There’s a few cool features of this pack that are designed for those that travel via air. Eagle-eyed readers will have spotted the first one in a previous photo of the internal camera block… backpack straps!
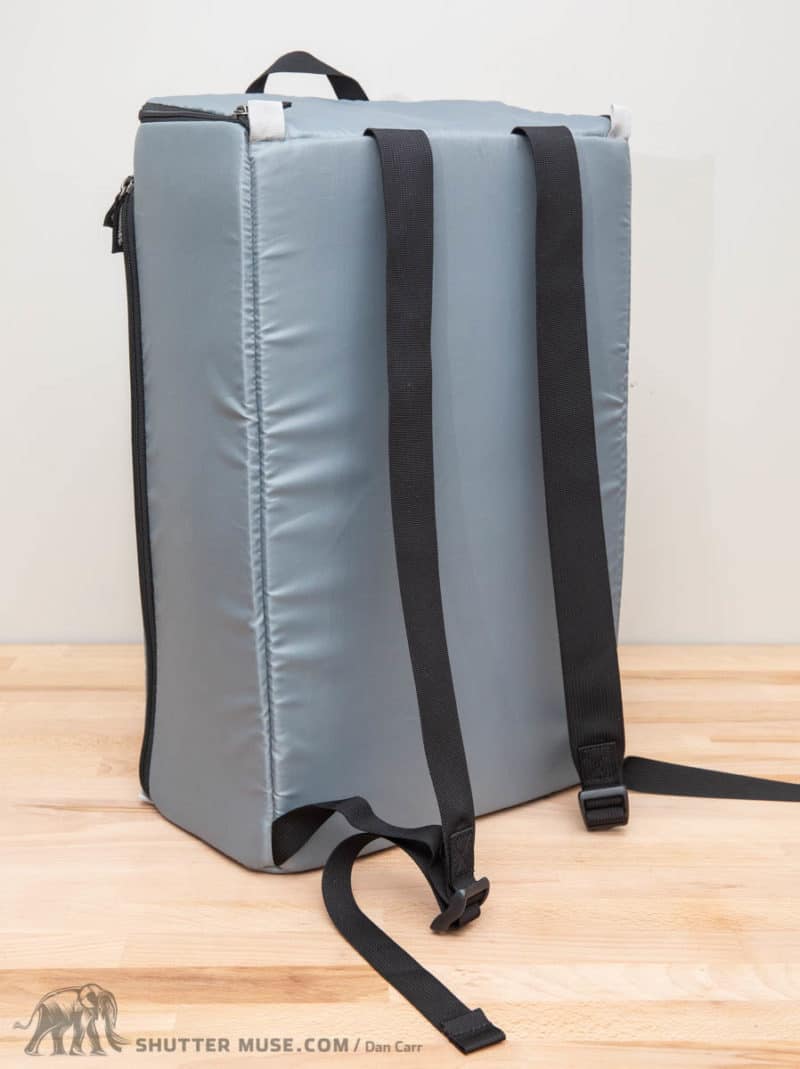
Yes, the removable camera block has a set of ultralight backpack straps on it to help you when you hear the dreaded words “excuse me, I’m afraid that bag is too big, you’ll have to gate check it”.
If you do run into serious problems getting the pack onto a plane as carry-on, now you have a backup plan which will at least get all of the most important pieces safely onboard with you. How clever is that?!
In the time spent testing my prototypes I probably flew 20+ times with the pack as carry-on, and only had a problem once because the airline weighed it and of course it was well beyond weight limits. The trick to keeping these kind of gate agent encounters to a minimum is to keep the pack looking as small, and simple as possible. The one time I didn’t do this was the one time they weighed the bag!
There are several little tricks this bag has to get it into what I call “travel mode” that looks so much simpler and smaller. Firstly the large padded waist belt is totally removable. Take is right off and stuff it into your checked luggage. It makes a huge difference to the bag’s profile at a quick glance.

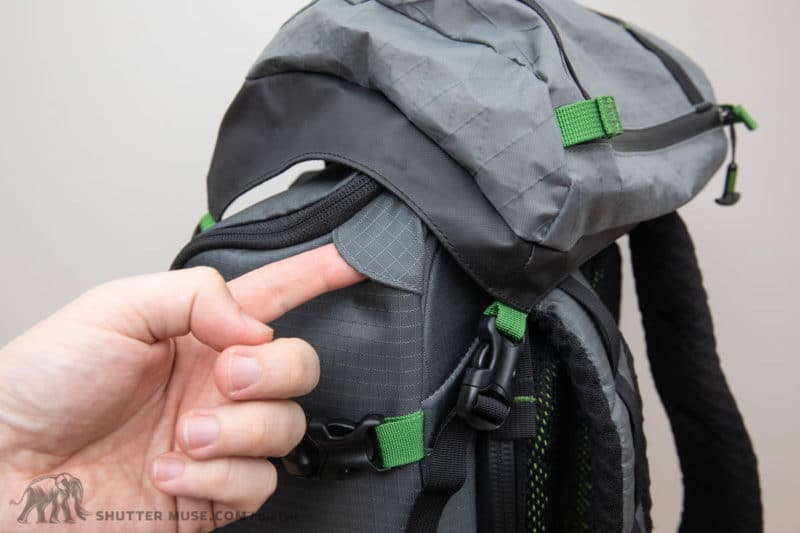
Secondly you’ll want to remove the top pocket of the bag as well, and throw that in the checked bag with the waist belt. Thirdly, take all the straps from the front of the bag and tuck them into the small holes that are provided on the front of the bag. Fourthly, take the side compression straps and give them a good yank to tighten them right up. Now finally, take the lower clips that are normally used for securing the top pocket, and clip them into the top buckle the tripod straps on either side of the bag. This works to compress the front pocket of the bag.
Voila! The bag has been transformed from a huge technical mountain-conquering hiking pack to a relatively svelte looking travel pack. With these changes made, I doubt you’ll have much trouble and the bag in this mode will meet nearly all international and domestic carry-on limits.
There are a few airlines that have slightly shorter length restrictions on your carry-on items. If you get asked to put the pack into the size testing cage for one of these airlines, you might need to pull out aluminum frame of the pack which can be done from the inside top of the pack by lifting up the flap. When you do this, you can shorten the height of the bag by about 2 inches and then it’ll fit into these stricter regulations. The frame can be easily put into the bag’s front pocket at that point.
And of course, if all else fails then you have the emergency backpack straps on the internal camera block. I don’t think there has ever been a camera pack that has been so well thought through for travel.
Blending Into the Wild
During the bag’s development we had several discussions about the predominant colour and the highlight colour of the bag, and how this could potentially have an effect for its users.
The main problem is that bright flashes of colour and competing panel contrasts can be a good thing for people traveling in the mountains, when you might want to be seen from a distance. But for those wanting to blend into their surroundings while waiting for wildlife, it might cause a problem.
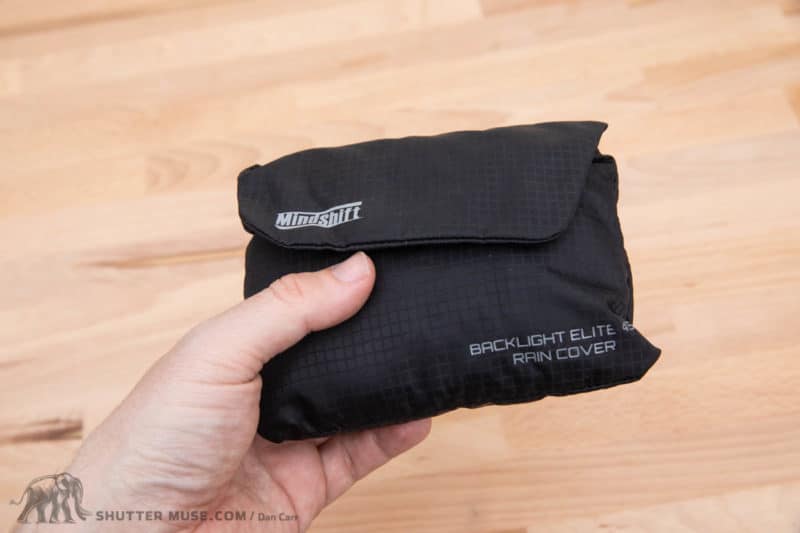


The solution that I proposed was to deviate from the traditional black rain covers that Think Tank and MindShift have always provided, and create one in a more natural colour that can basically be used to cover the bag and hide it when you want to be stealthy. The designers analyzed various camouflage patterns and chose a shade of brown that we thought would be the most universally natural and useful for this purpose.
It’s a simple thing, but it shows the amount of thought that went into making this pack as good as it can be for every kind of outdoor adventure you might find yourself in. With the back panel opening design of the bag, even when the rain cover is applied you can still unzip the main section and access your camera gear.
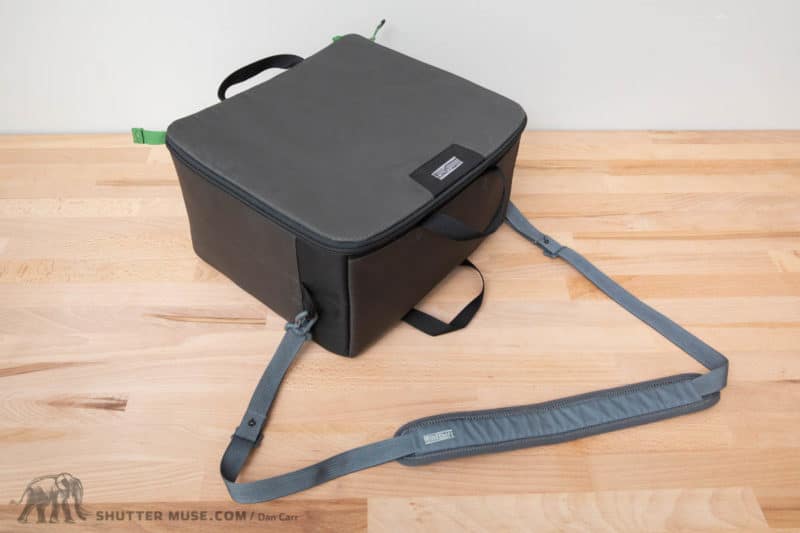
BackLight Elite Accessory: Stash Master 13L
UPDATE: Think Tank has improved and expanded their lineup of Stash Master Photo Cubes. Now, five different sizes will fit in the Elite 45L backpack. All the details are in my review of the Stash Master lineup.
Making the main camera insert for the BackLight Elite removable was always an important feature for the “emergency gate check mode”, and also so that the pack could be easily used for a variety of other uses. After all, if you spend a lot of money on a comfortable backpack, it’s nice to be able to use it for other things when you aren’t carrying all your camera gear.
When I learned that this would be a feature (it’s not a feature on the smaller BackLight packs) I started pushing hard for them to create an optional smaller camera insert for the pack that could be used when you don’t want to fill the entire bag with camera gear. After a few iterations to the design and size of this smaller insert, the Stash Master 13L was born.

The Stash Master is sized for a pro zoom trifecta so it’ll fit a pro-sized body with a 70-200 attached, as well as a couple of larger zooms like a 16-35 and a 24-70. If you have an extender and maybe a small prime you’ll be able to squeeze those in there as well with a few accessories.
With the Stash Master in the BackLight Elite you’ll find that it consumes about half of the available volume in that main part of the pack. There’s plenty of room left for other outdoor gear such a climbing equipment with a helmet, backcountry ski touring gear or even overnight camping gear if you have a nice ultralight setup.
For the general camping setup that was tested I was able to get my stove, Thermarest NeoAir mattress, food and down sleeping bag into the main section above the Stash Master. I added some extra clothing into the front part of the pack, and then used the straps on either side of the pack to secure a 2-person MSR Hubba Hubba tent. Poles on one side, tent on the other. For an overnighter to get you into the right place for a sunrise shoot, this was a more than capable setup and you still have a ton of extra room in the top pocket for things like a hat, gloves and head lamp. On one night whilst filming for a ski resort, I even used the bag to camp out on top of a mountain in the winter and ski down the next day. An overnighter which required quite a lot more clothing and ski gear.


During the last couple of years testing these new products for MindShift, I also put the Stash Master prototypes to good use while I was travelling via air. Although I always put the large camera insert into the backpack as my carry-on item, I packed the Stash Master into my travel duffle to protect any other camera gear that I wasn’t taking onto the plane.
Cameras and lenses obviously come on the plane in the pack, but in an effort to shed weight and at least try and get my pack down to regulation weight, I put things like chargers, filters and tripod heads into my duffle. The Stash Master serves as a perfect way to organize and protect that stuff in my duffle, and then I always have it with me at my destination if I want to swap it into the pack to carry a smaller camera load. I can even throw a shoulder strap onto it if I just want a simple shoulder bag.
So, should you get the Stash Master with your Elite pack? Pricing for the Stash Master 13L is a more-than-reasonable $59 which is considerably cheaper than the equivalent, well-known camera blocks offered by F-Stop. Features and build quality are absolutely equivalent between the two, so to me that makes the Stash Master a good deal, and a valuable accessory.
While you could always take the time to use the spare dividers to re-configure the large camera insert to just use a portion of its volume for camera storage, who really wants to do that all the time? If you’re like me, you spend the first few weeks with a new bag tweaking the internal layout to find the best setup, and then you want to leave it exactly like that for the rest of its life.
Alternative MindShift Backpack Options
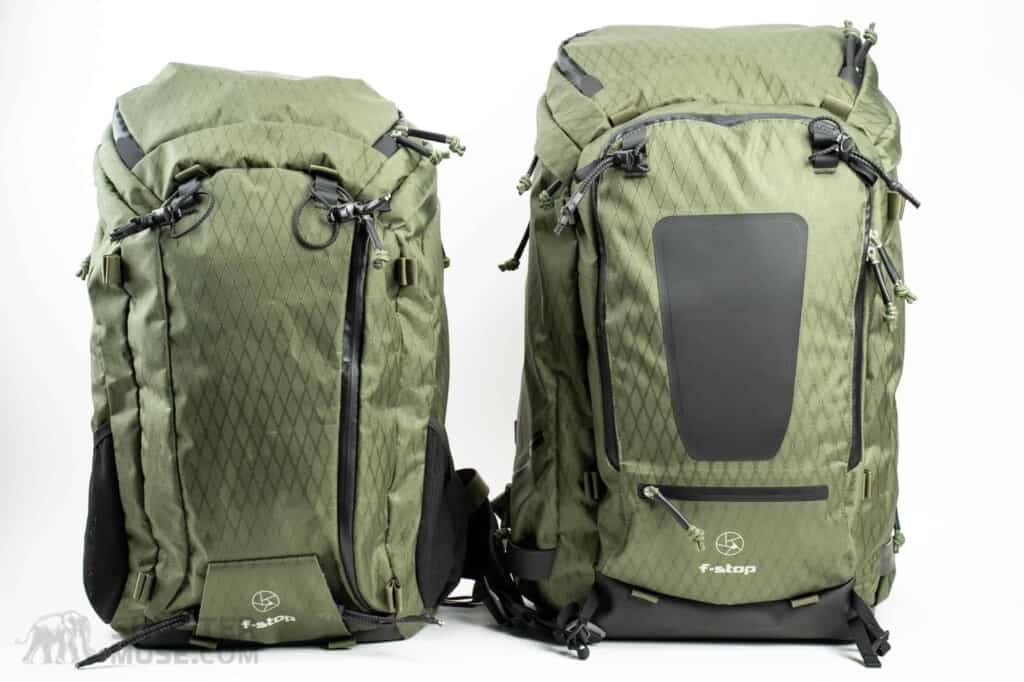
BackLight 36L Vs. BackLight Elite 45L
The BackLight 36L is an obvious candidate for an alternative to the Elite 45L so it’s worth discussing the differences and underlining the things that make the Elite a full $110 more expensive than the 36L.
Obviously the Elite had 9 extra litres of storage capacity and this is added in four main areas:
- Elite camera section is deeper. More suitable for pro bodies.
- Elite front pocket slightly taller. Doesn’t make a lot of functional difference, though. Simply a function of the overall taller pack size.
- Elite includes removable top pocket. Very useful and quickly accessible storage area.
- Elite has space at the top of the pack above the camera section.
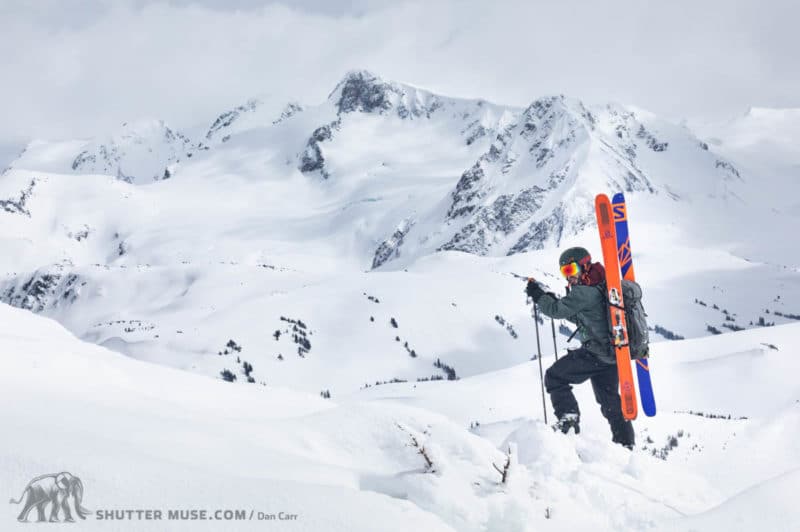
It’s not just the capacity of the bag that’s different, though. For one, the Elite uses much more expensive and durable materials in its construction, such as the waterproof TPU base and the ultralight rip-stop sailcloth. Then you also have an even higher level of carrying comfort on the elite with the harness and back panel that I have already discussed in detail. If you’re looking to go backcountry skiing or snowboarding, the Elite has suitable straps to carry your gear, which the 36L does not.

The bag sizes don’t answer the question on their own. Even if you think that your gear could fit in the BackLight 36L, the BackLight Elite 45L might still be a better choice for you if you plan on carrying a heavy load over huge distances, or plan on regularly tackling wet/snowy and rugged terrain.
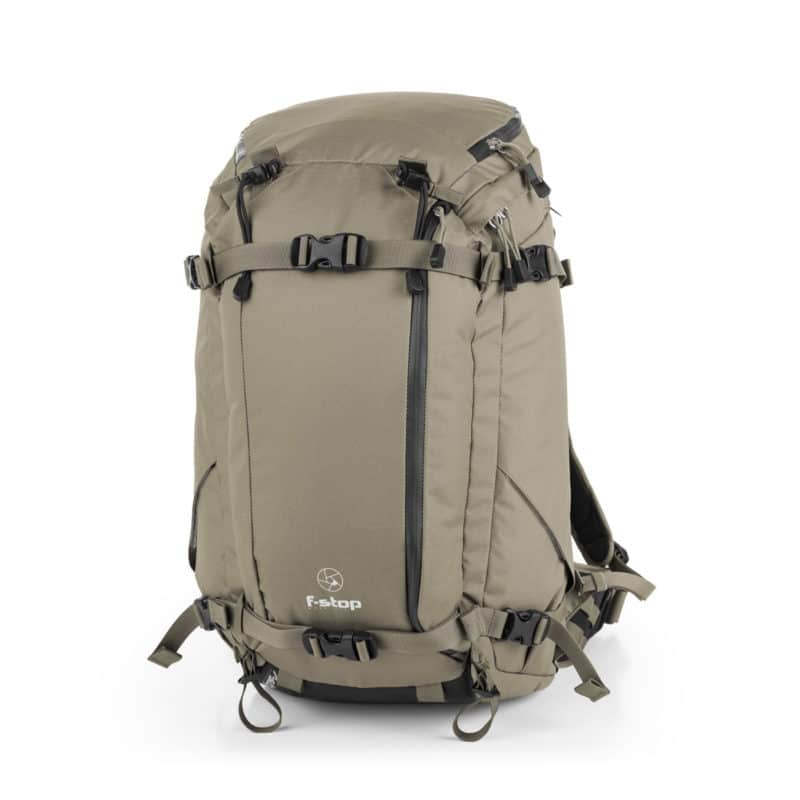
FirstLight 40L
If you’re browsing the MindShift website looking for a high capacity backpack then the FirstLight 40L might also catch your attention. This series of packs opens from the front, whereas the BackLight opens from the back.
I’ve had a FirstLight 40L in my closet since they were first launched, and after that many years I can say it serves a different purpose to the BackLight packs. While there are many benefits to a back panel opening pack like the Elite, you do end up with a smaller opening due to the limitations of zipper placement amongst the padding and pack frame construction. There’s just a lot more going on back there.
With a front opening pack like the FirstLight, you can really maximize the width of the opening. On top of that, the FirstLight packs prioritize space for camera gear over space for non-photographic items, so there is much more space for cameras and lenses.
While the FirstLight 40L is technically smaller than the Elite 45L, you can get a lot more camera gear in the huge main compartment of the FirstLight pack. In fact, you can actually get two super telephoto lenses side-by-side if you needed to.
The FirsLight 40L is much cheaper at $330, and it’ll hold much more camera gear than the Elite, but at the expense of overall pack durability, and carrying comfort. I still use mine when I have to carry my large underwater camera housing because it really swallows up big items like that, but unsurprisingly the Elite is overall a much more capable pack. Albeit with a price tag to reflect that.
Alternative Brand Options
If you’re considering this backpack then its very likely you have considered some of these other options:
F-Stop
Credit where credit is due, F-Stop packs have brought a huge amount to this particular market segment over the years, and they used to be my go-to packs for adventure photography work. They even seem to be getting themselves back on track a little after the shipping timeline issues that plagued them for some time.
In the F-Stop lineup, the bags that would be most comparable to the Backlight Elite are the Ajna (40L) and the Tilopa (50L). When you factor in the cost of the internal camera block that is a separate purchase with F-Stop products, the Tilopa works out to be a bit more expensive than the BackLight Elite, and the Ajna works out to be a bit cheaper.

As with the comparison to the Lowepro Whistler packs though, the F-Stop bags simply aren’t as comfortable as the Backlight Elite 45L. I know I’m repeating myself a little here, but moulded EVA back panels simply can’t compete with the proper back panel, harness and lumbar design of the Backlight Elite. It’s the only photography backpack out there that I have used which truly has comfort that is comparable to a high-end hiking pack. It makes a big difference to a long day in the field with a heavy pack.
Aside from the comfort aspect, the removable top pocket on the Elite is another differentiating feature from the F-Stop packs. This pocket gives you an easy way to secure ropes and additional gear or clothing to the top of the pack, as well as giving you a nice removable grab bag that can be turned into a belt pack.
Lowepro Whistler
The Whistler backpack was launched by Lowepro a few years ago and it caught me a little by surprise when it did. In terms of styling, it was quite a departure from previous Lowepro bags and it was made from extremely durable materials. I reviewed the bag in great detail and used it for a long time.

The Lowepro Whistler packs are aimed at exactly the same market as the Backlight Elite 45L. They are designed for adventurers, wildlife photographers and landscape photographers who want the ultimate in rugged protection for their gear. Whilst I found the Whistler pack to be more comfortable than the equivalently sized F-Stop packs, it still uses that same style of simple back panel that basically every other bag in this segment has ever used. In terms of comfort, it can’t keep pace with the Backlight Elite 45L and its huge lumbar support, thickly padded shoulder straps and ridged foam channels.

Like the F-Stop bags, the Whistler pack also lacks the removable top pocket of the Elite, and it also lacks the water resistant zippers. From a versatility point of view, it doesn’t have a removable camera insert which is a fairly significant feature in all the other bags of a similar type.
Shimoda
I know a little less about the Shimoda Explore 40 pack because I haven’t yet had a chance to test one. That said, there’s a few things that jumped out at me from the specifications. Firstly, the largest camera insert for the Explore 40 isn’t nearly as large as the camera insert in the BackLight Elite. For those that want to carry huge super telephoto lenses for wildlife photography it would immediately discount that possibility with this bag. Even though they make a larger Explore 60 backpack, there isn’t a larger camera insert so you still wouldn’t be able to carry a 500mm/600mm/200-400mm size of lens.
Similar to the F-Stop and Lowepro bags, the Shimoda bags also stick with the standard basic moulded back panel design.
Pricing for the Explore 40 with the large camera insert (the closest comparable option) is a little cheaper than the BackLight Elite, but there looks to be quite a lot less camera storage available in this overall smaller bag. If you step up to the Explore 60 and add more camera inserts the price quickly becomes a lot more expensive than the Elite.
Simply put…
The Backlight Elite was designed to be the ultimate camera pack in the adventure and outdoor photography market and I’m confident in saying that it more than stacks up against the other key players in this sector. Unless you are particularly drawn to the aesthetic of either the other bags, your money is better spent on the BackLight Elite where you’ll get a more comfortable carry, as well as a list of features that the others can’t quite match.
Pros & Cons
Pros
- Incredibly comfortable when carrying heavy loads
- Thoughtful features for air travel
- Stash Master accessory expands usefulness
- Durable and highly water resistant
- Lots of space available for non-photographic gear (including laptop)
- Lots of external carry options for tripods, snowboards, hiking poles etc.
- Rain cover included as standard (and colored to use as camouflage in the wild)
- Removable top pocket turns into a useful waist pack
Cons
- Large pack size makes it less suitable for smaller people
- No adjustable torso size
- High price is inline with competitors, but still a lot for a camera bag
Conclusion
If you’ve read the review in its entirety then I’m sure you already know my conclusions about this bag, so this is for the people who skipped straight to the end.
Not only is this the most comfortable camera backpack I’ve ever used, but it’s finally a bag that I can recommend to those people that say to me, “I just use a good hiking backpack and squeeze my gear into that because it’s more comfortable than a camera bag”.
Knowing how much effort went into the development of this pack I’m not surprised how well it turned out. It gives you the comfort, technicality and durability of a high-end hiking backpack, but with the protection and organization that’s required for all types of outdoor photography. On top of that you’ve got a clever set of features that make it easier for airline travel, and the option to add the 13L Stash Master accessory if you want to adjust the size of your camera load. It’s a winner on every level.
Where to Buy
US Customers spending over $50 in Think Tank Photo’s online store can get a free gift at checkout after following one of the links to the store from this review–like this one. If you have any issues, please follow the instructions on this page.
As always, using our links for your purchases is appreciated. Of course, US readers should shop directly with Think Tank to take advantage of the gift you get when spending over $50. Canadian readers should shop with B&H Photo as they offer free shipping and the option to pre-pay the tax and duties. This results in a better final price than buying from Think Tank distributors in Canada.
- Think Tank MindShift BackLight Elite 45L – Think Tank (US only) / B&H Photo / Amazon / Adorama / WEX (UK)
- Think Tank BackLight Long Lens – Think Tank (US only) / B&H Photo / Adorama / WEX (UK)
- Think Tank BackLight Sprint – Think Tank (US only) / B&H Photo / Amazon / WEX (UK)
- Think Tank BackLight 18 – Think Tank (US only) / B&H Photo / Amazon / Adorama / WEX (UK)
- Think Tank BackLight 26 – Think Tank (US only) / B&H Photo / Amazon / Adorama / WEX (UK)
- Think Tank BackLight 36 – Think Tank (US only) / B&H Photo / Amazon / Adorama / WEX (UK)


2 years!!!
I knew I could count on you for a review. I quite welcome the direction of this bag to be more in line with the removable cubes like f-stop and Shimoda. Do you have a video review coming?
I have the Rotation360Pro and Backlight26L. It would be helpful for a side-by-side image with those. The bag looks quite tall but sits quite low.
The top door of this cube looks greatly improved (has a velcro divider?) over the cube for the Rotation360pro. Those dividers are frustratingly limited. Could two of the small cubes fit in the Elite? Could the small cube bit in the rotation?
In terms of comfort, I want you to try a Shimoda. The largest insert does appear to similar. 15.7″ ?
Does the Aquatech housing really fit well into the FirstLight 40L?
Yep! Two years of development.
Video coming soon, yes.
No, you can’t fit two small cubes in the Elite at the same time.
Large Shimoda cube is about 3 inches shorter than the MindShift insert, that makes the difference between being able to use a 500mm and a 600mm or not.
Yes my whole Aquatech kit fits into the FL 40 with a flat port and a dome port and zoom gears etc.
I think the small cube could fit in the Rotation, but I no longer have the R180 or the BL26 so I can’t shoot the photo you need. I simply don’t have space to keep every single backpack 🙁 The Elite feels similar in size to the R180 but the useable volume is far easier to pack.
Thanks! I’d be interested in seeing a photo of that 40L Aquatech setup.
Ok I’ll try and remember that next time I use it. The gear isn’t stored in that bag right now. BTW, I asked MindShift designer and you can’t fit the Stash Master into the R180 Pro unfortunately.
the Aquatech housing and dome could likely fit in the top of this bag with the Stash Master?
It would be tight but I think it would work id you detached the dome. And here I’m referring to the PD-85 dome that I have. Their new dome that came out last month is bigger and I do not think that would fit.
How much bag weight when take top lid and waist strap off? I really like my Backlight 36L. Only one drawback is it dont have aluminum frame. If 45L model have same camera capacity and weight similar i might buy one.
I think it would be 3.9lbs which is the lower weight limit quoted in the specifications.
This pack is nearly exactly what I have wanted in a camera bag. I have only two concerns compared to a good hiking pack: I suspect it is a little too short to properly use the load lifters, and I wish it had an adjustable torso size (which would come at the expense of the large back panel opening).
I have a bad back and I am struggling to find something that fits properly, allows easy access to my gear, and has space for survival gear.
I was about to get a Gregory Targhee 45 (the medium size is perfect for me; I’ve never found a better fit anywhere) and add an insert and water bottle holders to the sides. But the Elite made me pause.
Do you know the ideal torso size to fit this pack?
How much weight have your carried and for how long? Did your back or shoulders ever hurt?
I’d like to find an Elite locally and try the fit.
For the ideal torso size you’d have to shoot an email to MindShift. They even have an online chat thing from their website.
Indeed, adjustable torso size would come at the expense of the back panel opening mechanism. The FirstLight series DOES have adjustable torso size because it is a front opening pack.
I have carried up to about 55lbs in it on my camp trips with ski gear. Of course there will always be some discomfort after hours with that kind of weight, but the key is that it’s more of a general discomfort in the body and not pinpointed to specific spots in my experience.
Dan,
Great review! Can you let us know how big are you (height/weight0 to get an idea on around what size person this bag would work for?
I’m using two Moose Peterson bags for my hiking trips where I am carrying two bodies with lenses and multiple lenses (pick the size depending on how much gear) and the Lowepro Pro Tactic 350 when I am only carrying one body with multiple lenses around town.
I love the Moose Peterson bags, because it easy access (and superate access for gear). However, I would like a bag with batter lumber support and shoulder straps and can carry more room for non-photography gear.
Lastly, is the bag deep enough for a pro/gripped body with an L-Plate?
I’m 5’8″ and 180lbs. I would say that it would comfortably fit someone who is a little shorter than me, and up to a heigh over 6ft. But the thing to remember as well is that torso height isn’t necessarily related to human height, so even a human height doesn’t tell the full story. Perhaps the MindShift customer service crew can give a little more direction on this for you. If you have used the MP packs with no height issue then I don’t anticipate a real problem though.
Yes the MP packs are really travel focussed and far from ideal when it comes to hiking long distances. You would see a night and day difference if you used a BackLight Elite.
Yes, it’s deep enough for that. I have been using a gripped body in it for years.
I’ve tried the backpack on, and it’s way to short for me (6’3”), I’d guess it really depends on how long your back is.
The non-adjustable torso length is a dealbreaker for many people as it’s almost impossible to adjust the back to sit correctly.
But just as well is it a deal breaker when backs can’t open to the back – I have the Firstlight, and yes it’s a great backpack, but it’s annoying that it have to lie on the back … in the mud 🙁
Hi Dan, was there ever some discussion on having accessory rails on both sides of the waist belt instead of having an integrated pouch on side? I’d love the extra flexibility of being able to use the ThinkTank belt accessories on both sides of the waist belt rather than the less flexible built in pocket. This would make the removable waist belt even more versatile, having your camera with a lens in a holster one one side and then a filter pouch / lens changer on the other side. That would also be a useful set up when carrying the bag too and want quick access to the camera.
That wasn’t a discussion, no. Having some sort of pocket on the waist belt is important, and you have to remember that the majority of the people buying the bag probably don’t have Think Tank pouches. It was important for the bag to be fully function “as is”, and not make people feel like they had to buy more stuff to make it useable. What they did do, was make the pocket on the waist belt fairly large in comparison to many other similar pockets on other packs. Whilst I take your point, and see it would be cool if you already own those pouches, this also means people can buy the bag like this and use the belt in a better way without having to carry additional pouches at all. If you want to have a setup like you describe, I honestly think you’d just be better carrying the Think Tank pouches on a Think Tank Skin Belt inside the pack. Then you can just whip the whole setup out with it already set up. The Skin belt is lightweight, so it wouldn’t add much weight compared to just bringing a couple of pouches.
How much bag weight when take top lid and waist strap off? I really like my Backlight 36L. Only one drawback is it dont have aluminum frame. If 45L model have same camera capacity and weight similar i might buy one.
I think they would be fairly similar in weight. The Elite, although a bit bigger, uses lighter materials in some areas. Certainly with the top lid and waist belt removed they should be very similar. The top lid doesn’t weigh much, but the belt is very chunky and would give some weight savings. The frame itself is aluminum so it doesn’t weigh very much at all.
Thank you very much for your reply.
You’re welcome
Hi Dan,
I have a question regarding using a Peak Design Clip on the shoulder straps. I am used to carrying my camera that way and would love to be able to do it on this if I get it. I already have the longer screws for a thicker straps but if the strap is too wide like the Shimoda one it wouldn’t fit.
Thanks for the review.
Hey that’s a good question, I should add something about this in the review. Yes, you can use a Capture Clip. You will need the longer screws, but yes it does work. You are slightly limited as to where you can put it, because the strap width varies. If you look at the photos of the harness you will see that on the wearer’s left side there is the word MindShift stitched onto the strap. Just below that is where you can fit the Capture Clip V3 (not sure about older versions). Once you get to the stitched name on the strap, the strap is too wide. I think on some other bags I have had it higher up, so it’s perhaps not ideal, but it works ok.
Hi Dan,
I am still waiting for a company to understand how high end backpacks actually transfer load. That is, torso length cannot be too long or too short to achieve that perfect height of the straps so that the weight is actually carried on the hip belt. For all the talk and focus on the suspension system for this pack, I am really surprised that there is no torso length adjustment system (movable attachment points of the shoulder straps) and also the bag comes in only one size. Which means this pack should be great as long as you have exactly the intended torso length. Many backpacking companies measure this as the distance between the iliac crest (top of the hip bones) to the C7 vertebrae. It would be nice if they published what torso length this bag is made for.
“no torso length adjustment system” As I understand it, it simply would not be possible to do this efficiently and still make it a back panel opening pack. That is the exact reason why they also have the FirstLight series of packs that is front opening, and does have adjustable torso length. Sure, you can keep stacking hardware on the back of a bag but then it gets too thick to pass carry-on regulations and fit super telephoto lens hoods. For a bag that is designed for that market, that is’t a viable solution.
As for multiple sizes of this pack… I think this is just an economies of scale issue. The fact is that the high-end photo pack market is considerably smaller than the high-end hiking pack market. I’m sure they could make different sizes, but the individual cost of the bags would likely increase quite dramatically, to the point where people wouldn’t buy them as they aren’t competitive in the market segment. I think you should try the bag before passing judgement, but otherwise you should check out the FirstLight packs. They are pretty much the only photo packs on the market that DO have adjustable torso length.
Three questions, Dan… What makes the weight vary between the listed weight of 3.9 – 7.0 lbs? Also, do you find the insert dividers velcro better than the usual crappy ones that don’t hold well after a few adjustments of different setups? And finally, at 5’8″ do you think I’d be too short for a good solid fit?
Thanks a lot for this review!!!
The 7lb weight would be the bag with all the accessories. The 3.9 would be removing everything that is optional: top lid, waist belt, internal camera unit.
The velcro dividers are great. You can reposition them for a lifetime and you’ll have no trouble.
I’m 5’8″ myself, you’ll be just fine!
Thanks very much, Dan!
Very welcome, Scott.
Hi Dan,
I have been hiking in Asia recently with an old camera backpack without a built in frame, and I struggle to carry much weight in the pack. My wife who is avid hiker, uses a backpack with built in frame and says that a frame is important to help with keeping the weight on the hips.
Hence, I am in the market for a new camera backpack such as the one that you reviewed.
I came across another make on my internet search and those the backpacks made by atlas packs.com I was wondering if you have tried them or can comment what they make.
Hi Lenny. I have never heard of Atlas Packs so I can’t comment I’m afraid. I guess they must be a small, or perhaps brand new company if I haven’t heard of them. With MindShift, which is owned by Think Tank Photo (and run out of the same office by the same people) you are getting 15+ years of experience and a brand that is well known for treating their customers extremely well.
Hi Dan,
Considering the length and completeness of that review, I’d say you’re pretty much impressed with the bag.
Having followed you for quite a number of years (lurker is such an awkward title, I like… hmm… ok, lurker), I know when you really are impressed with something, so, it’s time to look for one of these here in Victoria (we finally have a Henry’s).
Been looking for a good backpack for years, and from your description, I might have finally found one.
Thanks for the review ?
Awesome! Glad to hear it. I’m not certain if Henry’s carries them. Even if they do plan to at some point, they won’t have stock now. B&H will ship it to you for free, and I suspect that the price would end up working out to be about the same. Call Henry’s and ask them, maybe get a price if you can, and then check the CAD equivalent on B&H. I’m obviously in Canada as well and for the most part I still get things from B&H even with the poor current exchange rate. Thanks for lurking! :p
We all fear having to place gear under the plane if it does not fit in the overhead. In your suggested travel mode, did you try placing the bag under the seat? Also can the straps be “tied, hidden” in a manner to help them from not getting hooked on items either in the overhead or under the seat? What length is the bag in the travel mode, ie without the top pocket. Thanks.
In travel mode the bag is too tall to fit under a seat. But that is the beauty of the removable insert with the straps on it. You can, in a few seconds, pull the insert out and then put the insert under the seat without a problem. You can then hand the “shell” of the bag to the cabin crew who can either gate check it, or better still, ask them to slip it into one of their crew lockers. If you ask nicely, and already solve most of the issue by putting the insert under the seat, I don’t think you’d have an issue.
No, the straps can’t really be tied of hidden. If you place the bag staps-down in the overhead, though, there won’t be anything for them to get hooked onto and it’ll slide right in. The tapered top of the bag conforms perfectly to the slightly tapered depth of an overhead bin do you can fit it into the bin by sliding the top of the bag in first. This makes sure you are using up very little room in the overhead. No need to take up extra space by putting it horizontally across half of the overhead.
I don’t believe the bag height changes in travel mode because the top pocket doesn’t really add any bag height when empty. The bag height is defined by the aluminum frame (which can be removed if you are in dire need to do so).
Hi Dan
Great review of the new Mindshift backlight elite 45L. Could you share with me your height, so I can gauge if it will be to big for me as I am only 5′ 10″ (1.77m).
After watching your review of the canon 400mm F4 DO mk2 I purchased one, great lens apart from the long min focus.
thanks
Craig
I’m only 5’8″ so you’ll be good for sizing! Glad you got the 400mm DO, as you can see, it fits so perfectly in this pack!
I would like to see pictures with either a 600mm or 200/180-400 in the bag.
Thanks
I wish I had those lying around but I just sold my Canon 200-400. If I ever have one of them nearby again, I’ll add some shots but I doubt it will happen in the very short term. The 200-400 easily fits in the bag on its own, and just about fits in with a body attached.
Dan, once more a great review. Thanks. Your reviews never failed me. In fact I would instantly buy the Backlight Elite 45L, if I did not already invest considerable money into the PeakDesign Travel Pack 45 plus a ton of accessories last year. The decision was by the way inspired by your review. I am very happy with the PD Travel Pack, but whilst it is really dedicated to (air) travel, the Elite just seems to add even more versatility. Well, the better is the foe of the good, isn‘t it? Keep it up, Dan, your reviews are always a joy to read. It does make me scratch my head, when I read some of the comments and then see you patiently answer the same question 5 times, although the answer has already been provided at the beginning of the review. Cheers, Urs
Thanks for the kind comments Urs! I’m glad to see you’re enjoying the Travel Pack. That’s also a great bag 🙂
Your reviews are always thorough and informative but this one takes it to the next level, especially given your history with the bag during its development. I have been struggling with bag issues, such as (1) finding a bag that can carry a fair amount of equipment (soon the Fuji GFX 100 and several lenses plus filters and tripod) along with overnight camping gear, and (2) how to carry a tripod, camera gear, and water on a sport bike (motorcycle) on one- to two-day trips (taking beauty shots of the bike on location for a company). I have the Rotation 180 with the optional insert. It has the volume for scenario (2) above but I find the rotating belt pack is not so convenient for this purpose and that it probably uses space less efficiently than a front or back loading pack. I was looking at high volume photo packs (like the Lowepro Pro Trekker 650) or mixed packs like the larger F-Stop models, but I think the Elite 45L actually hits the mark. In addition to the much better back panel and belt system, the interior design looks way more efficient (less wasted space) than the F-Stop ICU setup. I also have other Think Tank Photo bags and I trust their inner pocket design much more (in terms of protecting camera gear from items in the liner pockets). Pardon the long comment, but I’m very thankful to have found this review (along with Mindshift’s video).
Thanks for the kind words, Ben! Sounds like this would be a great bag for your needs.
P.S.: I meant to say I trust the TTP and MindShift Interior design more than the F-Stop versions, based on issues various reviewers have posted regarding cosmetic damage to camera gear in F-Stop bags (presumably avoidable by not overusing the liner pockets and/or by closing the secondary ICU lid as well as the back panel).
Thank you for a very thorough review of what looks like a fantastic camera backpack. I have a few questions:
– The size of the camera insert seems to be right for the Lowepro HighLine roller. Do you know if it fits? I know… ThinkTank makes rollers too, but they are heavy and expensive and offer a protection that I don’t really need for endless airport walks.
– How flat can I make the Backlight 45L when the insert has been taken out?
– Is 59.7 cm the absolute minimum length even with the insert taken out?
It would have been great if they could make a smaller Stash Master too, so that two units could fit in the bag. Then I could have one for basic camera gear and one for drone, gimbal and other gear that I sometimes leave at the overnight location.
All the best,
Jorgen
Thanks Thor.
– I don’t know if it fits in the Highline roller. I suspect it might not work in the corners because the highline has rounded corners. I don’t have that roller anymore so I can’t test it.
-About 3.5-4 inches
-No, as mentioned in the article, if you remove the frame from the bag you can make it shorter. At that point it’s entirely flexible you could even roll it up to some extent.
Thanks very much for this most detailed review. It is most informative and testifies to going far beyond qualifying for a real field test!
I’m also one of those travelling photographers who’s tried too many backpacks – trying to meet the dual set of challenges for hiking with weather-proofing and then airline cabin “infiltration”. My solutions have all been partial so far to get a 400 f2.8E Nikkor plus 2-3 cameras plus other optics (1) safely onboard, and (2) into a decent hiking pack with similar storage capacity ie 45 litres – so in a bag that classifies in the “top end f Stop b’pack arena”
Besides packing a fair pile of camera gear, the Vanguard Alta Sky 53 lacks any extra storage space for essentials / accessories. By various means I’ve been managing to get 2 b’packs on board nearly all recent flights in central Africa, but it’s alwaays a stressful exercise. With the Vanguard, the 2nd has been a Mindshift B’Light 26L, which packs in vital accessories + spill over of lenses. My other key tactic is wearing a Photographer’s waistcoat with N+ pockets types copious. The UK made Country Innovation Raptor can pack away a medium zoom and a dslr ++++ 🙂
Apart from a couple of irksome shortfalls, the new PeakDesign Travel Pack 45 is a big help (albeit it is still backed up by venerable waistcoat in airports). Together with both I can get all my gear aboard regional flights. The irksome shortfalls are (1) No Top Access; (2) the largest camera cubes and all the cubes stand too shallow; these need to be deeper (at least to fold out to 20cm, better 25cm if needed to expand into the 29cm of the expanded PD pack (2) the straps & hip belt are designed for urbanites; they conform more to some hipster ideal…too little support with heavier loads. I carried the PD pack with a 20kg load on and off tubes etc pounding pavements all day long in UK soon after it arrived. This proved this design flaw beyond doubt; so I will not bother trying it on hikes. Vanguard Sky 53 is far better, and I hope the Elite 45 will do very well on this score (I’m 5’8”, 158 lb).
So I’m pleased to see the new MS Elite ticks nearly all boxes. 2 Mega Ticks are scored on the synthesis of BOTH rear AND Top access. So you can access gear “Out – Into” the bag standing up, or swung around on the hipbelt etc. Leaving out either (worse both!) these 2 features in a b’pack is a showstopper for real photography. (Not only outdoor, how do you reach into a bag standing at your feet in a café, vehicle or street etc?) So Vanguard score high here with Alta Sky models but fail badly on too many other criteria… Moose P packs also fail to give Top Access, as do too many other models! Thus by excluding Top access, the PD designers dropped the ball, even though it was requested in feedpack forums etc. I still bought this PD setup on kickstarter last year, so it’s a money loss to try sell onwards; instead I’m working on modifying the camera cubes to make these deeper. Although it fails for real photography, at least for the interim I plan to use the PD b’pack for plane trips only, until something better comes along … but in any case all the PD packing cubes can be used in most other packs etc, notably the Elite
So…. what the diversity of photography backpacks reveal beyond doubt is most of the designers still flounder in getting out a pack that meets the key criteria for the outdoor genres. So it’s (1) Modularity to meet unanticipated applications [hipbelt, and carry ons etc]; (2) Maximum-Optimal Space [optimizing the usage of Depth is still a common challenge, sadly. All bag designers flounder badly on this Depth issue, or don’t appreciate the concept and so have yet to act on it!!! ] ; (3) Accessories Storage with modicum of safety; (4) Weatherproofing [underscore this feature]; (5) Speed-Access [also out of the mud etc]. So Top-Access and Rear-Access are absolutely Crucial; (6) Clandestine colours and cover; The lessons are clear that F-Stop hit home runs on a lot of these some years back. Now we see Mindshift getting very close to the synthesis of these key features.
I see this new Backlight becoming my (almost) ideal hiking solution. Thus, Fly to destination using PD pack on plane(s) then repack camera gear etc into the Elite 45 that’s arrived compressed in the plane’s hold (or carrying hold gear). But as summarized above, there’s still a shortfall in design that afflicts almost all backpacks made to date. The Mindshift company should consider fixing this in a future revamp… See below.
Thanks for your detailed reply and the design requests. I will pass them on to the MindShift team 🙂
On thing I do want to note is about the bag depth. “Please give us more Depth to pack camera gear” This is all to do with those pesky airline bag sizes. To remain within carry-on size, you can either have more camera gear depth and no fancy foam back panel, or you can have the dimensions that are used in this bag. Compression straps are all well and good, but if you fill the available volume with camera gear, you can’t compress cameras and lenses with them anyway. The halfway house is the FirstLight series. The 30 and 40 have greater internal depth, at the expense of a small amount of the back panel padding.
Thanks for feedback. Yes, pesky airline policing does influence actions and packing and thus bag designs! Nevertheless, the expansion-option (using side zips) is one feature PD have done right in their new backpack. If the size restrictions on a particular flight/airline are austere, then one has to pack accordingly ie into the bag in its “compressed” mode (+ other tactics).
But with a typical outdoor FX camera system, a depth of 25cm is really useful to optimize its packing. Most of the medium zooms (80-400; 70-300; 70-200 etc) stand at ~20-23cm tall including protecting caps. Thus packing 2 bodies with 4-5 lenses in a deeper 45 litre space frees up finite space. This will be invaluable for outdoor trips etc. The supertelephotos will always be the real space guzzlers of course.
Design Request A: – Please give us more Depth to pack camera gear. Getting it deeper to 25cm will be a big +ve – even better as close as feasible to a 30cm depth will be a mega boon to pack cameras and shorter lenses standing vertically. This helps access and saves space. Extra depth also allows stacking 2 standard size primes (or short zooms) on top of each other protected by padding in between. The folding “oregami” style PD padded inserts used in PeakDesign’s Slings and new Travel Pack 45. What if the airline though police say it’s too deep for boarding into cabin? Then add compression zips along the long sides of the pack that squeeze entire pack tighter (as in PD’s Travel Pack).
~
Design Request B: – Similarly for removable Camera Compartments, make these with Fold-Up/Pull-Up sides so they can stand operational at a depth of least 25cm. But the bag needs to be able to accommodate such a storage unit, obviously (Loop back to Basic Request A).
~
Design Request C: – The other Design Criteria for Outdoor packs follows on from the above. It is somewhat more niche need for big telephoto Rigs. This is put out a Backpack long enough to store a DLSR+Telephoto rig assembled with hood (and also plus a Teleconverter when needed). So basically the bag needs to add the means to expand in the “neck”. Straightforward addition of extra material, with clipping straps (perhaps), are what’s missing currently. Plus add adequate protective padding in the floor; then it will stand close to 70cm high carried in the field / hide / vehicle. The Thinktank Glass Limo is too stunted. It fails this test very badly, as do all the other options I tested. All stand too short. Only the Lowpro Lenstrekker gets anywhere close to meeting this market need. But mine still needed a thinner closed-cell foam base plate to fit the Nikon D850+TC2+400 f2.8E Nikkor with extended hood! The latter rig stands at 625mm high: add 30+mm for a 600 f4E or 60mm for a 800 f5.6E. This may seem a tall order but it’s entirely feasible to put out. (In fact, once the Elite 45 is in my paws, I plan to investigate modifying its neck accordingly.) As many of us outdoor need to carry the telephoto rig protected but assembled – to deploy swiftly on suddenly reaching a shooting location. There is the market. It will sell.
Great review as always, thanks. I wonder how the BackLight 45 Elite compares with Alotech‘s ELEV 5800, which is in the middle of a kick starter campaign at the moment. What do you think, Dan? I guess your main concern will be that it is not front loadable. But other than that it appears to come with some pretty cool features and the kick starter price seems to be a bargain.
I have probably mixed up front with back loadable, I am afraid. This is probably due to my aviation background where position indications are always made in relation to flight direction. Henne, the panel facing ones back would therefore be the forward panel in relation to walking direction.
Great review!
I am in a hunt for a backpack with a good lumbar support. Came accros with your review from the Elite 45 and the rotational Pro, I am in doubt between them. I really like the idea of “quick deployment” from the rotational pro, however I am concerned with the air travel restrictions that i may found, as I am contantly flying international. Other point that made me in doubt is that the rotational doesnt have the laptop compartment.
My actual gear consist of a canon 70d, a 13_55 III, 24-70 II, 70-200 Ii (al of them f2.8), flash unit, extender, two gopros, a mavic pro, laptop15″, tablet, medium tripod… that is what a bring most of the time, plus 2 changes of cloth, passport etc.
That been said, how do you compare the support/confort between the two? What about the “urban usability”?
Last, would a 15″ laptop fit in the rotational pro, when using the top camera insert?
Thanks
15″laptop won’t fit in the R180. I would say that comfort is very similar between the two bags, but the Elite 45 is much more useable. The rotation is good as long as you really want to use the rotation feature. If you only use it 10% of the time, or only need to, then it becomes a bit of a hassle and overall looks and feels bulkier than the Elite for air travel. I think you will have less gate hassle with the Elite.
Dan, a great review. I a looking for a backpack and have narrowed down to 3 – Tilopa, Shimoda and Mindshift Backlight Elite 45. My only concern is whether my gear will fit. Having contacted suppliers they are helpful ‘buy and return if gear doesn’t fit’ I thought maybe a quick yes or no from you would be possible?
I need to transport EOS 7DmkII, eOS 5DmkIV EF 500mm f4 II, EF 100-400mm mkII, EF 28-70mm f2.8 a couple of extenders and charger etc. tripod, moped and 13″ MacBook Pro
Any comments would be appeciated.
Many thanks
Alan
Moped?? monopod!! sorry!
I took the plunge and have ordered the bag. I think I may need to use the top compartment for the 100-400mm but the bag looks very good quality! I will update when it arrives!
Excellent! Yes please come back and let me know what you think 🙂
Haha. No problem. Sorry I took so long to reply to your previous comment, I have been on vacation for the last ten days.
I think you might be right in that you will end up putting the 100-400 in the top section of the bag. I’ve actually done the same thing myself when the bag is really packed full. However, it’s a great spot for it and it fits perfectly up there. I usually put mine in a LensCoat TravelCoat just to give it a little extra protection up there.
Bag arrived today. It is obviously a quality product. Very robust and clearly up to tougher conditions than its owner!! All my gear fitted – the 100-400 is in a lens coat above the ICU. I have the 5DmkIV connected to the 24-70mm. Time will tell if that is the best solution as I usually use the 7DmkII on the 500mm and the 5D on the 24-70 and 100-400. Do you have any comments on the lens connected to camera or not? I haven’t tried my peak design capture on the strap yet but I suspect it may not fit. I will try it tomorrow. Have you tried the capture on the strap?
Capture does fit on the strap but you need the extra long screws. They give these to you when you buy Capture, but it’s easy to loose them. If you have lost them, contact them and I’m sure they would send you some more. It’s a tight fit but I have done it at some point.
No comment on camera connected or not, since I have never tried an identical kit to your one in the bag.
Already owning the Backlight 26L, I purchased the 45L last year prior to a Greenland trip and have been using it since. It’s good. It is still not as comfortable as my Rotation180 Pro 8L but the rotation bag has its own challenges. I’m using the top pocket less and less so it would have been nice if there was a place to hide the straps.
Thanks for the great review and details. Narrowed down to this or Shimoda action X (leaning towards the Mindshift)
Can you give some further details on the frame. What is its size when taken out and does it collapse down?
Also are the external dimensions of the camera cube what is listed or is this the internal dimensions?
Many thanks
Hey Tim, for dimensional questions you are best to talk to the Think Tank customer service folks as I don’t have this bag with me at the moment. Regarding the frame, no it does not collapse but it’s very thin so it’s easy to store in a duffle bag if you needed to do that.
Dan, thank you for this extensive review! The Elite is a very interesting backpack, unfortunately really hard to find in stores (at least here in Germany) to touch and examine it “in reality” before spending the (even higher) Euro-based price. I’ll probably have to place a trial-and-error online order…
A while back I bought a Lowepro Whistler 450, mainly based on your back-then review, and I was/am happy with it in certain aspects as it is a great fit for my wildlife gear around a Nikon D500 with Sigma 150-600 Sport. Except for the probably most important aspects, weight and wearing comfort! Lowepro made some great design choices, including materials, colors, interior arrangement, flexibility, etc. But both the shoulder straps as well as the waist belt are utterly bad: At least for my body (6″1, long torso) as I can never really find longterm-comfortable strap settings and the waist belt never properly distributes the weight to my hips. The shoulder strap padding is barely existent which, probably contrary to your “cold” use cases with additional clothes-padding, turned out disappointingly bad in hot-humid climate situations where you only wear a thin layer like a hiking shirt (for me: 3 week trips to Costa Rica and Uganda, with regular hiking day trips and heavy camera gear). The shoulder straps are super stiff and I noticed some wrinkling of the body-facing layer because of excess material as they did not compensate for the natural bending around the shoulders. And of course the high tare weight of the Whistler does not improve the whole situation. 😉
Anyway, this is in no way a critique on your Whistler-review, I am just looking for a better alternative–which the Elite seems to be! Could you maybe comment on the “jungle climate suitability” of the Elite?
Thanks and regards
Hey Toby,
I’m happy to comment on hot climate usage, or try to, once I understand a bit more about which things are important to you in those climates? Is it simply the padding, for comfort, since you are just wearing a t-shirt? Or are you also concerned about things such as air flow?
Hi Dan,
I would be less concerned of airflow as I’d probably sweat anyway in hot climate sooner or later. 😉 From my experience (which is far from extensive), only mesh back systems like Deuter Aircomfort can really provide airflow but of course this is incompatible with a rear-opening camera backpack (which is desirable because of theft protection and “throwing in the mud” capability).
Maybe you could simply share your thoughts if you think the Elite’s padding is also comfortable with hiking shirt or t-shirt as only torso layer. And what is the minimum length of the waist belt (i.e. waist circumference)? When wearing no fleece layer or jacket, this is in fact an issue for me with the Whistler because I cannot fasten/tighten it enough to take the weight off my shoulders and onto my hips.
Thanks for your time!
It’s more comfortable than the Whistler. It has padding that is much thicker. I certainly hiked in a t-shirt with the bag and didn’t have any issues with it.
As for the minimum belt circumference, I’m honestly not sure about this. I don’t have one of the bags here with me at the moment, so you would have to ask the people at Mindshift. They are very helpful and I’m sure they can help.
My 0.02c – I have carried the Elite 45L with full Nikon load, close to 20kg. 2 cameras, 400 f2.8E, plus other lenses, and accessories. Although not as comfortable as top end hiking packs, I cannot complain. By comparison a fStop Sukha is better with similar load, but bear in mind the Sukha is in a different league, being a 70 l hiking pack.
This is wearing a standard cotton drill shirt on hot days with max temp into the mid 30 C’s. Max in Zambia and SW Cape being about 40 C. One sweats regardless of load, and the MS Elite has the middle gap in the padding. This helps with heat load
Thanks for chiming in with your experiences F
Dan,
As usual, your review is the most detailed than anything I’ve ever seen, and THANK YOU! I find myself coming to the same set of choices, Shimoda, F-Stop, Whistler, and Elite 45.
Capacity: I have the Backlight 26L, and I’ve realized it’s too small to carry two Sony bodies – one with 200-600mm while the other has 100-400mm GM attached. I also foresee bringing either Sony 400mm or 600mm GM in future.
a) Is the Elite large enough to carry one of these prime lenses attached, and the other one with 200-600mm attached?
b) It sounds like Elite 45L is smaller than Firstlight in terms of capacity. Is it as big or bigger than Backlight 36L?
a) No, Elite it’s not large enough to hold both of those kits with lenses attached. That’s a tall order, I think the only bag that would do this would be the Shimoda Action-X 70 with the XL camera insert. –>> https://shuttermuse.com/go/shimoda-action-x70/
And probably the Firstlight 40L. But the Firstlight lacks much space outside of the camera area so those two bags are very different.
Review of the Action-X 70 is coming soon…I have been testing it for a few months.
b) Elite 45L is much bigger than BackLight 36L. But camera capacity of Firtslight 40L is slightly larger.
Dan
One more question…
Fit/Comfort: I’m 5″9, and longer torso, and 150lb. To me, Backligt 26L has sufficient hip support but I wish it has more vertical height as it droops down when viewed from the side (like a turtle) unless you tighten the shoulder and sternum straps.
1) Does the inability to adjust like Firstlight or F-Stop, make it any less fitting or limiting? I know you’re about same build as I.
2) Does Elite 45L have better waist belt than Backlight 26L or 36L? When I see detachable belts, I usually think of thin, flimsy ones like those of Peak Design, instead of firm beefy ones like those of proper backpacks).
Thanks!
Btw, I love your idea to make it cabin compliant by removing waist belt and the top compartment.
Back length should be good for you on this one. I find it fits me very well. Back length is quite a lot longer than the BackLight 26L.
Thanks for this great review! I love hearing about the thought process behind things like the color of the rain cover. I’m buying this for sure!
Thanks, Erik!
I have done a quick search but found no one who had tried to cut off an inch or two from the aluminum frame insert. Any idea if this would seriously compromise the stability of the pack. Seems a dumb idea to make the pack larger than many airlines will allow in the cabin overhead.
I don’t think it would work. If you cut the bottom off, you wouldn’t be able to push it in further anyway, because of the crossbar on the top. If you cut the crossbar off at the top, yes, 100% it would have an adverse effect. I don’t recommend doing this. As I said, I have flown with it and had no issues, so it may never be an issue. But if you do have real concerns about it and want something that truly fits well within the carry-on limits, try the Shimoda Explore V2: https://shuttermuse.com/shimoda-designs-explore-backpack-review/
Hey Dan,
Great review. Thanks for publishing this.
Are you still using this bag in 2021, or is there anything better now?
|Is it truly waterproof, or do you need to use the camouflage cover with it? I’ve used F-Stop bags for years, but I’m fed up with rain covers and would prefer a bag that is just straight up waterproof.
Thanks, Dan
Very interesting article, as usual.
How do you hang the Mindshift filter hive on the waist belt? I have the Backlight 26l and the filter hive hangs on its waist belt. However, from the photos I can see in this review, the 45l Elite does not allow the filter hive to hang on its waist belt.
I’m very curious as I would like to switch from the 26l to the 45l Elite.
Kind regards,
Xavier