The Shimoda Explore v2 series is designed for adventurous travel and landscape photographers. In this review, I will walk you through all the features, and we will also take a look at how the Explore v2 series compares to the Action X v2 series so that you can make a well-informed purchasing decision.
Disclosure: Shimoda sent me these bags to review. No money changed hands, and they did not get to see the content before it was published. These are my honest views about the Explore v2 bags.
Shimoda Designs has offered Shutter Muse readers a 10% discount on anything purchased through their online stores. US, Canadian, UK, French, or German residents should use the discount code ShutterMuse10 after clicking here to access the store. Australian readers should use the same code on the local Shimoda distributor’s site, Maxxum, instead.
Table of Contents
Explore v1 vs. v2 – What Has Changed?
The original Explore backpack was Shimoda’s first product. It was designed as a do-it-all outdoor camera bag whose broad size range (30L, 40L, and 60L) would suit various photographic pursuits, from travel and landscape to action and adventure sports photographers.
With the Action X backpack’s later introduction, a bag targeting those action and adventure photographers more specifically, there was now some significant crossover between the Shimoda Explore and Action X lineups. For the Explore v2 series, a clear target from Shimoda was to clarify the line between these two Shimoda backpack products. The new Shimoda Explore v2 backpacks have been redesigned to accommodate the needs of travel and landscape photographers, with the introduction of features specific to the needs of those markets.
Explore v2 Improvements
- New travel-friendly sizes (25L, 30L, 35L)
- New Women’s version in two sizes (25L and 30L)
- Luggage handle pass-through
- Filter pocket
- Additional handles around the bag for repositioning on the ground
- Second front zippered pocket added
- 12 strap attachment points for accessory straps
- Stowable side pockets for tripod and water bottle
- Dual access internal document pocket
- Aired-out mesh harness
- Aired-out mesh back panel
- Lockable YKK zippers
- Hidden passport pocket
These individual features will all be detailed and discussed as we go through the review. What I can say right away, though, is that the new features are all welcome additions. There isn’t a single new feature that feels unnecessary or a step backwards from the original camera bag. This is good news. The Explore v2 isn’t just a new bag for the sake of having a new product launch. This is a well thought out update that has clearly taken user feedback and transferred it to an updated design.
Shimoda Designs Explore v2 Specifications
Dimensions and Weight
| Specification | Explore 25 v2 | Explore 30 v2 | Explore 35 v2 |
|---|---|---|---|
| Weight (shell) | 3.5lb / 1.57kg | 3.6lb / 1.65kg | 4.4lb / 2kg |
| Outside Dimensions (in): | 10.6W x 18.3H x 6.6D in. | 11.6W x 20.3H x 6.6D in. | 11.6W x 21.2H x 7.8D in. |
| Outside Dimensions (cm): | 27W x 46.5H x 17D cm | 29.5W x 51.5H x 17D cm | 29.5W x 54H x 20D cm |
| Inside Dimensions (in): | 10.2W x 17.9H x 6.2D in. | 11.2W x 19.8H x 6.2D in. | 11.2W x 20.8H x 7.4D in. |
| Inside Dimensions (cm): | 26W x 45.5H x 16D cm | 28.5W x 50.5H x 16D cm | 28.5W x 53H x 19D cm |
| Max Laptop Size | 14″ | 16″ | 16″ |
| Compatible Core Units | XS25 / S25 | XS25 / S25 / Medium Mirrorless / Large Mirrorless | XS25 / S25 / Medium Mirrorless / Large Mirrorless / Small DSLR / Medium DSLR / Large DSLR |
Explore v2 Sizing

The original Shimoda Designs Explore backpack series was available in three versions with different volumes: Explore 30, Explore 40, and Explore 60. Those bags were launched before the Action X v2 series came to market. Now that the Shimoda backpack lineup includes the Action X v2 in 25L, 30L, 40L, 50L, and 70L sizes, Shimoda Designs has decided to adjust the sizing of the Explore backpacks to re-position them. The Explore v2 backpacks are now available in three sizes: Explore 25, Explore 30, and Explore 35. A dedicated teal-colored women’s version of the Explore v2 is available in the Explore 25 and Explore 30 sizes.

Compared to most photo backpacks that cross my desk, I wouldn’t classify any of these bags as huge. There are plenty of outdoor photography backpacks out there in the 40-50L range, such as the MindShift Backlight Elite (45L), the F-Stop Ajna (37L), F-Stop Tilopa (50L), Lowepro Pro Trekker 550 (40L) and Think Tank FirstLight 46L+.
This smaller sizing isn’t a bad thing at all. What’s nice about the new Shimoda Explore v2 sizes is that very few genuinely top-end photo packs are available in these smaller sizes. With most camera bag manufacturers, when you step down to the smaller sizes, you are also stepping down to a lower product tier with a lower price point. The Gura Gear Kiboko backpacks in the 16L and 22L sizes jump out at me as exceptions to that rule, but in general, super high-quality smaller photo packs are harder to come by.
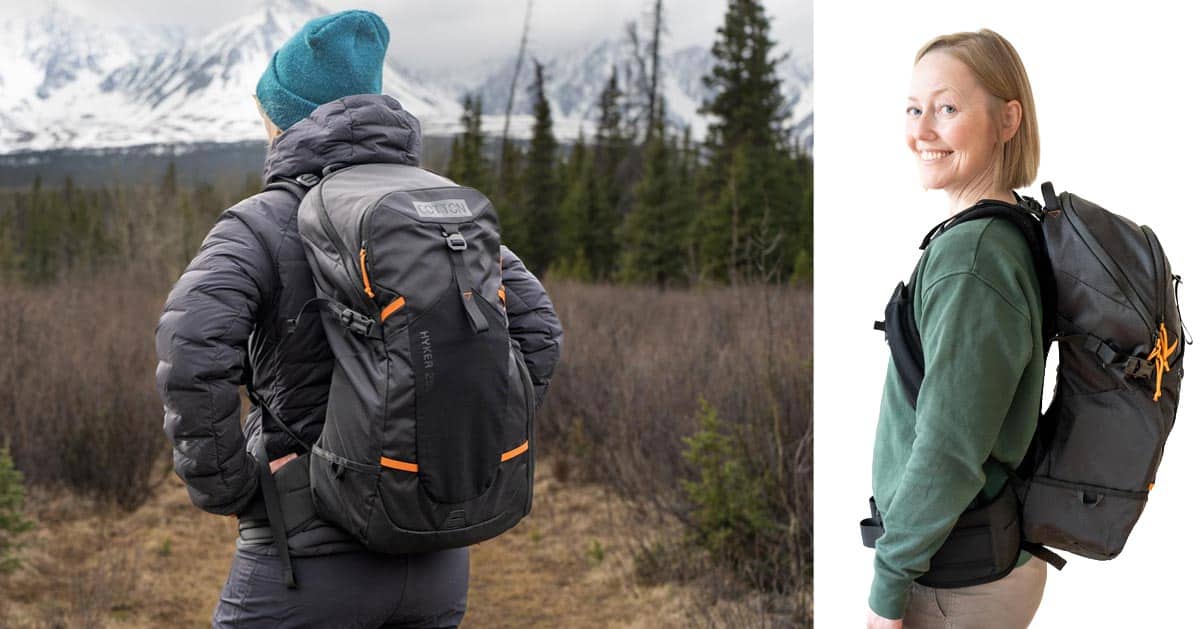
Explore v2 Women’s Series
Shimoda continues to lead the way in offering camera bags that fit a wider variety of body shapes and sizes. However, this isn’t limited to adjustable torso length and their size booster kit availability. As part of Shimoda’s Women’s Series, the Explore v2 is available in 25L and 30L, with specially designed shoulder straps, adjustable hip belt padding, and an exclusive Teal color. The women’s specific contoured shoulder straps use a twin sternum strap design to alleviate awkward pressure points around the chest.
The Women’s Explore v2 packs will please female photographers who often struggle to find correctly fitting packs for their smaller frames. I’m glad I can now recommend a smaller camera pack that doesn’t compromise build quality and features.
My partner Kait uses the other Shimoda Women’s Series bag, the Women’s Action X. It uses the same shoulder straps and hip belt as the Women’s Explore v2, so it feels the same to wear. Kait doesn’t usually pay much attention to the torrent of gear that arrives weekly at our house, but she was smitten by the Shimoda Women’s bag as soon as I showed it to her and explained the features. With a big smile, she said, “I LOVE this bag!!” I knew right then we would end up keeping that one for her.
It’s not just the only camera backpack she has ever owned that’s designed for a woman’s body; it’s the only backpack, period, that she had seen with these kinds of considerations. Out of over one hundred camera bags I’ve tested and reviewed, it’s the only one she has ever wanted to keep. That says a lot!
Airline Travel with Explore Backpacks
Shimoda’s Take on Explore Backpack Sizing
- Shimoda Explore 25 – Sized for Global Carry–On & will fit under an airplane seat
- Shimoda Explore 30 – Sized for EU Carry–On & fits under some airplane seats
- Shimoda Explore 35 – Sized for US Carry–On and Premium Seating options
I think Shimoda is playing it too safe with these carry-on definitions. Of course, you should always check allowable baggage dimensions with your airline carrier before embarking on a trip. Still, I have flown countless international trips with bags larger than any of these Explore backpacks. I’ve even flown with the Shimoda Action X 70 HD, a bag twice the size of any of the Explore v2 models.
The Explore 25 is a very small camera bag, so I don’t want people to come away from this review or any of their research into the Explore backpack series, thinking this would be the only one they could take on an international flight. That’s nowhere near the case. For example, I checked Air Canada’s current carry-on regulations for international flights: 21in X 9in X 15.5in. This means the largest Explore 35 backpack easily falls within the allowable dimensions for that international flight. In fact, the allowable “personal item” dimensions are 13in X 6in X 17in, which means you could nearly take the E25 as your second item on the plane! If you removed the shoulder straps and carried it by the side handle, I think that’s well within the realms of possibility.
So, please treat Shimoda’s air travel recommendations for the Explore series as one with a significant safety net. I would not say that any of the new Explore v2 backpacks are large bags, and I would not hesitate to take any of them on any airline. The clean, no-fuss external design of these bags also works in their favor and should help them fly under the radar when overweight.
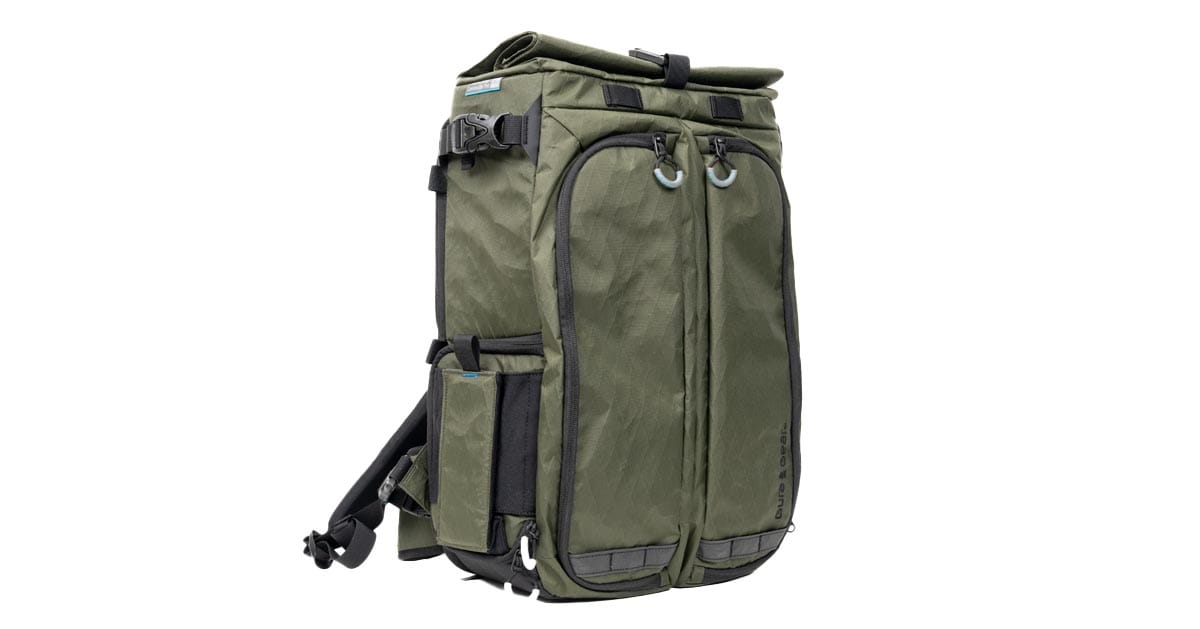
Shimoda Explore v2 Design and Features
Harness
The harness is made from an aerated mesh that is extremely comfortable. It is adjustable in all the right places and crucially features a torso length adjustment in three steps: S, M, L. Torso adjustment is becoming more common on high-end photo packs these days. Still, Shimoda Designs were definitely at the forefront of this concept went the original Explore packs were launched.
It’s worth noting that, at first glance, the torso adjustment feature might look like a construction weak point. Having the bag’s weight pass through those small bar tacks is not intuitive. However, I can confidently say that these stitching points are incredibly strong. The same design is used on my Action X50 backpack, and I have regularly loaded that bag with 60 lbs of gear and had no issues.
After putting some miles under my belt with the Shimoda Explore v2 packs, I’m confident these are the most comfortable outdoor camera bags I have ever used in this 25L-35L bracket. The severe contouring of the shoulder straps wraps around my torso in just the right way, and the top attachment point on the torso length adjust mechanism provides some lateral expansion that adds comfort to my very broad shoulders.
Aside from the general comfort of the harness on these, I’m also a big fan of the pockets’ additional functionality. Living as I do in bear country, where a grizzly can be just around the corner, bear spray is a constant companion. The right-hand expandable pocket on the harness is perfect for this! The left-hand pocket is a bit of a tight squeeze with a “Plus” iPhone, but it’s still doable if you don’t have it in a bulky case. Alternatively, this is a great place to keep your In-Reach or another personal location device.
Camera Access
Your camera gear can be accessed through a zippered back panel or a zippered side panel. I’m a big fan of back panel access. For any outdoor photography, this is preferable to a bag with front access as it keeps the back of the pack clean when you lay the bag down in the dirt and therefore does not transfer that dirt to you when you shoulder the pack.
I’m not a user of side access in camera bags. It generally requires you to organize your internal camera unit less than efficiently to ensure the camera can be retrieved through the side door. Of course, its use is also limited because you can usually only retrieve the camera with whatever lens is attached to it. If you have four lenses in your bag, there is a 1-in-4 chance you have the right one. If you don’t, you’ll need to drop the pack and open the back panel. Or worse, you get lazy and use the lens you have side access to, despite it not being quite the right one for the job.
I have experimented with it many times and always returned to simply opening the back panel. Your mileage may vary. I assume there must be many people who like this feature as it keeps showing up on backpacks that I’m reviewing. Probably the best-use scenario is that you are using the Shimoda Explore 25 with its small Core Unit and only carrying a camera with a single general-purpose lens such as a 24-70 or 24-105.
Front Pockets
For the Shimoda Explore v2, a new lower front pocket was added to the bags. The profile of the pocket is relatively flat and, for travel, would lend itself well to guides such as Lonely Planet books. If you are traveling somewhere where pickpockets are a concern, the contents of this pocket would be the most vulnerable as it has a single zipper and, therefore, can’t be locked.
I like the addition of this pocket. More organization is always welcome when travelling, as long as it doesn’t make the bag too complicated and fussy. This pocket has been thoughtfully added in such a way, and location, that it doesn’t alter the bulk or lines of the bag. If you don’t use the pocket, you’ll forget it’s even there.
Above this, a much larger front pocket is internally divided by a lightweight nylon panel. Useful if you need to separate damp clothing from other gear. At the top of this pocket are two more zippered window pockets for small items such as batteries, USB cables, tripod/camera tools, and lens cloths.
Top Section
The main top zipper provides access to a gear storage compartment above the Core Unit. The compartment is made from lightweight nylon, and the amount of storage space you have up here depends on the Core Unit size you have chosen for your camera gear. At full volume, this section is large enough to store several extra layers of clothing, gloves, food for a day, binoculars, and more. It’s a considerable space.
Inside this top section is two mesh zippered pockets for even more organization. One of these pockets is lightly padded and contains a quick-release key clip that can also be used to secure an SD card wallet. If you decide one day to use your bag for something completely different, you can remove this top section of the bag entirely, creating a regular backpack that uses the complete internal volume.
Another addition for the Explore v2 is a semi-hidden document pocket. This pocket is sewn into the rear of the top section. To access it, you either have to open a secondary zipper on top of the bag or get to it through the pack’s back panel. This pocket has zippers at the top and the bottom to suit both access methods. In my testing, I found this pocket a good place for items you do not regularly need. The contents are not as quick to get to as things stored in the other two mesh pockets, so it would be an excellent place to store travel documents that are only needed at the beginning or end of your trip.
Side Pockets
There are zippered openings on both sides of the bag. One of these gives you access to the camera compartment, and within that door flap, there is a secret padded pocket secured with hook-and-loop. If you like to use the side access for camera gear, you might want to slot the Core Unit side flap into this pocket so that it opens with the bag’s side flap. If, like me, you don’t use the side access for camera gear, this provides a conveniently hidden pocket where you can store cash and passports while traveling.
On the opposite side of the bag, a similar-looking zipper gives you access to a pair of smaller zippered filter pockets. You’re also seeing the rear of the pocket that stores the water bottle/tripod holder, and there is room in that pocket to hold additional smaller items if the ten other pockets aren’t already enough for you!
Water Carry
The bag’s front pocket has a connection for hanging a water bladder, and the hose can be routed through the pack to the shoulder strap. The internal elasticated divider in the front protects your gear should you suffer a total water bladder failure. Alternatively, you can use one of the two hidden side pockets to carry a 1L Nalgene bottle. If you don’t need a large volume of water, a third possibility is to use the expandable pocket on the harness to carry a small soft-sided bottle often used by adventure racers and long-distance runners.
Tripod Carry
You can use the accessory straps to attach a tripod to the front of the pack, but this impedes entry to the front pockets. A better solution is to use the hidden tripod/water bottle cups tucked away on the sides of the bag. Many photo packs have a side pocket for this purpose, but Shimoda’s packs are the only ones I know where you can completely tuck them away when not in use. This is a valuable feature for travel, as it gives the bag a nice clean line and makes it look much smaller.
Laptop Carry
All three sizes of the Explore backpacks feature a thickly padded laptop sleeve on the inside of the back panel. The Explore 25 can carry up to a 13″ laptop, while the Explore 30 and Explore 35 can carry up to a 16″ laptop. The laptop sleeve in this location protects it from theft and bumps. You can easily pull it upwards from the bag by partially unzipping the top part of the back panel when you have limited space, such as on an airplane.
Rain Cover
The Explore backpacks are made from highly weather-resistant material and feature YKK AquaGuard zippers. If you get caught in a brief shower, this isn’t going to present you with any problems. Eventually, some water would get into the bag, but it would take a big downpour and prolonged exposure. Shimoda Designs does offer a rain cover for the bags for a very reasonable $7.95.
Whether this is worth it to you likely depends on where you live or where you plan to shoot with the bag. On most days, unless rain was specifically forecast, I’d probably risk it and not take a cover to save some room and weight in the bag. If I were traveling to Asia during monsoon season, I’d take a rain cover. For less than $10, it’s worth having the cover in your gear closet. After all, these bags are designed for travel, so who knows where you will take them!
Shimoda Core Unit Choices
Compatible Core Units
- Explore 25 – XS25 / S25
- Explore 30 – XS25 / S25 / Medium Mirrorless / Large Mirrorless
- Explore 35 – XS25 / S25 / Medium Mirrorless / Large Mirrorless / Small DSLR / Medium DSLR / Large DSLR
Core Units are Shimoda’s version of camera inserts. Unlike most other camera inserts, these have an internal frame that gives them a lot of structure and allows the walls to be a lot thinner for more efficient use of the bag’s internal space. They are available in multiple sizes (S, M, L, XL, XXL) and three depths (DV, DSLR, and Mirrorless). The deepest Core Units, the DV lineup, will not fit in the Explore backpack, only the Action X70 HD, so we will skip over those and concentrate on the Mirrorless and DSLR Core Units in this review.
The naming of the depths is a little confusing. The Mirrorless Core Units are the shallowest, but they can perfectly fit a regular DSLR like a Canon 5D Mark IV or a Nikon D850 despite their name. You only need a DSLR Core Unit to use a camera with a battery grip, or a pro-sized body like a Nikon Z9 or Canon R3. The DV depth is designed for cine cameras and super-telephoto lenses. In summary:
- Mirrorless Core Units – For mirrorless cameras or DSLRs
- DSLR Core Units – For gripped mirrorless cameras, gripped DSLRs, or pro-sized DSLRs/Mirrorless (Canon R3, Nikon Z9 etc.)
- DV Core Units – Gripped cameras, cine cameras
Explore 25 Core Units
The Explore 25 is narrower than all the other bags in the series, and therefore has a dedicated line of Core Units that fit it and the Action X25. These are the XS Core Unit, S25 Core Unit, and L25 RST Core Unit. While all other sizes of Action X bags are available as “Shell Only” or “Kit” with a Core Unit, the X25 is only available as a kit with the S25 Mirrorless Core Unit.
The S25 has space for a camera with a mounted 24-70mm, an unmounted 70-200mm f/2.8, and one smaller prime or lightweight zoom. The XS25 is perfect for smaller Fujifilm or m4/3 kits, or a full-frame camera with a 24-70mm f/2.8 lens attached. The L25 RST was mainly designed for the Action X25 and allows easy access to a telephoto lens. It can technically fit in the Explore 25; however, top access is restricted, making this an unofficial pairing that I don’t really recommend.
Explore 30 Core Units
The Explore 30 backpack shares the same low profile as the Explore 25. This means that you can only use the Mirrorless Core Units in the bag. As well as the S25 mentioned above, you can also use the Medium Mirrorless and the Large Mirrorless Core Unit.
If you choose the Large Mirrorless Core Unit, it will use up most of the bag’s internal space. Choosing either the Small or Medium Mirrorless Core Unit will enable you to utilize the zippered organization pockets in the top half of the bag more effectively. The bag works better if you can squeeze your camera gear into the Small or Medium Unit. In other words, don’t buy an unnecessarily large Core Unit for the gear you plan to use. Run the smallest Unit you can for the best results.
The XL30 RST Core Unit also fits in the Explore 30; however, it was primarily designed for the Action X30’s roll-top opening. As a result, access to that core unit from the top is limited on the Explore 30. Since the whole point of the RST Core Units is to allow vertical extraction of a telephoto lens, which you cannot do when pairing it with the Explore 30, I don’t recommend this combination.
Explore 35 Core Units
For the Explore 35, you can use any Mirrorless Core Units or slightly deeper DSLR Core Units. If you shoot with a mirrorless camera without a battery grip and therefore don’t need the extra depth of the DSLR Core Units, you could use the slimmer Mirrorless Core Unit in this bag.
I find the Mirrorless Core Units useful when you have a lot of gear to store in the front pocket of your bag. That front pocket will expand into the main part of the bag and use up the extra space you have vacated by using the slimmer Core Unit. However, if you use a Mirrorless Core Unit in this bag and do not have a lot else in the bag, you will find the Core Unit has a lot of room to move around. You’ll also need to use the blue cover over the Core Unit to stop things from falling out as it moves around. This doesn’t happen if you use one of the DSLR Core Units that take up the full depth of the bag.
In my time testing the Explore 35, I found the real sweet spot to be the Medium DSLR Core Unit. This gave me a lot of room for camera gear, but also allowed the top half of the bag to be put to full use. When a large Core Unit (Mirrorless or DSLR) is used in the bag, it occupies the majority of the internal volume, making it difficult to utilize all the pockets in the top section of the bag effectively. I think the Explore 35 with the Medium DSLR Core Unit will be a top-selling combo for this camera bag.
You can also use the X20 RST Core Unit; however, for all the reasons I do not recommend it in the Explore 30, I also do not recommend it in the Explore 35. The RST models were designed to work with the Action X backpacks.
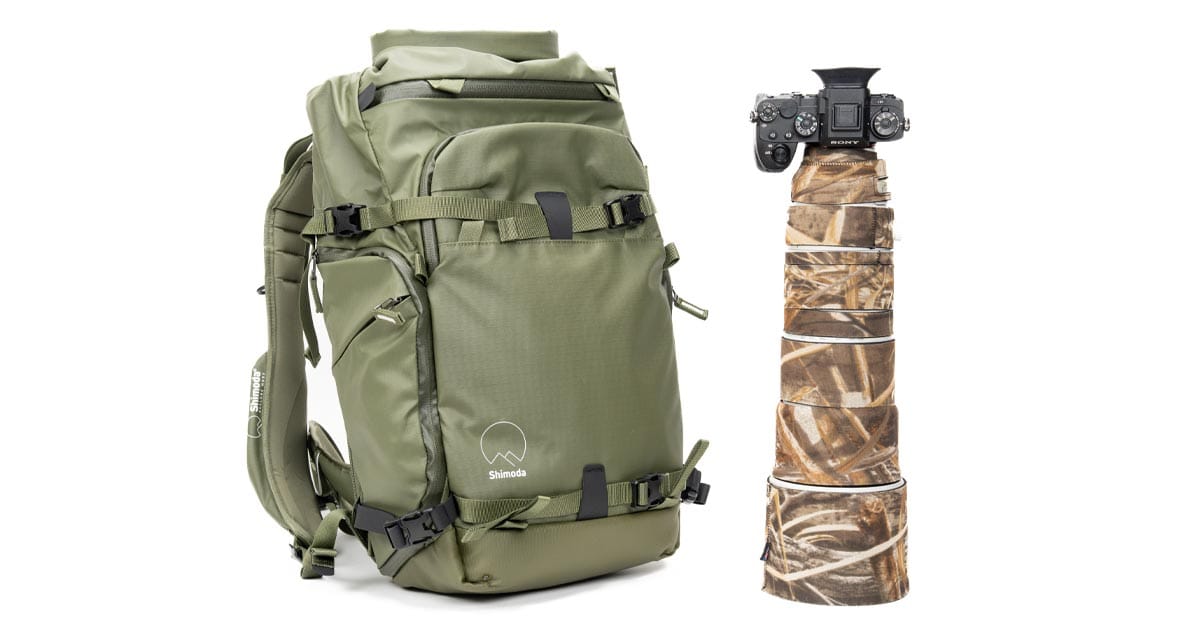
Sony 200-600mm, Canon 200-800mm, or Nikon 180-600mm – Which Core Unit?
People asked. I answered.
The Sony 200-600mm, Canon 200-800mm, or Nikon 180-600mm will fit in the Large Mirrorless or Large DSLR core unit. The video shows the slight differences.
Shimoda Explore Accessories
Shimoda has an excellent range of accessories for the Explore v2 backpack lineup. Here are some of my favorites.
Capture Strap
Shimoda’s Capture Straps replace the standard left-hand shoulder strap on the backpack, offering a better, lower, and more adjustable location for mounting camera clips from brands like Peak Design and Ulanzi, at the expense of the phone pocket featured as standard. These optional replacement straps are available in colors to match your backpack.
Shimoda HD Belt
The Shimoda HD Belt is an optional heavy-duty hip belt that provides increased comfort and stability with heavy loads. It also features two zippered pockets, suitable for quick-access items such as snacks, GPS devices, thin gloves, or a winter hat. This is the same belt that comes as standard on the X70 HD and is available in Black, Yellow, and Army Green.
Shimoda Booster Kit
The Shimoda Booster Kit allows you to fine-tune the fit of your Action X backpack by extending the straps in three key areas. It’s particularly handy for taller and broader photographers who need more room in the backpack’s harness.
Shimoda Top Loader
The Top Loader is Shimoda’s camera holster, available in three sizes. You can wear it on the backpack as a chest harness or attach it to the hip belt. Check out our review of the Shimoda Top Loader for more information.
Shimoda Soft Cores
The Soft Cores are great for organizing and protecting smaller accessories, vlogging kits, action cameras, or compact mirrorless systems. They are designed to fit into the roll-top section of the Action X backpacks. Check out the Shimoda Soft Core review for more details.
Shimoda Accessory Case
Shimoda’s Accessory Cases are ideal for organizing your chargers, cables, and audio equipment. Check out the Shimoda Accessory Case review for more details.
Core Unit Filter Pocket
The Core Unit Filter Pocket is an optional extra, perfectly designed to pair with Shimoda’s standard Core Units, and secures using hook-and-loop fasteners. The Filter Pocket holds up to four 100mm filters in a retractable case. If you’re a landscape photographer with a few NDs or polarizers, this case offers excellent protection and a clever design.
Shimoda Accessory Pouch
The Accessory Pouch organizes your batteries and other small items. An internal zippered pocket lets you sort dead batteries from fresh ones. Check out our review of the Shimoda Accessory Pouch for more information.
Shimoda Panel Wraps
The Panel Wraps are a great way to organize sets of accessories for you to grab depending on the shoot that day. They are available in three different sizes. Check out our review of the Shimoda Panel Wraps for more information.
Shimoda Explore v2 Vs. Urban Explore
Launched long after Explore’s introduction, the Shimoda Urban Explore is designed as a more straightforward, sleeker, more agile backpack for photography enthusiasts’ everyday carry in urban environments. To create the Urban Explore, Shimoda deleted some of the more technical features found on the Explore v2, but in doing so, hit a slightly lower price point. The Urban Explore is available in 20L, 25L, and 30L sizes. If you’ve been looking at this Explore v2 review and wishing for a slightly less technical camera pack, the Urban Explore might be for you. In my review of the Shimoda Urban Explore camera bag, I detail the critical differences between the Explore v2 and Urban Explore.
Shimoda Explore v2 vs. Action X v2

If you’re considering a Shimoda Explore v2 pack, there’s a good chance you’re also considering a Shimoda Action X v2 pack. The Action X v2 is available in 25L, 30L, 40L, 50L, and 70L capacities, so there is a considerable size crossover with the Explore v2 lineup’s 25L, 30L, and 35L sizes. Women’s versions of the Action X v2 are available in 25L, 30L, and 40L, compared to the Women’s Explore v2, which is available in 25L and 30L sizes.
On the face of it, these two bags are very similar. Both bags are ruggedly built, weather-resistant backpacks for outdoor and nature photography. They both feature the same comfortable harness system with torso length adjustment and the same back panel camera access for use with Shimoda’s range of Core Unit camera inserts. Dig a little deeper, though, and some differences stand out. If you’re on the fence, I recommend reading my Shimoda Action X v2 review or this detailed comparison between the Explore and Action X bags. A feature summary and comparison can also be found in the table below.
In the table, note some feature differences between the Explore v2 and the Women’s Explore v2, with a few of the Action X v2’s updates–such as a hidden AirTag pocket–finding their way onto the newer Women’s Explore v2. In a way, the Women’s Explore v2 is almost like a v2.5 for that reason.
| Feature | Explore v2 | Women’s Explore v2 | Action X v2 | Women’s Action X v2 | Action X70 HD |
|---|---|---|---|---|---|
| 2nd laptop sleeve in front pocket | No | Yes | Yes | Yes | No |
| Luggage handle pass-through | Yes | Yes | Yes | Yes | Yes |
| Adjustable length waist belt padding | No | Yes | Yes | Yes | Yes |
| Adjustable torso length | Yes | Yes | Yes | Yes | Yes |
| Base handle | Yes | Yes | Yes | Yes | Yes |
| Secondary zippered front pocket | Yes | Yes | No | No | No |
| Hidden passport pocket | Yes | Yes | No | No | No |
| Hidden AirTag Pocket | No | Yes | Yes | Yes | Yes |
| Rain cover pocket | No | Yes | Yes | Yes | Yes |
| Rain cover included with bag | Optional | Yes | Yes | Yes | Yes |
| Helmet Holder | No | No | Yes | Yes | Yes |
| Metal buckle hardware | No | No | No | No | Yes |
| HD Belt with pockets | Optional | Optional | Optional | Optional | Yes |
| Shovel handle/avalanche probe pocket | No | No | No | Yes | Yes |
| Ice axe loops | No | No | Yes | Yes | Yes |
| Hydration tube compatible | Yes | Yes | Yes | Yes | Yes |
| Removable tripod/water bottle pockets | No | Yes | Yes | Yes | Optional |
| Front straps across the bag | Optional | Optional | Yes | Yes | Yes |
| Side camera access | Yes | Yes | Yes | Yes | No |
| Top closure | Zip | Zip | Roll | Roll | Roll |
| Lockable zippers | Yes | Yes | No | No | No |
| Shoulder and hip padding | Air Mesh | Air Mesh | EVA Foam | Air Mesh | Air Mesh |
Conclusion
The Shimoda Explore v2 backpack is an excellent update to a great product. In the field, for bags in the 25L-35L range, these are the most comfortable photography backpacks I have ever tested. The heavily contoured and aerated shoulder straps provide all-day comfort, and the adjustable torso length and optional women’s shoulder straps ensure anyone can get a good fit with any bag in the Explore v2 range.
If you’re looking for a new camera bag for extensive travel and landscape photography, the Explore bags should be on your list. The only potential negative for some people is going to be the price. At $300 to $330 for the shell and an additional $60 to $80 for compatible Core Units, these bags are positioned at the top of the outdoor camera bag market. The superb build quality and a lengthy list of features do a great job of justifying the price, but I’m sure it’ll make a few people pause for thought. My 2 cents? You won’t be disappointed if you pull the trigger.
Where to Buy (+ Save 10%)
Shimoda Designs has offered Shutter Muse readers a 10% discount on anything purchased through their online stores. US, Canadian, UK, French, or German residents should use the discount code ShutterMuse10 after clicking here to access the store. Australian readers should use the same code on the local Shimoda distributor’s site, Maxxum, instead.
I recommend shopping directly with Shimoda, if you can, to take advantage of that 10% discount. However, using one of our other links is always appreciated if you can’t do that.
Note that because the Explore 25L bag is only compatible with the Small Mirrorless Core Unit, this bag is not available as “shell only,” only in a kit containing the Small Mirrorless Core Unit.
Explore V2 Shells and Kits
- Explore 25 v2 Kit – Shimoda / B&H / Amazon / Moment / Adorama
- Explore 30 v2 Shell – Shimoda / B&H / Amazon / Moment / Adorama
- Explore 30 v2 Kit – Shimoda / B&H / Amazon / Moment / Adorama
- Explore 35 v2 Shell – Shimoda / B&H / Amazon / Moment / Adorama
- Explore 35 v2 Kit – Shimoda / B&H / Amazon / Moment / Adorama
- Women’s Explore 25 v2 Kit – Shimoda / B&H / Amazon
- Women’s Explore 30 v2 Kit – Shimoda / B&H / Amazon
Shimoda Core Units
If you’re buying the “Shell Only” option of the pack, you’ll need to choose a Core Unit.
- XS25 Mirrorless Core Unit – Shimoda / B&H Photo
- S25 Mirrorless Core Unit – Shimoda / B&H Photo
- L25 RST Mirrorless Core Unit – Shimoda / B&H Photo
- Medium Mirrorless Core Unit – Shimoda / B&H Photo / Amazon / Adorama / WEX (UK)
- Large Mirrorless Core Unit – Shimoda / B&H Photo / Amazon / Adorama / WEX (UK)
- XL30 RST Mirrorless Core Unit – Shimoda / B&H Photo
- Small DSLR Core Unit – Shimoda / B&H Photo / Amazon / Adorama / WEX (UK)
- Medium DSLR Core Unit – Shimoda / B&H Photo / Amazon / Adorama / WEX (UK)
- Large DSLR Core Unit – Shimoda / B&H Photo / Amazon / Adorama / WEX (UK)
- XL40 RST DSLR Core Unit – Shimoda / B&H Photo
- XL50 RST DSLR Core Unit – Shimoda / B&H Photo
- Large DV Core Unit – Shimoda / B&H Photo / Amazon / Adorama / WEX (UK)
- XL DV Core Unit – Shimoda / B&H Photo / Amazon / Adorama / WEX (UK)
- XXL DV Core Unit – Shimoda / B&H Photo / Amazon / Adorama / WEX (UK)
Shimoda Pack Accessories
- Shimoda Core Units – Shimoda / B&H / Amazon / Adorama
- Shimoda Top Loader – Shimoda / B&H Photo / Amazon / Adorama
- Shimoda Accessory Straps – Shimoda / B&H Photo / Amazon
- Shimoda Accessory Pouch – Shimoda / B&H Photo / Amazon / Adorama
- Shimoda HD Hip Belt – Shimoda / B&H Photo / Amazon
- Shimoda Drop Pocket – Shimoda / B&H Photo / Amazon
- Shimoda Booster Kit – Shimoda / B&H Photo / Amazon
- Shimoda Women’s Shoulder Straps – Shimoda / B&H Photo / Amazon / Adorama
- Small Soft Core Unit – Shimoda / B&H Photo
- Medium Soft Core Unit – Shimoda / B&H Photo
- Large Soft Core Unit – Shimoda / B&H Photo
- Drone Mini Core Unit – Shimoda / B&H Photo
- Drone Pro Core Unit – Shimoda / B&H Photo


Dan,
Just curious how comfortable you found the shoulder straps and waist belt to be over longer hikes and how well they support the weight in the pack. I’ve used f-stop bags in the past that I honestly felt were pretty uncomfortable hiking longer distances. That led me to modify a traditional hiking back pack (a Gregory Baltoro 65L pack) which has a great harness system but is a bit bigger than I need.
Thanks, Josh K.
I found them to be very comfortable, as long as you don’t fill the bag with bricks. They also make an optional “plus” shoulder strap that is double thickness, although a bit less breathable as it is made in the style of the Action X packs.
Explore packs are a step up from the F-Stop bags in terms of comfort. But I will say that it’s very hard for a back panel entry camera bag to be absolutely 100% as comfortable as a dedicated hiking bag because it’s very hard to have things like large lumber support or mesh suspension like an Osprey pack.
As I said in the review, for camera bags in the 25-35L volume range, these are the most comfortable I have used.
If you step up to a larger size, the Action X bags with the Plus strap are great, and then I’d also throw the MindShift Elite 45 and Rotation 50 into the mix for comfort. They have some great materials in the straps of those two bags.
For smaller bags, though, these Explore bags are top-notch. That is, as far as my body shape is concerned. I guess all discussions of this type should include the caveat that everyone is different. That said, the adjustable torso length on these bags goes a long way to levelling that out and making comfort more of a universal thing.
Every review always claims Shimoda is the most comfortable. Does your BackLight Elite 45L compare well to the Shimoda straps? Will the Explore find a home in your personal needs?
Thanks Dan. How do you feel the bag compares to the Fernweh in terms of comfort and function?
I would have to say the Explore series is more comfortable than the Fernweh. It also offers far more internal organization, better camera inserts (the all-black WANDRD ones are annoyingly hard to find gear in). The Fernweh is much larger, though, at 50L.
Hi Dan,
I’m looking for a backpack that gives good comfort (cycling and walking!), and quick access. I’ve gone over your review of the v2 MindShift Rotation backpacks and they’re high on my list to try but hard to get — now I see your review of the Shimoda Explore v2!
So since you’ve obviously used both, I’m wondering how you’d compare them for comfort, capacity, etc. And if the quick access provided by the MindShift Rotation system lives up to the hype, or if back-panel access is just as good when travelling with 2 cameras.
Your thoughts on the comparison are appreciated!
Kind regards,
–Tim
Good question. Yes, the easy access to a camera does live up to the hype on the Rotation packs. It’s fantastic, but it works best when you have a single camera and lens in the belt pack. If you are the kind of person who regularly switches between different lenses, the Shimoda packs would have an edge. That is the best way I can think of to separate them. I would also say the Shimoda explore is more comfortable than the Rotation 22L and Rotation 34L. It’s marginal, but it’s there. Rotation 50L is a different beast (with a price-point to match), and easily matches the comfort of the Explore packs.
So I guess it depends on which size you are going for? The Rotation 50L is a top-end bag with materials, hardware and a price to match. The Explore series are all top end bags, with a similar high quality of materials. The Rotation 22L and 34L and near-top-end bags. But the exterior materials are not as tough as the Explore. That contributes to a lower price on the two smaller Rotation bags.
Hi Dan,
Thanks for your answer! I somehow missed it last week…
If I will go for a MindShift Rotation pack, it will be the larger 50L+ version. I tried the older version in a store today, in principle I liked it and could fit 2 Fuji mirrorless bodies in the belt pack with lenses attached (not large lenses of course). Comfort was good, but my back started to sweat already even just walking around the store in nothing but a t-shirt. That’s not good!
I will hope that the v2 and the latest Shimoda bags are both better in this respect.
Alternatively I’m looking at Aarn packs with front “balance pockets” for my most important camera-gear and put the rest in an ICU in the back. These backpacks have a mesh-system for better ventilation.
I have not heard of Aarn packs. I will Google them!
OOOh! I like the idea of the Balance Pockets. Very nice.
Many people say the Aarn packs are very comfortable. Unfortunately there is no way for me to try them out before buying!
The idea of balance pockets seems sound, but one of my hesitations is if they will not be cumbersome to put things in and take them out. I’m still on the fence — wait for Shimoda Explorer v2, MindShift Rotation 50L v2, or a combination of Aarn pack and balance pockets.
That’s too bad. Quite a gamble as there would be taxes and all sorts of shipping stuff to deal with.
Hi Dan,
I think I have one more question on the Shimoda Explore v2 — what’s the back panel like? I can’t quite make it out from your photos or other photos I’ve seen online. They call it an air-mesh, but I can’t quite figure out exactly what that is.
If it is what I have on my gabbag then it makes me really sweat. If it is more like what the new MindShift Rotation 50+ v2 seems to be, I will probably be much more OK with that (that looks like something I’ve seen on backpacks in a shop the other day and it seemed to work for keeping my back dry).
PS: This is what the back panel looks like of the backpack that I tried the other day:
https://www.decathlon.co.uk/p/men-s-trekking-travel-backpack-50-litres-travel-500-grey/_/R-p-156348
That looks similar to what I can see on your photos of the MindShift Rotation 50L.
(I tried posting this reply earlier but that comment is now gone?)
As it says, any comment with a link has to be manually approved by me to prevent people from posting spam to things like gambling websites.
Thanks for the photo!
Yeah I realised that later after I already re-posted! I could at first not see the notice that my comment was awaiting moderation, as soon as I reposted I saw that and wished I could remove one of them. 😳
That said, I still wish to know what the back panel of the Shimoda Explore v2 is like! Like what I posted, or more like the older design MindShift Rotations?
Thanks for your patient answers!
This image gives you a pretty close look at the mesh: https://shuttermuse.com/wp-content/uploads/2021/07/shimoda-eplore-zippers.jpg
Thanks!
Hi Dan,
After you have so patiently answered many of my questions I thought you might like to know that I decided to back the Kickstarter using your affiliate link. 🙂
That’s great. I’m sure you will be pleased. Thanks for using my link!
Hi Dan. I use the Sony mirrorless systems. I take two cameras, a Sony 100-400 lens, a 24-105 lens and 16-35 2.8 lens. I have a 70-200 lens as well but I don’t have to take it since I’m trying to keep weight down. I do take some filters as well. I have narrowed the bag down to either the 30 or 35 ( I would prefer the smaller bag due to weight etc. ) but I’m not sure which bag would be better or whether or which core system (i.e. medium or large). I would appreciated any advice you could give me.
Thanks so much,
Thanks for the detailed review, loving the looks of these. Hoping the peak design camera cubes I already have will fit in the E35 it looks like its very close in dimensions.
It should be fine, yes. Most of these cubes are similarly sized.
Great review Dan,
I am looking and upgrading from my F-Stop backpack that has served me well for many years.
When you mention Action X pack can fit a prime 600mm is that w or w/o camera attached? Please clarify.
Cheers,
John
Hi Dan,
Thanks for the great review. Any idea if the large mirrorless core unit fits the Sony 200-600mm with the Sony a9? I’d like to use it as a thinner core unit vs. the large dslr core (which I already have) in the Shimoda explore 60.
Thanks
Tony
Hi Tony. Yes, it does. I have just added a video to the review that demonstrates this.
Great review Dan. I was wondering if you can comment on the construction of the elastic pocket on the hip belt. Specifically, If the elastic pocket was cut away does that webbing that enters at the edge of that pocket continue far enough to mount a Peak Design Capture? (probably would require some seam ripping to free up a stretch of webbing, as I imagine it’s sewn down.) If there is webbing under that pocket than I am confident it will be an easy mod with a sewing machine. I think mounting the clip any further back (like where the hip belt splits into upper and lower) would be simply too far back to reach the release button. Thanks.
The webbing doesn’t continue behind the pocket. Do you dislike using the Capture on the shoulder strap at chest height?
Very helpful. It seems the core unit will move around using a mirrorless version. If that’s the case, would the whole core unit move around if it’s too heavy?
You might have a typo…
Did you mean “Medium DSLR Core Unit” instead of Mirrorless DSLR in this last paragraph:
“I think the Explore 35 with the Mirrorless DSLR Core Unit will be a top-selling combo for this camera bag.”
“will move around using a mirrorless version” It would move around in the 35 because the 35 is designed for the deeper DSLR units. In the 25 and 30, it would not move around as these are the correct depth for mirrorless units.
You are correct about the typo. I have fixed this. Thanks!
That is one thorough review. I hate to think how much money I have spent on bags. I use the old Peak Design bag the most, and it’s great, but the tiered flip up organization just isn’t for me. This Explore V2 looks really nice. I wonder if it’ll mean lower prices for the first version.
Picked up the 35l Explore v2 last week, not quite perfect at that price, Several gripes, they only uses 3 waterproof zips, what was going to be a real useful phone pocket isn’t, firstly its not waterproof and as the harness shapes to your chest it puts pressure on your phone as the pockets not deep enough to avoid flex, also the core unit i needed was a dslr to fit my mirrorless a7r4 and grip on a 200-660mm, the core unit comes with a zipped cover, as the bag isn’t waterproof i thought it would add that extra shielding from the rain, but the internal steel frame pushes up tight against the zip and you cannot fasten it shut, went on a 4 hour walk seemed reasonably comfortable with 10kg. It rained for 3 hours straight although i did use the provided rain cover water still got in the pack around the large zipped back, and soaked into the core unit. Think ill invest in a better rain cover with taped seams as the one provided has none. Think im all “backpacked out” now so this ones going to have to last.
Hi Dan,
Great review and very thorough!
Have you tried the Atlas Athlete or Adventure packs? If you have, I wonder how they compare in comfort to the Explore V2s. I have the Athlete and it is the most comfortable pack I have ever used so far, in any category of pack (realizing we all fit these a little differently). The Atlas Adventure is a little taller and deeper than I need, so I’m looking for an intermediate size and the Explore 30 or 35 V2 might work.