Shimoda has launched a new camera backpack designed to meet photography enthusiasts’ everyday urban carry needs. The Urban Explore backpack comes in three sizes, each with a removable Core Unit, allowing you to customize your carry space to suit the day.
While the Shimoda Urban Explore backpacks share DNA with the landscape photography-focussed Explore v2 and recently released mountain adventure-focussed Action X v2 backpacks, the new bag’s features cater to a broader audience. These camera bags, the UE20, UE25, and UE30, are designed for photographers who spend much of their time in an urban environment–whether that be for work, school, or while pursuing street photography–but need a ruggedly built, reliable camera backpack that can adapt to agile outdoor adventures when its time to break out of the city.
Disclaimer: Shimoda provided an Urban Explore pack for testing and review. No money changed hands, and they were not allowed to read the review before publication.
Table of Contents
Shimoda Urban Explore Key Features
As we’ve come to expect from Shimoda, the Urban Explore backpacks are stacked with features and high-end materials. Here are the headliners:
- Dual 16-inch Laptop Sleeves (UE25/UE30)
- Dual 14-inch Laptop Sleeves (UE20)
- Luggage-Handle Pass-Through
- Air Mesh Harness
- Side Access
- Rear Access
- Premium Webbing Base Handle
- Hidden AirTag Holder
- YKK Splashguard Zippers
- Removable Camera Insert Included
- 5 Internal Organizer Pockets
- Rain Cover
- Internal Frame
- re/cor – Recycled Cordura Shell
- Capture Clip-compatible Shoulder Strap Mount
- Retractable Side, and Top handles
- Tripod / Water Bottle pockets
- Stowaway tripod straps
- Aluminum Hardware
- Magnetic Sternum Clip
- Hidden Passport Pocket
- Charge Cable Pass-Through
- Plush Dividers
Shimoda Urban Explore Specifications
| Specification | Urban Explore 20 | Urban Explore 25 | Urban Explore 30 |
|---|---|---|---|
| External Dimensions (in) | 10.6W x 16.9H x 7.9D in | 12.2W x 19.3H x 7.9D in | 12.6W x 20.5H x 7.9D in |
| External Dimensions (cm) | 27W x 43H x 20D cm | 31Wx 49H x 20D cm | 32W x 52H x 20D cm |
| Internal Dimensions (in) | 9.4W x 16.5H x 6.3D in | 10.2W x 18.9H x 6.3D in | 11. 4W x 20.1H x 6.3D in |
| Internal Dimensions (cm) | 24W x 42H x 16D cm | 25W x 48H x 16D cm | 29W x 50H x 16D cm |
| Laptop Sleeve (in) | 9.1W x 12.2H x 0.8D in | 9.8W x 14H x 0.8D in | 10.6W x 15.4H x 0.8D in |
| Laptop Sleeve (cm) | 23W x 31H x 2D cm | 25W x 35.5H x 2D cm | 27W x 39H x 2D cm |
| Weight (Including Core Unit) | 4 lbs / 1.8kg | 4.35lbs / 1.9kg | 4.65lbs / 2.1kg |
| Price | $Check Price *1 | $Check Price *1 | $Check Price *1 |
Urban Explore Backpack Sizing
The backpack featured in this review’s photos is the Urban Explore 25. I specifically requested this size, judging it as the sweet spot in the lineup. This size can hold a decent amount of gear while remaining small enough to fit under an airplane seat. Aside from sizing, all three Shimoda Urban Explore bag models are identical, so it’s safe to take this review to indicate the entire Urban Explore range. All three sizes meet even the strictest international carry-on regulations.
Shimoda’s payload ideas are below, though remember to take such recommendations lightly. They are meant as mere starting points for your imagination. If you want to carry 3 cameras and one tiny lens in the UE20, or just a single camera and a 300mm prime in the UE30, go right ahead!
- Shimoda Urban Explore 20 – A camera, 3-4 lenses and up to a 14″ laptop
- Shimoda Urban Explore 25 – A camera with an f/2.8 trifecta and up to a 16″ laptop
- Shimoda Urban Explore 30 – 1-2 cameras, 4-6 lenses and up to a 16′ laptop.
Video Overview
Shimoda Urban Explore Design and Features In Depth
Top Pocket
The bag’s zippered top section is designed to hold your quick-access everyday items like a laptop charger, sunglasses, and notebooks. A zippered mesh pocket provides some additional organization; within that, two more pockets add further compartmentalization. The mesh pocket is also where you’ll find a quick-release key clip that can act as a safe location to attach your memory card wallet.
Laptop Pocket(s)
The UE20 has a laptop pocket capable of holding up to a 14′ computer, while the UE25 and UE30 laptop pockets are large enough to hold up to a 16″ machine. Access to the laptop pocket is hidden inside the bag’s top pocket behind a magnetic flap. A further padded sleeve inside the bag’s rear hatch can hold a second laptop, a tablet, or any other smaller items that benefit from the thick padding.

The fact that these are two distinct pockets is worth underlining, as I misunderstood it until I got the bag in my hands. The reason for that misunderstanding was that on the Shimoda Explore v2 and Action X v2 backpacks, the padded sleeve inside the back panel hatch is called the laptop pocket. For the Urban Explore pack, Shimoda has kept that padded pocket but added a new laptop sleeve inside the front of the bag, accessible through the top zipper.
I presume the reason for doing this is to make the laptop more easily accessible. This makes total sense for a bag designed for everyday carry, but I’m glad they didn’t delete the old padded laptop sleeve from the rear panel since this can now be used for carrying a tablet or other fragile items with a flatter profile. My Atomos Ninja V monitor found a snug new home in there during my testing.
Front Pocket
A large zippered front pocket is hidden behind what looks like a seam in the material. This is another place to store your laptop charger and accessories, but it works equally well for bulkier soft items like gloves, a winter hat, a rain jacket, or a compressible mid-layer. Within this front pocket is another zippered pocket made from transparent TPU to give you a view of its contents. This pocket runs the entire width of the bag, making it suitable for longer items such as small tabletop tripods or, in my case, my DJI Osmo Pocket 3. The Urban Explore certainly isn’t lacking organizational options, and we’re not done yet.
Apple AirTag Pocket
I have written before about how helpful Apple AirTags are for photographers to keep track of their gear. As they did with the Action X v2, Shimoda has included a hidden AirTag pocket on the Urban Explore backpack. This tiny pocket is in the bottom of the bag’s front pocket. The tiny pocket is hard to see as it should be, so I couldn’t easily photograph it. Still, it is the same as the AirTag pocket in the Action X v2, pictured above.
Rear Internal Pocket
This pack has so many pockets that I wasn’t even sure what to call this one. I think Shimoda calls this the Document Pocket on the Explore backpack, but there are arguably better places to store documents in the Urban Explore, so it seems to have gone officially unnamed. Regardless, it’s another useful organizational option, accessible through the back panel.
Due to its location inside the camera compartment, I found this pocket best suited to accessories that you need while using the camera. This includes wireless microphones, Bluetooth camera remotes, cable releases, and spare camera batteries. By sticking with this organizational methodology, I could separate my camera accessories from my laptop and tech accessories nicely.
Side Pocket Organizer
Thought we were done with organization? Think again. While one zipper on the side of the bag gives you access to the camera compartment, another reveals a padded pocket, a set of elasticated loops, and a charging cable pass-through.
The elastic loops are a useful place to store cables (USB, HDMI, shutter release), or you can use them for EDC items like pens, a flashlight, or a multitool. The padded pocket is designed to work in conjunction with the charging pass-through. Place your USB battery bank into the pocket, then run the USB-C cable into the pass-through and straight to your camera.
Side Panel Pockets
Both sides of the Urban Explore feature an elasticated pocket to hold a large water bottle or tripod. The pockets use the same Cordura ReCor material as the rest of the bag, helping them to blend into the bag’s curves when not in use. The elastic strap at the top of the pocket closes the pocket when not in use, once again keeping things sleek and simple-looking.
Retractable Side and Top Handles
Shimoda says the side and top of the Urban Explore feature retractable handles. While I don’t dispute that description of the top handle–it certainly retracts to a flatter position using elastic–the side handle doesn’t do any retracting on my bag. Nonetheless, these handles already have a very flat profile that helps to keep the bag feeling sleek and uncluttered.
The downside to the somewhat rigid, hard-edged handle design is that they are uncomfortable to hold. These handles should be used to move a bag around quickly or to hoist it into vehicles or overhead luggage bins on a plane. For comfortable carrying over a distance, you should always plan on using the shoulder straps with this bag.
Base Handle
A simple nylon webbing handle is stitched onto the base of the bag. Use this handle with the top handle to move the bag around on the ground when the back panel has already been opened to access your camera gear.
Hidden Passport Pocket
I have seen camera bags that claim to have a “hidden” pocket for passports and cash before. Most are not well-hidden, but this one is not the case. Even when I knew the Urban Explore had this feature, I couldn’t find it without looking through the promotional images for a clue. This zippered pocket is behind the lumbar padding on the bag’s back panel. As long as the zipper pull is tucked away, you’d never know it was there.
Peak Design Capture Clip Compatibility
The left-hand shoulder strap on the Urban Explore features what Shimoda calls an Integrated Accessory Strip. This is an extra section of lightly padded Cordura ReCor sewn on top of the shoulder strap so that a Peak Design Capture Clip can be easily attached. It works well and is long enough to give some positional adjustment to suit people of varying shoulder sizes.
Rain Cover
A rip-stop nylon rain cover is included with the Urban Explore backpack. While the YKK SpashGurad zippers and polyurethane-coated Cordura ReCor material stand up well to light showers, you’ll want to use this cover for prolonged periods in heavy rain. I love that Shimoda has started to include rain covers with their bags instead of making them an additional purchase.
Rain Cover Pocket
Below the base of the Core Unit inside the pack’s main compartment is a discreet pocket for the bag’s rain cover. Without a dedicated, out-of-the-way spot to stash a rain cover, it’s easy to leave it behind when you pack your bag, so I appreciate the inclusion of this simple but effective storage location.
Side Camera Access
A zippered hatch on one side of the Urban Explore gives you direct access to the bag’s internal camera compartment. Rotating the bag from your back to your side allows you to grab a camera with an attached lens without completely removing the pack and putting it on the ground. This side access setup works well if you often carry a camera with an attached lens suitable for most of your shooting. Say, a general-purpose zoom like a 24-70mm or 24-105mm. The side hatch doesn’t give you access to all your lenses, so if you’re the type to change lenses every other shot, the benefits of this feature are somewhat lost. You must remove the bag and access your remaining lenses through the back hatch.
Rear Camera Access
The bag’s zippered rear panel allows you to access your camera gear. The opening is larger than the camera insert, revealing the previously discussed Rear Internal Pocket above your gear. Rear panel access is preferable to most other types of camera bag access because it allows you to rest the bag on its front when you take it off and put it on the ground. This keeps the dirt and city grime off the shoulder straps and, consequentially, off your clothing.
Luggage Pass-Through
In the center of the back panel, the Urban Explore has a pass-through slot for the handle of your rolling luggage. Depending on the size of your luggage handle, you may also repurpose the bag’s side handle for the same use if you’d prefer the bag to be carried in a different orientation.
Harness System
The Urban Explore’s shoulder straps are made from Cordura ReCor and backed with breathable AirMesh. The back panel features a moderate amount of AirMesh padding, arranged in the standard shape to create a small amount of airflow. The sternum strap uses a magnetic buckle with Hypalon attachment points. Metal buckles on the load lifter straps and the shoulder strap length adjustment straps add nicely to the overall sense of quality.
Overall, I have no complaints about this bag’s carrying comfort if used within the design parameters. Medium-sized everyday carry packs in the 20-30L range are not designed to carry 50 lbs of camera gear. With a camera, a few lenses, a laptop, and some daily essentials, I don’t see anyone having a problem with comfort while sporadically carrying the bag throughout daily city activities.
If you haven’t picked up on it from the photos, one thing worth highlighting is the bag’s lack of a hip belt. This is not unusual for an urban-inspired camera backpack. Interestingly, there is a pass-through behind the lumbar support that would allow you to use a regular belt to add some stability during active outdoor pursuits, but this wouldn’t be an effective way to transfer any of the bag’s weight to your hips, as is the case when a pack includes a heavily padded hip belt.
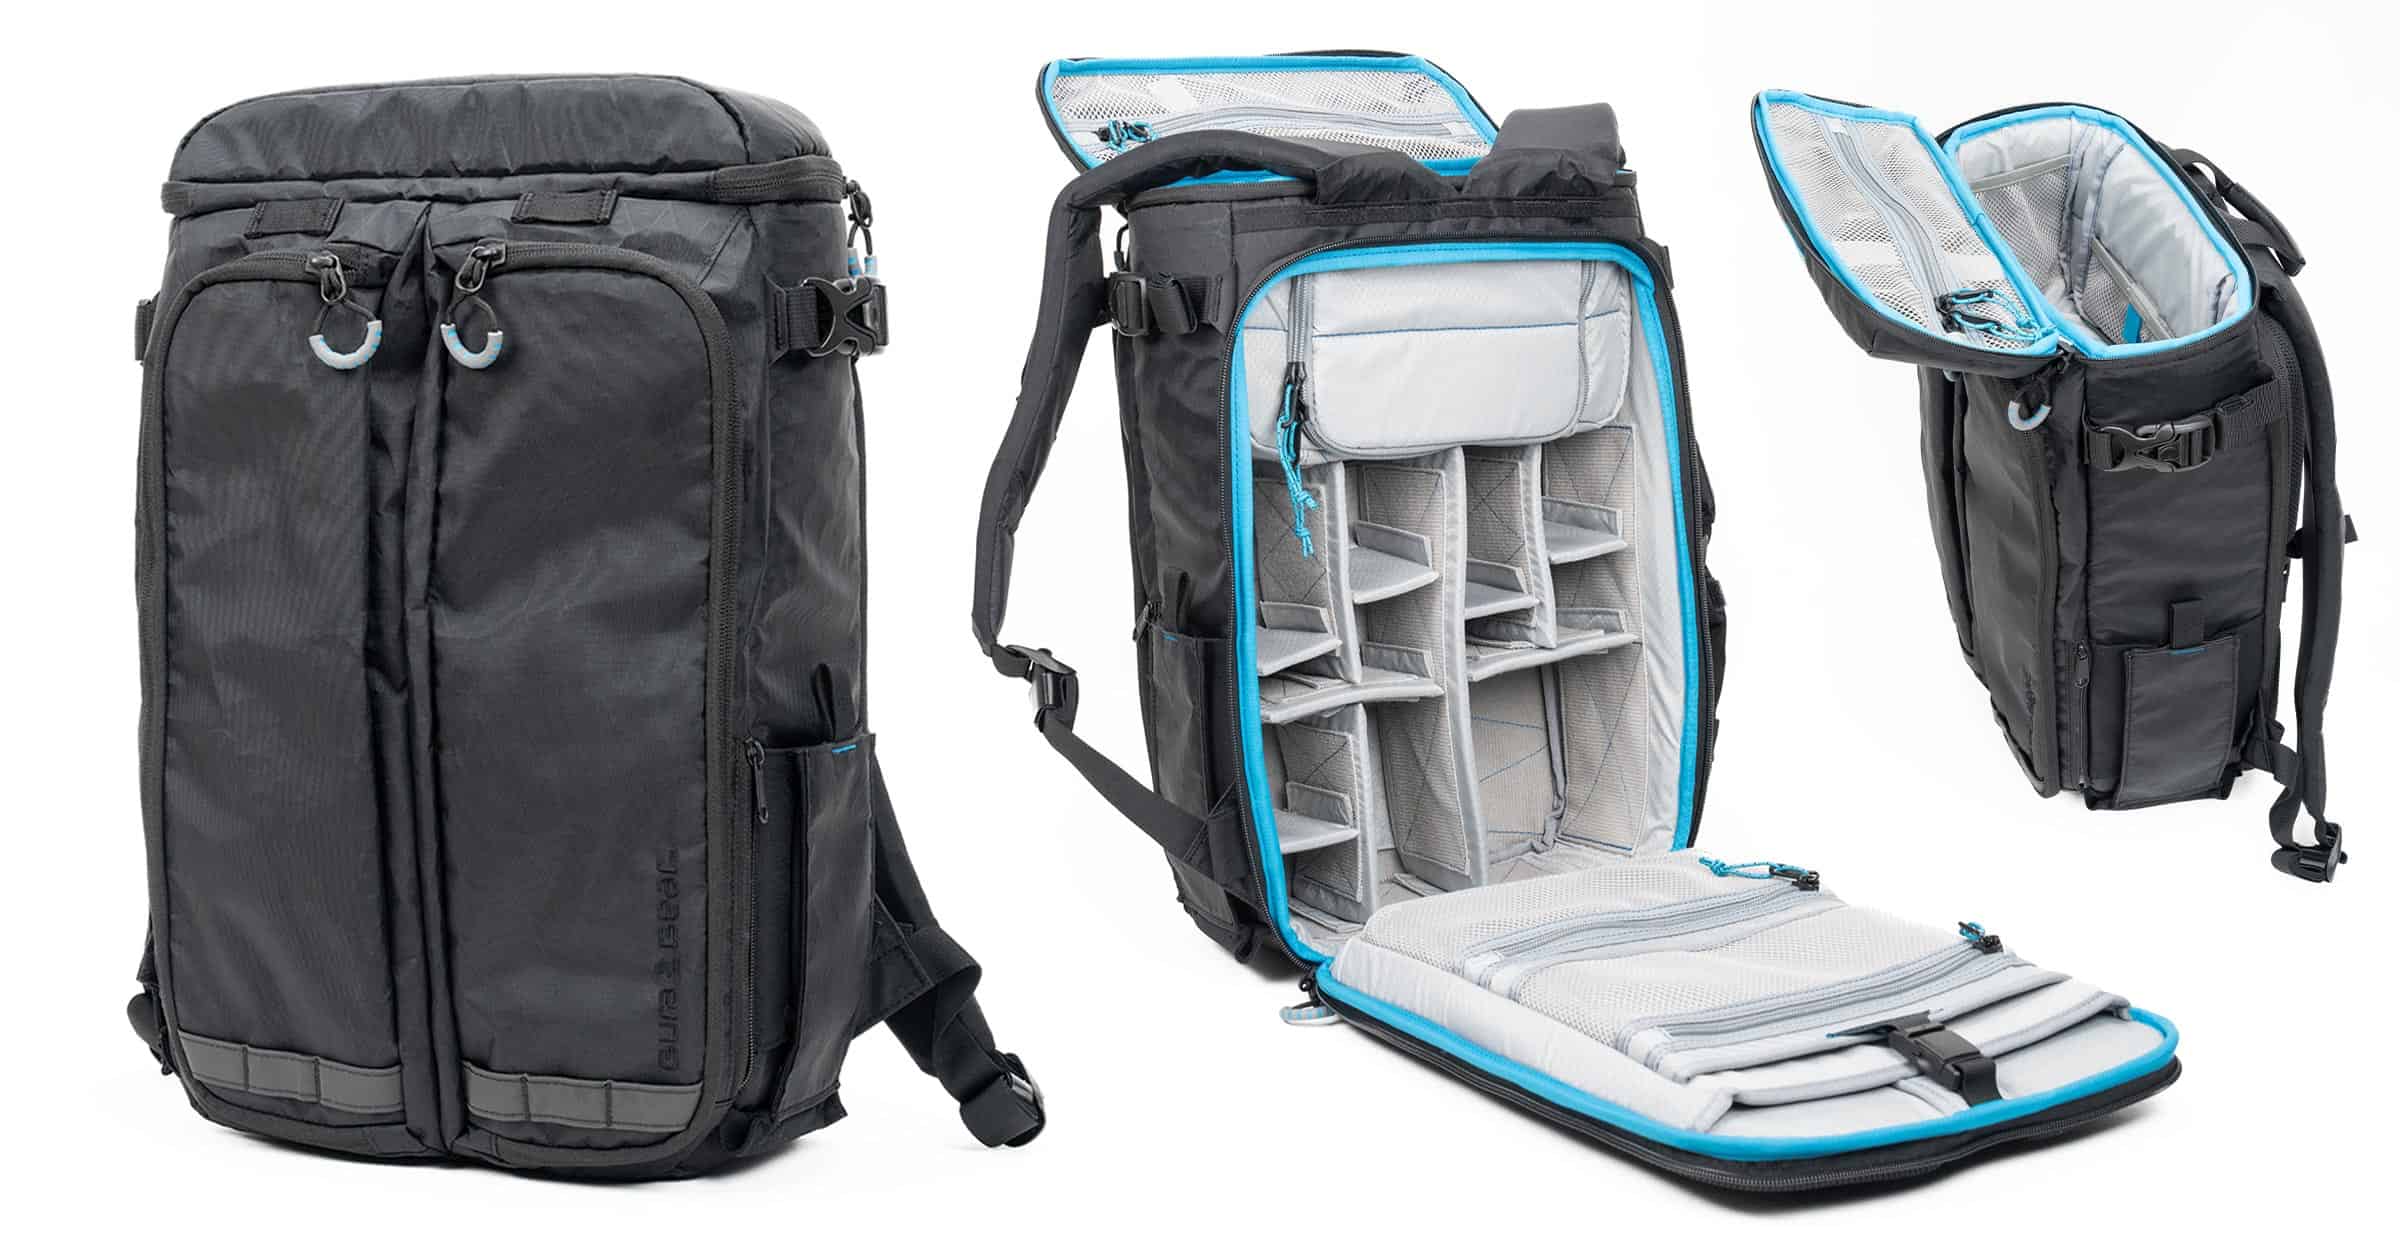
Convertible Interior
The protective Core Units in the bag are removable, as is the upper compartment of the bag, which unzips from the main shell of the pack. With both removed, the bag is transformed into a single large multi-purpose volume.
Removable Core Units
Shimoda’s Urban Explore backpacks come with bespoke, removable Core Units. These Core Units protect your camera gear between softly padded, flexible dividers and are quickly removable when using the bag’s entire volume for a different purpose.
The dimensions of the included Core Units for all three Urban Explore models are listed below. If you aren’t sure which pack size you need, I recommend using this information to sketch out some squares on a piece of paper. Then, try configuring your gear within those squares.
| UE Core Unit | Width | Height | Depth |
|---|---|---|---|
| Urban Explore 20 | 7.9″ / 20cm | 10.6″ / 27cm | 5.1″/ 13cm |
| Urban Explore 25 | 9″ / 23cm | 10.6″ / 27cm | 5.1″ / 13cm |
| Urban Explore 30 | 10.2″ / 26cm | 13″ / 33cm | 5.1″ / 13cm |
As a point of interest, because people will always ask me whether X or Y telephoto lenses will fit in a particular bag, these somewhat large lenses should fit in the UE30: Sony 300mm f/2.8 GM, Nikon 600mm f/6.3 VR S, Nikon 400mm f/4.5 VR S. The Canon 200-800mm, Sony 200-600mm, and Nikon 180-600mm lenses will not fit in the largest UE30.
While the Urban Explore backpacks come with bespoke Core Units, Shimoda also sells a range of optional Core Units. These additional Core Units are primarily designed for Shimoda’s Explore v2 and Action X v2 backpacks, which are sold in a “shell only” configuration, allowing customers to choose precisely which size of Core Unit they need. While Shimoda anticipates most Urban Explore users will stick to using the Core Unit that comes with their bag, some may wonder which standard Core Units will fit their bags. Particularly existing Shimoda customers who already own some of these Core Units. Here is the answer:
- Urban Explore 20 – Too narrow to hold any Core Unit other than the custom one it comes with.
- Urban Explore 25 – Fits the Small Mirrorless Core Unit, although it’s almost identical in size to the unit that comes with the bag, so I can’t see why anyone would do this.
- Urban Explore 30 – S, M, and L Mirrorless Core Units will fit in this bag. There is some overlap with the bag’s included Core Unit.
Shimoda Urban Explore Vs. Explore v2
Anyone considering the Shimoda Urban Explore backpack is probably weighing the differences between this pack and the Shimoda Explore v2 backpack. Now in its second generation, the Explore (my review) is Shimoda’s original camera backpack for travel and landscape photographers. The Explore range consists of 25L, 30L, and 35L sizes, whereas the Urban Explore range consists of 20L, 25L, and 30L sizes. Slight differences in available pack volumes aside, other features or lack thereof separate these two bags.
| Feature | Urban Explore | Explore v2 | Women’s Explore v2 |
|---|---|---|---|
| Core Units camera insert | Included | Separate *1 | Separate *1 |
| Padded Laptop Sleeve | Yes | Yes | Yes |
| 2nd laptop sleeve in front pocket | No | No | Yes |
| Luggage handle pass-through | Yes | Yes | Yes |
| Charging cable pass-through | Yes | No | No |
| Adjustable torso length | No | Yes | Yes |
| Base handle | Yes | No | Yes |
| Side Handle | Yes | Yes | Yes |
| Hidden passport pocket | Yes | Yes | Yes |
| Hidden AirTag Pocket | Yes | No | Yes |
| Rain cover pocket | Yes | No | Yes |
| Rain cover included with bag | Yes | Optional | Yes |
| Metal buckle hardware | Yes | No | No |
| Waist Belt | No | Yes | Yes |
| Shoulder strap pockets | No | Yes | Yes |
| HD Belt with pockets | No | Optional | Optional |
| Hydration tube compatible | No | Yes | Yes |
| Tripod/water bottle pockets | Fixed | Fixed | Removable |
| Front straps across the bag | No | Optional | Optional |
| Side camera access | Yes | Yes | Yes |
| Rear panel camera access | Yes | Yes | Yes |
| Lockable zippers | No | Yes | Yes |
| Sternum strap | Magnetic | Buckle | Buckle |
| Pro-sized or gripped body compatible? | No | Yes (35L model) | No |
| Shoulder and hip padding | Air Mesh | Air Mesh | Air Mesh |
In terms of price, the Urban Explore pack is slightly cheaper than the Explore v2. To make this comparison, we need to consider the price of the Explore v2 with one of the separate Core Units, which is most easily done by comparing the Urban Explore bags to the Explore v2 Starter Kit prices. When we do this, we get Urban Explore bags at $280, $320, and $340 for the 20L, 25L, and 30L bags, respectively. In contrast, the Explore v2 Starter Kits come in at $373, $385, and $399 for the 25L, 30L and 35L sizes, respectively.
There are many similarities in the features of both bags. Still, some stand-out differences are likely to sway people’s decisions one way or the other. In most cases, these differences are features not available on the Urban Explore that are available on the Explore v2. This stands to reason since the Urban Explore bags are much cheaper. Some features were necessarily deleted to reach that lower price point without compromising the quality of the remaining features.

The first of these more critical differences is the lack of any wasit/hip belt on the Urban Explore. Such a feature is rare on an urban-inspired camera backpack, so I’m not surprised, but those considering long hikes on the weekend with heavily laden packs should note this difference.
The second critical difference is the lack of torso length adjustment on the cheaper Urban Explore packs. Again, such a feature would have been rare on an urban camera pack, so I’m not marking this as a negative for the Urban Explore; it’s just something noteworthy on the list of Urban Explore vs. Explore v2 differences. Getting that last little bit of comfort perfection, helpful in wearing the pack for many hours at a time, might be harder with the Urban Explore, particularly if you have an above or below-average torso length. Thirdly, there are no women-specific versions of the Urban Explore.
Notable but less critical is the lack of phone and water bottle pockets on the shoulder straps of the Urban Explore, the lack of hydration bladder compatibility, and the lack of nylon webbing loops to add additional straps to the bag for carrying more gear. Compared to the Explore, all these missing features from the Urban Explore shouldn’t be seen as a negative when the bag is considered for its purpose. The Urban Explore is designed to be a simpler, less busy-looking, or as some might say, a less technical-looking backpack that hits a lower price point. If it had all these features, it would be the Explore v2, wouldn’t it?
It’s good to have choices. Shimoda did a great job deleting mostly unnecessary features in an urban setting while retaining a Shimoda bag’s core look, feel, and function. Importantly, what remains might be cheaper in dollar terms, but it doesn’t look or feel like a cheaper bag. It is still very much a high-end camera pack and very much a Shimoda product.
What about the Action X v2 backpack? With features such as an included helmet-carrying system, the Shimoda Action X v2 backpack is explicitly designed for wilderness adventures. As the shared name suggests, the Explore backpack is far closer to the Urban Explore backpack than the Action X. You can read my Action X v2 review if you want more details; however, I don’t think considering the Urban Explore alongside the Action X is the right move. There are more differences than similarities.
Instead of comparing the Urban Explore with the Action X series, I envisage Action X users–particularly those using the larger 40L, 50L, and 70L versions–being interested in picking up an Urban Explore pack for days in the city when they need something sleek and straightforward to carry daily tech items. As an Action X70 HD user myself, I fall into this category. Such a huge pack is no good for trips to work at my local coffee shop. The Urban Explore, on the other hand, is perfect.
Conclusion
The Urban Explore backpack is a fantastic addition to Shimoda’s camera bag catalog that retains the brand’s rugged aesthetic while externally simplifying the bag to be stealthier and more agile in an urban environment. Many of us wish to spend all day in the wilderness, but the reality is often very different. Whether heading to your office, a coffee shop, or school for the day, the Urban Explore is the photographer’s everyday companion that’s still ready for a weekend of adventure.
All three sizes of the Shimoda Urban Explore are packed with organizational pockets and clever features such as the helpful camera charging pass-through port. A well-hidden passport pocket is a nice touch for travelers, and the internally located laptop pocket offers added protection for one of your most fragile daily-carry items. There’s even an additional padded sleeve that can hold a large tablet.
Perhaps most impressive is the price point Shimoda has achieved with the Urban Explore bags, which will open sales up to a much broader audience. While reaching these lower prices did mean sacrificing some of the features from their more expensive Explore v2 and Action X v2 packs, Shimoda struck a fair balance, maintaining the features that will matter most in a photographer’s everyday carry companion, and only deleting those that would be minimally missed in the city. Notably, while the Urban Explore is cheaper than their other bags, it doesn’t look or feel cheaper and is still every bit a Shimoda bag.
Where to Buy (Discount Available)
Shimoda Designs has offered Shutter Muse readers a 10% discount on anything purchased through their online stores. US, Canadian, UK, French, or German residents should use the discount code ShutterMuse10 after clicking here to access the store. Australian readers should use the same code on the local Shimoda distributor’s site, Maxxum, instead.
The Shimoda Urban Explore backpacks are available from the links below. Obviously, it makes the most sense to use our ShutterMuse10 discount code and order directly from Shimoda if they have your chosen size and color in stock.


I’ll be the first to admit I have too many bags. I have the Gura Gear City Commuter and am curious about the 20 liter size of this new bag from Shimoda because having the ability to put a water bottle on one side and a tripod on the other (without having to use lashing straps as on the City Commuter) would be useful, albeit only occasionally, and while I know from your past reviews that side access is not important to you, it can be helpful for me and I’m wondering if the wider door would mean being able to swap lenses whereas with the City Commuter it’s really more of a take camera out / put camera away setup and anything beyond that means opening up the back panel.
Do you think people who are pretty content with the City Commuter and have (several) other bags for hauling other kits should still consider this bag, and if so, what do you perceive to be the different use cases between those two bags (Shimoda Urban Explore 20 and Kiboko City Commuter 18)?
Heads up, in both this review and the review for the Explore V2, you list in the features table the non-women’s Explore V2 as not having a based handle, when in fact all of the explore V2 bags have a base handle
Thanks. I have edited this.
Dan, do you think the laptop compartment on this bag would hold the Asus ProArt Studiobook 16, which measures 10.7″ x 14″ x 1″? It is tough finding a camera bag that fits this laptop, thank you.
I have been recently looking for new bags, one for my commute, and one as a lighter camera bag (in addition to my existing Shimoda X50).
This bag does seem to fit my needs really well. Being that I already have a Shimoda backpack, I have been wondering about core unit compatibility. I understand that the 25L bag that I have been looking at can’t fit my 2 small DSLR units, but I do wonder about the other way around, as the core unit in the UE25 will fit my needs. Can the core units from this bag be used in my Action X50 backpack?
Yeah, there’s no reason why you can’t use the Urban Explore Core in any other bag.