
Getting low is one of the first lessons when I teach wildlife photography. Photographing birds and small animals from their level is a great way to create a compelling, intimate image with a beautifully blurred background. However, getting your camera at that level can be tricky while maintaining a stable shooting position. Tripods won’t often get low enough; even if they do, they are cumbersome to move discreetly while you approach your subject.
The Naturescapes Skimmer Ground Pod aims to solve these problems by giving you a stable low-level platform on which to mount a tripod head. While simultaneously making it much easy to slide over sandy, wet, muddy or grassy ground. This review will take a detailed look at this popular piece of wildlife photography gear and examine the best type of tripod head to use with it. Is it worth buying? Should you use a gimbal or a 2-way head on it? Let’s find out.
Disclaimer: Naturescapes provided me with the Skimmer Ground Pod for review. No money changed hands and they were not allowed to see the review before it was published.

Table of Contents
Design and Construction

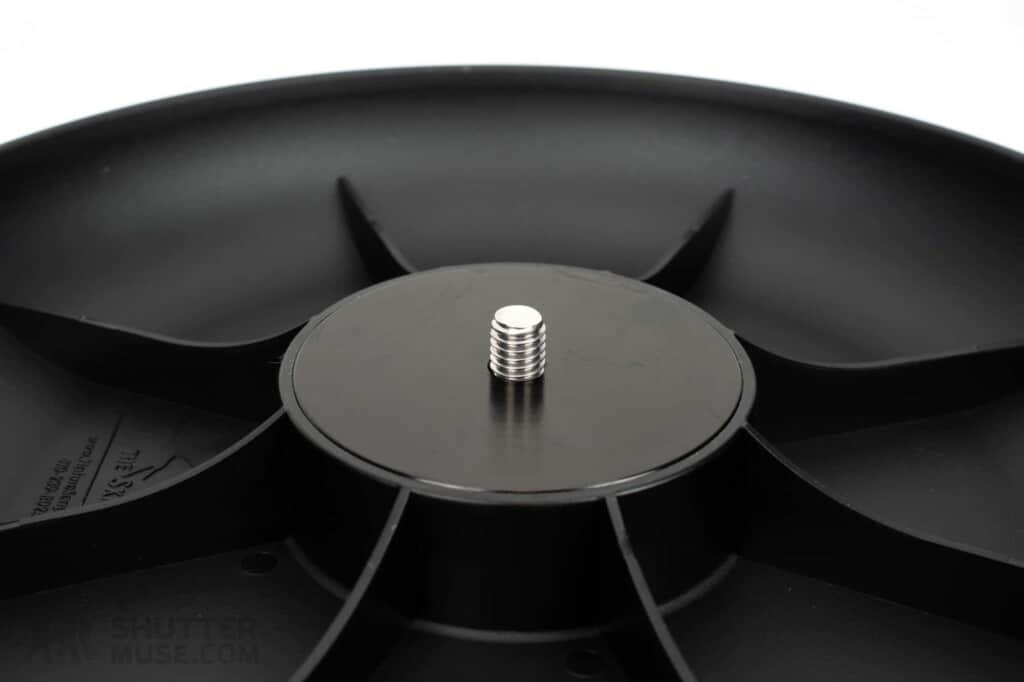
Constructed from heavy-duty injection-moulded plastic, the Skimmer Ground Pod is 10″ in diameter, 1.5″ tall, and weighs 14.85 oz (420g). A central aluminium platform houses a 3/8″ male thread, and a hex nut on the base can be used with the included hex wrench to ensure a tight fit between the tripod head and skimmer. A small tongue on the side of the Ground Pod allows you to connect your skimmer to the outside of your camera bag using a carabiner (not included).


What Kind of Head Should You Use on a Skimmer?
The 3/8″ male stud on the Skimmer means you can attach any tripod head to the Skimmer, but some are better choices than others. Having tried them all, I’ll give some impressions in this section. Whether or not you use an existing head from your collection, or purchase a head specifically for use on the Skimmer will largely depend on your budget and how often you plan to use it.
Ball Head

Using a ball head on a Skimmer is my least favourite option for all the same reasons that it’s inadvisable to use one on a monopod or tripod when using a super-telephoto lens. If you want to switch to portrait orientation, the ball head drop-notch is unavailable to you because your camera and lens will either contact the Skimmer or the ground. This means you must rotate the camera with the lens collar, which requires you to lock the ball head first. The whole thing becomes a cumbersome process and you feel like you are constantly locking and unlocking knobs, potentially missing shots. I would advise against using a ball head on a Skimmer.
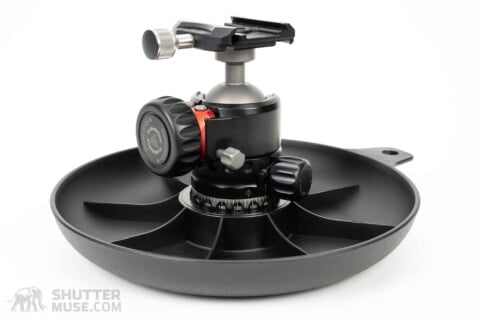
Gimbal


Most super-telephoto lens users already have a gimbal head, making it a common companion to the Skimmer ground pod. Having tested this combination with three different gimbals, I can say that it works very well but didn’t allow me to get my lens as low to the ground as some other options. That said, a gimbal on the Skimmer did position the camera’s viewfinder slightly higher, and was the most comfortable option to use. This is a tradeoff that might be informed by how flexible you are.
2-Way Head
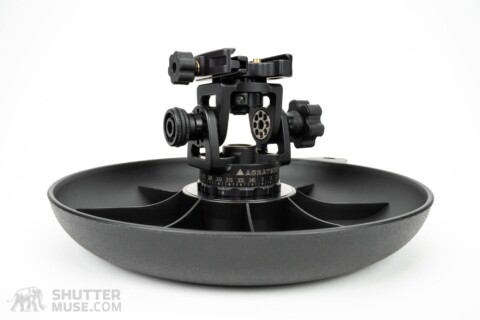

A 2-way tilt head is another option that can be used on the Skimmer. These give you fore and aft tilt while relying on the lens collar to correct your horizon. Tile heads come in two varieties: Ones with a panning base and ones without a panning base. A tilt head without a panning base is usually called a monopod head. A tilt head with a panning base is sometimes called a pan and tilt head. On the Skimmer, it is preferable to use one with a panning base, otherwise, you must rotate the entire Skimmer while panning. I recommend the Acratech Long Lens Head.
A 2-way head on the Skimmer has a few benefits. Firstly, the setup is much smaller, lighter and easy to manoeuvre. A 2-way head is much lighter than even the most lightweight gimbal head. Secondly, there are no issues with parts of your gimbal hitting the side of the Skimmer. Thirdly, the lens can get 2-3 inches lower to the ground, giving you an even better background and getting to eye level with even smaller birds or animals.
The biggest downside to using a tilt head on the Skimmer is that the camera’s viewfinder gets even lower. Some people will find it very difficult to get themselves into a position where this is useable. Particularly for extended periods of shooting. If you do not consider yourself fit and flexible, it might be best to avoid this option unless you are willing to shoot using Live View. A second downside is that the camera is not balanced like a gimbal. The tilt head must be locked every time you want to remove your hand from the camera to move your position.
FlexShooter
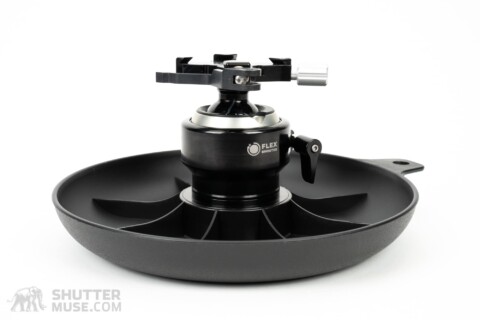

The FlexShooter is a ball head with a spring balance system that allows gimbal-like functionality. Imagine it like a ball head where the ball does not need to be locked. You can take your hands off the camera and it stays in position, but, place your hands back on the camera, and it moves freely in a fore/aft tilt direction or a horizontal panning direction. The FlexShooter is always ready to go, like a gimbal, but has the compactness of a ball head.
As a second benefit, the FlexShooter’s “ball within a ball” design allows you to level the panning axis of the camera perfectly. It is impossible to do this with any of the other head types we have discussed unless you add a separate levelling head to them. The FlexShooter gives you the even lower camera position of a tilt head but removes the annoyance of having to lock the head every time you take your hand off the camera. It gives you the benefits of a gimbal and a tilt head, without some negatives. The downside of the FlexShooter is its high price tag, starting at around $580 for the mini version and moving upwards for the lever-lock Pro version. Check out of review of the Flexshooter ball heads if you want to learn more.
Concluding Thoughts on Head Type
The FlexShooter was my preferred head on the Skimmer, but the high price is not worth paying solely for this purpose. If you already own one or plan to use one on a tripod instead of a gimbal, using it on the Skimmer will give you great results. My second favourite option was the 2-way tilt head. These heads are cheaper than a FlexShooter and considerably lighter to carry. Again, though, for most people, it’s not worth buying a brand new tilt head just for use on a Skimmer. If you already have one for your monopod or tripod, great! You’ll get great results if you can contort yourself to reach the low position of the viewfinder.
Finally, the gimbal. Using a gimbal on Skimmer is a great option. Don’t let its third-place award dissuade you from using this combination. The difference between all these options is relatively minor. A gimbal on a skimmer is arguably the easiest to use. The slightly higher viewfinder will be much easier for most users, and the balanced nature of the whole setup makes it easy for you to adjust your body position and go “hands off” with your camera until it’s needed. Perhaps the best thing about the gimbal is that it is most people’s preferred long lens option on a tripod, making the most financial sense.
The ball head doesn’t even rank in this discussion. I do not recommend it. You will get much better results with any of the other three options, and if you don’t have any of them, it’s probably time you invested in a new head. My guide to the best gimbals includes several excellent low-cost options to get you started.
Adding a Riser Block to the Head
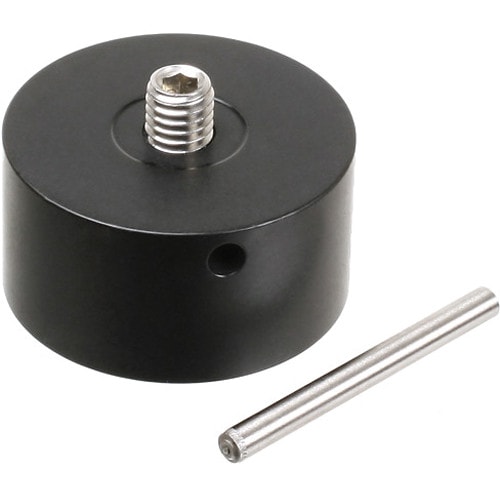
The Wimberley RB-100 riser was initially designed to let people use the Wimberley WH-200 gimbal head on the original Skimmer Ground Pod. This riser block is not needed to use the Wimberley gimbal on the Skimmer Ground Pod II that is being reviewed on this page. However, some might find that the riser positions the camera’s viewfinder in a higher and more comfortable position. Initially, I would suggest trying to use your Skimmer without the riser. Should you find the viewfinder uncomfortable to reach, this is a cheap way to help the problem.
Adding a Quick Release to the Skimmer Ground Pod
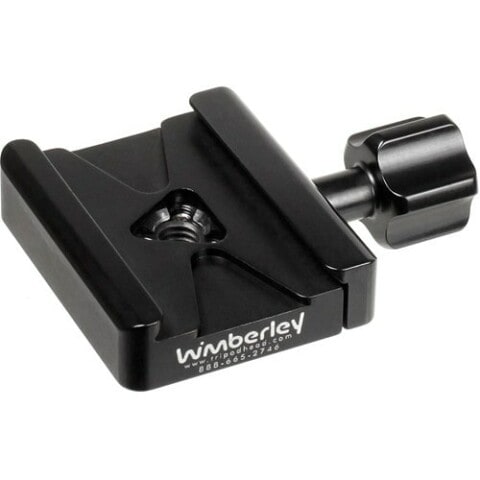

You can add a quick-release Arca clamp to your Skimmer Ground pod if the clamp has a standard 3/8″ female thread. This can be useful if you use circular Arca plates on your tripod heads, allowing you to swap heads from a tripod to the Skimmer quickly.
Using the Skimmer While Shooting From a Vehicle
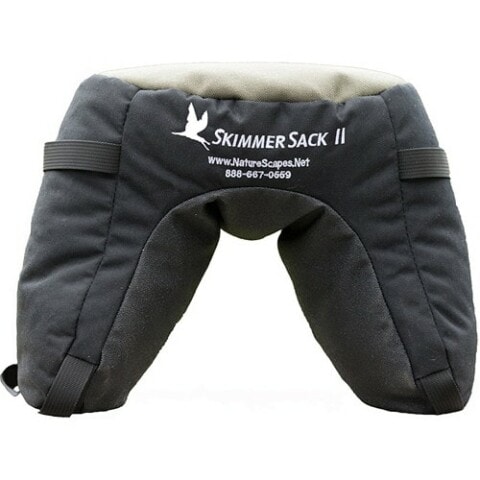

When shooting wildlife photos from a vehicle, it’s helpful to use a photography bean bag for stabilization. If you have a Skimmer Ground Pod, you can place this on the beanbag as a convenient way to add a gimbal or other tripod head to this setup. Naturescapes makes a beanbag called the SkimmerSack II, designed for this purpose.
How to Clean Your Skimmer Ground Pod
After a photo session in the dirt or on the beach, your Skimmer Ground Pod should be cleaned with clean, fresh water and a cloth. A mild detergent can also be used. If you’re shooting at the beach, don’t be tempted to wash the sand off the Skimmer in the ocean. Saltwater and metal are not a good combination, and while the base of the Skimmer is made from plastic, remember that the central thread is metal.
If the Skimmer does come into contact with salt water or any other corrosive agents, disassemble all parts immediately after your shoot and give them a thorough cleaning with fresh water. The cap screw and internal thread can be re-greased with standard household oils, WD-40, or my favourite tripod grease, Super Lube.
The ability to clean the Acratech Long Lens Head or the Acratech GXP simply by running it under a tap is one of the main reasons I like to use these tripod heads for work in salty, sandy environments. Although gimbals work very well on the Skimmer Ground Pod, I feel a little paranoid about getting sand in
Conclusion
When shooting birds and small animals, placing your camera at a low level has two distinct advantages. Firstly, it connects the viewer to their world and creates a more intimate feeling in the image. It’s the difference between feeling like you are in their world and feeling like you are looking at their world. A subtle change that often turns an image from good to great. Secondly, shooting at a low level places the background further away from your subject. The added separation causes the background to be blurrier, with potential distractions more easily obscured.
The Skimmer Ground Pod is the best way to get these stable, low-level wildlife images. The lightweight construction makes it easy to travel with, and the strong central platform creates a stable mount for a range of different heads. The relatively low price should be easy to swallow for people placing thousands of dollars of camera equipment onto it.
While I’m aware that some people try to create their own versions of the Skimmer Ground Pod from things like frying pans, these homemade solutions will be much heavier to travel with and usually have a bolt head piercing the bottom, creating friction on the ground. Over rocky ground, metal frying pans make too much noise when approaching skittish wildlife and corrode too quickly after contact with salt water. My advice: Do it right and buy the real thing. I bet it would still be one of the cheapest photography accessories you ever buy and one of the few that can be guaranteed to improve your wildlife photos.
Where to Buy
The NatureScapes Skimmer Ground Pod II can be purchased from the following retailers. Residents of the USA can enjoy free shipping from B&H or Adorama, while Canadians need only spend $1 more to qualify for the free-shipping-over-$100 option from B&H. For international customers, I recommend using B&H as they provide the opportunity to pre-pay any duties so that there are no surprises.


Guessing what I used 30 years ago would still work as well. Fo to your local $Dollar Store. Find the cheapest frying pan, unbolt or saw off the handle. Now you can either drill a hole in the bottom and secure a bolt through the bottom or glue a tripod adaptor to the center. Voila, you have a $20 ground pod.
Someone didn’t read the whole review…
I mention that some people like to use a frying pan and also outline some reasons why that is not the ideal solution. I’m glad it has worked for you, but the Skimmer is certainly better than a frying pan for a number of reasons. Given that most people are attaching well over $5000 worth of camera gear to these devices and frequently more than $15,000, I am sometimes confused about the logic of refusing to spend another $100 to get the right solution.
You suggest using WD40 to lubricate the metal components after cleaning, WD 40 has minimal lubricating properties and not much more water dispersing ability, frankly it would be the last thing I’d use. I’d sooner pull the dipstick out of my engine and use black engine oil, at least you can add just one drop and wipe most of it off and leave an oily film! Having said that I’d sooner use a drop of clean oil like 3in1 or clean engine oil.
Thanks for some great reviews.
Cheers, Graham.
Hi Graham, I mentioned WD40 because that is what Naturescapes recommend in the manual that comes with the Skimmer. I do not know exactly why they make that recommendation, but I would presume they have a reason since they have been selling this product for about 20 years. Could it be its water resistance? Remember, there are no moving parts in the Skimmer, so we are not lubricating bearings here. If you used a product that lubricated it too much, all you’re going to do is make it harder for your tripod head to stay screwed to the stud, or easier for the stud to back its way out of the thread in the Skimmer. I don’t think you really want it to be well lubricated.
I see Amazon.ca has it for $224.12 Canadian. No duties and free shipping.
Honestly, that doesn’t seem like a great price. B&H will do free shipping for Canadians too, and it’s $100USD, so that’s about 134 CAD. No way duties will be more than another $20.
Is there a reason Skimmer doesn’t allow you to attach it to a tripod? It just requires a different female-male central fitting and would be super useful. Keep the valued content your publish coming, Many Thanks.
Hi Cymon. I’m not sure I quite understand you. Do you want to attach it to the top of your tripod? Why would you want to to that?
Hey Dan, My belly is where I do the majority of my car photography. I’d have another comfortable, stable height to explore if I could quickly attach and remove the Skimmer item while keeping the lens and head in place.
I think it would be easier to just have a quick-release plate on your camera/lens, and then a clamp on the Skimmer and your tripod. If you made the Skimmer quick-releasable via some sort of plate, it wouldn’t sit flat on the ground.